2015 DODGE DART engine
[x] Cancel search: enginePage 342 of 664

DID Red Telltales
This area will show reconfigurable red telltales. These
telltales include:
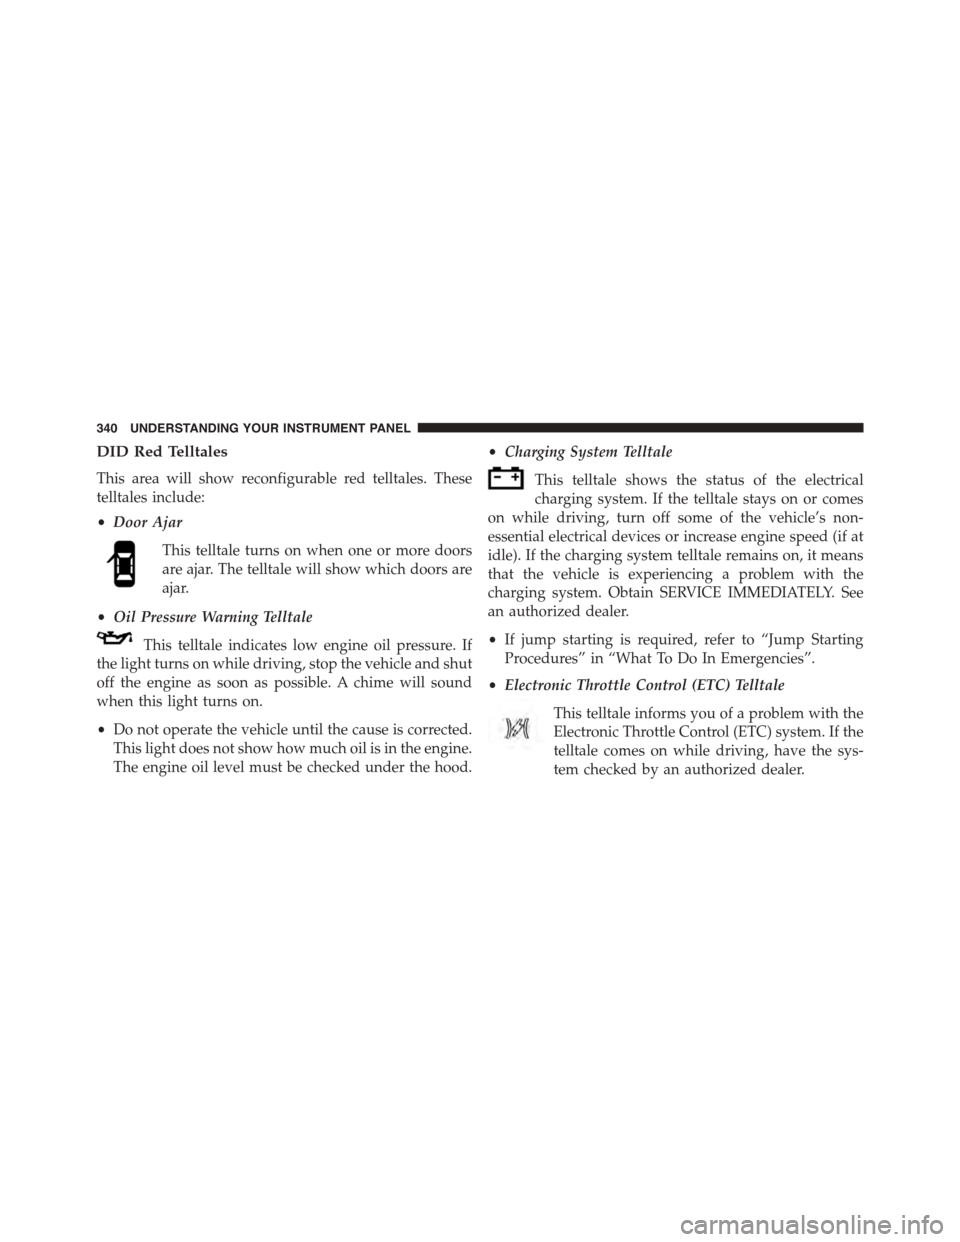
•Door Ajar
This telltale turns on when one or more doors
are ajar. The telltale will show which doors are
ajar.
•Oil Pressure Warning Telltale
This telltale indicates low engine oil pressure. If
the light turns on while driving, stop the vehicle and shut
off the engine as soon as possible. A chime will sound
when this light turns on.
•Do not operate the vehicle until the cause is corrected.
This light does not show how much oil is in the engine.
The engine oil level must be checked under the hood.
•Charging System Telltale
This telltale shows the status of the electrical
charging system. If the telltale stays on or comes
on while driving, turn off some of the vehicle’s non-
essential electrical devices or increase engine speed (if at
idle). If the charging system telltale remains on, it means
that the vehicle is experiencing a problem with the
charging system. Obtain SERVICE IMMEDIATELY. See
an authorized dealer.
•If jump starting is required, refer to “Jump Starting
Procedures” in “What To Do In Emergencies”.
•Electronic Throttle Control (ETC) Telltale
This telltale informs you of a problem with the
Electronic Throttle Control (ETC) system. If the
telltale comes on while driving, have the sys-
tem checked by an authorized dealer.
340 UNDERSTANDING YOUR INSTRUMENT PANEL
Page 343 of 664

•If a problem is detected, the telltale will come on while
the engine is running. Cycle the ignition key when the
vehicle has completely stopped and the shift lever is
placed in the PARK position. The telltale should turn
off.
•If the telltale remains lit with the engine running, your
vehicle will usually be drivable. However, see an
authorized dealer for service as soon as possible. If the
telltale is flashing when the engine is running, imme-
diate service is required. You may experience reduced
performance, an elevated/rough idle or engine stall
and your vehicle may require towing.
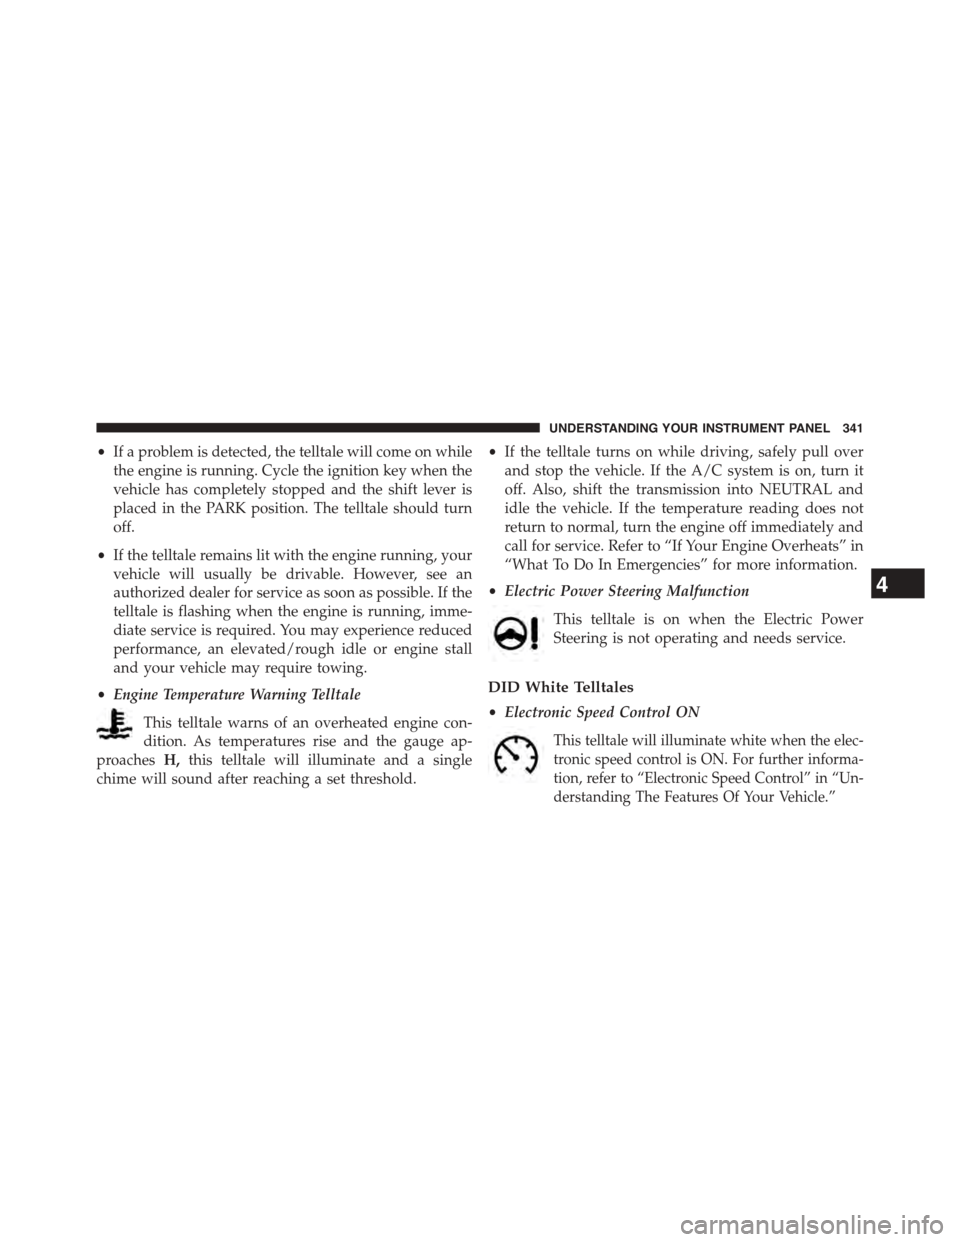
•Engine Temperature Warning Telltale
This telltale warns of an overheated engine con-
dition. As temperatures rise and the gauge ap-
proachesH,this telltale will illuminate and a single
chime will sound after reaching a set threshold.
•If the telltale turns on while driving, safely pull over
and stop the vehicle. If the A/C system is on, turn it
off. Also, shift the transmission into NEUTRAL and
idle the vehicle. If the temperature reading does not
return to normal, turn the engine off immediately and
call for service. Refer to “If Your Engine Overheats” in
“What To Do In Emergencies” for more information.
•Electric Power Steering Malfunction
This telltale is on when the Electric Power
Steering is not operating and needs service.
DID White Telltales
•Electronic Speed Control ON
This telltale will illuminate white when the elec-
tronic speed control is ON. For further informa-
tion, refer to “Electronic Speed Control” in “Un-
derstanding The Features Of Your Vehicle.”
4
UNDERSTANDING YOUR INSTRUMENT PANEL 341
Page 351 of 664

Time
Range To Empty (RTE)
Average MPG
Current MPG
Trip A
Trip B
•Lower Left
None (default setting)
Compass
Outside Temp
Time
•Lower Right
None (default setting)
Compass
Outside Temp
Time
•Restore To Defaults (Restores All Settings To De-
fault Settings)
Cancel
Okay
Oil Change Indicator
•Your vehicle is equipped with an engine oil change
indicator system. The “Oil Change Due” message will
flash in the DID display for approximately 10 seconds
after a single chime has sounded, to indicate the next
scheduled oil change interval. The engine oil change
indicator system is duty cycle based, which means the
engine oil change interval may fluctuate, dependent
upon your personal driving style.
4
UNDERSTANDING YOUR INSTRUMENT PANEL 349
Page 352 of 664

•Unless reset, this message will continue to display
each time you turn the ignition switch to the ON/RUN
position or cycle the ignition to the ON/RUN position
if equipped with Keyless Enter-N-Go™. To turn off the
message temporarily, push and release the MENU
button. To reset the oil change indicator system (after
performing the scheduled maintenance) refer to the
following procedure.
Vehicles Equipped With Keyless Enter-N-Go™
1. Without pushing the brake pedal, cycle the ignition to
the ON/RUN position (do not start the engine).
2. Fully push the accelerator pedal, slowly, three times
within 10 seconds.
3. Cycle the ignition to the OFF/LOCK position.
Vehicles Not Equipped With Keyless Enter-N-Go™
1. Turn the ignition switch to the ON/RUN position (do
not start the engine).
2. Fully push the accelerator pedal, slowly, three times
within 10 seconds.
3. Turn the ignition switch to the OFF/LOCK position.
Using The DID Menu
Vehicles Equipped With Passive Entry
•Without pushing the brake pedal, push the ENGINE
START/STOP button and cycle the ignition to the
ON/RUN position (Do not start the engine.)
•Push and release the DOWNarrow button to
scroll downward through the main menu to “Ve-
hicle Info”.
•Push and release the RIGHTarrow button to
access the ”Oil Life” screen.
•Push and hold the RIGHTarrow button for one
second to access the ”Oil Life Reset” screen.
350 UNDERSTANDING YOUR INSTRUMENT PANEL
Page 353 of 664

•Push and hold the DOWNarrow button to reset
the gauge and numeric display to 100% for ”Oil
Life.”
•Push and release the Up arrow button to exit the DID
screen.
Vehicles Not Equipped With Passive Entry
•Without pushing the brake pedal, cycle the ignition to
the ON/RUN position (Do not start the engine.)
•Push and release the DOWNarrow button to
scroll downward through the main menu to “Ve-
hicle Info”.
•Push and release the RIGHTarrow button to
access the ”Oil Life” screen.
•Push and hold the RIGHTarrow button for one
second to access the ”Oil Life Reset” screen.
•Push and hold the DOWNarrow button to reset
the gauge and numeric display to 100% for ”Oil
Life.”
•Push and release the Up arrow button to exit the DID
screen.
NOTE:If the indicator message illuminates when you
start the vehicle, the oil change indicator system did not
reset. If necessary, repeat this procedure.
Uconnect® SETTINGS
The Uconnect® system uses a combination of buttons on
the touchscreen and buttons on the faceplate that allows
you to access and change the customer programmable
features.
Buttons On The Faceplate
Buttons on the faceplate are located below the Uconnect®
system in the center of the instrument panel. In addition,
4
UNDERSTANDING YOUR INSTRUMENT PANEL 351
Page 354 of 664

there is a Scroll/Enter control knob located on the right
side of the Climate Controls in the center of the instru-
ment panel. Turn the control knob to scroll through
menus and change settings (i.e., 30, 60, 90), press the
center of the control knob one or more times to select or
change a setting (i.e., ON, OFF).
Buttons On The Touchscreen
Buttons on the touchscreen are accessible on the
Uconnect® Touchscreen.
Customer Programmable Features — Uconnect®
System 8.4 Settings
Press the More button on the touchscreen, then press the
Settings button on the touchscreen to display the menu
setting screen. In this mode the Uconnect® system allows
you to access programmable features that may be
equipped such as Display, Clock, Safety & Driving Assis-
tance, Lights, Doors & Locks, Auto-On Comfort & Re-
mote Start, Engine Off Operation, Compass Settings,
Audio, Phone/Bluetooth and SIRIUS Setup.
NOTE:Only one touchscreen area may be selected at a
time.
When making a selection, press the button on the touch-
screen to enter the desired mode. Once in the desired
mode press and release the preferred setting until a
check-mark appears next to the setting, showing that
setting has been selected.
Once the setting is complete press the Back Arrow button
on the touchscreen to return to the previous menu or
press the X button on the touchscreen to close out of the
settings screen. Pressing the Up or Down Arrow buttons
on the touchscreens on the right side of the screen will
allow you to toggle up or down through the available
settings.
352 UNDERSTANDING YOUR INSTRUMENT PANEL
Page 361 of 664

•Daytime Running Lights
When this feature is selected, the headlights will turn on
whenever the engine is running. To make your selection,
press the Daytime Running Lights button on the touch-
screen, until a check-mark appears next to setting, show-
ing that setting has been selected. Press the back arrow
button on the touchscreen to return to the previous
menu.
•Flash Lights With Lock
When this feature is selected, the exterior lights will flash
when the doors are locked or unlocked with the Remote
Keyless Entry (RKE) transmitter. This feature may be
selected with or without the sound horn on lock feature
selected. To make your selection, press the Flash Lamps
with Lock button on the touchscreen, until a check-mark
appears next to setting, showing that setting has been
selected. Press the back arrow button on the touchscreen
to return to the previous menu.
Doors & Locks
After pressing the Doors & Locks button on the touch-
screen the following settings will be available.
•Auto Unlock On Exit
When this feature is selected, all doors will unlock when
the vehicle is stopped and the transmission is in the
PARK or NEUTRAL position and the driver’s door is
opened. To make your selection, press the Auto Unlock
On Exit button on the touchscreen, until a check-mark
appears next to setting, indicating that the setting has
been selected. Press the back arrow button on the touch-
screen to return to the previous menu.
•Flash Lights With Lock
When this feature is selected, the exterior lights will flash
when the doors are locked or unlocked with the Remote
Keyless Entry (RKE) transmitter. To make your selection,
4
UNDERSTANDING YOUR INSTRUMENT PANEL 359
Page 364 of 664

Auto-On Comfort & Remote Start
After pressing the Auto-On Comfort & Remote Start
button on the touchscreen the following settings will be
available.
•Horn With Remote Start
When this feature is selected, the horn will sound when
the remote start is activated. To make your selection,
press the Sound Horn With Remote Start button on the
touchscreen, until a check-mark appears next to setting,
showing that setting has been selected. Press the back
arrow button on the touchscreen to return to the previous
menu.
•Auto-On Driver Heated Seat & Steering Wheel With
Vehicle Start — If Equipped
When this feature is selected the driver’s heated seat and
heated steering wheel will automatically turn on when
temperatures are below 40° F (4.4° C). To make your
selection, press the Auto Heated Seats button on the
touchscreen, until a check-mark appears next to setting,
showing that setting has been selected. Press the back
arrow button on the touchscreen to return to the previous
menu.
Engine Off Options
After pressing the “Engine Off Options” button on the
touchscreen the following settings will be available.
•Engine Off Power Delay
When this feature is selected, the power window
switches, radio, Uconnect® system (if equipped), DVD
video system (if equipped), power sunroof (if equipped),
and power outlets will remain active for up to 10 minutes
after the ignition is cycled to OFF. Opening either front
door will cancel this feature. To change the Engine Off
Power Delay status press the “0 seconds,” “45 seconds,#
“5 minutes” or “10 minutes” button on the touchscreen.
Then press the back arrow button on the touchscreen.
362 UNDERSTANDING YOUR INSTRUMENT PANEL