Page 158 of 664
Voice Training
For users experiencing difficulty with the system recogniz-
ing their voice commands or numbers, the Uconnect®
Phone Voice Training feature may be used. To enter this
training mode, follow one of the two following procedures:
•From outside the Uconnect® Phone mode (e.g., from
radio mode), push and hold the Voice Command
button for five seconds until the session begins,
or,
•Push the Voice Commandbutton and say the
“Voice Training,” “System Training,” or “Start Voice
Training” command.
You can either push the Uconnect® Phone button to restore
the factory setting or repeat the words and phrases when
prompted by the Uconnect® Phone. For best results, the
Voice Training session should be completed when the
vehicle is parked with the engine running, all windows
closed, and the blower fan switched off.
This procedure may be repeated with a new user. The
system will adapt to the last trained voice only.
Reset
To Reset all settings using Voice Command:
1. Push the Phonebutton.
2. After the “Ready” prompt and the following beep, say
“Setup,” then “Reset.”
•This will delete all phone pairing, phone book en-
tries, and other settings in all language modes. The
System will prompt you before resetting to factory
settings.
Voice Command
Uconnect® Voice Command Tutorial
To hear a brief tutorial of the Voice Command features,
push the Voice Commandbutton and say “Voice
Command Tutorial.”
156 UNDERSTANDING THE FEATURES OF YOUR VEHICLE
Page 173 of 664
Natural Speech
Your Uconnect® Phone Voice system uses a Natural
Language Voice Recognition (VR) engine.
Natural speech allows the user to speak commands in
phrases or complete sentences. The system filters out
certain non-word utterances and sounds such as “ah”
and “eh.” The system handles fill-in words such as “I
would like to.”
The system handles multiple inputs in the same phrase
or sentence such as “make a phone call” and “to Kelly
Smith.” For multiple inputs in the same phrase or sen-
tence, the system identifies the topic or context and
provides the associated follow-up prompt such as “Who
do you want to call?” in the case where a phone call was
requested but the specific name was not recognized.
The system utilizes continuous dialog; when the system
requires more information from the user it will ask a
question to which the user can respond without pushing
the “Voice Command”button on your steering
wheel.
Voice Command Tree
Refer to “Voice Tree” in this section.
Help Command
If you need assistance at any prompt, or if you want to
know your options at any prompt, say “Help” following
the beep.
To activate the Uconnect® Phone from idle, simply push
the Phonebutton on your steering wheel and say a
command or say “help.” All Uconnect® Phone ses-
sions begin with a push of the Phonebutton on the
radio control head.
3
UNDERSTANDING THE FEATURES OF YOUR VEHICLE 171
Page 213 of 664
•“Tutorial”
•“Voice Training”
NOTE:Keep in mind that you have to push the Voice
Commandbutton first and wait for the beep
before speaking the “Barge In” commands.
Voice Training
For users experiencing difficulty with the system recog-
nizing their voice commands or numbers the Uconnect®
Voice “Voice Training” feature may be used.
1. Push the Voice Commandbutton, say “System
Setup” and once you are in that menu then say
“Voice Training.” This will train your own voice to
the system and will improve recognition.
2. Repeat the words and phrases when prompted by
Uconnect® Voice. For best results, the “Voice Training”
session should be completed when the vehicle is
parked, engine running, all windows closed, and the
blower fan switched off. This procedure may be re-
peated with a new user. The system will adapt to the
last trained voice only.
VOICE COMMAND
Uconnect® 8.4/8.4 Nav
The Uconnect® Voice Command system allows
you to control your AM, FM radio, satellite
radio, disc player, USB/iPod® and SiriusXM
Travel Link.
NOTE:Take care to speak into the Voice Command
system as calmly and normally as possible. The ability of
the Voice Command system to recognize user voice
commands may be negatively affected by rapid speaking
or a raised voice level.
3
UNDERSTANDING THE FEATURES OF YOUR VEHICLE 211
Page 231 of 664

NOTE:The engine must be running for the heated seats
to operate.
Vehicles Equipped With Remote Start
On models that are equipped with remote start, the
heated seats can be programed to come on during a
remote start.
This feature can be programmed through the Uconnect®
system. Refer to “Uconnect® Settings” in “Understand-
ing Your Instrument Panel” for further information.
WARNING!
•Persons who are unable to feel pain to the skin
because of advanced age, chronic illness, diabetes,
spinal cord injury, medication, alcohol use, exhaus-
tion or other physical condition must exercise care
when using the seat heater. It may cause burns
even at low temperatures, especially if used for
long periods of time.
•Do not place anything on the seat or seatback that
insulates against heat, such as a blanket or cushion.
This may cause the seat heater to overheat. Sitting
in a seat that has been overheated could cause
serious burns due to the increased surface tempera-
ture of the seat.
3
UNDERSTANDING THE FEATURES OF YOUR VEHICLE 229
Page 239 of 664
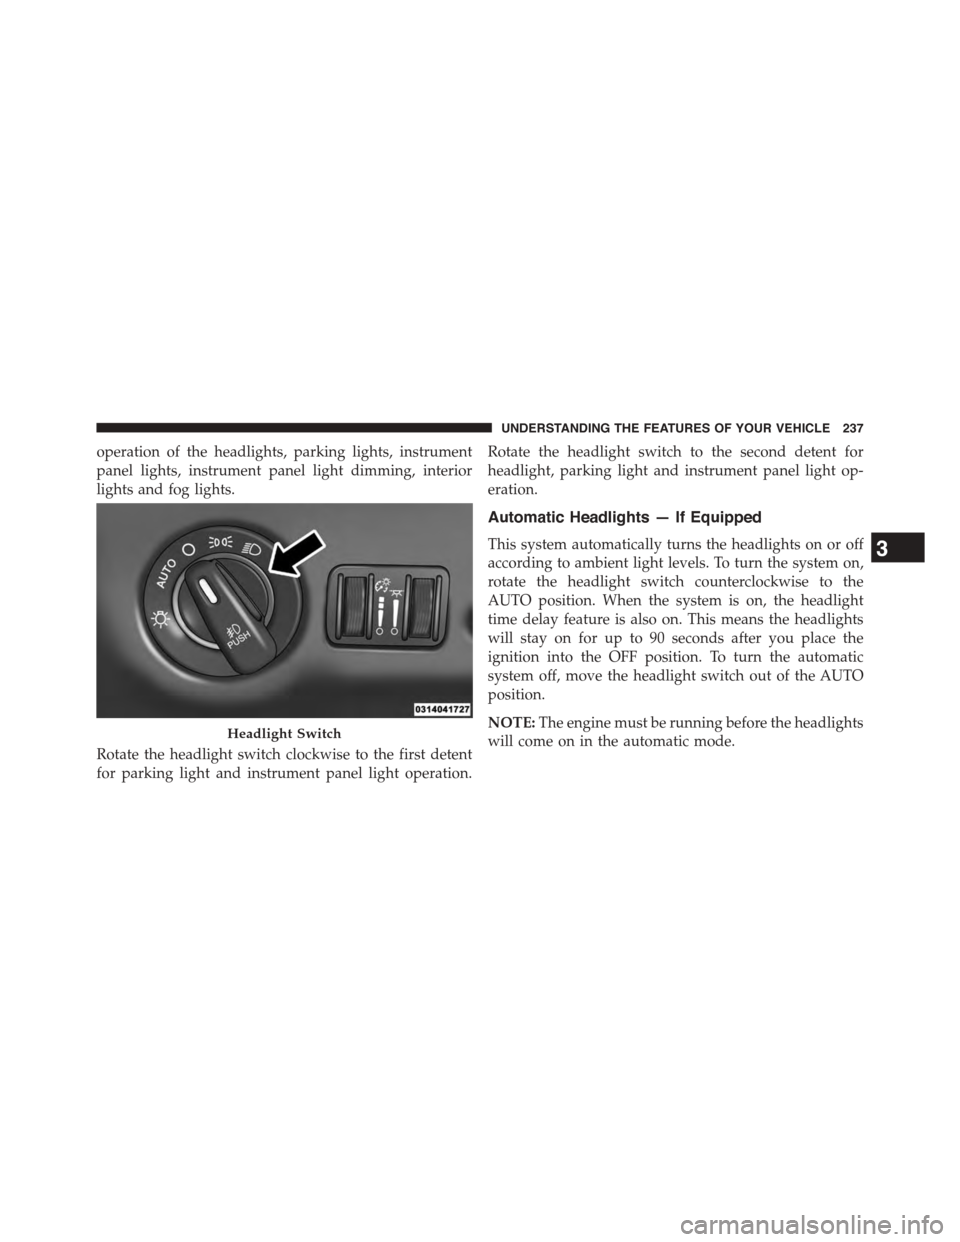
operation of the headlights, parking lights, instrument
panel lights, instrument panel light dimming, interior
lights and fog lights.
Rotate the headlight switch clockwise to the first detent
for parking light and instrument panel light operation.
Rotate the headlight switch to the second detent for
headlight, parking light and instrument panel light op-
eration.
Automatic Headlights — If Equipped
This system automatically turns the headlights on or off
according to ambient light levels. To turn the system on,
rotate the headlight switch counterclockwise to the
AUTO position. When the system is on, the headlight
time delay feature is also on. This means the headlights
will stay on for up to 90 seconds after you place the
ignition into the OFF position. To turn the automatic
system off, move the headlight switch out of the AUTO
position.
NOTE:The engine must be running before the headlights
will come on in the automatic mode.Headlight Switch
3
UNDERSTANDING THE FEATURES OF YOUR VEHICLE 237
Page 249 of 664
Intermittent Wiper System
Use the intermittent wiper when weather conditions
make a single wiping cycle with a variable pause be-
tween cycles desirable. Rotate the end of the multifunc-
tion lever to the first detent position, and then turn the
end of the lever to select the desired delay interval. There
are four delay settings, which allow you to regulate the
wipe interval from a minimum of one cycle every second
to a maximum of approximately 36 seconds between
cycles. The delay intervals will double in duration when
the vehicle speed is 10 mph (16 km/h) or less.
Wiper Operation
Rotate the end of the multifunction lever to the first
detent, past the intermittent settings for low-speed wiper
operation, or to the second detent past the intermittent
settings for high-speed wiper operation.
CAUTION!
•Turn the windshield wipers off when driving
through an automatic car wash. Damage to the
windshield wipers may result if the wiper control
is left in any position other than off.
•In cold weather, always turn off the wiper switch
and allow the wipers to return to the “Park” posi-
tion before turning off the engine. If the wiper
switch is left on and the wipers freeze to the
windshield, damage to the wiper motor may occur
when the vehicle is restarted.
•Always remove any buildup of snow that prevents
the windshield wiper blades from returning to the
off position. If the windshield wiper control is
turned off and the blades cannot return to the off
position, damage to the wiper motor may occur.
3
UNDERSTANDING THE FEATURES OF YOUR VEHICLE 247
Page 254 of 664

HEATED STEERING WHEEL — IF EQUIPPED
The steering wheel contains a heating element that helps
warm your hands in cold weather. The heated steering
wheel has only one temperature setting. Once the heated
steering wheel has been turned on it will operate for up
to 80 minutes before automatically shutting off. The
heated steering wheel can shut off early or may not turn
on when the steering wheel is already warm.
The heated steering wheel control button is located
within the Uconnect® system. You can gain access to the
control button through the climate screen or the controls
screen.
•Press the heated steering wheel buttononce to
turn the heating element ON.
•Press the heated steering wheel buttona second
time to turn the heating element OFF.
NOTE:The engine must be running for the heated
steering wheel to operate.
Vehicles Equipped With Remote Start
On models that are equipped with remote start, the
heated steering wheel can be programmed to come on
during a remote start through the Uconnect® system.
Refer to “Uconnect® Settings” in “Understanding Your
Instrument Panel” for further information.
252 UNDERSTANDING THE FEATURES OF YOUR VEHICLE
Page 281 of 664

2. Place the hand-held transmitter 1 to 3 inches (3 to 8
cm) away from the HomeLink® button you would like
to program while keeping the HomeLink® indicator
light in view.
3. Simultaneously push and hold both the HomeLink®
button you want to program and the hand-held trans-
mitter button.
4. Continue to hold both buttons and observe the indi-
cator light. HomeLink® indicator will flash slowly
and then rapidly after HomeLink® has received the
frequency signal from the hand-held transmitter. Re-
lease both buttons after the indicator light changes
from slow to rapid.
5. Push and hold the programmed HomeLink® button
and observe the indicator light.
•If the indicator light stays on constantly, program-
ming is complete and the garage door/device should
activate when the HomeLink® button is pressed.
•To program the remaining two HomeLink® buttons,
repeat each step for each remaining button. DO NOT
erase the channels.
Reprogramming A Single HomeLink® Button
(Non — Rolling Code)
To reprogram a channel that has been previously trained,
follow these steps:
1. Cycle the ignition to the ON/RUN position.
For vehicle’s equipped with Keyless Enter-N-Go™, place
the ignition in the RUN position with the Engine ON.
2. Push and hold the desired HomeLink® button until
the indicator light begins to flash after 20 seconds.Do
not release the button.
3.Without releasing the buttonproceed with “Program-
ming A Non-Rolling Code” step 2 and follow all
remaining steps.
3
UNDERSTANDING THE FEATURES OF YOUR VEHICLE 279