2015 DODGE CHARGER brake
[x] Cancel search: brakePage 52 of 236

This setting is designed to provide early warnings per NHTSA (National Highway Traffic
Safety Administration) recommendations.
More cautious drivers that do not mind frequent warnings may prefer this setting.
NOTE:
This setting gives you the most reaction time.
Near
Changing the FCW status to the “Near” setting, allows the system to warn you of a
potential frontal collision when you are much closer.
This setting provides less reaction time than the “Far” setting, which allows for a more
dynamic driving experience.
More dynamic or aggressive drivers that want to avoid frequent warnings may prefer this
setting.
Off
Changing the FCW status to “Off” prevents the system from warning you of a possible
collision with the vehicle in front of you.
Turning Active Braking ON Or OFF
The Active Braking feature has two settings and can be changed within the Uconnect®
System Screen:
•On
•Off
Changing the Active Braking status to “Off” prevents the system from providing limited
autonomous braking, or additional brake support if the driver is not braking adequately in
the event of a potential frontal collision.
NOTE:
If FCW is set to “Off,” “FCW OFF” will be displayed in the DID.
Refer to the Owner's Manual on the DVD for further details.
WARNING!
Forward Collision Warning (FCW) is not intended to avoid a collision on its own, nor can
FCW detect every type of potential collision. The driver has the responsibility to avoid
acollisionbycontrollingthevehicleviabrakingandsteering.Failuretofollowthis
warning could lead to serious injury or death.
OPERATING YOUR VEHICLE
50
Page 55 of 236

EIGHT-SPEED AUTOMATIC TRANSMISSION
The transmission gear range (PRNDM) is displayed both on the shift lever and in the Driver
Information Display (DID).
To s e l e c t a g e a r r a n g e , p r e s s t h e l o c k b u t t o n o n t h e s h i f t l e v e r a n d m o v e t h e l e v e r r e a r w a r d
or forward. You must also press the brake pedal to shift the transmission out of PARK, or
to shift from NEUTRAL into DRIVE or REVERSE when the vehicle is stopped or moving at
low speeds (refer to “Brake/Transmission Shift Interlock System” within the “Starting And
Operating” chapter in your Owner’s Manual on the DVD for further information). Select the
DRIVE range for normal driving.
The electronically-controlled transmission
provides a precise shift schedule. The trans-
mission electronics are self-calibrating;
therefore, the first few shifts on a new vehicle
may be somewhat abrupt. This is a normal
condition, and precision shifts will develop
within a few hundred miles (kilometers).
Only shift from DRIVE to PARK or RE-
VERSE when the accelerator pedal is re-
leased and the vehicle is stopped. Be sure
to keep your foot on the brake pedal when
shifting between these gears.
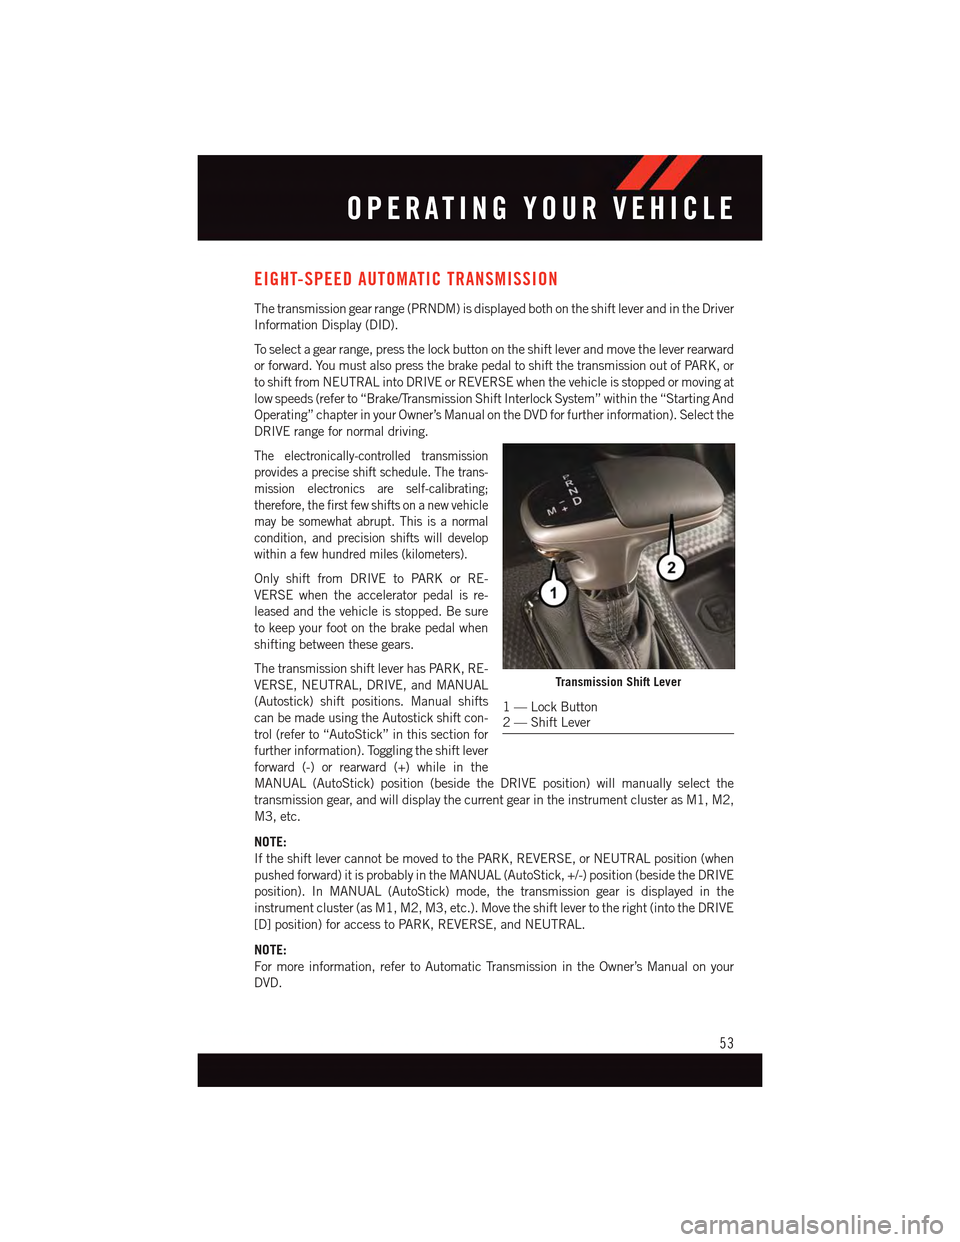
The transmission shift lever has PARK, RE-
VERSE, NEUTRAL, DRIVE, and MANUAL
(Autostick) shift positions. Manual shifts
can be made using the Autostick shift con-
trol (refer to “AutoStick” in this section for
further information). Toggling the shift lever
forward (-) or rearward (+) while in the
MANUAL (AutoStick) position (beside the DRIVE position) will manually select the
transmission gear, and will display the current gear in the instrument cluster as M1, M2,
M3, etc.
NOTE:
If the shift lever cannot be moved to the PARK, REVERSE, or NEUTRAL position (when
pushed forward) it is probably in the MANUAL (AutoStick, +/-) position (beside the DRIVE
position). In MANUAL (AutoStick) mode, the transmission gear is displayed in the
instrument cluster (as M1, M2, M3, etc.). Move the shift lever to the right (into the DRIVE
[D] position) for access to PARK, REVERSE, and NEUTRAL.
NOTE:
For more information, refer to Automatic Transmission in the Owner’s Manual on your
DVD.
Transmission Shift Lever
1—LockButton2—ShiftLever
OPERATING YOUR VEHICLE
53
Page 147 of 236

1/4 Mile (400 Meters)
When selected, this screen displays the time it takes the vehicle to travel 1/4 mile within
25 seconds and the vehicle's speed when it reaches 1/4 mile (200 meters).
•Thefeaturewill“ready”whenthevehicleisat0mph(0km/h).Theword“READY”will
flash when conditions are met for the event to begin.
•Dasheswilldisplayifthevehiclefailstoreach1/4mile(400meters)inlessthen
25 seconds.
•Toclearthevehicle'sbest1/4mile400meters)run,pushandholdtheOKbutton for
two seconds.
Braking Distance
When selected, this screen displays the vehicle's braking distance, and the speed at which
the brake pedal was pushed.
•Thisfeaturewillonlyfunctionwhenapplyingthebrakesatspeedsabove30mph
(48 km/h).
•Engagingtheparkingbrakewilldisablethisfeature.
•Theword“READY”willdisplaywhenconditionsaremetfortheeventtobegin.
•Thedistanceandspeedmeasurementsdisplaywhiletheeventistakingplace.
•Thedistancemeasurementwillbeabortedifthebrakepedalisreleasedbeforethe
vehicle comes to a complete stop.
•PushingandholdingtheOKbutton will clear the current and last run values.
Current G-Force
When selected, this screen displays the current G-Force (lateral and longitudinal) that
displays the directions of the forces.
Peak G-Force
When selected, this screen displays all four G-Force values (two lateral and two longitu-
dinal).
•Whenaforcegreaterthanzeroismeasured,thedisplaywillupdatethevalueasit
climbs. As the G-Force falls, the peak forces will continue to display.
•PushandholdtheOKbutton to clear the peak force values.
ELECTRONICS
145
Page 158 of 236

1/8 Mile, 1/4 Mile
•Whenselected,thisscreendisplaysthetimeittakesthevehicletotravel1/8mile
(1/4 mile) within 30 seconds and the vehicle's speed when it reaches 1/8 mile
(1/4 mile).
Braking Distance
•Whenselected,thisscreendisplaysthevehicle'sbrakingdistanceandthespeedat
which the brake pedal was depressed.
Current G-Force
•Whenselected,thisscreendisplaysthecurrentG-Force(lateralandlongitudinal)along
with a friction circle that displays the directions of the forces.
Peak G-Force
•Whenselected,thisscreendisplaysallfourG-Forcevalues(twolateralandtwo
longitudinal).
Lap Timer
•WhenselectedtheLapTimerpagewillshowthetimeralwaysat0:00.00withthe
previous Best and Last time data (unless the driver has cleared it via hold to Reset)
Lap History
•Whenselected,thisscreendisplaystheLapHistory,andwillcolorhighlightthetime
that is the best time from the Timer Page.
Top Speed
•Whenselected,thisscreendisplaystheTopSpeedsincelastreset.
Uconnect® SRT PERFORMANCE PAGES
To a c c e s s t h e S R T P e r f o r m a n c e P a g e s , p r e s s t h e “ S R T & A p p s ” b u t t o n o n t h e t o u c h -
screen then press the “SRT Performance” button on the touchscreen. Press the feature
button on the touchscreen to select that feature.
The Performance Pages includes the following menus:
•Home•Gauges 2
•Ti m e r s•G–Force
•Gauges 1•Engine
Home
When Home is selected, the following options will be available:
•Aseriesofsiximageswhichcanbeselectedbytheuser.
•Aleftandrightarrowtoallowtheusertoscrollthroughvehicleimages.
•Ashort-cuttotheSRTDriveModesfeature.
SRT
156
Page 161 of 236

ROADSIDE ASSISTANCE
Dial toll-free 1-800-521-2779 for U.S. Residents or 1-800-363-4869 for Canadian
Residents.
•Provideyourname,vehicleidentificationnumber,licenseplatenumber,andyour
location, including the telephone number from which you are calling.
•Brieflydescribethenatureoftheproblemandanswerafewsimplequestions.
•Youwillbegiventhenameoftheserviceproviderandanestimatedtimeofarrival.
If you feel you are in an “unsafe situation”, please let us know. With your consent, we
will contact local police or safety authorities.
INSTRUMENT CLUSTER WARNING LIGHTS
-LowFuelWarningLight
This warning light indicates when the fuel level reaches approximately 2.0 gal (7.8 L).
This light will turn on and a single chime will sound.
Charging System Light
This light shows the status of the electrical charging system. If the charging system light
remains on, it means that the vehicle is experiencing a problem with the charging system.
We recommend you do not continue driving if the charging system light is on. Have the
vehicle serviced immediately.
Oil Pressure Warning Light
This light indicates low engine oil pressure. If the light turns on while driving, stop the
vehicle and shut off the engine as soon as possible. A chime will sound when this light
turns on.
We recommend you do not operate the vehicle or engine damage will occur. Have the
vehicle serviced immediately.
Anti-Lock Brake (ABS) Light
This light monitors the Anti-Lock Brake System (ABS).
If the light is not on during starting, stays on or turns on while driving, we recommend you
contact the nearest authorized dealer and have the vehicle serviced immediately.
Air Bag Warning Light
If the light is not on during starting, stays on, or turns on while driving, have the vehicle
serviced by an authorized dealer immediately.
WHAT TO DO IN EMERGENCIES
159
Page 164 of 236

Electronic Stability Control (ESC) Activation/Malfunction Indicator Light
The “ESC Activation/Malfunction Indicator Light” in the instrument cluster will come on
when the ignition switch is turned to the ON/RUN position. It should go out with the
engine running. If the “ESC Activation/Malfunction Indicator Light” comes on continu-
ously with the engine running, a malfunction has been detected in the ESC system.
If this light remains on after several ignition cycles, and the vehicle has been driven
several miles (kilometers) at speeds greater than 30 mph (48 km/h), we recommend you
drive to the nearest service center and have the vehicle serviced immediately.
Brake Warning Light
This light monitors various brake functions, including brake fluid level and parking brake
application. If the brake light turns on, it may indicate that the parking brake is applied,
that the brake fluid level is low, or that there is a problem with the anti-lock brake system
reservoir.
If the light remains on when the parking brake has been disengaged, and the fluid level is
at the full mark on the master cylinder reservoir, it indicates a possible brake hydraulic
system malfunction or that a problem with the Brake Booster has been detected by the
Anti-Lock Brake System (ABS)/Electronic Stability Control (ESC) system. In this case, the
light will remain on until the condition has been corrected. If the problem is related to the
brake booster, the ABS pump will run when applying the brake, and a brake pedal
pulsation may be felt during each stop.
The dual brake system provides a reserve braking capacity in the event of a failure to a
portion of the hydraulic system. A leak in either half of the dual brake system is indicated
by the Brake Warning Light, which will turn on when the brake fluid level in the master
cylinder has dropped below a specified level. The light will remain on until the cause is
corrected.
Vehicles equipped with the Anti-Lock Brake System (ABS) are also equipped with
Electronic Brake Force Distribution (EBD). In the event of an EBD failure, the Brake
Warning Light will turn on along with the ABS Light. Immediate repair to the ABS system
is required.
Operation of the Brake Warning Light can be checked by turning the ignition switch from
the OFF position to the ON/RUN position. The light should illuminate for approximately
two seconds. The light should then turn off unless the parking brake is applied or a brake
fault is detected. If the light does not illuminate, have the light inspected by an authorized
dealer.
The light also will turn on when the parking brake is applied with the ignition switch in the
ON/RUN position.
NOTE:
This light shows only that the parking brake is applied. It does not show the degree of
brake application.
WHAT TO DO IN EMERGENCIES
162
Page 165 of 236

WARNING!
Driving a vehicle with the red brake light on is dangerous. Part of the brake system may
have failed. It will take longer to stop the vehicle. You could have a collision. Have the
vehicle checked immediately.
Malfunction Indicator Light (MIL)
Certain conditions, such as a poor fuel quality, etc., may illuminate the MIL after engine
start. The vehicle should be serviced if the light stays on through several typical driving
cycles. In most situations, the vehicle will drive normally and not require towing.
If the MIL flashes when the engine is running, serious conditions may exist that could lead
to immediate loss of power or severe catalytic converter damage. We recommend you do
not operate the vehicle. Have the vehicle serviced immediately.
Electronic Stability Control (ESC) OFF Indicator Light
This light indicates the Electronic Stability Control (ESC) is off.
INSTRUMENT CLUSTER INDICATOR LIGHTS
Turn Signal Indicator
The arrows will flash with the exterior turn signals when the turn signal lever is operated.
Atonewillchime,andaDIDmessagewillappearifeitherturnsignalisleftonformore
than 1 mile (1.6 km).
NOTE:
If either indicator flashes at a rapid rate, check for a defective outside light bulb.
High Beam Indicator
Indicates that headlights are on high beam.
Front Fog Light Indicator
This indicator will illuminate when the front fog lights are on.
Vehicle Security Light
This light will flash rapidly for approximately 15 seconds when the vehicle security alarm
is arming. The light will flash at a slower speed continuously after the alarm is set. The
security light will also come on for about three seconds when the ignition is first turned on.
Electronic Speed Control Set
Indicates that the Electronic Speed Control has been set.
WHAT TO DO IN EMERGENCIES
163
Page 166 of 236

-AdaptiveCruiseControl(ACC)ONIndicator
•If your vehicle is equipped with adaptive cruise control, the controls operate exactly the
same as the normal (fixed speed) cruise control with one difference. You can set a
specified distance you would like to maintain between you and the vehicle in front of you.
•IftheACCsensordetectsavehicleahead,ACCwillapplylimitedbrakingoraccelera-
tion automatically to maintain a preset following distance, while matching the speed of
the vehicle ahead.
•If the sensor does not detect a vehicle ahead of you, ACC will maintain a fixed set speed.
•Referto“SpeedControl”in“OperatingYourVehicle”forfurtherinformationon
Adaptive Cruise Control (ACC) ON operation and proper use.
NOTE:
Adaptive Cruise Control (ACC) increases the driving convenience provided by cruise
control while traveling on highways and major roadways. However, it is not a safety system
and not designed to prevent collisions.
Electronic Stability Control (ESC) OFF Indicator Light
This light indicates the Electronic Stability Control (ESC) is off.
-DoorAjarIndicator
This indicator will illuminate when a door(s) is left ajar and not fully closed.
Oil Change Due
Yo u r v e h i c l e i s e q u i p p e d w i t h a n e n g i n e o i l c h a n g e i n d i c a t o r s y s t e m . T h e “ O i l C h a n g e
Due” message will display for 5 seconds along with a single chime to indicate the next
scheduled oil change interval. The engine oil change indicator system is duty cycle based,
which means the engine oil change interval may fluctuate dependent upon your personal
driving style.
Resetting The Light After Servicing
Vehicles Equipped With Keyless Enter-N-Go™
1. Without pushing the brake pedal, push the ENGINE START/STOP button and cycle the
ignition to the ON/RUN position (do not start the engine).
2. Fully depress the accelerator pedal, slowly, three times within 10 seconds.
3. Without pushing the brake pedal, push the ENGINE START/STOP button once to
return the ignition to the OFF/LOCK position.
Vehicles Not Equipped With Keyless Enter-N-Go™
1. Turn the ignition switch to the ON/RUN position (do not start the engine).
2. Fully depress the accelerator pedal, slowly, three times within 10 seconds.
3. Turn the ignition switch to the OFF/LOCK position.
WHAT TO DO IN EMERGENCIES
164