2015 DODGE CHARGER check engine light
[x] Cancel search: check engine lightPage 312 of 638

Engine Off Options, Audio, Phone/Bluetooth®, Siri-
usXM Setup, Restore Settings, Clear Personal Data and
System Information.
NOTE:
•Only one touchscreen area may be selected at a time.
•Depending on the vehicles options, feature settings
may vary.
When making a selection, press the button on the touch-
screen to enter the desired mode. Once in the desired
mode, press and release the preferred setting until a
check-mark appears next to the setting, showing that
setting has been selected. Once the setting is complete,
either press the Back Arrow button on the touchscreen to
return to the previous menu, or press the “X” button on
the touchscreen to close out of the settings screen. Press-
ing the Up or Down Arrow button on the right side of the
screen will allow you to toggle up or down through the
available settings.
Display
After pressing the “Display” button on the touchscreen
the following settings will be available:
•Display Mode
When in this display you may select one of the auto
display settings. To change Mode status, press and re-
lease the “Manual” or “Auto” button on the touchscreen.
Then press the back arrow button on the touchscreen.
NOTE:When Day or Night is selected for the Display
Mode, the usage of the Parade Mode feature will cause
the radio to activate the Display Brightness Day control
even though the headlights are on.
•Display Brightness With Headlights ON
When in this display, you may select the brightness with
the headlights on. Adjust the brightness with the “+” and
“–” setting buttons on the touchscreen or by selecting any
310 UNDERSTANDING YOUR INSTRUMENT PANEL
Page 322 of 638

•Rain Sensing Auto Wipers
When this feature is selected, the system will automati-
cally activate the windshield wipers if it senses moisture
on the windshield. To make your selection, press the
“Rain Sensing Auto Wipers” button on the touchscreen,
until a check-mark appears next to setting, indicating that
the setting had been selected. Press the back arrow button
on the touchscreen to return to the previous menu.
•Hill Start Assist — If Equipped
When this feature is selected, the Hill Start Assist (HSA)
system is active. Refer to “Electronic Brake Control
System” in “Starting And Operating” for system function
and operating information. To make your selection, press
the “Hill Start Assist” button on the touchscreen, until a
check-mark appears next to setting, indicating that the
setting had been selected. Press the back arrow button on
the touchscreen to return to the previous menu.
Lights
After pressing the “Lights” button on the touchscreen the
following settings will be available.
•Headlight Off Delay
When this feature is selected, it allows adjustment of the
amount of time the headlights remain on after the engine
is shut off. To change the Headlights Off Delay setting,
press the “+” or “-” button on the touchscreen to select
your desired time interval, and choose either 0 sec, 30 sec,
60 sec or 90 seconds. Press the back arrow button on the
touchscreen to return to the previous menu, or push the
back button on the faceplate.
•Headlight Illumination On Approach
When this feature is selected, the headlights will activate
and remain on for 0, 30, 60, or 90 seconds when the doors
are unlocked with the Remote Keyless Entry (RKE)
transmitter. To change the Illuminated Approach status,
320 UNDERSTANDING YOUR INSTRUMENT PANEL
Page 323 of 638

press the “+” or “-” button on the touchscreen to select
your desired time interval. Press the back arrow button
on the touchscreen to return to the previous menu, or
push the back button on the faceplate.
•Headlights With Wipers — If Equipped
When this feature is selected, and the headlight switch is
in the AUTO position, the headlights will turn on ap-
proximately 10 seconds after the wipers are turned on.
The headlights will also turn off when the wipers are
turned off if they were turned on by this feature. To make
your selection, press the “Headlights With Wipers” but-
ton on the touchscreen, until a check-mark appears next
to setting, indicating that the setting has been selected.
Press the back arrow button on the touchscreen to return
to the previous menu, or push the back button on the
faceplate.
•Auto Dim High Beams — If Equipped
When this feature is selected, the high beam headlights
will activate/deactivate automatically under certain con-
ditions. To make your selection, press the “Auto High
Beams” button on the touchscreen, until a check-mark
appears next to setting, indicating that the setting has
been selected. Press the back arrow button on the touch-
screen to return to the previous menu, or push the back
button on the faceplate. Refer to “Lights — If Equipped”
in “Understanding The Features Of Your Vehicle” for
further information.
•Daytime Running Lights — If Equipped
When this feature is selected, the headlights will turn on
whenever the engine is running. To make your selection,
press the “Daytime Running Lights” button on the touch-
screen, until a check-mark appears next to setting, indi-
cating that the setting has been selected. Press the back
4
UNDERSTANDING YOUR INSTRUMENT PANEL 321
Page 434 of 638
Synchronizing ESC
If the power supply is interrupted (battery
disconnected or discharged), the “ESC
Activation/Malfunction Indicator Light” may
illuminate with the engine running. If this
should occur, turn the steering wheel completely to the
left and then to the right. The “ESC Activation/
Malfunction Indicator Light” should go out. However, if
the light remains on, have the ESC and BAS checked at
your authorized dealer as soon as possible.
TIRE SAFETY INFORMATION
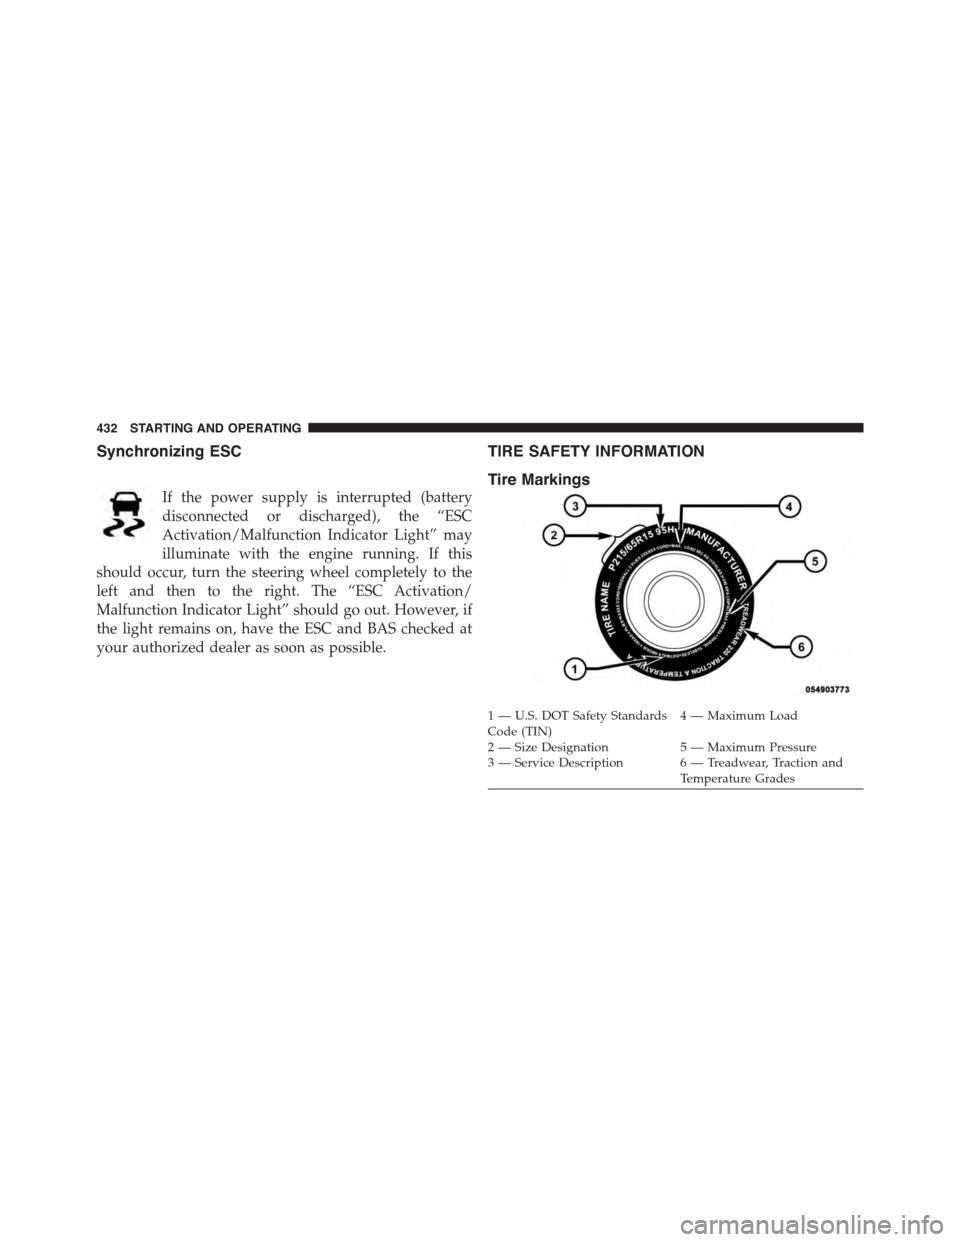
Tire Markings
1—U.S.DOTSafetyStandardsCode (TIN)4—MaximumLoad
2 — Size Designation 5 — Maximum Pressure3 — Service Description 6 — Treadwear, Traction andTemperature Grades
432 STARTING AND OPERATING
Page 537 of 638
ONBOARD DIAGNOSTIC SYSTEM — OBD II
Your vehicle is equipped with a sophisticated onboard
diagnostic system called OBD II. This system monitors
the performance of the emissions, engine, and automatic
transmission control systems. When these systems are
operating properly, your vehicle will provide excellent
performance and fuel economy, as well as engine emis-
sions well within current government regulations.
If any of these systems require service, the OBD II system
will turn on the “Malfunction Indicator Light (MIL).” It
will also store diagnostic codes and other information to
assist your service technician in making repairs. Al-
though your vehicle will usually be drivable and not
need towing, see your authorized dealer for service as
soon as possible.
CAUTION!
•Prolonged driving with the MIL on could cause
further damage to the emissions control system. It
could also affect fuel economy and driveability.
The vehicle must be serviced before any emissions
tests can be performed.
•If the MIL is flashing while the engine is running,
severe catalytic converter damage and power loss
will soon occur. Immediate service is required.
EMISSIONS INSPECTION AND MAINTENANCE
PROGRAMS
In some localities, it may be a legal requirement to pass
an inspection of your vehicle’s emissions control system.
Failure to pass could prevent vehicle registration.
For states that require an Inspection and Mainte-
nance (I/M), this check verifies the “Malfunction
7
MAINTAINING YOUR VEHICLE 535
Page 538 of 638
Indicator Light (MIL)” is functioning and is not on when
the engine is running, and that the OBD II system is
ready for testing.
Normally, the OBD II system will be ready. The OBD II
system maynotbe ready if your vehicle was recently
serviced, recently had a dead battery or a battery replace-
ment. If the OBD II system should be determined not
ready for the I/M test, your vehicle may fail the test.
Your vehicle has a simple ignition actuated test, which
you can use prior to going to the test station. To check if
your vehicle’s OBD II system is ready, you must do the
following:
1. Cycle the ignition switch to the ON position, but do
not crank or start the engine.
NOTE:If you crank or start the engine, you will have to
start this test over.
2. As soon as you cycle the ignition switch to the ON
position, you will see the Malfunction Indicator Light
(MIL) symbol come on as part of a normal bulb check.
3. Approximately 15 seconds later, one of two things will
happen:
•The MIL will flash for about 10 seconds and then
return to being fully illuminated until you turn OFF
the ignition or start the engine. This means that your
vehicle’s OBD II system isnot readyand you should
notproceed to the I/M station.
•The MIL will not flash at all and will remain fully
illuminated until you place the ignition in the off
position or start the engine. This means that your
vehicle’s OBD II system isreadyand you can proceed
to the I/M station.
If your OBD II system isnot ready,you should see your
authorized dealer or repair facility. If your vehicle was
536 MAINTAINING YOUR VEHICLE
Page 561 of 638
•Do not change the thermostat for Summer or Winter
operation. If replacement is ever necessary, install
ONLY the correct type thermostat. Other designs may
result in unsatisfactory engine coolant (antifreeze)
performance, poor gas mileage, and increased emis-
sions.
Brake System
In order to assure brake system performance, all brake
system components should be inspected periodically.
Refer to the “Maintenance Schedule” for the proper
maintenance intervals.
WARNING!
Riding the brakes can lead to brake failure and
possibly a collision. Driving with your foot resting or
riding on the brake pedal can result in abnormally
(Continued)
WARNING!(Continued)
high brake temperatures, excessive lining wear, and
possible brake damage. You would not have your full
braking capacity in an emergency.
Master Cylinder — Brake Fluid Level Check
Check the fluid level in the master cylinder immediately
if the brake system warning light indicates system fail-
ure.
Check the fluid level in the master cylinder when per-
forming underhood services.
Clean the top of the master cylinder area before removing
the cap. Add fluid to bring the level up to the top of the
“FULL” mark on the side of the master cylinder reservoir.
Overfilling of fluid is not recommended because it may
cause leaking in the system.
7
MAINTAINING YOUR VEHICLE 559
Page 599 of 638
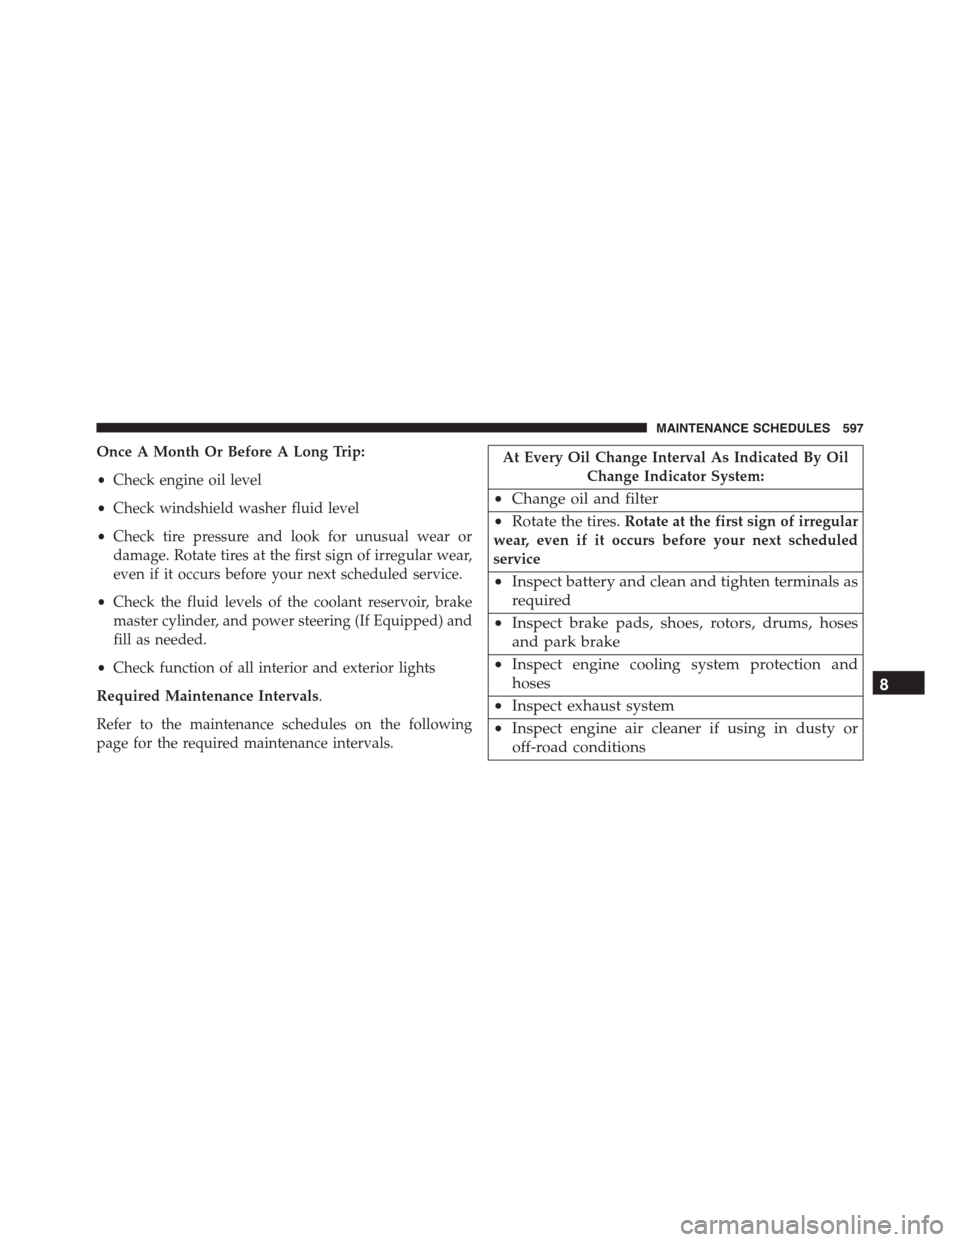
Once A Month Or Before A Long Trip:
•Check engine oil level
•Check windshield washer fluid level
•Check tire pressure and look for unusual wear or
damage. Rotate tires at the first sign of irregular wear,
even if it occurs before your next scheduled service.
•Check the fluid levels of the coolant reservoir, brake
master cylinder, and power steering (If Equipped) and
fill as needed.
•Check function of all interior and exterior lights
Required Maintenance Intervals.
Refer to the maintenance schedules on the following
page for the required maintenance intervals.
At Every Oil Change Interval As Indicated By Oil
Change Indicator System:
•Change oil and filter
•Rotate the tires.Rotate at the first sign of irregular
wear, even if it occurs before your next scheduled
service
•Inspect battery and clean and tighten terminals as
required
•Inspect brake pads, shoes, rotors, drums, hoses
and park brake
•Inspect engine cooling system protection and
hoses
•Inspect exhaust system
•Inspect engine air cleaner if using in dusty or
off-road conditions
8
MAINTENANCE SCHEDULES 597