Page 140 of 638
•Press the ventilated seat buttona second time to
choose LO.
•Press the ventilated seat buttona third time to
turn the ventilated seat OFF.
NOTE:The engine must be running for the ventilated
seats to operate.
Vehicles Equipped With Remote Start
On models that are equipped with remote start, the
ventilated seats can be programed to come on during a
remote start.
This feature can be programmed through the Uconnect®
system. Refer to “Uconnect® Settings” in “Understand-
ing Your Instrument Panel” for further information.
Manual Seats — If Equipped
Forward Or Rearward Adjustment
The adjusting bar is at the front of the seat, near the floor.
Pull the bar upward to move the seat forward or rear-
ward. Release the bar once the seat is in the position
desired. Using body pressure, move forward and rear-
ward on the seat to be sure that the seat adjusters have
latched.
138 UNDERSTANDING THE FEATURES OF YOUR VEHICLE
Page 155 of 638

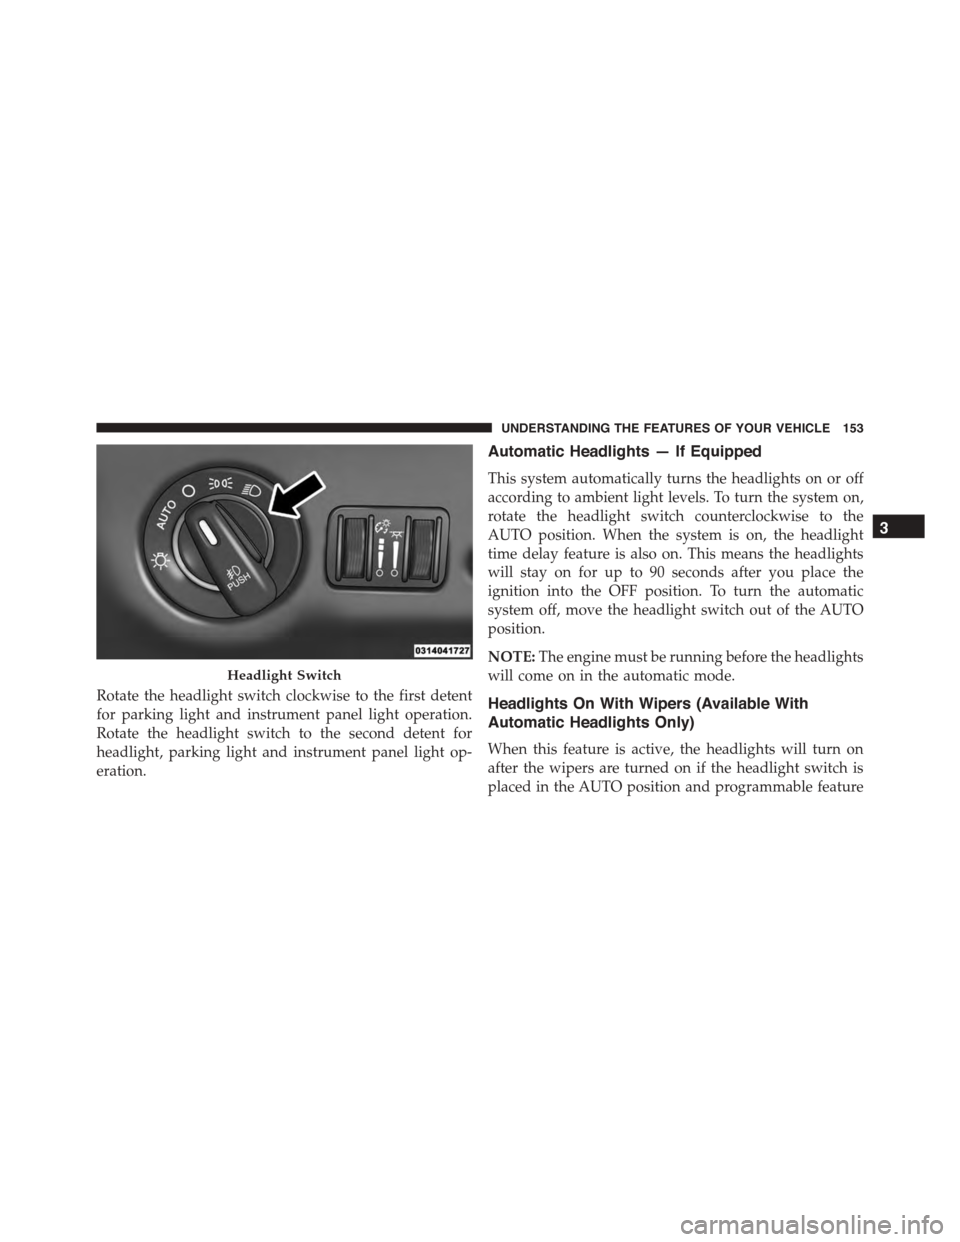
Rotate the headlight switch clockwise to the first detent
for parking light and instrument panel light operation.
Rotate the headlight switch to the second detent for
headlight, parking light and instrument panel light op-
eration.
Automatic Headlights — If Equipped
This system automatically turns the headlights on or off
according to ambient light levels. To turn the system on,
rotate the headlight switch counterclockwise to the
AUTO position. When the system is on, the headlight
time delay feature is also on. This means the headlights
will stay on for up to 90 seconds after you place the
ignition into the OFF position. To turn the automatic
system off, move the headlight switch out of the AUTO
position.
NOTE:The engine must be running before the headlights
will come on in the automatic mode.
Headlights On With Wipers (Available With
Automatic Headlights Only)
When this feature is active, the headlights will turn on
after the wipers are turned on if the headlight switch is
placed in the AUTO position and programmable feature
Headlight Switch
3
UNDERSTANDING THE FEATURES OF YOUR VEHICLE 153
Page 157 of 638

2. Push the multifunction lever away from you (toward
front of vehicle) to engage the high beam mode.
NOTE:This system will not activate until the vehicle is
at or above 15 mph (24 km/h).
To Deactivate
1. Pull the multifunction lever toward you (or rearward
in car) to manually deactivate the system (normal
operation of low beams).
2. Push back on the multifunction lever to reactivate the
system.
Headlight Time Delay
This feature provides the safety of headlight illumination
for up to 90 seconds when leaving your vehicle in an
unlit area.
To activate the delay feature, turn OFF the ignition switch
while the headlights are still on. Then, turn off the
headlights within 45 seconds. The delay interval begins
when the headlight switch is turned off.
NOTE:The lights must be turned off within 45 seconds
of turning the ignition OFF to activate this feature.
If you turn the headlights, park lights or ignition switch
ON again, the system will cancel the delay.
If you turn the headlights off before the ignition, they will
turn off in the normal manner.
NOTE:The Headlight Time Delay is programmable us-
ing the Uconnect® System, refer to “Uconnect® Settings”
in “Understanding Your Instrument Panel” for further
information.
3
UNDERSTANDING THE FEATURES OF YOUR VEHICLE 155
Page 164 of 638
With the parking lights or headlights on, rotating the left
dimmer control upward will increase the brightness of
the instrument panel lights and lighted cupholders (if
equipped).
Dome Light Position
Rotate the left dimmer control completely upward to the
second detent to turn on the interior lights. The interior
lights will remain on when the dimmer control is in this
position.
Interior Light Defeat (OFF)
Rotate the left dimmer control to the extreme bottom
“OFF” position. The interior lights will remain off when
the doors are open.
Parade Mode (Daytime Brightness Feature)
Rotate the instrument panel dimmer control upward to
the first detent. This feature brightens all text displays
such as the odometer, Driver Information Display (DID),
and radio when the position lights or headlights are on.Instrument Panel Dimmer
162 UNDERSTANDING THE FEATURES OF YOUR VEHICLE
Page 187 of 638

•The shift lever/gear selector is removed from the
Drive position.
•The Electronic Stability Control/Traction Control Sys-
tem (ESC/TCS) activates.
•The vehicle parking brake is applied.
•Driver seatbelt is unbuckled at low speeds.
•Driver door is opened at low speeds.
•The driver switches ESC to full-off mode.
NOTE:
•If your vehicle stays at standstill for longer than two
seconds, then the system will cancel and the brake
force will be ramped-out. The driver will have to apply
the brakes to keep the vehicle at a standstill.
•ACC cannot be resumed if there is a stationary vehicle
in-front of your vehicle in close proximity.
To Turn Off
The system will turn off and erase the set speed in
memory if:
•The Normal (Fixed Speed) Electronic Speed Control
ON/OFF button is pushed.
•The ignition is turned off.
•The Adaptive Cruise Control (ACC) On/Off button is
pushed.
To Resume
If there is a set speed in memory push the RES (resume)
button and then remove your foot from the accelerator
pedal. The DID will display the last set speed.
3
UNDERSTANDING THE FEATURES OF YOUR VEHICLE 185
Page 190 of 638

•If the button is continually pushed, the set speed will
continue to decrease in 10 km/h decrements until the
button is released. The decrease in set speed is re-
flected in the DID.
NOTE:
•When you override and push the SET+button or SET
-buttons, the new Set Speed will be the current speed
of the vehicle.
•When you use the SET-button to decelerate, if the
engine’s braking power does not slow the vehicle
sufficiently to reach the set speed, the brake system
will automatically slow the vehicle.
•The ACC system applies the brake down to a full stop
when following a target vehicle. If an ACC host vehicle
follows a target vehicle to a standstill, the host vehicle
will release the vehicle brakes two seconds after com-
ing to a full stop.
•The ACC system maintains set speed when driving up
hill and down hill. However, a slight speed change on
moderate hills is normal. In addition, downshifting
may occur while climbing uphill or descending down-
hill. This is normal operation and necessary to main-
tain set speed. When driving up hill and down hill, the
ACC system will cancel if the braking temperature
exceeds normal range (overheated).
Setting The Following Distance In ACC
The specified following distance for ACC can be set by
varying the distance setting between four bars (longest),
three bars (long), two bars (medium) and one bar (short).
Using this distance setting and the vehicle speed, ACC
calculates and sets the distance to the vehicle ahead. This
distance setting displays in the DID.
188 UNDERSTANDING THE FEATURES OF YOUR VEHICLE
Page 197 of 638

The “ACC/FCW Unavailable Wipe Front Radar Sensor”
message can sometimes be displayed while driving in
highly reflective areas (i.e. tunnels with reflective tiles, or
ice and snow). The ACC system will recover after the
vehicle has left these areas. Under rare conditions, when
the radar is not tracking any vehicles or objects in its path
this warning may temporarily occur.
NOTE:If the “ACC/FCW Unavailable Wipe Front Radar
Sensor” warning is active Normal (Fixed Speed) Cruise
Control is still available. For additional information refer
to “Normal (Fixed Speed) Cruise Control Mode” in this
section.
If weather conditions are not a factor, the driver should
examine the sensor. It may require cleaning or removal of
an obstruction. The sensor is located in the center of the
vehicle behind the lower grille.
To keep the ACC System operating properly, it is impor-
tant to note the following maintenance items:
•Always keep the sensor clean. Carefully wipe the
sensor lens with a soft cloth. Be cautious not to damage
the sensor lens.
•Do not remove any screws from the sensor. Doing so
could cause an ACC system malfunction or failure and
require a sensor realignment.
•If the sensor or front end of the vehicle is damaged due
to a collision, see your authorized dealer for service.
•Do not attach or install any accessories near the sensor,
including transparent material or aftermarket grilles.
Doing so could cause an ACC system failure or
malfunction.
3
UNDERSTANDING THE FEATURES OF YOUR VEHICLE 195
Page 230 of 638

“check entire surroundings” across the top of the screen.
After five seconds this note will disappear.
NOTE:The ParkView® Rear Back Up Camera has pro-
grammable modes of operation that may be selected
through the Uconnect® System. Refer to “Uconnect®
Settings” in “Understanding Your Instrument Panel” for
further information.
If your vehicle is equipped with the Camera Delay feature
and it is turned ON, the rear camera image will be
displayed for up to 10 seconds when the vehicle is shifted
out of REVERSE unless the forward vehicle speed exceeds
8 mph (13 km/h), the transmission is shifted into#PARK#
or the vehicle’s ignition is cycled to the OFF position.
When the Vehicle is shifted out of Reverse (with camera
delay turned OFF) the rear camera mode is exited and the
last touchscreen appears again.
When enabled, active guide lines are overlaid on the
image to illustrate the width of the vehicle and its
projected backup path based on the steering wheel
position.
Different colored zones indicate the distance to the rear of
the vehicle.
The following table shows the approximate distances for
each zone:
ZoneDistance to the rear of the vehicle
Red0 - 1 ft (0 - 30 cm)
Yellow1 ft - 6.5 ft (30 cm - 2 m)
Green6.5 ft or greater (2 m or greater)
228 UNDERSTANDING THE FEATURES OF YOUR VEHICLE