2015 DODGE CHALLENGER lock
[x] Cancel search: lockPage 67 of 220

Remote Door Lock/Unlock—Thisfeatureprovidestheabilitytolockorunlockthedooron
your vehicle, without the keys and from virtually any distance. You can send a request to
your vehicle in one of three ways:
1. Using the Uconnect®Access App from a compatible smartphone.
2. From the Mopar Owner Connect website.
3. By contacting the Uconnect®Care on the phone.
To u s e t h i s f e a t u r e a f t e r t h e U c o n n e c t®Access App is downloaded, login using your user
name and password. You will need your four digit Uconnect®Security PIN to confirm the
request. Press the “closed lock” icon on your Uconnect®Access App to lock the doors,
and press the “open Lock” icon to unlock the driver’s door.
Yo u c a n s e t - u p n o t i f i c a t i o n s f o r y o u r a c c o u n t t o r e c e i v e a n e m a i l o r t e x t ( S M S ) m e s s a g e
every time a command is sent. Login to Mopar Owner Connect (moparownerconnect.com)
and click on Edit Profile to manage Uconnect®Notifications.
Remote Horn And Lights—It’seasytolocateavehicleinadark,crowdedornoisyparking
area by activating the horn and lights. It may also help if you need to draw attention to your
vehicle for any reason. You can send a request to your vehicle in one of three ways:
1. Using the Uconnect®Access App from a compatible smartphone.
2. From the Mopar Owner Connect website.
3. By contacting the Uconnect®Care on the phone.
To u s e t h i s f e a t u r e a f t e r t h e U c o n n e c t®Access App is downloaded, login using your user
name and password. You will need your four digit Uconnect®Security PIN to confirm the
request. You can set-up notifications for your account to receive an email or text (SMS)
message every time a command is sent. Login to Mopar Owner Connect
(moparownerconnect.com) and click on Edit Profile to manage Uconnect®Notifications.
Voice Texting—Wanttodictateapersonalmessage?RegisterwithUconnect®Access to
take advantage of a new, cloudbased Voice Texting service, an enhancement to Voice Text
Reply.
Voice Texting allows you to compose a new text or reply to an incoming text message.
Before you attempt to use the Voice Texting feature, check to ensure you have the
following:
1. A paired, Bluetooth®enabled phone with the Message Access Profile (MAP). Not all
Bluetooth®enabled phones support MAP, including all iPhones®(Apple iOS). Visit
UconnectPhone.com for system and device compatibility information.
2. An active Uconnect®Access trial or paid subscription. Press the “Apps” button on the
lower right hand corner of the touchscreen to begin the registration process.
3. Accept the “Allow MAP” profile request on your smart phone. (Please refer to device
manufacturer instructions for details).
ELECTRONICS
65
Page 73 of 220

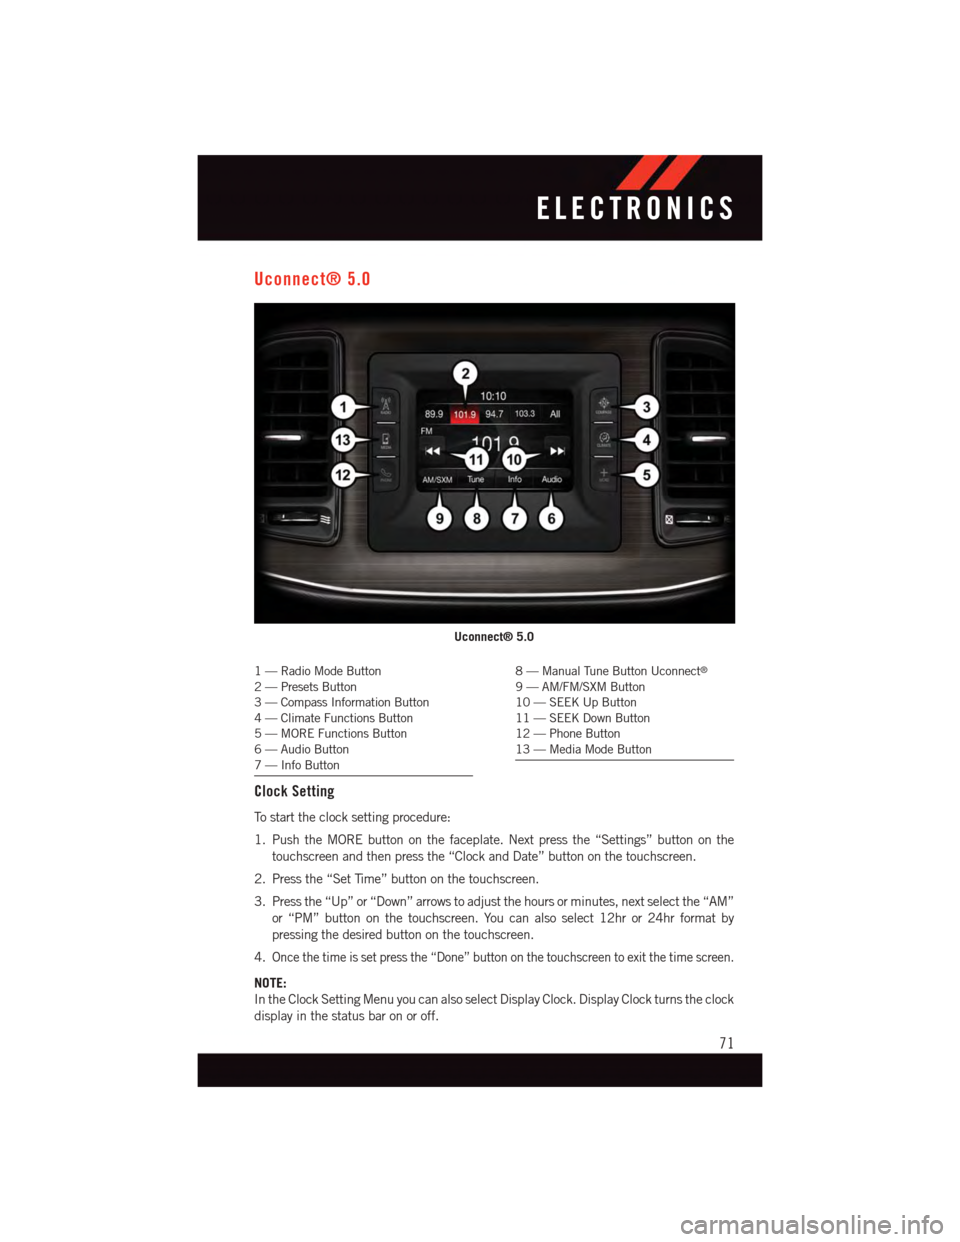
Uconnect® 5.0
1—RadioModeButton2—PresetsButton3—CompassInformationButton4—ClimateFunctionsButton5—MOREFunctionsButton6—AudioButton7—InfoButton
8—ManualTuneButtonUconnect®
9—AM/FM/SXMButton10 — SEEK Up Button11 — SEEK Down Button12 — Phone Button13 — Media Mode Button
Clock Setting
To s t a r t t h e c l o c k s e t t i n g p r o c e d u r e :
1. Push the MORE button on the faceplate. Next press the “Settings” button on the
touchscreen and then press the “Clock and Date” button on the touchscreen.
2. Press the “Set Time” button on the touchscreen.
3. Press the “Up” or “Down” arrows to adjust the hours or minutes, next select the “AM”
or “PM” button on the touchscreen. You can also select 12hr or 24hr format by
pressing the desired button on the touchscreen.
4.Once the time is set press the “Done” button on the touchscreen to exit the time screen.
NOTE:
In the Clock Setting Menu you can also select Display Clock. Display Clock turns the clock
display in the status bar on or off.
Uconnect® 5.0
ELECTRONICS
71
Page 84 of 220

Uconnect® 8.4A
Uconnect® 8.4A — If Equipped
At A Glance
Displaying The Time
•Ifthetimeisnotcurrentlydisplayedontheradioorplayermainpage,pressthe
“Controls” button on the touchscreen or the “Apps” button on the touchscreen, then
the “Settings” button on the touchscreen. In the Settings list, press the “Clock” button
on the touchscreen.
Setting The Time
Model 8.4AN synchronizes time automatically via GPS, so it should not require any time
adjustment. If you do need to set the time manually, follow the instructions below for
Model 8.4A.
1. Turn the unit on, then press the “Time Display” at the top of the screen. Press “Yes.”
Uconnect® 8.4A
1—StatusBar2—MenuBar3—Uconnect®Apps Button4—Uconnect®Phone Button
5—ClimateButton6—ControlsButton7—MediaButton8—RadioButton
ELECTRONICS
82
Page 85 of 220

NOTE:
If the time is not displayed at the top of the screen, press the “Controls” or the “Apps”
button on the touchscreen, then the “Settings” button on the touchscreen. In the Settings
screen, press the “Clock” button on the touchscreen.
2. Press “+” or “–” next to Set Time Hours and Set Time Minutes to adjust the time.
3. If these features are not available, uncheck the Sync with GPS box.
4. Press “X” to save your settings and exit out of the Clock Setting screen.
Audio Settings
1. Press the “Media” or “Radio” button on the touchscreen.
2. Press the “Audio” button on the touchscreen to activate the Audio settings screen to
adjust Balance/Fade, Equalizer and Speed Adjusted Volume.
3. You can return to the Radio screen by pressing the “X” located at the top right.
Balance/Fade
1. Press the “Media” or “Radio” button on the touchscreen.
2. Press the “Audio” button on the touchscreen to activate the Audio settings screen to
adjust Balance/Fade, Equalizer and Speed Adjusted Volume.
3. Press the “Balance/Fade” button on the touchscreen to Balance audio between the
front speakers or fade the audio between the rear and front speakers.
4. Pressing the “Front,” “Rear,” “Left” or “Right” button on the touchscreens or press
and drag the Speaker Icon to adjust the Balance/Fade.
Equalizer
1. Press the “Media” or “Radio” button on the touchscreen.
2. Press the “Audio” button on the touchscreen to activate the Audio settings screen to
adjust Balance/Fade, Equalizer and Speed Adjusted Volume.
3. Press the “Equalizer” button on the touchscreen to activate the Equalizer screen.
4. Press the “+” or “–” button on the touchscreens, or by pressing and dragging over the
“level bar” for each of the equalizer bands. The level value, which spans between plus
or minus 9, is displayed at the bottom of each of the Bands.
Speed Adjusted Volume
1. Press the “Media” or “Radio” button on the touchscreen.
2. Press the “Audio” button on the touchscreen to activate the Audio settings screen to
adjust Balance/Fade, Equalizer and Speed Adjusted Volume.
3. Press the “Speed Adjusted Volume” button on the touchscreen to activate the Speed
Adjusted Volume screen. The Speed Adjusted Volume is adjusted by pressing the
“volume level” indicator. This alters the automatic adjustment of the audio volume
with variation to vehicle speed.
ELECTRONICS
83
Page 88 of 220

Jump
Automatically tells you when Traffic & Weather for a favorite city is available, and gives you
the option to switch to that channel.
•Press“Jump”toactivatethefeature.AfterlisteningtoTrafficandWeather,press
“Jump” again to return to the previous channel.
Fav
Activates the favorites menu. You can add up to 50 favorite artists or songs.
•JustpressAddFavArtistorAddFavSongwhilethesongisplaying.Youwillthenbe
alerted any time one of these songs, or works by these artists, is playing on other
SiriusXM channels.
SiriusXM Parental Controls
Yo u c a n s k i p o r h i d e c e r t a i n c h a n n e l s f r o m v i e w i f y o u d o n o t w a n t a c c e s s t o t h e m .
•Pressthe“More”buttononthetouchscreen,thenthe“Settings”buttononthe
touchscreen, next press the “Sirius Setup” button on the touchscreen, then select
“Channel Skip”. Press the box, check-mark, next to the channel you want skipped.
They will not show up in normal usage.
SiriusXM also offers the option to permanently block selected channels. Call
(1-888-601-6297 for U.S. customers, 1-877-438-9677 for Canadian customers) and
request the Family-Friendly Package.
Browse
Lets you browse the SiriusXM channel listing or Genre listing. Favorites, Game Zone,
Weather and Jump settings also provide a way to browse the SiriusXM channel list.
Browse Sub-Menu Sub-Menu Description
AllShows the channel listing.
GenreProvides a list of all genres, and lets you jump to a channel within theselected genre.
PresetsLets you scroll the list of Preset satellite channels. Press the channel, orpress Enter on the Tune knob, to go to that channel. Press the trash canicon to delete a preset. Your presets are also shown at the top of the mainSatellite Radio screen.
Favorites Lets you manage artists and songs in the Favorites list and configureAlert Settings to let you know when favorite songs or artists are playing onother channels. Also, view a list of channels airing any of your Favorites.
Game Zone Provides alerts when your favorite sports teams are starting a game whichis being aired on other SiriusXM channels, or when their game score isannounced. You can select and manage your Teams list here, andconfigure alerts.
JumpLets you select your favorite cities for Traffic & Weather information,which is used by the Jump feature on the main satellite radio screen.
ELECTRONICS
86
Page 108 of 220

Uconnect® Access — If Equipped (8.4A/8.4AN)
An included trial and/or subscription is required to take advantage of the Uconnect®
Access services in the next section of this guide. To register with Uconnect®Access, press
the “Apps” button on the 8.4-inch touchscreen to get started. Detailed registration
instructions can be found on the next page.
*Uconnect®Access is available only on equipped vehicles purchased within the conti-
nental United States, Alaska and Hawaii. Services can only be used where coverage is
available; see coverage map for details.CALL9119-1-1 CallTheft Alarm Notification
Remote Door Lock/UnlockStolen Vehicle Assistance
Remote Vehicle Start**Ye l p®Search
Remote Horn and Lights
Text
Voice Texting
Roadside Assistance CallWi-Fi Hotspot***
**If vehicle is equipped.
***Extra charges apply.
ELECTRONICS
106
Page 110 of 220

Mobile App (8.4A/8.4AN)
Securely link your mobile device to your vehicle with the Uconnect®Access App. Once
you have downloaded the App, you may start your vehicle or lock it from virtually any
distance. (Vehicle must be properly equipped with factory-installed Remote Start.)
Download the Uconnect®Access App to compatible Apple®or Android®mobile devices.
All you need to do is:
1. After registering with Uconnect®Access, log on to your Mopar®Owner Connect
account at moparownerconnect.com.
2. On the Dashboard page, enter your mobile phone number to receive a link to download
the App on your mobile device. Or, go to iTunes®or Google Play and search for the
Uconnect®Access App.
3. To activate the App, enter your Mopar Owner Connect user name and password and log
in. Your vehicle is then connected to your mobile device.
Mobile App
ELECTRONICS
108
Page 115 of 220

Uconnect® 8.4AN
Uconnect® 8.4AN — If Equipped
At A Glance
Displaying The Time
•If the time is not currently displayed on the radio or player main page, press the “Controls”
button on the touchscreen or the “Apps” button on the touchscreen, then the “Settings”
button on the touchscreen. In the Settings list, press the “Clock” button on the touchscreen.
Uconnect® 8.4AN
1—StatusBar2—ViewSmallNavigationMap3—HDRadioAvailable4—Uconnect®Apps Button5—Uconnect®Phone Button
6—Uconnect®Navigation Button7—ClimateButton8—ControlsButton9—MediaButton10 — Radio Button
ELECTRONICS
113