2015 DODGE CHALLENGER change time
[x] Cancel search: change timePage 90 of 220
There are also two USB “Charge Only” ports located on the back of the center console for
rear passengers.
To r o u t e t h e U S B / i P o d®cable out of the center console, use the access cut out.
NOTE:
•WhenconnectingyouriPod®device for the first time, the system may take several
minutes to read your music, depending on the number of files. For example, the system
will take approximately five minutes for every 1,000 songs loaded on the device. Also
during the reading process, the Shuffle and Browse functions will be disabled. This
process is needed to ensure the full use of your iPod®features and only happens the
first time it is connected. After the first time, the reading process of your iPod®will take
considerably less time unless changes are made or new songs are added to the playlist.
•TheUSBportsupportscertainMini,Classic,Nano,Touch,andiPhone®devices. The
USB port also supports playing music from compatible external USB Mass Storage
Class memory devices. Some iPod®software versions may not fully support the USB
port features. Please visit Apple’s website for iPod®software updates.
Audio Jack (AUX)
The AUX allows a portable device, such as an MP3 player or an iPod®,tobepluggedinto
the radio and utilize the vehicle’s sound system, using a 3.5 mm audio cable, to amplify
the source and play through the vehicle speakers.
•Pressingthe“AUX”buttononthetouchscreenwillchangethemodetoauxiliarydevice
if the audio jack is connected, allowing the music from your portable device to be heard
through the vehicle's speakers. In order to activate the AUX, plug in the audio jack.
•Thefunctionsoftheportabledevicearecontrolledusingthedevicebuttons.The
volume may be controlled using the radio or portable device.
•Toroutetheaudiocableoutofthecenterconsole,usetheaccesscutoutinthefront
of the console.
Bluetooth® Streaming Audio
If using a Bluetooth®-equippeddevice,youmayalsobeabletostreammusictoyour
vehicle's sound system. Your connected device must be Bluetooth-compatible, and paired
with your system (see Uconnect®Phone for pairing instructions).
•YoucanaccessthemusicfromyourconnectedBluetooth®device by Pressing the
“Bluetooth®”buttononthetouchscreenwhileinMediamode.
SD Card
SD Card Mode allows you to play music that has been saved to your SD Card through your
vehicle’s sound system.
•YoucanenterSDCardModeisbyeitherinsertingaSDCardintotheSDCardslotor
press the “SD Card” button on the left side of the display while media mode.
For further information refer to your Radio Supplement.
ELECTRONICS
88
Page 121 of 220
Replay
Lets you replay up to 44 minutes of the content of the current SiriusXM channel.
Replay OptionOption Description
Play/Pause Press to Pause content playback. Press Pause/Play again to resume playback.
Rewind/RW Rewinds the channel content in steps of five seconds. Press and hold torewind continuously, then release to begin playing content at that point.
FastForward/FWForwards the content, and works similarly to Rewind/RW. However, FastForward/FW can only be used when content has been previously rewound.
Replay Time Displays the amount of time in the upper center of the screen by which yourcontent lags the Live channel.
Live Resumes playback of Live content at any time while replaying rewoundcontent.
SiriusXM services require subscriptions, sold separately after the 12-month trial included
with the new vehicle purchase.If you decide to continue your service at the end of your
trial subscription, the plan you choose will automatically renew and bill at then-current
rates until you call SiriusXM at 1-866-635-2349 for U.S. residents and 1-888-539-7474
for Canadian residents to cancel. See SiriusXM Customer Agreement for complete terms
at www.siriusxm.com for U.S. residents and www.siriusxm.ca for Canadian residents.All
fees and programming subject to change. Our satellite service is available only to those at
least 18 and older in the 48 contiguous USA and D.C. Our Sirius satellite service is also
available in PR (with coverage limitations). Our Internet radio service is available
throughout our satellite service area and in AK and HI. © 2014 Sirius XM Radio Inc.
Sirius, XM and all related marks and logos are trademarks of Sirius XM Radio Inc.
MEDIA HUB — iPod®/USB/MP3/SD Card
There are many ways to play music from iPod®/MP3 players, SD card, or USB devices
through your vehicle's sound system.
•Pressyour“Media”buttononthetouchscreentobegin.
USB Port
Connect your iPod®or compatible device using a USB cable into the USB Port. USB
Memory sticks with audio files can also be used. Audio from the device can be played on
the vehicle's sound system while providing metadata (artist, track title, album, etc.)
information on the radio display.
When connected, the iPod®/compatible USB device can be controlled using the radio or
Steering Wheel Audio Controls to play, skip to the next or previous track, browse, and list
the contents.
ELECTRONICS
119
Page 122 of 220
The iPod®battery charges when plugged into the USB port (if supported by the specific
device).
To r o u t e t h e U S B / i P o d®cable out of the center console, use the access cut out.
NOTE:
•WhenconnectingyouriPod®device for the first time, the system may take several
minutes to read your music, depending on the number of files. For example, the system
will take approximately five minutes for every 1000 songs loaded on the device. Also
during the reading process, the Shuffle and Browse functions will be disabled. This
process is needed to ensure the full use of your iPod®features and only happens the
first time it is connected. After the first time, the reading process of your iPod®will take
considerably less time unless changes are made or new songs are added to the playlist.
•TheUSBportsupportscertainMini,Classic,Nano,Touch,andiPhone®devices. The
USB port also supports playing music from compatible external USB Mass Storage
Class memory devices. Some iPod®software versions may not fully support the USB
port features. Please visit Apple’s website for iPod®software updates.
Audio Jack (AUX)
The AUX allows a portable device, such as an MP3 player or an iPod®,tobepluggedinto
the radio and utilize the vehicle’s sound system, using a 3.5 mm audio cable, to amplify
the source and play through the vehicle speakers.
•Pressingthe“AUX”buttononthetouchscreenwillchangethemodetoauxiliarydevice
if the audio jack is connected, allowing the music from your portable device to be heard
through the vehicle's speakers. In order to activate the AUX, plug in the audio jack.
•Thefunctionsoftheportabledevicearecontrolledusingthedevicebuttons.The
volume may be controlled using the radio or portable device.
•Toroutetheaudiocableoutofthecenterconsole,usetheaccesscutoutinthefront
of the console.
Bluetooth® Streaming Audio
If using a Bluetooth®-equippeddevice,youmayalsobeabletostreammusictoyour
vehicle's sound system. Your connected device must be Bluetooth-compatible, and paired
with your system (see Uconnect®Phone for pairing instructions).
•YoucanaccessthemusicfromyourconnectedBluetooth®device by pressing the
“Bluetooth®”buttononthetouchscreenwhileinMediamode.
SD Card
SD Card Mode allows you to play music that has been saved to your SD Card through your
vehicle’s sound system.
•YoucanenterSDCardModeisbyeitherinsertingaSDCardintotheSDCardslotor
press the “SD Card” button on the left side of the display while media mode.
For further information refer to your Radio Supplement.
ELECTRONICS
120
Page 135 of 220
3. Simultaneously push and hold both the Homelink®button you want to program and
the hand-held transmitter button.
4. Continue to hold buttons until the DID display changes from “CHANNEL # TRAIN-
ING” to “CHANNEL # TRAINED”, then release both buttons.
NOTE:
If the DID displays “DID NOT TRAIN” repeat from Step 2.
5. At the garage door opener motor (in the garage), locate the “LEARN” or “TRAINING”
button. This can usually be found where the hanging antenna wire is attached to the
garage door opener motor. Firmly push and release the “LEARN” or “TRAINING”
button.
NOTE:
Yo u h a v e 3 0 s e c o n d s i n w h i c h t o i n i t i a t e t h e n e x t s t e p a f t e r t h e L E A R N b u t t o n h a s b e e n
pushed.
6. Return to the vehicle and push the programmed HomeLink®button twice (holding the
button for two seconds each time). The DID will display “CHANNEL # TRANSMIT”. If
the garage door opener/device activates, programming is complete.
NOTE:
If the device does not activate, push the button a third time (for two seconds) to complete
the training.
7. To program the remaining two HomeLink®buttons, repeat each step for each
remaining button. DO NOT erase the channels.
Programming A Non-Rolling Code
•ForprogrammingGarageDoorOpenersmanufacturedbefore1995.
1. Turn the ignition switch to the ON/RUN position.
2. Place the hand-held transmitter 1 to 3 inch (3 to 8 cm) away from the HomeLink®
button you wish to program while keeping the HomeLink®indicator light in view.
3. Simultaneously push and hold both the HomeLink®button you want to program and
the hand-held transmitter button.
4. Continue to hold buttons until the DID display changes from “CHANNEL # TRAIN-
ING” to “CHANNEL # TRAINED”, then release both buttons.
5. Push and hold the programmed HomeLink®button and observe the indicator light.
NOTE:
•IftheDIDdisplays“DIDNOTTRAIN”repeatfromStep2.
•ToprogramthetworemainingHomeLink®buttons, repeat each step for each remain-
ing button. DO NOT erase the channels.
ELECTRONICS
133
Page 141 of 220
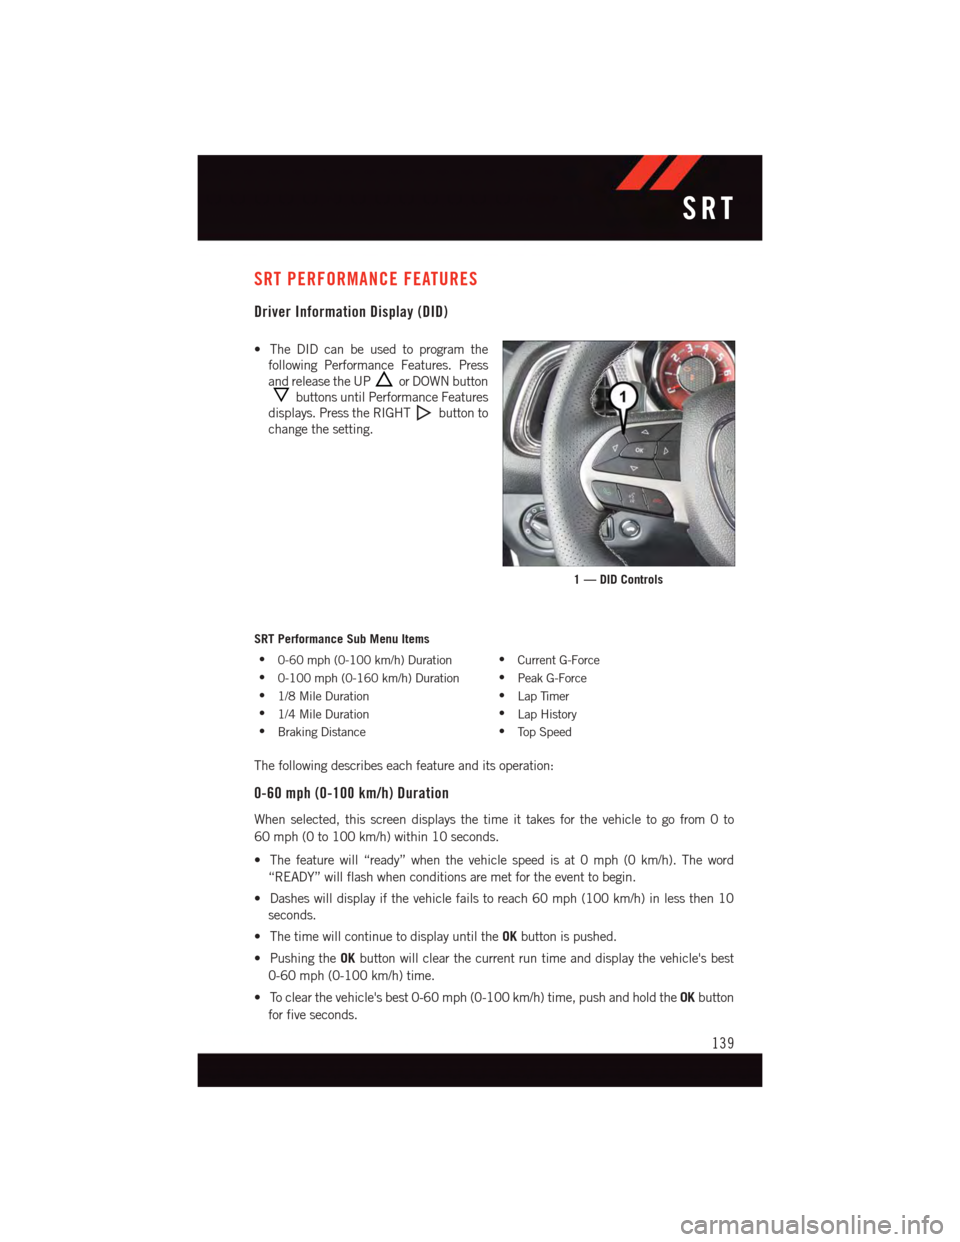
SRT PERFORMANCE FEATURES
Driver Information Display (DID)
•TheDIDcanbeusedtoprogramthe
following Performance Features. Press
and release the UPor DOWN button
buttons until Performance Features
displays. Press the RIGHTbutton to
change the setting.
SRT Performance Sub Menu Items
•0-60 mph (0-100 km/h) Duration•Current G-Force
•0-100 mph (0-160 km/h) Duration•Peak G-Force
•1/8 Mile Duration•Lap Timer
•1/4 Mile Duration•Lap History
•Braking Distance•To p S p e e d
The following describes each feature and its operation:
0-60 mph (0-100 km/h) Duration
When selected, this screen displays the time it takes for the vehicle to go from 0 to
60 mph (0 to 100 km/h) within 10 seconds.
•Thefeaturewill“ready”whenthevehiclespeedisat0mph(0km/h).Theword
“READY” will flash when conditions are met for the event to begin.
•Dasheswilldisplayifthevehiclefailstoreach60mph(100km/h)inlessthen10
seconds.
•ThetimewillcontinuetodisplayuntiltheOKbutton is pushed.
•PushingtheOKbutton will clear the current run time and display the vehicle's best
0-60 mph (0-100 km/h) time.
•Toclearthevehicle'sbest0-60mph(0-100km/h)time,pushandholdtheOKbutton
for five seconds.
1 — DID Controls
SRT
139
Page 144 of 220

•ColorwillindicatethetimethatisthebesttimefromtheTimerPage.
•HoldingtheOKbuttononlyresetsthepageyouareon.
•LapHistorypageisastaticdisplayoflaptimesonly.
Top Speed
When selected, this screen displays the To Speed during a drive cycle:
•Populatesatopspeedfromfirstdrivecycleandeverytimethatspeedisexceededthat
number is stored here unless/until the driver resets the screen.
•Latchingoverignitioncycles.
•Unitswillchangewiththeglobalchangeinunits.
WARNING!
Measurement of vehicle statistics with the Performance Features is intended for
off-highway or off-road use only and should not be done on any public roadways. It is
recommended that these features be used in a controlled environment and within the
limits of the law. The capabilities of the vehicle as measured by the performance pages
must never be exploited in a reckless or dangerous manner, which can jeopardize the
user’s safety or the safety of others. Only a safe, attentive, and skillful driver can prevent
accidents.
Uconnect® SRT PERFORMANCE PAGES
•ToaccesstheSRTPerformancePages,pressthe“SRT&Apps”buttononthe
touchscreen then press the “SRT Performance” button on the touchscreen. Press the
feature button on the touchscreen to select that feature.
•ThePerformancePagesincludesthefollowingmenus:
•Home•Gauges 2
•Ti m e r s•G–Force
•Gauges 1•Engine
Home
When Home is selected, the following options will be available:
•Aseriesofsiximageswhichcanbeselectedbytheuser.
•Aleftandrightarrowtoallowtheusertoscrollthroughvehicleimages.
•Ashort-cuttotheSRTDriveModesfeature.
SRT
142
Page 152 of 220

Resetting The Light After Servicing
Vehicles Equipped With Keyless Enter-N-Go™
1. Without pressing the brake pedal, push the ENGINE START/STOP button and cycle
the ignition to the ON/RUN position (do not start the engine.)
2. Fully depress the accelerator pedal, slowly, three times within 10 seconds.
3. Without pressing the brake pedal, push the ENGINE START/STOP button once to
return the ignition to the OFF/LOCK position.
Vehicles Not Equipped With Keyless Enter-N-Go™
1. Turn the ignition switch to the ON/RUN position (do not start the engine.)
2. Fully depress the accelerator pedal, slowly, three times within 10 seconds.
3. Turn the ignition switch to the OFF/LOCK position.
NOTE:
If the indicator message illuminates when you start the vehicle, the oil change indicator
system did not reset. If necessary, repeat this procedure.
INSTRUMENT CLUSTER INDICATOR LIGHTS
-TurnSignalIndicator
The arrows will flash with the exterior turn signals when the turn signal lever is operated.
Atonewillchime,andaDIDmessagewillappearifeitherturnsignalisleftonformore
than 1 mile (1.6 km).
NOTE:
If either indicator flashes at a rapid rate, check for a defective outside light bulb.
-Park/HeadlightONIndicator
This indicator will illuminate when the park lights or headlights are turned on.
-HighBeamIndicator
Indicates that headlights are on high beam.
-FrontFogLightIndicator
This indicator will illuminate when the front fog lights are on.
-VehicleSecurityLight
This light will flash rapidly for approximately 15 seconds when the vehicle security alarm
is arming. The light will flash at a slower speed continuously after the alarm is set. The
security light will also come on for about three seconds when the ignition is first turned on.
WHAT TO DO IN EMERGENCIES
150
Page 188 of 220

Chassis
ComponentFluid, Lubricant, or Genuine Part
Manual Transmission – IfEquippedWe recommend you use MOPAR®AT F + 4®Automatic Trans-mission Fluid.
Automatic Transmission – IfEquippedUse only MOPAR®ZF 8&9 Speed ATF™ Automatic Transmis-sion Fluid, or equivalent. Failure to use the correct fluid mayaffect the function or performance of your transmission.
Power Steering Reservoir –If EquippedWe recommend you use MOPAR®Power Steering Fluid + 4,MOPAR®or ATF+4®Automatic Transmission Fluid.
Brake Master Cylinder We recommend you use MOPAR®DOT 3, SAE J1703should be used. If DOT 3, SAE J1703 brake fluid is notavailable, then DOT 4 is acceptable.
Rear Axle We recommend you use MOPAR®LSD Synthetic Gear Lu-bricant SAE 75W85 (API GL-5).
MAINTENANCE PROCEDURES
For information on the maintenance procedures for your vehicle, please refer to “Main-
tenance Procedures” in “Maintaining Your Vehicle” in your Owner’s Manual or applicable
supplement on the DVD for further details.
MAINTENANCE SCHEDULE — 3.6L AND 5.7L
Yo u r v e h i c l e i s e q u i p p e d w i t h a n a u t o m a t i c o i l c h a n g e i n d i c a t o r s y s t e m . T h e o i l c h a n g e
indicator system will remind you that it is time to take your vehicle in for scheduled
maintenance.
Based on engine operation conditions, the oil change indicator message will illuminate.
This means that service is required for your vehicle. Operating conditions such as frequent
short-trips, trailer tow, extremely hot or cold ambient temperatures, and E85 fuel usage
will influence when the “Change Oil” or “Oil Change Required” message is displayed.
Severe Operating Conditions can cause the change oil message to illuminate as early as
3,500 miles (5,600 km) since last reset. Have your vehicle serviced as soon as possible,
within the next 500 miles (805 km).
The message “Oil Change Required” will be displayed in the DID and a single chime will
sound, indicating that an oil change is necessary.
Yo u r a u t h o r i z e d d e a l e r w i l l r e s e t t h e o i l c h a n g e i n d i c a t o r m e s s a g e a f t e r c o m p l e t i n g t h e
scheduled oil change. If a scheduled oil change is performed by someone other than your
authorized dealer, the message can be reset by referring to the steps described under
“Instrument Cluster Warning Lights” in “What To Do In Emergencies” in this guide or
“Driver Information Display (DID)” in “Understanding Your Instrument Panel” in your
Owners Manual on the DVD for further information.
MAINTAINING YOUR VEHICLE
186