2015 Citroen C4 bonnet
[x] Cancel search: bonnetPage 245 of 494

243
C4-2_en_Chap11_info-pratique_ed01-2015
C4-2_en_Chap11_info-pratique_ed01-2015
F Remove the air deflector by unclipping e
ach of its three attachment points.
F
U
nclip the bonnet release cable at its
two
fixings.
F
M
ove the cable down.
After
changing the failed bulb, remember to
p
ut everything back in place (cable and air
d
eflector).
Depending
on the engine and only on the left
h
and side, you must first carry out the following
o
perations for access to the protective covers
on the bulbs.
Access to bulbs
Model with halogen headlamps
and LED light signature* (type 2)
1. Direction indicators (LEDs).
2. Daytime running lamps / sidelamps (LEDs).3. Dipped beam headlamps (H7).
4. M
ain beam headlamps (H7).
5.
F
o g l a m p s ( H11) .
Bulbs
with lugs, type H1, H7... take care
t
o position them correctly to ensure the
b
est
l
ighting.
Model with halogen headlamps
(t y p e 1)
1. Direction indicators (H21 clear).
2. Dipped beam headlamps (H7).
3.
M
ain beam headlamps (H1).
4.
D
aytime running lamps / sidelamps
(P21/5W XL).
5.
F
o g l a m p s ( H11) .Bulbs
with lugs, type H1, H7... take care
t
o position them correctly to ensure the
b
est
l
ighting.
*
LED: light emitting diodes.
11
Practical information
Page 258 of 494

256
C4-2_en_Chap11_info-pratique_ed01-2015
C4-2_en_Chap11_info-pratique_ed01-2015
12 V battery
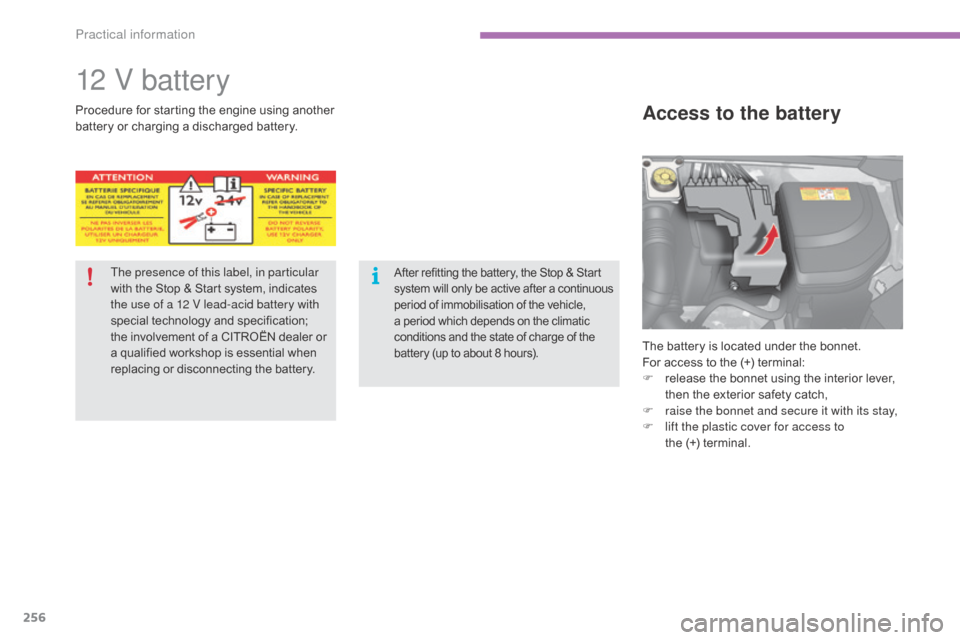
The battery is located under the bonnet.
For access to the (+) terminal:
F
r
elease the bonnet using the interior lever,
t
hen the exterior safety catch,
F
r
aise the bonnet and secure it with its stay,
F
l
ift the plastic cover for access to
the (+)
terminal.
Access to the batteryProcedure for starting the engine u sing another b
attery or charging a discharged battery.
The presence of this label, in particular
with
the Stop & Start system, indicates
t
he use of a 12 V lead-acid battery with
special
t
echnology
a
nd
s
pecification;
t
he involvement of a CITROËN dealer or
a
qualified workshop is essential when
r
eplacing or disconnecting the battery.
After refitting the battery, the Stop & Start system w ill o nly b e a ctive a fter a c ontinuous p
eriod of immobilisation of the vehicle,
a
period which depends on the climatic
c
onditions and the state of charge of the
b
attery (up to about 8 hours).
Practical information
Page 288 of 494

286
C4-2_en_Chap12_caracteristique_ed01-2015
C4-2_en_Chap12_caracteristique_ed01-2015
Identification markings
A. Vehicle identification number (VIN) under
the bonnet.
This
number is engraved on the bodywork near
t
he suspension damper mounting.
B.
V
ehicle identification number on the
dashboard.
This
number is indicated on a self-adhesive
l
abel which is visible through the windscreen. D. Tyre/paint label.
This
label is affixed to the driver's front pillar.
C. Manufacturer's label.
The VIN is indicated on a self-destroying label
a
ffixed to the driver's centre pillar.It
bears the following information:
-
t
he tyre pressures, for unladen and laden
conditions,
-
t
he tyre sizes (including the load index and
s
peed
ra
ting),
-
t
he spare tyre inflation pressure,
-
t
he paint colour code.
The tyre pressures must be checked w
hen the tyres are cold, at least once a
month.
Low tyre pressures increase fuel
consumption.
Various
visible markings for the identification of your vehicle.
Technical data
Page 398 of 494

396
C4-2_en_Chap14_index-alpha_ed01-2015
C4-2_en_Chap14_index-alpha_ed01-2015
Paint colour code .........................................28 6
Panoramic glass
sunroof
................
......................................... 78
Parcel shelf, rear
................................... 11
4 ,
11
7
Parking
brake
........................................1
77, 220
Parking
brake, electric
............................1
8, 170
Parking
lam
ps
.............................................. 12
2
Parking
sensors, front
..................................20
6
Parking
sensors, rear................................... 205
Particle filter
.......................................... 21
8,
21
9
Passenger
c
ompartment
f
ilter
........
..................................................... 219
Personalisation
...............................
...............36
Player,
CD MP3
............................ 3
06, 369, 370
Port,
USB
..................................... 1
03, 306, 371
Priming
the fuel system
................................2
11
Protecting
children
................. 1
35 -149, 157, 159
Puncture
................
....................................... 229Quickly
detachable towball
..........................
2
67
P
Navigation ...............................
......................312 N
umber plate lamps ..................................... 25
0
oil
filter
...............
...........................................
219
oi
l level
................................................... 29, 215
Opening the bonnet
......................................
2
12
Opening the boot
..............................
. 59, 72, 73
Opening the doors
...............................
.... 59, 71
Opening the panoramic
sunroof blind
................................................ 78ope
ration indicator
lamps
..............................
........................
16 -28
N
Main beam .............................. ......118, 242, 245
Maintenance .............................. ....................10
Map
reading lamps
...................................... 13
3
Markings,
id
entification
................................ 28
6
Massage
function
...............................
...........94
Mat
.......
......................................................... 11 0
Memorising
a speed
.................................... 19
9
Menu
....................................2
94, 296, 298, 312,
314,
316, 332, 342, 344
Menu,
main
..............................
....................362
Menus (Touch
screen tablet)
.................................29
0
Mirror, rear view
........................................... 10
0
Mirrors, door ..................................... 98,
99, 196
Misfuel prevention
...............................
.........210
Motorway function (direction
i
ndicators)
.................................. 15
0
Mountings
for ISOFIX
seats
...............
........................................... 14 4
MP3
CD
................
........................ 306, 369, 370 Radio
...............
..................................... 300, 363
Radio
pr
e-equipment
...................................2
72
R
dS ................
...................................... 303, 364
Rear
s
creen
(
demisting)
.................................90
R
echarging the battery
........................ 2
58, 259
Reduction of electrical load
......................... 26
0
Regeneration
of the particle
emissions
f
ilter
............................................2
19
Reinitialising
the electric
windows
....................................................... 76
R
einitialising the remote
control
.................................................... 5
8, 63
Remote
control
..........................................53
-64
Removable
screen (snow shield).................262
Removing
a wheel
..............................
.........237
Removing
the mat
...............................
..........11 0
Repair
kit, puncture
......................................2
29
Replacing
bu
lbs
..............................
......242-250
Replacing
f
uses
..............................
......251-255
Replacing
the air filter
...................................2
19
Replacing
the oil filter
...................................2
19
Replacing
t
he
p
assenger
c
ompartment filter
......................................2
19
Replacing
wiper blades.........................131, 261
Resetting
the service indicator
......................32
R
esetting the trip recorder
.............................33
R
ev counter
................................................1
2-15
R
Oil change .....................................................215
Oil consumption ............................................ 2
15
O
QM
alphabetical index
Page 412 of 494

Driving
8
C4-2-add_en_Chap09_conduite_ed01-2015
Maintenance
In the event of a malfunction with the system, the "ECO OFF" switch warning lamp flashes, then comes on continuously. Have it checked by a CITROËN dealer or a qualified workshop.
Operating fault
This system requires a specific battery with a special specification and technology (reference numbers available from a CITROËN dealer or a qualified workshop). Fitting a battery not listed by CITROËN introduces the risk of malfunction of the system.
Before doing anything under the bonnet, deactivate the Stop & Start system to avoid any risk of injury resulting from automatic operation of START mode.
The Stop & Start system makes use of advanced technology. All work on this type of battery must be done only by a CITROËN dealer or a qualified
workshop.
In the event of a fault in STOP mode, the vehicle may stall. All of the instrument panel warning lamps come on. Depending on version, an alert message may also be displayed asking you to put the gear lever into position Nand put your foot on the brake pedal.
It is then necessary to switch off the ignition, then restart the engine using the key or the "START/STOP" button.
Reactivation
The system is reactivated automatically at every new start using the key or the "START/STOP" button.
Press the "ECO OFF" switch again. The system is active again; this is confirmed by the switch warning lamp going off and the display of a message.
Deactivation
At any time, press the "ECO OFF" switch to deactivate the system. This is confirmed by the switch warning lamp coming on accompanied by the display of a message.
If the system has been deactivated in STOP mode, the engine restarts immediately.
Page 421 of 494

10
Checks17
C4-2-add_en_Chap10_verifi cation_ed01-2015
Running out of fuel (Diesel)
1.6 HDi engine 2.0 HDi engine
On vehicles fitted with HDi engines, the fuel system must be primed if you run out of fuel; refer to the corresponding engine compartment view.
If the tank on your vehicle is fitted with a misfuel prevention device, refer to the "Misfuel prevention (Diesel)" section.
BlueHDi engines
If the engine does not start first time, don't keep trying but start the procedure again from the beginning.
Fill the fuel tank with at least five litres of diesel. Open the bonnet. If necessary, unclip the styling cover for access to the priming pump. Squeeze and release the priming pump repeatedly until resistance is felt (there may be resistance at the first press). Operate the starter until the engine starts (if the engine does not start at the first attempt, wait around 15 seconds before trying again). If the engine does not start after a few attempts, operate the priming pump again
then start the engine. Refit the styling cover and clip it in place. Close the bonnet.
Fill the fuel tank with at least five litres of Diesel. Open the bonnet. If necessary, unclip the style cover for access to the priming pump. Slacken the bleed screw. Squeeze and release the priming pump repeatedly until fuel appears in the transparent pipe. Tighten the bleed screw. Operate the starter until the engine starts (if the engine fails to start at the first attempt, wait around 15 seconds before trying again).
If the engine fails to start after a few attempts, operate the priming pump again, then the starter. Put the style cover back in position and clip it in place, ensuring that it has clipped c o r r e c t l y. Close the bonnet.
Fill the fuel tank with at least five litres of Diesel. Switch on the ignition (without starting the engine). Wait around 6 seconds and switch off the ignition. Repeat the operation 10 times. Operate the starter to run the engine.