Page 5 of 389

Direction indicators 141
Hazard warning lamps
1
41
H o r n
1
41
Braking assistance systems
1
42
Trajectory control systems
1
44
Front seat belts
1
46
Airbags
1
50
Child seats
1
55
Deactivating the passenger's front airbag
1
57
ISOFIX child seats
1
64
Child lock
1
70
Safety
Temporary puncture repair kit 1 71
Changing a wheel
1
75
Snow chains
1
81
Changing a bulb
1
82
Changing a fuse
1
88
12 V battery
1
94
Automatic power cut-off to accessories
1
97
Changing a wiper blade
1
97
Recovering the vehicle
1
98
Towing a trailer
2
01
Fitting roof bars
2
03
Accessories
2
04
Practical information
Bonnet 20 7
Petrol engines
2
08
Diesel engines
2
09
Fuel tank
2
10
Running out of fuel (Diesel)
2
12
Checking levels
2
13
Checks
2
16
Checks
Petrol engines 2 19
Petrol weights
2
20
Diesel engines
2
26
Diesel weights
2
27
Dimensions
2
33
Identification markings
2
35
Technical data
bluetooth® telephone with voice recognition 237
Touch screen AUDIO -TELEMATIC system
2
49
TOUCH SCREEN AUDIO - CD system
2
89
AUDIO - CD system
3
11
Audio and telematics
Alphabetical index
Contents
Page 6 of 389

4
Exterior
Lighting controls 127-131
Headlamp beam adjustment 1 33
Welcome lighting
1
32
Changing bulbs
1
82-185
-
f
ront lamps
-
fo
glamps
-
d
irection indicator repeaters
Wiper controls
1
34-137
Changing a wiper blade
1
97
Door mirrors
7
7-78
Doors
6
2, 64
-
o
pening / closing
-
c
entral locking
Child lock
1
70
Electric windows
6
8 - 69
Alarm
6
5-67
Panoramic sunroof
7
0
Roof bars
2
03
Accessories
20
4-205
Braking assistance
1
42-143
Trajectory control
1
44-145
Tyre pressures
1
75, 235
Under-inflation detection
1
14-117
Boot
6
3
-
o
pening / closing
- em
ergency release
Temporary puncture
repair kit
1
71-174
Changing a wheel
1
75 -180
-
t
ools
-
r
emoving / refitting
Snow chains
1
81
Changing bulbs
1
86-187
-
r
ear lamps
-
3
rd brake lamp
-
n
umber plate lamps
-
fo
glamp
Parking sensors
1
23 -125
Reversing camera
1
26
Towbar
20
1-202
To w i n g
1
9 8 - 2 0 0
Fuel tank
2
10
Remote control key /
electronic
key
5
2- 61
-
o
pening / closing
-
a
nti-theft protection
-
b
attery
over view
Page 7 of 389
5
Interior
Boot fittings 96 -97
- r ear parcel shelf
-
s
towing rings
-
s
torage
Child seats
1
55 -163
ISOFIX mountings
1
64-168
Child lock
1
70
Front seats
7
1-74
Seat belts
1
46-149
Glove box
9
1
Deactivating the passenger's airbag
1
51, 157
A ir bags
15
0 -15 4
Front fittings
9
0 -94
-
A
UX socket / USB port
-
c
igarette lighter / 12 V socket
-
p
ortable ashtray
-
f
ront armrest
-
s
un visor
-
m
at
Rear seats
7
5 -76
Rear fittings
9
5
Rear armrest / Ski flap
7
6
.
over view
Page 12 of 389

10
Eco-drivingEco-driving is a range of everyday practices that allow the motorist to optimise their fuel consumption and CO2 emissions.
Optimise the use of your gearbox
With a manual gearbox, move off gently and change up without waiting.
During acceleration change up early.
With an automatic or electronic gearbox, give preference to automatic
mode and avoid pressing the accelerator pedal heavily or suddenly.
The gear shift indicator invites you to change up: as soon as the
indication to change up is displayed in the instrument panel, follow it
straight away.
With an electronic or automatic gearbox, this indicator appears only in
manual mode.
Drive smoothly
Maintain a safe distance between vehicles, use engine braking rather
than the brake pedal, and press the accelerator progressively. These
practices contribute towards a reduction in fuel consumption and
Co
2 emissions and also helps reduce the background traffic noise.
Control the use of your electrical
equipment
Before moving off, if the passenger compartment is too warm, ventilate it
by opening the windows and air vents before using the air conditioning.
Above 30 mph (50 km/h), close the windows and leave the air vents
open.
Remember to make use of equipment that can help keep the
temperature in the passenger compartment down (sunroof and window
blinds...).
Switch off the air conditioning, unless it has automatic regulation, as
soon as the desired temperature is attained.
Switch off the demisting and defrosting controls, if not automatic.
Switch off the heated seat as soon as possible.
Switch off the headlamps and front foglamps when the level of light
does not require their use.
Avoid running the engine before moving off, particularly in winter; your
vehicle will warm up much faster while driving.
As a passenger, if you avoid connecting your multimedia devices
(film, music, video game...), you will contribute towards limiting the
consumption of electrical energy, and so of fuel.
Disconnect your portable devices before leaving the vehicle.
If your vehicle has cruise control, make use of the system at speeds
above 25 mph (40 km/h) when the traffic is flowing well.
Eco-driving
Page 18 of 389

16
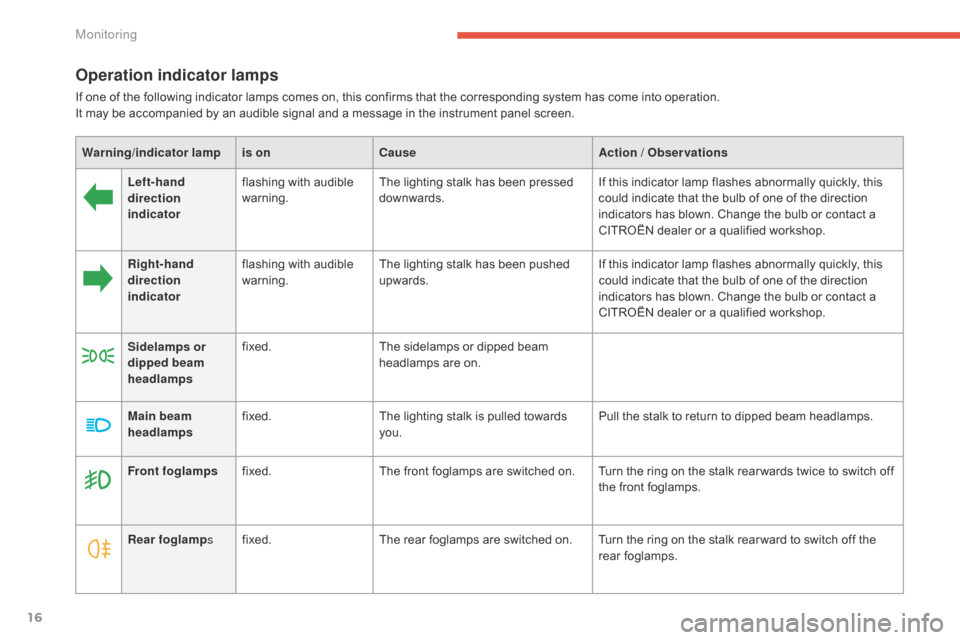
Operation indicator lamps
If one of the following indicator lamps comes on, this confirms that the corresponding system has come into operation.
It may be accompanied by an audible signal and a message in the instrument panel screen.Warning /indicator lampis on Cause Action / Observations
Left-hand
direction
indicator flashing with audible
warning.
The lighting stalk has been pressed
downwards. If this indicator lamp flashes abnormally quickly, this
could indicate that the bulb of one of the direction
indicators has blown. Change the bulb or contact a
CITROËN dealer or a qualified workshop.
Right-hand
direction
indicator flashing with audible
warning.
The lighting stalk has been pushed
upwards. If this indicator lamp flashes abnormally quickly, this
could indicate that the bulb of one of the direction
indicators has blown. Change the bulb or contact a
CITROËN dealer or a qualified workshop.
Sidelamps or
dipped beam
headlamps fixed.
The sidelamps or dipped beam
headlamps are on.
Main beam
headlamps fixed.
The lighting stalk is pulled towards
you. Pull the stalk to return to dipped beam headlamps.
Front foglamps fixed. The front foglamps are switched on. Turn the ring on the stalk rear wards twice to switch off
the front foglamps.
Rear foglamp sfixed. The rear foglamps are switched on. Turn the ring on the stalk rear ward to switch off the
rear foglamps.
Monitoring
Page 61 of 389
59
Emergency procedure with the Keyless Entry and
Starting system
Unlocking
F Turn the key towards the front in the driver's door lock to unlock the vehicle.
Emergency unlocking/locking
using the integral key
The integral key is used to lock and unlock the
vehicle when the electronic key cannot operate:
-
c
ell battery flat, vehicle battery discharged
or disconnected, ...
-
v
ehicle located in an area with strong
electro-magnetic signals.
F
P
ull and hold button 1 , to extract the
integral key 2 .Locking
F Turn the key towards the rear in the driver's
door lock to lock the vehicle.
The emergency key allows you to lock
or unlock the driver's door only.
To lock or unlock the other doors, use
the interior controls (see "Locking
/
unlocking from inside").
2
access
Page 66 of 389
64
Locking / unlocking from inside
Central locking control
Locking
F Press the front of button A to lock the vehicle.
Unlocking
F Press the rear of button A to unlock the vehicle.
Individual controls
This control can also be used to lock the front
passenger's door and the rear doors in the
event of a failure with the central locking. To
do this:
F
O
pen the door in question.
F
P
ivot the interior control B towards the
front, then close the door.
Locking the front and rear doors
F Pivot the interior control B towards the front.
System which provides full manual locking or
unlocking of the doors and boot from the inside.
Unlocking the front and rear
doors
F Pivot the interior control B towards the rear.
It is possible to lock the vehicle with a
passenger door open, using using the
individual locking controls: ensure that
you have the key before closing the
passenger door.
Access
Page 69 of 389

67
Triggering of the alarm
This is indicated by sounding of the siren
and flashing of the direction indicators for
thirty seconds.
A message then appears in the instrument
panel screen while the siren is operating.
When the ignition is next switched on (ON
mode if your vehicle has the "Keyless Entry
and Starting" system), an audible signal sounds
four times to inform you that the alarm was
triggered during your absence.
Complete deactivation of
the alarm
F Switch off the ignition (OFF mode if your vehicle has the "Keyless Entry and
Starting" system).
F
R
emove the key from the ignition switch,
if your vehicle does not have the "Keyless
Entry and Starting" system.
F
O
pen the driver's door.
F
P
lace the lighting control stalk in
the " OFF"
position.
F
P
ull the wiper control stalk towards you
and hold.
A
fter about ten seconds there is an audible
signal.
F
W
hen the audible signal stops, continue to
hold the wiper stalk pulled towards you and
press the remote control locking button.
You can completely deactivate the alarm
system. To do this, proceed as follows:
F T he state of the system is then signalled to
you by the number of beeps:
O
ne beep: the alarm system is completely
deactivated.
T
wo beeps: the alarm system is activated.
E
ach new press of the remote control
locking button changes the state of the
system.
2
Access