2015 Citroen C4 AIRCROSS RHD change time
[x] Cancel search: change timePage 12 of 389

10
Eco-drivingEco-driving is a range of everyday practices that allow the motorist to optimise their fuel consumption and CO2 emissions.
Optimise the use of your gearbox
With a manual gearbox, move off gently and change up without waiting.
During acceleration change up early.
With an automatic or electronic gearbox, give preference to automatic
mode and avoid pressing the accelerator pedal heavily or suddenly.
The gear shift indicator invites you to change up: as soon as the
indication to change up is displayed in the instrument panel, follow it
straight away.
With an electronic or automatic gearbox, this indicator appears only in
manual mode.
Drive smoothly
Maintain a safe distance between vehicles, use engine braking rather
than the brake pedal, and press the accelerator progressively. These
practices contribute towards a reduction in fuel consumption and
Co
2 emissions and also helps reduce the background traffic noise.
Control the use of your electrical
equipment
Before moving off, if the passenger compartment is too warm, ventilate it
by opening the windows and air vents before using the air conditioning.
Above 30 mph (50 km/h), close the windows and leave the air vents
open.
Remember to make use of equipment that can help keep the
temperature in the passenger compartment down (sunroof and window
blinds...).
Switch off the air conditioning, unless it has automatic regulation, as
soon as the desired temperature is attained.
Switch off the demisting and defrosting controls, if not automatic.
Switch off the heated seat as soon as possible.
Switch off the headlamps and front foglamps when the level of light
does not require their use.
Avoid running the engine before moving off, particularly in winter; your
vehicle will warm up much faster while driving.
As a passenger, if you avoid connecting your multimedia devices
(film, music, video game...), you will contribute towards limiting the
consumption of electrical energy, and so of fuel.
Disconnect your portable devices before leaving the vehicle.
If your vehicle has cruise control, make use of the system at speeds
above 25 mph (40 km/h) when the traffic is flowing well.
Eco-driving
Page 36 of 389

34
Resetting the service indicator
to zero
After a certain distance and a certain
time, the display of "---" is reset
automatically and the display indicates
the time remaining before the next
service is due.
Your CITROËN dealer or a qualified workshop
carries out this operation after each service.
If you have carried out your vehicle's service
yourself, the zero reset procedure is the
following:
F
s
witch off the ignition,
F
p
ress the INFO button several times in
succession until the service indicator is
displayed,
F
p
ress and hold the INFO button for a few
seconds until the spanner flashes ,
F
p
ress the INFO button while the spanner
is flashing to change the display "--- " to
"CLEAR" then the time remaining before
the next service is due is displayed.
Monitoring
Page 39 of 389

37
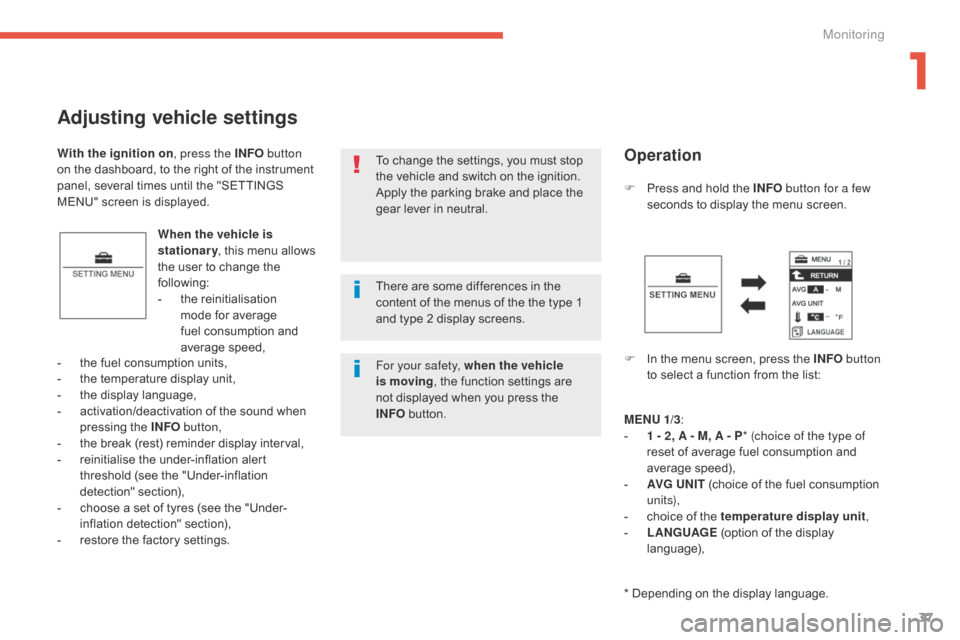
Adjusting vehicle settings
When the vehicle is
stationary, this menu allows
the user to change the
following:
-
t
he reinitialisation
mode for average
fuel consumption and
average speed, F
P
ress and hold the INFO
button for a few
seconds to display the menu screen.
F
I
n the menu screen, press the INFO button
to select a function from the list:
-
t
he fuel consumption units,
-
t
he temperature display unit,
-
t
he display language,
-
a
ctivation/deactivation of the sound when
pressing the INFO button,
-
t
he break (rest) reminder display interval,
-
r
einitialise the under-inflation alert
threshold (see the "Under-inflation
detection" section),
-
c
hoose a set of tyres (see the "Under-
inflation detection" section),
-
r
estore the factory settings. To change the settings, you must stop
the vehicle and switch on the ignition.
Apply the parking brake and place the
gear lever in neutral.
With the ignition on
, press the INFO button
on the dashboard, to the right of the instrument
panel, several times until the "SETTINGS
MENU" screen is displayed.
Operation
MENU 1/3:
- 1 - 2 , A - M, A - P * (choice of the type of
reset of average fuel consumption and
average speed),
-
AV
G UN IT (choice of the fuel consumption
un i t s),
-
c
hoice of the temperature display unit ,
-
L
ANGUAGE (option of the display
language),
* Depending on the display language.
There are some differences in the
content of the menus of the the type 1
and type 2 display screens.
For your safety, when the vehicle
is moving
, the function settings are
not displayed when you press the
INFO
button.
1
Monitoring
Page 50 of 389

48
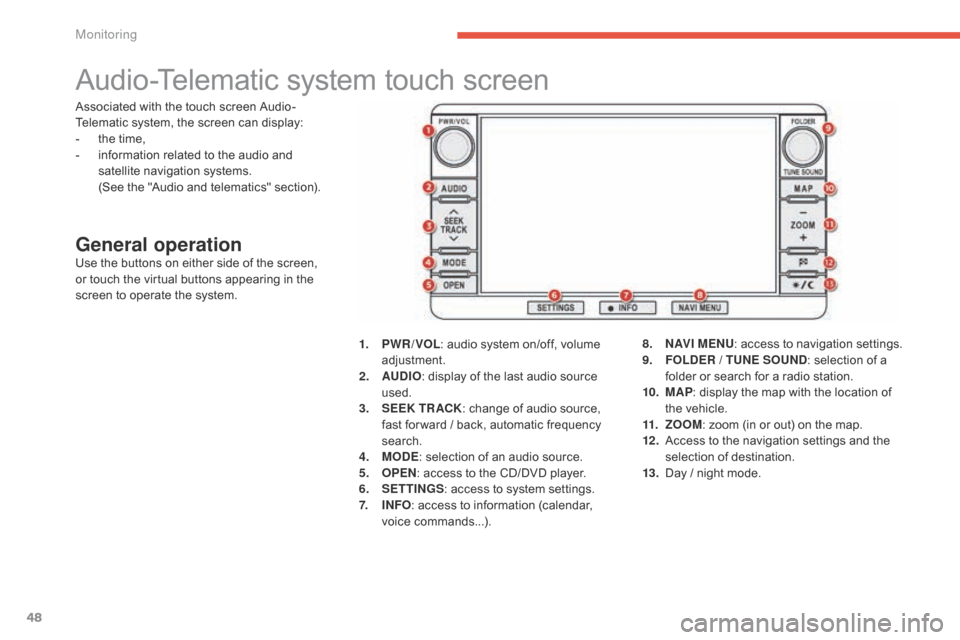
Audio-Telematic system touch screen
General operationUse the buttons on either side of the screen,
or touch the virtual buttons appearing in the
screen to operate the system.1.
P
WR / VOL: audio system on/off, volume
adjustment.
2.
AU
DIO: display of the last audio source
used.
3.
S
EEK TR ACK: change of audio source,
fast for ward / back, automatic frequency
search.
4.
M
ODE: selection of an audio source.
5.
O
PEN: access to the CD/DVD player.
6.
S
ETTINGS: access to system settings.
7.
I
NFO: access to information (calendar,
voice commands...). 8.
N
AV I M E NU: access to navigation settings.
9.
F
OLDER / TUNE SOUND: selection of a
folder or search for a radio station.
10.
M
AP: display the map with the location of
the vehicle.
11.
Z
OOM: zoom (in or out) on the map.
12 .
A
ccess to the navigation settings and the
selection of destination.
13.
D
ay / night mode.
Associated with the touch screen Audio-
Telematic system, the screen can display:
-
t
he time,
-
i
nformation related to the audio and
satellite navigation systems.
(
See the "Audio and telematics" section).
Monitoring
Page 52 of 389

50
You must deactivate automatic
adjustment (RDS Auto Correct) to
change the time zone and summer time
settings.
1. Auto / GMT / GMT+1 / GMT+2: Select the time zone.
2.
S
ummer Time :
S
ummer time On / Off.
3.
R
DS Auto Correct:
A
utomatic adjustment On / Off.
Once this menu has been selected, you can
access the following functions:
Setting the display format
From the "
Time" menu:
F p ress the " Format Change " button.
F
a
djust the display settings.
F
p
ress the " Back" button to confirm.
F
P
ress the Back button to confirm and
return to the previous menu.
F
o
n t
he touch screen, press the " System"
button.
The system settings screen is displayed.
F Press the " Time" button.
Monitoring
Page 53 of 389

51
Lighting dimmer
System for manual adjustment of the
brightness of the instruments and controls in
relation to the exterior brightness.There is an audible signal and the
intensity of the lighting increases each
time the button is pressed.
With the lighting on or off, press the button
to change the intensity of the lighting of
the instruments and controls in "day" or
"night"
mode. When the lighting reaches the maximum
setting, press again to change to the minimum
setting.
When the lighting reaches the required
intensity, release the button.
With the vehicle's lighting off, only the
brightness of the instrument panel is modified. The setting is saved when the ignition switch is
turned to OFF.
Wit the vehicle's lighting on, the brightness of
the entire dashboard (instrument panel, screen,
air conditioning control panel...) is modified.
1
M
Page 69 of 389

67
Triggering of the alarm
This is indicated by sounding of the siren
and flashing of the direction indicators for
thirty seconds.
A message then appears in the instrument
panel screen while the siren is operating.
When the ignition is next switched on (ON
mode if your vehicle has the "Keyless Entry
and Starting" system), an audible signal sounds
four times to inform you that the alarm was
triggered during your absence.
Complete deactivation of
the alarm
F Switch off the ignition (OFF mode if your vehicle has the "Keyless Entry and
Starting" system).
F
R
emove the key from the ignition switch,
if your vehicle does not have the "Keyless
Entry and Starting" system.
F
O
pen the driver's door.
F
P
lace the lighting control stalk in
the " OFF"
position.
F
P
ull the wiper control stalk towards you
and hold.
A
fter about ten seconds there is an audible
signal.
F
W
hen the audible signal stops, continue to
hold the wiper stalk pulled towards you and
press the remote control locking button.
You can completely deactivate the alarm
system. To do this, proceed as follows:
F T he state of the system is then signalled to
you by the number of beeps:
O
ne beep: the alarm system is completely
deactivated.
T
wo beeps: the alarm system is activated.
E
ach new press of the remote control
locking button changes the state of the
system.
2
Access
Page 88 of 389

86
Personalisation of the
Exterior air intake / Interior air
recirculation function
This function is controlled automatically.
However, you can deactivate its automatic
control if you wish to change the air intake
mode at any time.
Changing the status
Press the Air intake / Interior air recirculation
button for at least 10 seconds.
When the status changes from active to
inactive, three bleeps are heard and the
indicator lamp flashes three times.
When the status changes from inactive to
active, two bleeps are heard and the indicator
lamp flashes three times.
Automatic control active
If the air distribution adjustment dial and the air
flow adjustment dial are placed in the "AUTO"
position, the Air intake / Interior air recirculation
function is also controlled automatically.
Automatic control inactive
Even if the air distribution adjustment dial and
the air flow adjustment dial are placed in the
"AUTO" position, the Air intake / Interior air
recirculation function is no longer controlled
automatically.
The settings are retained, even after switching
off the ignition.
4. Intake of exterior air / Recirculation of interior air
This function insulates the passenger
compartment from exterior odours and smoke.
F
P
ress button 4 to select the air
intake mode.
When the indicator lamp on button 4 is off, the
exterior air intake function is on.
When the indicator lamp on button 4 is on, the
intake of exterior air is off and the system is in
air recirculation mode.
Do not drive for long periods in interior
air recirculation mode, except in truly
exceptional atmospheric conditions.
Comfort