2015 Citroen C3 ESP
[x] Cancel search: ESPPage 14 of 401

12
Visual indicators informing the driver that a system is in operation (operation or deactivation indicator lamps) or of the occurrence of a fault
(warning lamp).
When the ignition is switched on
Certain warning lamps come on for a few
seconds when the vehicle's ignition is
switched
on.
When the engine is started, these same
warning lamps should go off.
If they remain on, before moving off, refer to the
information on the warning lamp concerned.
Operation indicator lamps
If one of the following indicator lamps comes on, this confirms that the corresponding system has
come into operation.
Associated warnings
The illumination of certain warning lamps may
be accompanied by an audible signal and a
message in the multifunction screen.
The warning lamps may come on continuously
(fixed) or flash.
Warning /indicator lampis on Cause Action / Observations
Left-hand direction
indicatorflashing with buzzer. The lighting stalk is pushed down.
Right-hand
direction indicatorflashing with buzzer.The lighting stalk is pushed up.
Sidelamps fixed. The lighting stalk is in the
"Sidelamps" position.
Hazard warning
lamps
flashing with audible
signal. The hazard warning lamps switch,
located on the dashboard, has been
operated. The left-hand and right-hand direction indicators and
their associated indicator lamps flash simultaneously.Certain warning lamps may come on
in one of two different modes. Only by
relating the type of illumination to the
operating status of the vehicle can it
be ascertained whether the situation is
normal or whether a fault has occurred.
Indicator and warning lamps
Monitoring
Page 15 of 401

13
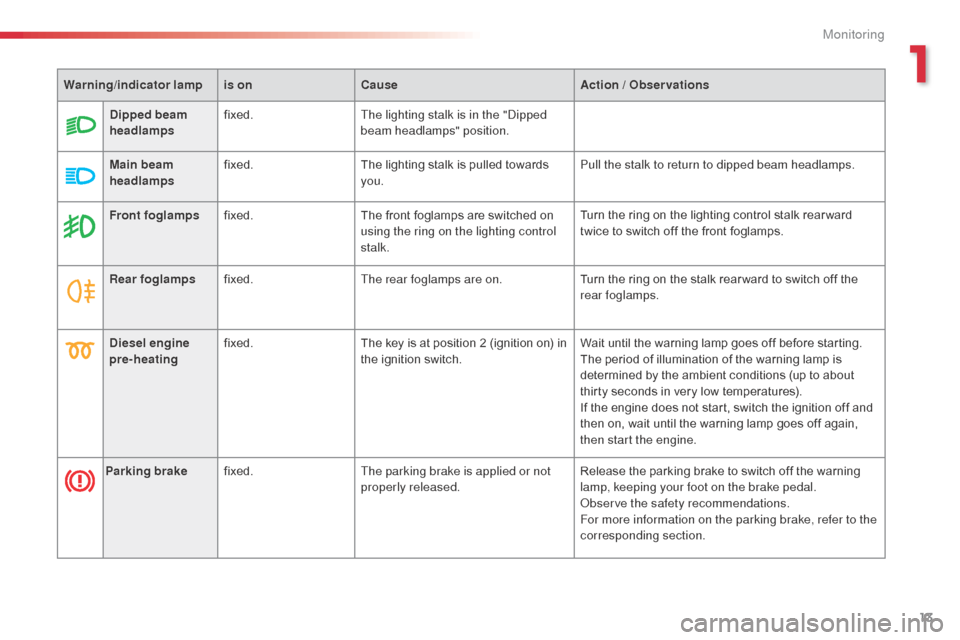
Front foglampsfixed. The front foglamps are switched on
using the ring on the lighting control
stalk. Turn the ring on the lighting control stalk rear ward
twice to switch off the front foglamps.
Rear foglamps fixed. The rear foglamps are on. Turn the ring on the stalk rear ward to switch off the
rear foglamps.
Diesel engine
pre-heating fixed.
The key is at position 2 (ignition on) in
the ignition switch. Wait until the warning lamp goes off before starting.
The period of illumination of the warning lamp is
determined by the ambient conditions (up to about
thirty seconds in very low temperatures).
If the engine does not start, switch the ignition off and
then on, wait until the warning lamp goes off again,
then start the engine.
Parking brake fixed. The parking brake is applied or not
properly released. Release the parking brake to switch off the warning
lamp, keeping your foot on the brake pedal.
ob
serve the safety recommendations.
For more information on the parking brake, refer to the
corresponding section.
Warning
/indicator lampis on Cause Action / Observations
Dipped beam
headlamps fixed.
The lighting stalk is in the "
di
pped
beam headlamps" position.
Main beam
headlamps fixed.
The lighting stalk is pulled towards
you. Pull the stalk to return to dipped beam headlamps.
1
Monitoring
Page 18 of 401

16
Deactivation indicator lamps
If one of the following indicator lamps comes on, this confirms that the corresponding system has been switched off intentionally.
This is may be accompanied by an audible signal and a message in the multifunction screen.Passenger's
airbag system fixed.
The control, located in the glove box,
is set to the OFF position.
The passenger's front airbag is
deactivated.
You can install a rear ward facing
child seat, unless there is a fault with
the operation of the airbags (Airbag
warning lamp on). Set the control to the ON
position to activate the
passenger's front airbag.
In this case, do not fit a child seat in the rear ward
facing position.
Dynamic
stability control
(DSC/ASR) fixed.
The button, located at the bottom
left of the dashboard, is pressed. Its
indicator lamp is on.
The
d
S
C/
aS
R is deactivated.
dSC
: dynamic stability control.
aS
R: anti-slip regulation.Press the button to activate the
d
S
C/
aS
R. Its
indicator lamp goes off.
The DSC/ASR system is activated automatically when
the vehicle is started.
If deactivated, the system is reactivated automatically
from around 30 mph (50 km/h).
Warning
/indicator lampis on Cause Action / Observations
Monitoring
Page 24 of 401

22
Warning/indicator lampis on Cause Action / Observations
AdBlue
® additive
(BlueHDi Diesel) fixed, on switching
on the ignition,
accompanied by an
audible signal and a
message indicating the
remaining driving range. The remaining driving range is
between 350 miles (600 km) and
1500 miles (2400 km).
Have the
adbl ue® additive tank topped up as soon
as possible: go to a CITRoËn dealer or a qualified
workshop, or carry out this operation yourself by
referring to the corresponding section.
+ flashing associated with
the SERVICE warning
lamp, accompanied by
an audible signal and a
message indicating the
remaining driving range.The remaining driving range is
between 0 and 350 miles (600 km).
You must top-up the
a d
blu
e
® additive tank to avoid
a breakdown : go to a CITRoËn
dealer or a qualified
workshop, or carry out this operation yourself by
referring to the corresponding section.
flashing, associated
with the SERVICE
warning lamp,
accompanied by an
audible signal and a
message indicating that
starting is prevented. The
a
d
blu
e
® tank is empty: the
starting inhibition system required
by legislation prevents starting of the
engine. To be able to start the engine, you must top-up the a
dblu e® additive tank: go to a CITRoËn dealer or a
qualified workshop, or carry out this operation yourself
by referring to the corresponding section.
It is essential to add at least 3.8 litres of AdBlue
® to
the additive tank.
Monitoring
Page 37 of 401

35
Vehicle configuration
once the " Vehicle Configuration" menu has
been selected, you can activate or deactivate
the following equipment:
-
w
iper linked with reverse gear (refer to the
"Visibility" section),
-
g
uide-me-home lighting (refer to the
"Visibility" section),
-
d
aytime running lamps (refer to the
"Visibility" section),
-
parking sensors (refer to the "Driving" section).Using this menu, you can also reinitialise the
tyre under-inflation detection system (refer to
the "Safety" section).
Options
once the "op tions" menu has been selected,
you can start diagnostics of the status of the
equipment (active, not active, faulty).
Display settings
once the "di splay settings" menu has been selected,
you can gain access to the following settings:
- year,
- month,
-
d ay,
-
h o u r,
-
minutes,
-
1
2 or 24 hour mode.
F
o
n
ce you have selected a setting, press
the " 7" or " 8" buttons to change its value.
F
P
ress the " 5" or " 6" buttons to switch
respectively to the previous or next setting.
F
P
ress the "OK" button to save the change
and return to the normal display or press
the "Back" button to cancel.
Setting the date and time
F
P ress the MENU button.
F
S
elect "
di
splay settings" using the " 5"
or
"6 " button.
F
Press "OK" to confirm the selection.
F
S
elect the "Year" function using the " 5"
or " 6" button.
F
Press "OK" to confirm the selection.
F
C
hoose the desired value, using the " 7"
or
"8 " button.
F
Press "OK" to confirm the selection.
F
R
epeat the procedure to set the "Month",
"
da
y", "Hours", and "Minutes".
2
Multifunction screens
Page 41 of 401

39
Example: setting of the duration of the guide-
me-home lighting
F
P
ress the " 5" or " 6" buttons, then the
"OK" button to select the menu required.
F
P
ress the " 5" or " 6" buttons, then the
"OK" button to select the "Guide-me-home
headlamps" line.
F
P
ress the " 7" or " 8" buttons to set the
value required (15, 30 or 60 seconds), then
press the "OK" button to confirm.
F
P
ress the " 5" or " 6" buttons, then the
"OK" button to select the "OK" box and
confirm or press the "Back" button to
cancel.Display configuration
once this menu has been selected, you can
gain access to the following settings:
-
b
rightness-video setting,
-
d
ate and time setting,
-
s
election of units.
on
ce the fuel consumption units have
been changed to mpg, the information
in the screen relating to speed and
distance also changes to mph and miles
respectively.
Setting the date and time
F
Sel
ect the "Set date and time" function
using the " 5" or " 6" button.
F
Press "OK" to confirm the selection.
F
a
d
just the settings one by one using
the
"7 " or " 8" button then confirm with
"OK" .
F
T
hen select the "OK" box in the screen
and confirm.
Choice of language
once this menu has been selected, you can
change the language used by the display, by
choosing a new language from the list offered. For safety reasons, configuration by the
driver of the multifunction screen must
only be done when stationary.
"Telephone" Menu
With audio system on, once this menu is
selected you can configure your
bl uetooth
hands-free system (pairing), view the various
telephone directories (list of calls, services...)
and manage your calls (call, hang up,
second
call, secret mode...).
For more information on the "Telephone"
function, refer to the "
au
dio system" section.
2
Multifunction screens
Page 43 of 401

41
Menus
Navigationnavigation is available depending on
country and/or trim level.
Refer to the "
au
dio and telematics"
section.
Telephone
Refer to the "
au
dio and telematics"
section. 1.
V
olume / mute.
Refer to the "
aud
io and telematics" section.
Radio Media
Refer to the "
au
dio and telematics"
section.
Settings
Allows configuration of the display
and the system.
Refer to the corresponding section.
Internet
These services are available
depending on country and/or trim
level.
Refer to the "
au
dio and telematics"
section. Driving
Allows access to the trip computer
and, depending on version, the
adjustment of settings for certain
functions.
Refer to the corresponding section.
Press this button, then choose the
desired menu.
2
Multifunction screens
Page 44 of 401

42
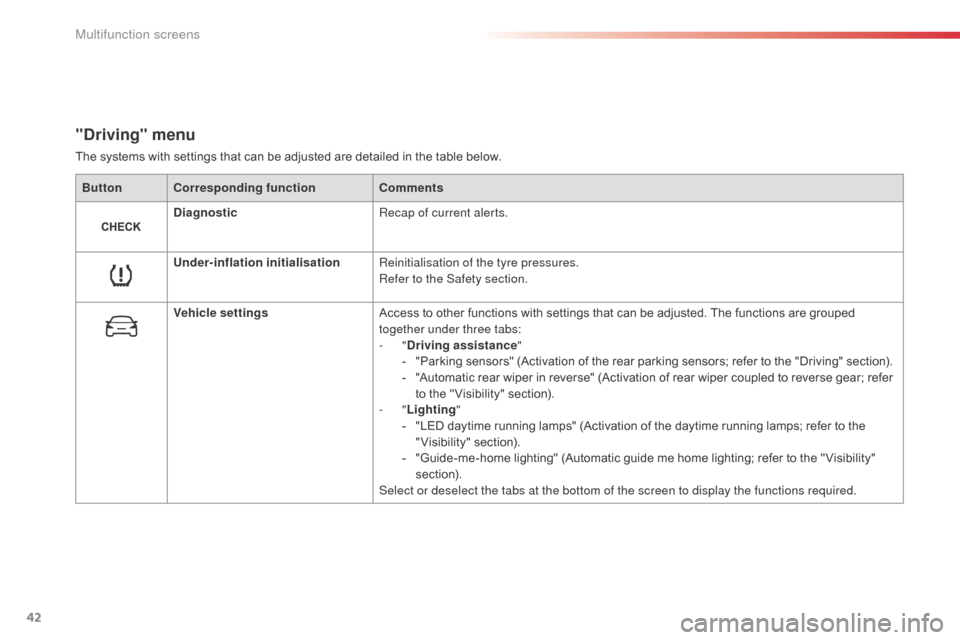
"Driving" menu
The systems with settings that can be adjusted are detailed in the table below.Button Corresponding function Comments
Diagnostic Recap of current alerts.
Under-inflation initialisation Reinitialisation of the tyre pressures.
Refer to the Safety section.
Vehicle settings Access to other functions with settings that can be adjusted. The functions are grouped
together under three tabs:
-
"Driving assistance "
-
"
Parking sensors" (Activation of the rear parking sensors; refer to the "Driving" section).
-
"
Automatic rear wiper in reverse" (Activation of rear wiper coupled to reverse gear; refer
to the " Visibility" section).
-
"Lighting "
-
"
LED daytime running lamps" (Activation of the daytime running lamps; refer to the
"Visibility" section).
-
"
Guide-me-home lighting" (Automatic guide me home lighting; refer to the " Visibility"
section).
Select or deselect the tabs at the bottom of the screen to display the functions required.
Multifunction screens