Page 153 of 266
151
Berlingo-2-VU_en_Chap08_Aide rapide_ed01-2015Berlingo-2-VU_en_Chap08_Aide rapide_ed01-2015
Side repeater
Type A, WY5W - 5W (amber)
-
Push the repeater towards the rear
and disengage it by pullin
g the
front.
-
Contact a CITROËN dealer to
obtain a new repeater which is a
sealed component.
-
T
o refit, engage the repeater
towards the rear and bring it
towards the front. Front / Rear
Courtesy lamps
Type A, 12V5W - 5W
-
Unclip the lens by sliding a
screwdriver in the slots on each
side of the courtesy lamp.
-
Pull the bulb out and change it.
-
Clip the lens in its housing and
ensure that it is secured correctly
.
QUICK HELP
8
Changing a bulb
Page 154 of 266

152
Berlingo-2-VU_en_Chap08_Aide rapide_ed01-2015Berlingo-2-VU_en_Chap08_Aide rapide_ed01-2015
This procedure requires the use of
the spanner supplied with the tools for
changing a wheel.-
Move aside the 4 tabs then extract
the bulb holder
.
-
Remove the faulty bulb by
pressing it lightly while turning it
anticlockwise.
-
Change the bulb.
When removing the lamp unit:
-
with tailgate, pull the lamp unit
towards the centre of the vehicle,
-
with hinged doors, pull the lamp
unit towards you.When refitting, take care to
reposition the tabs and the supply
wire correctly to avoid trapping the
wire.
After changing the rear direction
indicator bulb, the reinitialisation time is
above 2 minutes.
Rear lamps
For more information concerning the
bulbs, refer to the "Types of bulb".
1.
Brake lamps / sidelamps
T
ype B, P21/5W - 21/5W
2.
Direction indicators
T
ype B, PY21W - 21W (amber)
3.
Reversing lamps
T
ype B, P21W - 21W
4.
Foglamps
T
ype B, P21W - 21W
High pressure jet washing When using this type of washing
on stubborn dirt, do not persist on
the headlamps, the other lamps
and their edges to avoid damaging
their coating and seals. Chapter 9, "Changing a wheel"
section.
Chapter 3, "Access" section.
-
Identify the faulty bulb, then open
the rear doors to 180°.
-
Remove the two fixing bolts using
the spanner provided.
-
Pull the lamp unit from the outside.
-
Holding the lamp, disconnect the
electrical connector
.
Changing a bulb
Page 155 of 266
153
Berlingo-2-VU_en_Chap08_Aide rapide_ed01-2015Berlingo-2-VU_en_Chap08_Aide rapide_ed01-2015
number plate lamps
- Unscrew the two nuts.
-
Push the pins.
-
If necessary
, disconnect the
connector to remove the lamp.
-
Change the bulb.
Third brake lamp
Type A, W16W - 16W
Type A, W5W - 5W
With tailgate
-
Disengage the plastic lens using a
screwdriver
.
-
Change the bulb.
-
Replace the plastic lens and press
on it. W
ith hinged doors
-
Unclip the interior trim.
-
Disconnect the connector by
moving aside its tab.
-
T
urn the bulb holder a quarter turn
anticlockwise.
-
Change the bulb.
-
Put the bulb holder back in place
and reconnect the connector
.
-
Put the trim back in place.
QUICK HELP
8
Changing a bulb
Page 156 of 266

154
Berlingo-2-VU_en_Chap08_Aide rapide_ed01-2015Berlingo-2-VU_en_Chap08_Aide rapide_ed01-2015
CHAnGInG A FUSE
The fuseboxes are located:
-
in the lower dashboard on the
left-hand side (behind the cover),
-
under the bonnet (near the battery).
If fitted on your vehicle, an additional
fusebox is used for towing, the
towbar and the connections for
the coachbuilder and platform cab
modifications. It is located on the right
behind the load retaining partition.
The indications communicated
are only those fuses which can be
changed by the user using the tweezer
,
located behind the dashboard storage
compartment on the right-hand side.
For any other work, visit a CITROËN
dealer or a qualified workshop.
Removing and fitting a fuse
Always replace a failed fuse with a
fuse of the same rating.
CITR
o Ë n will not accept responsibility
for the cost incurred in repairing
your vehicle or for rectifying the
malfunctions resulting from the
installation of accessories not
supplied and not recommended by the
CITROËN network and not installed
in accordance with its instructions,
in particular when the combined
consumption of all of the additional
equipment connected exceeds
10 milliamperes.
Motor trade technicians: for
complete information on the fuses
and relays, refer to the "Repair
manual" diagram via the dealer
network. Before replacing a fuse, the cause
of the incident must be found and
rectified.
-
Use the tweezer
.
Changing a fuse
Page 157 of 266
155
Berlingo-2-VU_en_Chap08_Aide rapide_ed01-2015Berlingo-2-VU_en_Chap08_Aide rapide_ed01-2015
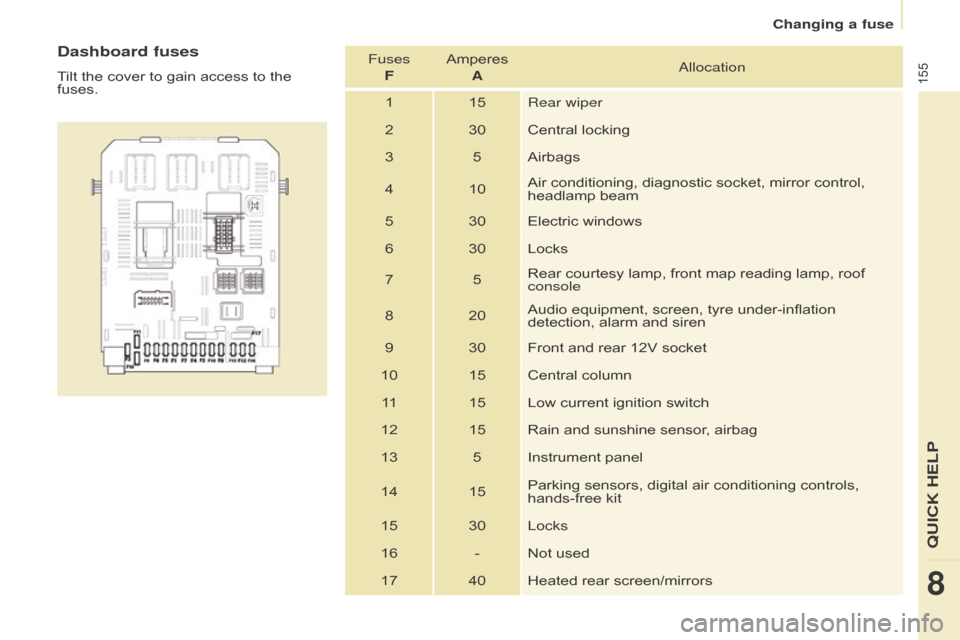
Dashboard fuses
Tilt the cover to gain access to the
fuses.Fuses
F Amperes
Aa llocation
1 15 Rear wiper
2 30 Central locking
3 5 Airbags
4 10 Air conditioning, diagnostic socket, mirror control,
headlamp beam
5 30 Electric windows
6 30 Locks
7 5Rear courtesy lamp, front map reading lamp, roof
console
8 20 Audio equipment, screen, tyre under-inflation
detection, alarm and siren
9 30 Front and rear 12V socket
10 15 Central column 11 15 Low current ignition switch
12 15 Rain and sunshine sensor, airbag
13 5 Instrument panel
14 15 Parking sensors, digital air conditioning controls,
hands-free kit
15 30 Locks
16 - Not used 17 40 Heated rear screen/mirrors
QUICK HELP
8
Changing a fuse
Page 158 of 266
156
Berlingo-2-VU_en_Chap08_Aide rapide_ed01-2015Berlingo-2-VU_en_Chap08_Aide rapide_ed01-2015
Passenger compartment fuses
Fuses F Amperes
Aa llocation
1 - Not used
2 20 Heated seats
3 - Not used
4 15 Folding mirrors relay
5 15 Refrigeration equipment socket relay
Towing / towbar / coachbiuilders /
floor cab fuses
The designations communicated are
an indication only as this additional
box relates to other information which
depends on the converter-coachbuilder
for which the handbook cannot be
used as a technical support.
Fuses F Amperes
A
a
llocation
1 15 Not used
2 15 Ignition, generator operating relay
3 15 Trailer 12V supply
4 15 Permanent supply for the modifiers
5 40 Hazard warning lamps
Changing a fuse
Page 159 of 266
157
Berlingo-2-VU_en_Chap08_Aide rapide_ed01-2015Berlingo-2-VU_en_Chap08_Aide rapide_ed01-2015
Fuses under the bonnet
After opening the bonnet, unclip and tilt
the box to gain access to the fuses.Fuses
F Amperes
Aa llocation
1 20 Engine management
2 15 Horn
3 10 Front and rear screenwash pump
4 20 Headlamp wash pump or LED
5 15 Engine components
6 10 Steering wheel angle sensor, DSC
7 10 Brake switch, clutch switch
8 25 Starter motor
9 10 Headlamp beam motor, parc management
unit
10 30 Engine components 11 40 Not used
12 30 Wipers
13 40 Built-in systems interface
14 30 Pump
15 10 Right-hand main beam headlamp
16 10 Left-hand main beam headlamp
17 15 Right-hand dipped beam headlamp
18 15 Left-hand dipped beam headlamp
QUICK HELP
8
Changing a fuse
Page 160 of 266
158
Berlingo-2-VU_en_Chap08_Aide rapide_ed01-2015Berlingo-2-VU_en_Chap08_Aide rapide_ed01-2015
Placing the windscreen wiper
blades in the special positionChanging a front wiper blade Changing the rear wiper blade
C HA n GI n G
A
WIPER BLADE
- Less than a minute after switching
of
f the ignition, press the wiper stalk
downwards to position the wiper
blades along the windscreen pillars
(special position). -
Lift the wiper arm.
- Unclip the blade and remove it.
-
Fit the new blade.
-
Push back the wiper arm.
T
o return the windscreen wipers to
their normal position, switch on the
ignition and operate the wiper stalk. -
Lift the wiper arm, then unclip the
blade and remove it.
-
Fit the new blade and push back
the wiper arm.
Changing a wiper blade