Page 17 of 164

2. While pushing the brake pedal, push the ENGINE START/STOP button once. If the engine
fails to start, the starter will disengage automatically after 10 seconds.
3. To stop the cranking of the engine prior to the engine starting, push the button again.
Stopping
1. Bring the vehicle to a complete stop.
2. Shift the transmission to PARK (P).
3. Push the ENGINE START/STOP button once. The ignition switch will return to the OFF
position.
NOTE:
If the transmission is not in PARK and the vehicle is in motion, the ENGINE START/STOP
button must be held for two seconds with the vehicle speed above 5 mph (8 km/h) before the
engine will shut off.
Accessory Positions With Engine Off
NOTE:
The following functions are with the driver’s foot OFF the Brake Pedal (transmission in PARK or
NEUTRAL).
Beginning With The Ignition Switch In The OFF Position:
1. Push the ENGINE START/STOP button once to cycle the ignition to the ACC position.
2. Push the ENGINE START/STOP button a second time to cycle the ignition to the ON/RUN
position.
3. Push the ENGINE START/STOP button a third time to return the ignition to the OFF
position.
NOTE:
If the ignition is left in the ACC or ON/RUN
(engine not running) position and the transmis-
sion is in PARK, the system will automatically
time out after 30 minutes of inactivity and the
ignition is returned to the OFF position.
Ignition Positions
GETTING STARTED
15
Page 18 of 164

VEHICLE SECURITY ALARM
The Vehicle Security Alarm monitors the vehicle doors for unauthorized entry and the Keyless
Enter-N-Go™ START/STOP button for unauthorized operation. While the Vehicle Security
Alarm is armed, interior switches for door locks and decklid release are disabled. If something
triggers the alarm, the Vehicle Security Alarm will provide the following audible and visible
signals: the horn will pulse, the park lamps and/or turn signals will flash, and the Vehicle Security
Light in the instrument cluster will flash.
To A r m
•Keyless Enter-N-Go™ button installed:Push the Keyless Enter-N-Go™ START/STOP
button until the Electronic Vehicle Information Center (EVIC) indicates that the vehicle
ignition is “OFF”. Push the power door LOCK switch while the door is open, push the Key Fob
LO C K b u t t o n , o r w i t h o n e o f t h e Ke y Fo b s l o c a t e d o u t s i d e t h e v e h i c l e a n d w i t h i n 5 f t ( 1 . 5 m )
of the driver's and passenger front door handles, push the Keyless Enter-N-Go™ LOCK
button located on the door handle.
•Keyless Enter-N-Go™ button not installed:Turn the ignition switch to the “OFF” position.
Push the power door lock switch while the door is open, push the Key Fob LOCK button, or
with one of the Key Fobs located outside the vehicle and within 5 ft (1.5 m) of the driver's and
passenger front door handles, push the Keyless Enter-N-Go™ LOCK button located on the
door handle.
NOTE:
After pushing the Keyless Enter-N-Go™ LOCK button, you must wait two seconds before you
can lock or unlock the vehicle via the door handle.
To D i s a r m
•Keyless Enter-N-Go™ button installed:Push the Key Fob UNLOCK button or with one of
the Key Fobs located outside the vehicle and within 5 ft (1.5 m) of the driver's and passenger
front door handles, grab the Keyless Enter-N-Go™ door handle and enter the vehicle, then
push the Keyless Enter-N-Go™ START/STOP button (requires at least one valid Key Fob in
the vehicle).
•Keyless Enter-N-Go™ button not installed:Push the Key Fob UNLOCK button or with one
of the Key Fobs located outside the vehicle and within 5 ft (1.5 m) of the driver's and passenger
front door handles, grab the Keyless Enter-N-Go™ door handle and enter the vehicle, then
turn the ignition to the ON/RUN position.
GETTING STARTED
16
Page 19 of 164

SEAT BELT SYSTEMS
Lap/Shoulder Belts
•Allseatingpositionsinyourvehicleareequippedwithlap/shoulderbelts.
•Besureeveryoneinyourvehicleisinaseatandusingaseatbeltproperly.
•Positionthelapbeltsothatitissnugandlieslowacrossyourhips,belowyourabdomen.
To r e m o v e s l a c k i n t h e l a p b e l t p o r t i o n , p u l l u p o n t h e s h o u l d e r b e l t . To l o o s e n t h e l a p b e l t i f i t
is too tight, tilt the latch plate and pull on the lap belt. A snug seat belt reduces the risk of
sliding under the seat belt in a collision.
• Position the shoulder belt across the shoulder and chest with minimal, if any slack so that it is
comfortable and not resting on your neck. The retractor will withdraw any slack in the shoulder
belt.
Seat Belt Pretensioner
•Thefrontseatbeltsystemisequippedwithpretensioningdevicesthataredesignedtoremove
slack from the seat belt in the event of a collision.
•Adeployedpretensioneroradeployedairbagmustbereplacedimmediately.
WARNING!
•Inacollision,youandyourpassengerscansuffermuchgreaterinjuriesifyouarenot
properly buckled up. You can strike the interior of your vehicle or other passengers, or you
can be thrown out of the vehicle. Always be sure you and others in your vehicle are buckled
up properly.
•Ashoulderbeltplacedbehindyouwillnotprotectyoufrominjuryduringacollision.You
are more likely to hit your head in a collision if you do not wear your shoulder belt. The lap
and shoulder belt are meant to be used together.
•Aseatbeltthatistooloosewillnotprotectyouproperly.Inasuddenstop,youcouldmove
too far forward, increasing the possibility of injury. Wear your seat belt snugly.
•Afrayedortornseatbeltcouldripapartinacollisionandleaveyouwithnoprotection.
Inspect the seat belt system periodically, checking for cuts, frays, or loose parts. Damaged
parts must be replaced immediately. Do not disassemble or modify the system. Seat belt
assemblies must be replaced after a collision.
GETTING STARTED
17
Page 20 of 164
 —
AIR BAGS
Air Bag System Components
Yo u r v e h i c l e m a y b e e q u i p p e d w i t h t h e f o l l o w i n g a i r b a g s y s t e m c o m p o n e n t s :")
SUPPLEMENTAL RESTRAINT SYSTEM (SRS) —
AIR BAGS
Air Bag System Components
Yo u r v e h i c l e m a y b e e q u i p p e d w i t h t h e f o l l o w i n g a i r b a g s y s t e m c o m p o n e n t s :
•OccupantRestraintController(ORC)
• Air Bag Warning Light
• Steering Wheel and Column
• Instrument Panel
•KneeImpactBolsters
• Advanced Front Air Bags
• Supplemental Side Air Bags
• Supplemental Knee Air Bags
•FrontandSideImpactSensors
• Seat Belt Pretenioners
• Seat Belt Buckle Switch
• Seat Track Position Sensors
Advanced Front Air Bags
•ThisvehiclehasAdvancedFrontAirBagsforboththedriverandfrontpassengerasa
supplement to the seat belt restraint systems. The Advanced Front Air Bags will not deploy in
every type of collision.
•AdvancedFrontAirBagsaredesignedtoprovideadditionalprotectionbysupplementingthe
seat belts. Advanced Front Air Bags are not expected to reduce the risk of injury in rear, side,
or rollover collisions.
•TheAdvancedFrontAirBagswillnotdeployinallfrontalcollisions,includingsomethatmay
produce substantial vehicle damage — for example, some pole collisions, truck underrides, and
angle offset collisions.
•Ontheotherhand,dependingonthetypeandlocationofimpact,AdvancedFrontAirBags
may deploy in crashes with little vehicle front-end damage but that produce a severe initial
deceleration.
•Becauseairbagsensorsmeasurevehicledecelerationovertime,vehiclespeedanddamageby
themselves are not good indicators of whether or not an air bag should have deployed.
•Seatbeltsarenecessaryforyourprotectioninallcollisions,andalsoareneededtohelpkeep
you in position, away from an inflating air bag.
•Theairbagsmustbereadytoinflateforyourprotectioninacollision.TheOccupantRestraint
Controller (ORC) monitors the internal circuits and interconnecting wiring associated with air
bag system electrical components.
GETTING STARTED
18
Page 21 of 164

•TheORCturnsontheAirBagWarningLightintheinstrumentpanelforapproximatelyfour
to eight seconds for a self-check when the ignition switch is first turned to the ON/RUN
position. After the self-check, the Air Bag Warning Light will turn off. If the ORC detects a
malfunction in any part of the system, it turns on the Air Bag Warning Light, either momen-
tarily or continuously. A single chime will sound to alert you if the light comes on again after
initial startup.
•TheORCmonitorsthereadinessoftheelectronicpartsoftheairbagsystemwheneverthe
ignition switch is in the START or ON/RUN position. If the ignition switch is in the OFF
position or in the ACC position, the air bag system is not on and the air bags will not inflate.
•IftheAirBagWarningLightintheinstrumentpanelisnotonduringthefourtoeightseconds
when the ignition switch is first turned to the ON/RUN position, stays on, or turns on while
driving, have the vehicle serviced by an authorized service center immediately.
NOTE:
If the speedometer, tachometer, or any engine related gauges are not working, the Occupant
Restraint Controller (ORC ) may also be disabled. In this condition the air bags may not be ready
to inflate for your protection. Have an authorized dealer service the air bag system immediately.
•Afteranycollision,thevehicleshouldbetakentoanauthorizeddealerimmediately.
•Donotdriveyourvehicleaftertheairbagshave deployed. If you are involved in another
collision, the air bags will not be in place to protect you.
•Ifitisnecessarytomodifytheairbagsystemforpersonswithdisabilities,contactyour
authorized dealer.
•RefertotheOwner'sManualontheDVDforfurtherdetailsregardingtheSupplemental
Restraint System (SRS).
Supplemental Knee Air Bags
This vehicle is equipped with a Supplemental Driver Knee Air Bag mounted in the instrument
panel below the steering column. The Supplemental Driver Knee Air Bag provides enhanced
protection during a frontal impact by working together with the seat belts, pretensioners, and
Advanced Front Air Bags.
WARNING!
•Relyingontheairbagsalonecouldleadtomoresevereinjuriesinacollision.Theairbags
work with your seat belt to restrain you properly. In some collisions, the air bags won't
deploy at all. Always wear your seat beltseven though you have air bags.
•BeingtooclosetothesteeringwheelorinstrumentpanelduringAdvancedFrontAirBag
deployment could cause serious injury, including death. Air bags need room to inflate. Sit
back, comfortably extending your arms to reach the steering wheel or instrument panel.
•Noobjectsshouldbeplacedoverorneartheairbagontheinstrumentpanelorsteering
wheel because any such objects could cause harm if the vehicle is in a collision severe
enough to cause the air bag to inflate.
GETTING STARTED
19
Page 22 of 164
locatedin
the outboard side of the front seats. The SABs are marked with a SRS AIRBAG or AIRBAG
label se")
Supplemental Side Air Bags
•ThisvehicleisequippedwithSupplementalSeat-MountedSideAirBags(SABs)locatedin
the outboard side of the front seats. The SABs are marked with a SRS AIRBAG or AIRBAG
label sewn into the outboard side of the seats.
•ThisvehicleisequippedwithSupplementalSideAirBagInflatableCurtains(SABICs)located
above the side windows. The trim covering the SABICs is labeled SRS AIRBAG or AIRBAG.
The SABICs may help reduce the risk of partial or complete ejection of vehicle occupants
through side windows in certain side impact events.
•TheSABICsandSABs(“SideAirBags”)aredesignedtoactivateincertainsideimpactsand
certain rollover events. The Occupant Restraint Controller (“ORC”) determines whether the
deployment of the Side Air Bags in a particular side impact or rollover event is appropriate,
based on the severity and type of collision. Vehicle damage by itself is not a good indicator of
whether or not Side Air Bags should have deployed.
WARNING!
• Side Air Bags need room to inflate. Do not lean against the door or window. Sit upright in
the center of the seat.
•BeingtooclosetotheSideAirBagsduringdeploymentcouldcauseyoutobeseverely
injured or killed.
•RelyingontheSideAirBagsalonecouldleadtomoresevereinjuriesinacollision.The
Side Air Bags work with your seat belt to restrain you properly. In some collisions, Side Air
Bags won’t deploy at all. Always wear your seat belt even though you have Side Air Bags.
•ThisvehicleisequippedwithleftandrightSupplementalSideAirBagInflatableCurtains
(SABICs). Do not stack luggage or other cargo up high enough to block the deployment
of the SABICs. The trim covering above the side windows where the SABIC and its
deployment path are located should remain free from any obstructions.
•ThisvehicleisequippedwithSABICs.InorderfortheSABICstoworkasintended,donot
install any accessory items in your vehicle which could alter the roof. Do not add an
aftermarket sunroof to your vehicle. Do not add roof racks that require permanent
attachments (bolts or screws) for installation on the vehicle roof. Do not drill into the roof
of the vehicle for any reason.
•DonotuseaccessoryseatcoversorplaceobjectsbetweenyouandtheSideAirBags;the
performance could be adversely affected and/or objects could be pushed into you,
causing serious injury.
GETTING STARTED
20
Page 23 of 164

CHILD RESTRAINTS
Children 12 years or younger should ride properly buckled up in a rear seat, if available. According
to crash statistics, children are safer when properly restrained in the rear seats rather than in the
front.
Every state in the United States and all Canadian provinces require that small children ride in
proper restraint systems. This is the law, and you can be prosecuted for ignoring it.
NOTE:
• For additional information, refer to www.Seatcheck.org or call 1-866-SEATCHECK.
• Canadian residents should refer to Transport Canada’s website for additional information:
http://www.tc.gc.ca/eng/motorvehiclesafety/safedrivers-childsafety-index-53.htm
LATCH – Lower Anchors And Tethers For CHildren
•YourvehicleisequippedwiththechildrestraintanchoragesystemcalledLATCH,which
stands for Lower Anchors and Tethers for CHildren.
•Thesecondrowseatingpostionsandthethirdrowcenterpositionhaveloweranchorsandtop
tether anchors.
LATCH System Weight Limit
Yo u m a y u s e t h e L A T C H a n c h o r a g e s y s t e m u n t i l t h e c o m b i n e d w e i g h t o f t h e c h i l d a n d t h e c h i l d
restraint is 65 lbs (29.5 kg). Use the seat belt and tether anchor instead of the LATCH system
once the combined weight is more than 65 lbs (29.5 kg).
Locating The LATCH Lower Anchorages
The lower anchorages are round bars that are found at the rear of the seat cushion where it
meets the seatback. They are just visible when you lean into the rear seat to install the child
restraint. You will easily feel them if you run your finger along the gap between the seatback and
seat cushion.
Lower Anchorages
GETTING STARTED
21
Page 24 of 164

Locating The Tether Anchorages
In addition, there are tether strap anchors located behind each rear seatback, near to the
floor.
Center Seat LATCH
If a child restraint installed in the center position
blocks the seat belt webbing or buckle for the
outboard position, do not use that outboard
position. If a child seat in the center position
blocks the outboard LATCH anchors or seat
belt, do not install a child seat in that outboard
position.
Installing The Child Restraint
Using The LATCH Lower Anchors
NOTE:
Never“share” a LATCH anchorage with two or
more child restraints.
1. Loosen the adjusters on the lower straps and
on the tether strap of the child seat so that you can more easily attach the hooks or connectors
to the vehicle anchorages.
2. Attach the lower hooks or connectors of the child restraint to the lower anchorages in the
selected seating position.
3. If the child restraint has a tether strap, connect it to the top tether anchorage. See below for
directions to attach a tether anchor.
4. Tighten all of the straps as you push the child restraint rearward and downward into the seat.
Remove slack in the straps according to the child restraint manufacturer’s instructions.
5. Test that the child restraint is installed tightly by pulling back and forth on the child seat at the
belt path. It should not move more than 1 inch (25.4 mm) in any direction.
Installing The Child Restraint Using The Vehicle Seat Belts
Except for the center position in the third row, all of the seat belts in the passenger seating
positions are equipped with a Switchable Automatic Locking Retractor (ALR). The third row
center position is equipped with a cinching latch plate. Both types of seat belts are designed to
keep the lap portion of the seat belt tight around the child restraint. Any seat belt system will
loosen with time, so check the belt occasionally, and pull it tight if necessary.
Te t h e r A n c h o r a g e W e i g h t L i m i t
Always use the tether anchor when using the seat belt to install a forward facing child restraint, up
to the recommended weight limit of the child restraint.
Tether Anchorages
GETTING STARTED
22
 1
1 2
2 3
3 4
4 5
5 6
6 7
7 8
8 9
9 10
10 11
11 12
12 13
13 14
14 15
15 16
16 17
17 18
18 19
19 20
20 21
21 22
22 23
23 24
24 25
25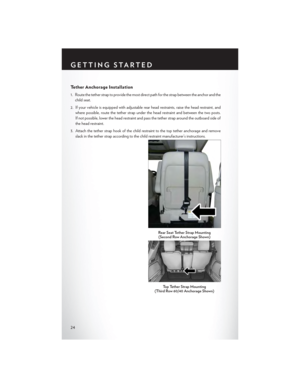 26
26 27
27 28
28 29
29 30
30 31
31 32
32 33
33 34
34 35
35 36
36 37
37 38
38 39
39 40
40 41
41 42
42 43
43 44
44 45
45 46
46 47
47 48
48 49
49 50
50 51
51 52
52 53
53 54
54 55
55 56
56 57
57 58
58 59
59 60
60 61
61 62
62 63
63 64
64 65
65 66
66 67
67 68
68 69
69 70
70 71
71 72
72 73
73 74
74 75
75 76
76 77
77 78
78 79
79 80
80 81
81 82
82 83
83 84
84 85
85 86
86 87
87 88
88 89
89 90
90 91
91 92
92 93
93 94
94 95
95 96
96 97
97 98
98 99
99 100
100 101
101 102
102 103
103 104
104 105
105 106
106 107
107 108
108 109
109 110
110 111
111 112
112 113
113 114
114 115
115 116
116 117
117 118
118 119
119 120
120 121
121 122
122 123
123 124
124 125
125 126
126 127
127 128
128 129
129 130
130 131
131 132
132 133
133 134
134 135
135 136
136 137
137 138
138 139
139 140
140 141
141 142
142 143
143 144
144 145
145 146
146 147
147 148
148 149
149 150
150 151
151 152
152 153
153 154
154 155
155 156
156 157
157 158
158 159
159 160
160 161
161 162
162 163
163