Page 249 of 726
Press the switch forward to move the pedals forward
(toward the front of the vehicle).
Press the switch rearward to move the pedals rearward
(toward the driver).
•The pedals can be adjusted with the ignition OFF.
•The pedalscannotbe adjusted when the vehicle is in
REVERSE or when the Electronic Speed Control Sys-
tem is on. The following messages will be displayed on
vehicles equipped with the Electronic Vehicle Informa-
tion System (EVIC) if the pedals are attempted to be
adjusted when the system is locked out (“Adjustable
Pedal Disabled — Cruise Control Engaged” or “Ad-
justable Pedal Disabled — Vehicle In Reverse”).
NOTE:
•Always adjust the pedals to a position that allows full
pedal travel.
•Further small adjustments may be necessary to find
the best possible seat/pedal position.
•For vehicles equipped with Driver Memory Seat, you
can use your Remote Keyless Entry (RKE) transmitter
or the memory switch on the driver ’s door trim panel
to return the adjustable pedals to pre-programmed
positions. Refer to “Driver Memory Seat” in “Under-
standing The Features Of Your Vehicle” for further
information.
CAUTION!
Do not place any article under the adjustable pedals
or impede its ability to move, as it may cause damage
to the pedal controls. Pedal travel may become lim-
ited if movement is stopped by an obstruction in the
adjustable pedal’s path.
3
UNDERSTANDING THE FEATURES OF YOUR VEHICLE 247
Page 267 of 726
If your vehicle is equipped with Remote Keyless Entry
(RKE) the lights will also turn on when the UNLOCK
button on the RKE transmitter is pressed.
The courtesy lights also function as reading lights. Press
in on each lens to turn these lights on while inside the
vehicle. Press a second time to turn each light off. You
may adjust the direction of these lights by pressing the
outside ring, which is identified with four directional
arrows (LED lamps only).
The area around the instrument panel cupholders is also
illuminated from a light in the overhead console (pre-
mium console only). This light is turned on when the
headlight switch is on, and will adjust in brightness when
the dimmer control is rotated up or down.
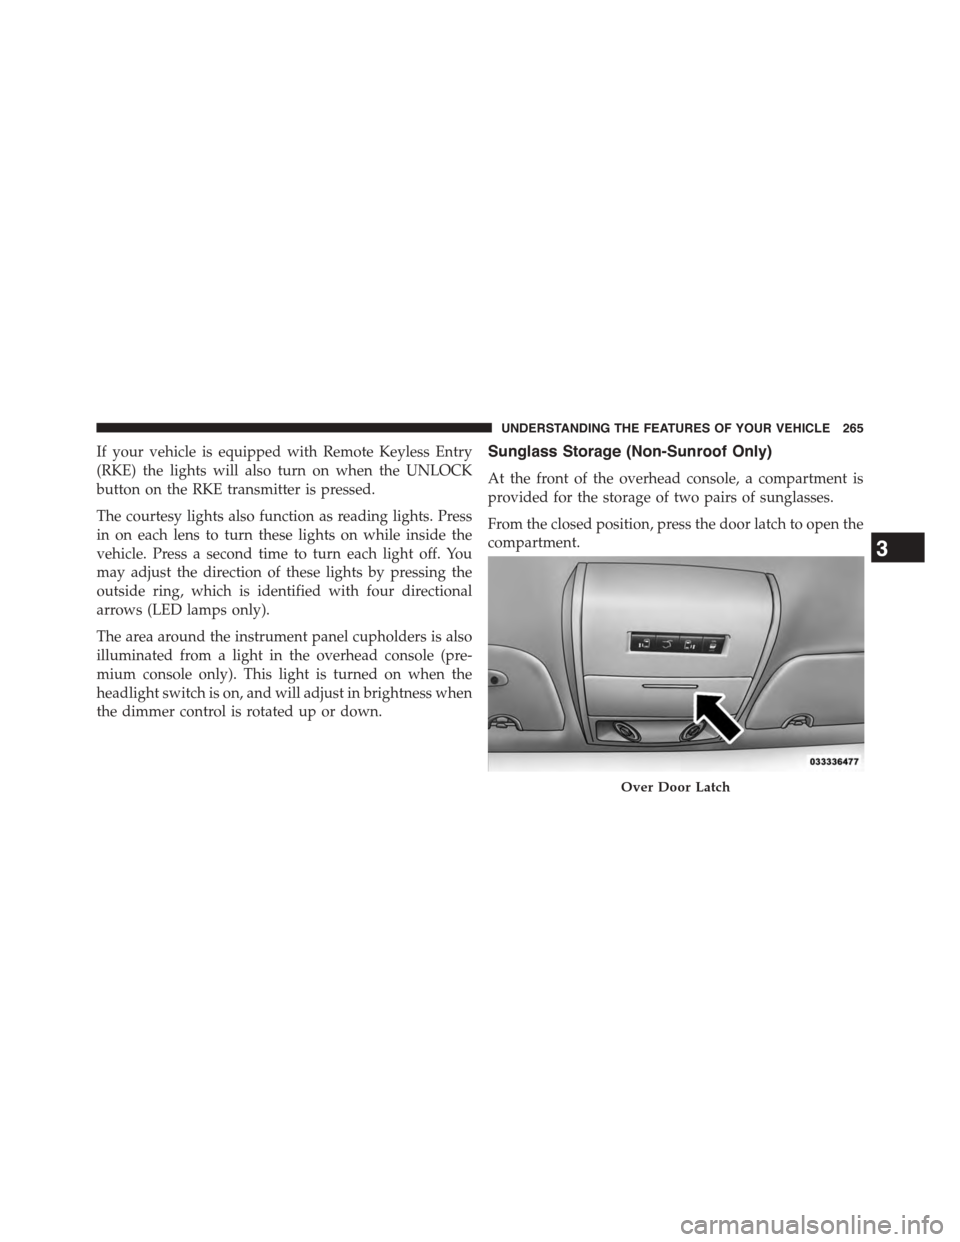
Sunglass Storage (Non-Sunroof Only)
At the front of the overhead console, a compartment is
provided for the storage of two pairs of sunglasses.
From the closed position, press the door latch to open the
compartment.
Over Door Latch
3
UNDERSTANDING THE FEATURES OF YOUR VEHICLE 265
Page 269 of 726
Rear Courtesy/Reading Lights — If Equipped
The overhead console has two sets of courtesy lights. The
lights turn on when a front door, a sliding door or the
liftgate is opened. If your vehicle is equipped with
Remote Keyless Entry (RKE) the lights will also turn on
when the UNLOCK button on the RKE transmitter is
pressed.
The courtesy lights also function as reading lights. Press
in on each lens to turn these lights on while inside the
vehicle. Press the lens a second time to turn each light off.
You may adjust the direction of these lights by pressing
the outside ring, which is identified with four directional
arrows.Rear Overhead Consoles — If Equipped
The rear overhead storage system is available in two
versions: with or without sunroof.
An additional LED at the front of the rear console shines
down on the front foot-well area while in courtesy mode,
for added convenience.
Reading Lights
3
UNDERSTANDING THE FEATURES OF YOUR VEHICLE 267
Page 277 of 726
•If the indicator light stays on constantly, program-
ming is complete and the garage door/device should
activate when the HomeLink® button is pushed.
•To program the two remaining HomeLink® buttons,
repeat each step for each remaining button. DO NOT
erase the channels.
If you unplugged the garage door opener/device for
programming, plug it back in at this time.
Reprogramming A Single HomeLink® Button
(Canadian/Gate Operator)
To reprogram a channel that has been previously trained,
follow these steps:
1. Cycle the ignition to the ON/RUN position.
2. Push and hold the desired HomeLink® button until
the indicator light begins to flash after 20 seconds.Do
not release the button.
3.Without releasing the buttonproceed with
“Canadian/Gate Operator Programming” step 2 and
follow all remaining steps.
Using HomeLink®
To operate, push and release the programmed
HomeLink® button. Activation will now occur for the
programmed device (i.e., garage door opener, gate opera-
tor, security system, entry door lock, home/office light-
ing, etc.,). The hand-held transmitter of the device may
also be used at any time.
Security
It is advised to erase all channels before you sell or turn
in your vehicle.
To do this, push and hold the two outside buttons for 20
seconds until the red indicator flashes. Note that all
channels will be erased. Individual channels cannot be
erased.
3
UNDERSTANDING THE FEATURES OF YOUR VEHICLE 275
Page 283 of 726
Sunroof Maintenance
Use only a non-abrasive cleaner and a soft cloth to clean
the glass panel.
Ignition Off Operation
For Vehicles Not Equipped With The Electronic Vehicle
Information Center (EVIC)
The power sunroof switch will remain active for 45
seconds after the ignition switch is turned to the LOCK
position. Opening either front door will cancel this
feature.
For Vehicles Equipped With The EVIC
The power sunroof switch will remain active for up to
approximately ten minutes after the ignition switch is
turned to the LOCK position. Opening either front door
will cancel this feature.
ELECTRICAL POWER OUTLETS — IF EQUIPPED
Two 12 Volt (13 Amp) power outlets are located on the
lower instrument panel, below the open storage bin. The
driver-side power outlet is controlled by the ignition
switch and the passenger-side power outlet is connected
directly to the battery. The driver-side power outlet will
also operate a conventional cigar lighter unit (if equipped
with an optional Smoker’s Package).
3
UNDERSTANDING THE FEATURES OF YOUR VEHICLE 281
Page 358 of 726
Auto Lock Doors
When selected, all doors will lock automatically when the
vehicle reaches a speed of 15 mph (24 km/h). To make
your selection, push and release the RIGHT arrow button
until a check-mark appears.
Auto Unlock Doors
When this feature is selected, all doors will unlock when
the vehicle is stopped and the transmission is in the
PARK or NEUTRAL position and the driver’s door is
opened. To make your selection, push and release the
Right arrow button until a check-mark appears next to
the feature showing the system has been activated, or the
check-mark is removed showing the system has been
deactivated.
Remote Unlock Sequence
WhenUnlock Driver Door Only On 1st Pressis selected,
only the driver ’s door will unlock on the first push of the
Remote Keyless Entry (RKE) transmitter UNLOCK but-
ton. When Unlock Driver Door Only On 1st Press, you
must push the RKE transmitter UNLOCK button twice,
to unlock the passenger ’s doors. WhenUnlock All Doors
On 1st Pressis selected, all of the doors will unlock on
the first push of the RKE transmitter UNLOCK button. To
make your selection, push and release the RIGHT arrow
button until a check-mark appears next to the feature
showing the system has been activated or the check-mark
is removed showing the system has been deactivated.
RKE Linked To Memory- If Equipped
When this feature is selected the memory seat, mirror,
and radio settings will return to the memory set position
when the RKE transmitter UNLOCK button is pushed. If
this feature is not selected then the memory seat, mirror,
and radio settings can only return to the memory set
position using the door mounted switch. To make your
selection, push and release the SELECT button until a
356 UNDERSTANDING YOUR INSTRUMENT PANEL
Page 359 of 726
check-mark appears next to the feature showing the
system has been activated or the check-mark is removed
showing the system has been deactivated.
Remote Start Comfort Sys.
When this feature is selected and the remote start is
activated, the heated steering wheel and driver heated
seat features will automatically turn on in cold weather.
These features will stay on through the duration of
remote start or until the key is cycled to ON/RUN
position. To make your selection, push and release the
RIGHT arrow button until a check-mark appears next to
the feature showing the system has been activated or the
check-mark is removed showing the system has been
deactivated.
Horn With Remote Lock
When this feature is selected, a short horn sound will
occur when the RKE transmitter LOCK button is pushed.
To make your selection, push and release the RIGHT
arrow button until a check-mark appears next to the
feature showing the system has been activated or the
check-mark is removed showing the system has been
deactivated.
Flash Lamps With Lock
When selected, the front and rear turn signals will flash
when the doors are locked with the RKE transmitter. To
make your selection, push and release the RIGHT arrow
button until a check-mark appears next to the feature
showing the system has been activated or the check-mark
is removed showing the system has been deactivated.
Automatic High Beams — If Equipped
When this feature is selected, the high beam headlights
will deactivate automatically under certain conditions. To
make your selection, push and release the SELECT
button until a check-mark appears next to the feature
showing the system has been activated or the check-mark
is removed showing the system has been deactivated.
4
UNDERSTANDING YOUR INSTRUMENT PANEL 357
Page 361 of 726
after the ignition switch is turned OFF. Opening either
front vehicle door will cancel this feature. To make your
selection, scroll up or down until the preferred setting is
highlighted, then push and release the SELECT button
until a check-mark appears next to the setting, showing
that the setting has been selected.
Illuminated Approach
When this feature is selected, the headlights will activate
and remain on for up to 90 seconds when the doors are
unlocked with the RKE transmitter. To make your selec-
tion, scroll up or down until the preferred setting is
highlighted, then push and release the SELECT button
until a check-mark appears next to the setting, showing
that the setting has been selected.
Hill Start Assist (HSA) — If Equipped
When on is selected, the HSA system is active. Refer to
“Electronic Brake Control System” in “Starting And
Operating” for system function and operating informa-
tion. To make your selection, push and release the
SELECT button until “ON” or “OFF” appears.
Flashers With Sliding Door
When this feature is selected the signal lamps activate
when power or manual sliding doors are in operation,
signaling other drivers that someone may be exiting or
entering the vehicle. To make your selection, push and
release the SELECT button until a check-mark appears
next to the feature showing the system has been activated
or the check-mark is removed showing the system has
been deactivated.
Keyless Enter-N-Go™ (Passive Entry) — If
Equipped
This feature allows you to lock and unlock the vehicle’s
door(s) without having to push the RKE transmitter lock
or unlock buttons. To make your selection, push and
release the SELECT button until a check-mark appears
4
UNDERSTANDING YOUR INSTRUMENT PANEL 359