Page 435 of 726
Disc Features control the remote DVD player’s (if
equipped) settings of DVD being watched in the remote
player.
Listening To Audio With The Screen Closed
To listen to only audio portion of the channel with the
screen closed:
•Set the audio to the desired source and channel.
•Close the video screen.
•To change the current audio mode, push the remote
control’s MODE button. This will automatically select
the next available audio mode without using the
MODE/SOURCE Select menu.
If the screen is closed and there is no audio heard, verify
that the headphones are turned on (the ON indicator is
illuminated) and the headphone selector switch is on the
desired channel. If the headphones are turned on, push
the remote control’s power button to turn audio on. If
audio is still not heard, check that fully charged batteries
are installed in the headphones.
Disc Formats
The DVD player is capable of playing the following types
of discs (12 cm or 8 cm diameter):
•DVD-Video discs (MPEG-2 video compression) (see
notes about DVD Region Codes)
•DVD-Audio discs (2 channel audio output only)
•Audio Compact Discs (CDs)
•CD Data discs with MP3 and WMA compressed audio
format files
•Video CDs (MPEG-1 video compression)
4
UNDERSTANDING YOUR INSTRUMENT PANEL 433
Page 437 of 726
•Maximum field rate for interlaced source 60 fields
per second
•To change the current chapter, use the remote control’s
or Blu-Ray™ Player ’s “Fast Forward” button to ad-
vance to the next chapter, or the “Fast Rewind” button
to return to the start of the current or previous chapter.
DVD/Blu-ray™/BD Region Codes
The DVD player/Blu-ray™ Player and many DVD/Blu-
ray™ Discs are coded by geographic region. These region
codes must match in order for the disc to play. If the
region code for the DVD/Blu-ray™ Disc does not match
the region code for the player, the disc will stop playing
and a warning will be displayed.
DVD Audio Support
When a DVD-Audio disc is inserted in the DVD player,
the DVD-Audio title on the disc is played by default
(most DVD-Audio discs also have a Video title, but the
Video title is ignored). All multi - channel program
material is automatically mixed down to two channels,
which may result in a lowered apparent volume level. If
you increase the volume level to account for this change
in level, remember to lower the volume before changing
the disc or to another mode.
Recorded Discs
The DVD player will play CD-R and CD-RW discs
recorded in CD-Audio or Video-CD format, or as a
CD-ROM containing MP3, WMA or AAC (Blu-ray™ Disc
Player only) files. The player will also play DVD-Video
content recorded to a DVD-R or DVD-RW disc. DVD-
ROM discs (either pressed or recorded) are not sup-
ported.
If you record a disc using a personal computer, there may
be cases where the DVD player may not be able to play
some or the entire disc, even if it is recorded in a
4
UNDERSTANDING YOUR INSTRUMENT PANEL 435
Page 441 of 726
Display
Other Language Setup
All of the Language settings have a special#Other#setting
to accommodate languages other than Japanese or Eng-
lish. These languages are selected using a special four-
digit code.
To enter a new language code, activate the DVD Setup
Menu. To enter DVD Setup Menu stop the DVD, enter
radio disc mode, then DVD setup and follow these
additional instructions:
•Using the remote control Up and Down cursor but-
tons, highlight the Language item you want to edit,
and then push the remote control ENTER/OK button.
•Using the remote control Down cursor button, select
the#Other#setting, then push the remote control’s
Right cursor button to begin editing the setting.
•Using the remote control Up and Down cursor but-
tons, select a digit for the current position. After
DVD Player Language Menu
4
UNDERSTANDING YOUR INSTRUMENT PANEL 439
Page 442 of 726
selecting the digit, push the remote control’s Right
cursor button to select the next digit. Repeat this digit
selection sequence for all four digits.
•When the entire four-digit code is entered, push the
remote control’s ENTER/OK button. If the language
code is not valid, the numbers all change back to#&#.
If the digits are visible after this step, then the lan-
guage code is valid.
Here is an abbreviated list of language codes. For more
language codes, please contact the dealer where the
vehicle was purchased.
Language Code Language Code
Dutch 2311 French 1517
German 1304 Italian 1819
Portuguese 2519 Spanish 1418
Rating And Password Setup
The Rating and Password settings work together to
control the types of DVDs that your family watches. Most
DVD-Video discs have a rating (from 1 to 8) assigned to
them where lower numbers are designated for all audi-
ences and higher numbers are designated for more adult
audiences.
When a DVD-Video disc is loaded, its rating is compared
to the setting in the DVD player. If the rating of the disc
is higher than the setting in the player, a Password screen
is displayed. In order to watch the disc, the rear passen-
ger must enter the correct password using the password
entry method described below.
To play all discs without requiring a password, set the
DVD player ’s rating to Level 8. Setting the rating to Level
1 always requires the password to play any DVD disc.
Not all DVD discs encode a Rating, so it is still possible
that discs designed for adult audiences can still play
without requiring a password.
440 UNDERSTANDING YOUR INSTRUMENT PANEL
Page 443 of 726
The default rating is Level 8 (play all discs without a
password) and the default password is 0000.
To set the password, activate the DVD Setup Menu and
follow these additional instructions:
•Using the remote control Left and Right cursor but-
tons, select the Rating tab.
•Highlight#Change Password#, and then push the
remote control’s ENTER/OK button.
•Enter the current password. Select a digit, use the
remote control Up and Down cursor buttons to set the
value for the current digit, and then push the remote
control’s Right cursor button to select the next digit.
Repeat this digit selection sequence for all four digits.
DVD Password Entry
4
UNDERSTANDING YOUR INSTRUMENT PANEL 441
Page 444 of 726
•After the four-digit password is entered, push the
remote control’s ENTER/OK button. If the password
is correct, the set password screen is displayed.
•Using the remote control’s Up and Down cursor
buttons to set the value for the current digit and the
remote control’s Right cursor button to select digits,
enter the new password.
•After the four-digit password is entered, push the
remote control’s ENTER/OK button to accept the
change.
DVD Player Level Menu
442 UNDERSTANDING YOUR INSTRUMENT PANEL
Page 445 of 726
To set the rating, activate the DVD Setup Menu and
follow these additional instructions:
•Using the remote control’s Left and Right cursor
buttons, select the Rating tab.
•Highlight#Change Rating#, and then push the remote
control’s ENTER/OK button.
•Enter the current password. Select a digit, use the
remote control’s Up and Down cursor buttons to set
the value for the current digit, and then push the
remote control’s Right cursor button to select the next
digit. Repeat this digit selection sequence for all four
digits.
•After the four-digit password is entered, push the
remote control’s ENTER/OK button. If the password
is correct, the Rating Level menu is displayed.
•Using the remote control’s Up and Down cursor
buttons, select the new rating level, and then push the
remote control’s ENTER/OK button to accept the
change.
Product Agreement
Software
This product contains software licensed under GNU
General Public License (GPL) or GNU Lesser General
Public License (LGPL), etc. You have the right of acqui-
sition, modification, and distribution of the source code
of the GPL/LGPL software. You may download Source
Code from the following website at no charge.
http://www.embedded-carmultimedia.jp/linux/
oss/download/MP_632_34W821
The website provides the Source Code#As Is#and
without warranty of any kind. By downloading Source
4
UNDERSTANDING YOUR INSTRUMENT PANEL 443
Page 449 of 726
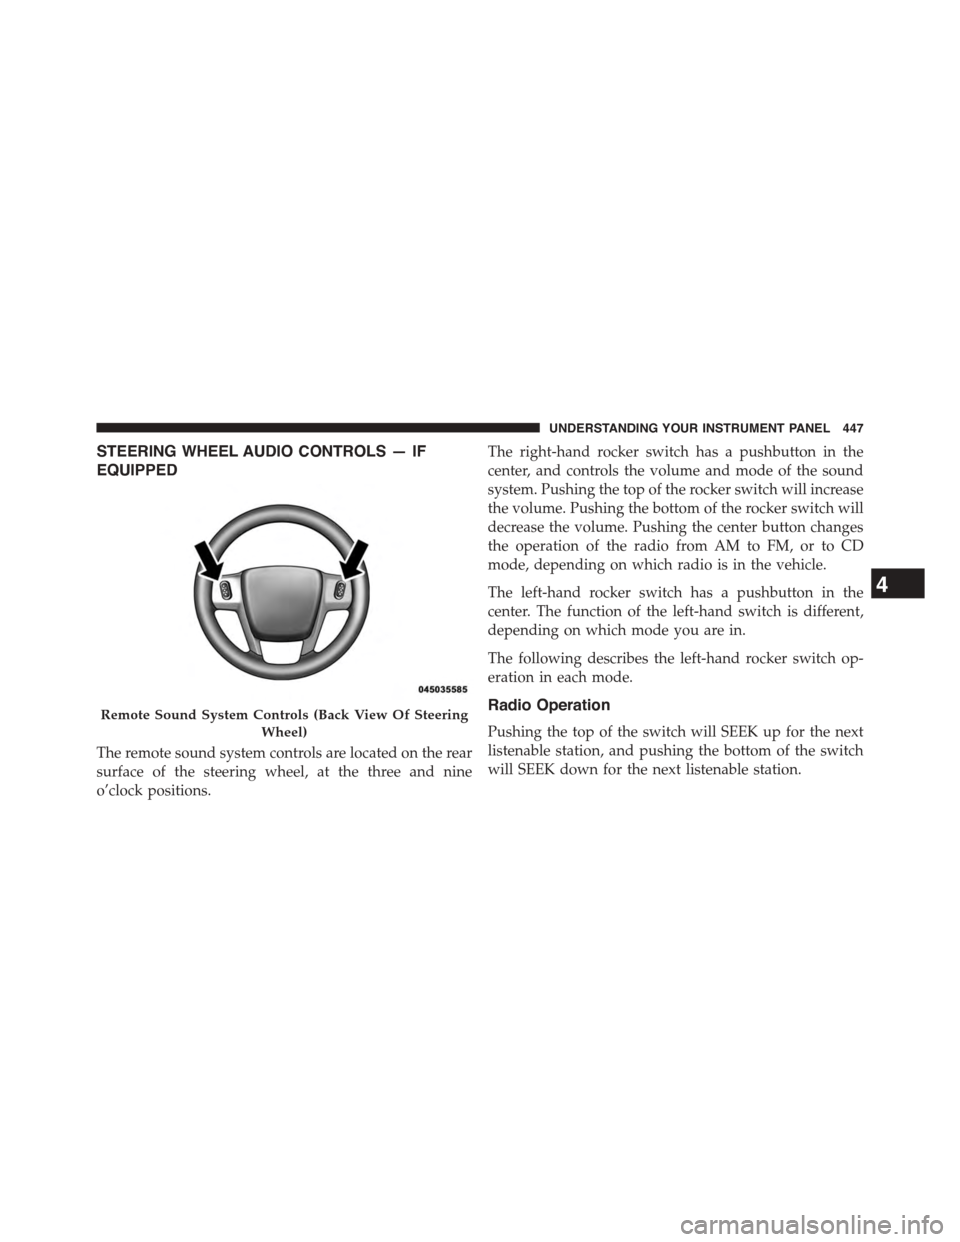
STEERING WHEEL AUDIO CONTROLS — IF
EQUIPPED
The remote sound system controls are located on the rear
surface of the steering wheel, at the three and nine
o’clock positions.
The right-hand rocker switch has a pushbutton in the
center, and controls the volume and mode of the sound
system. Pushing the top of the rocker switch will increase
the volume. Pushing the bottom of the rocker switch will
decrease the volume. Pushing the center button changes
the operation of the radio from AM to FM, or to CD
mode, depending on which radio is in the vehicle.
The left-hand rocker switch has a pushbutton in the
center. The function of the left-hand switch is different,
depending on which mode you are in.
The following describes the left-hand rocker switch op-
eration in each mode.
Radio Operation
Pushing the top of the switch will SEEK up for the next
listenable station, and pushing the bottom of the switch
will SEEK down for the next listenable station.
Remote Sound System Controls (Back View Of Steering
Wheel)
4
UNDERSTANDING YOUR INSTRUMENT PANEL 447