Page 267 of 726
If your vehicle is equipped with Remote Keyless Entry
(RKE) the lights will also turn on when the UNLOCK
button on the RKE transmitter is pressed.
The courtesy lights also function as reading lights. Press
in on each lens to turn these lights on while inside the
vehicle. Press a second time to turn each light off. You
may adjust the direction of these lights by pressing the
outside ring, which is identified with four directional
arrows (LED lamps only).
The area around the instrument panel cupholders is also
illuminated from a light in the overhead console (pre-
mium console only). This light is turned on when the
headlight switch is on, and will adjust in brightness when
the dimmer control is rotated up or down.
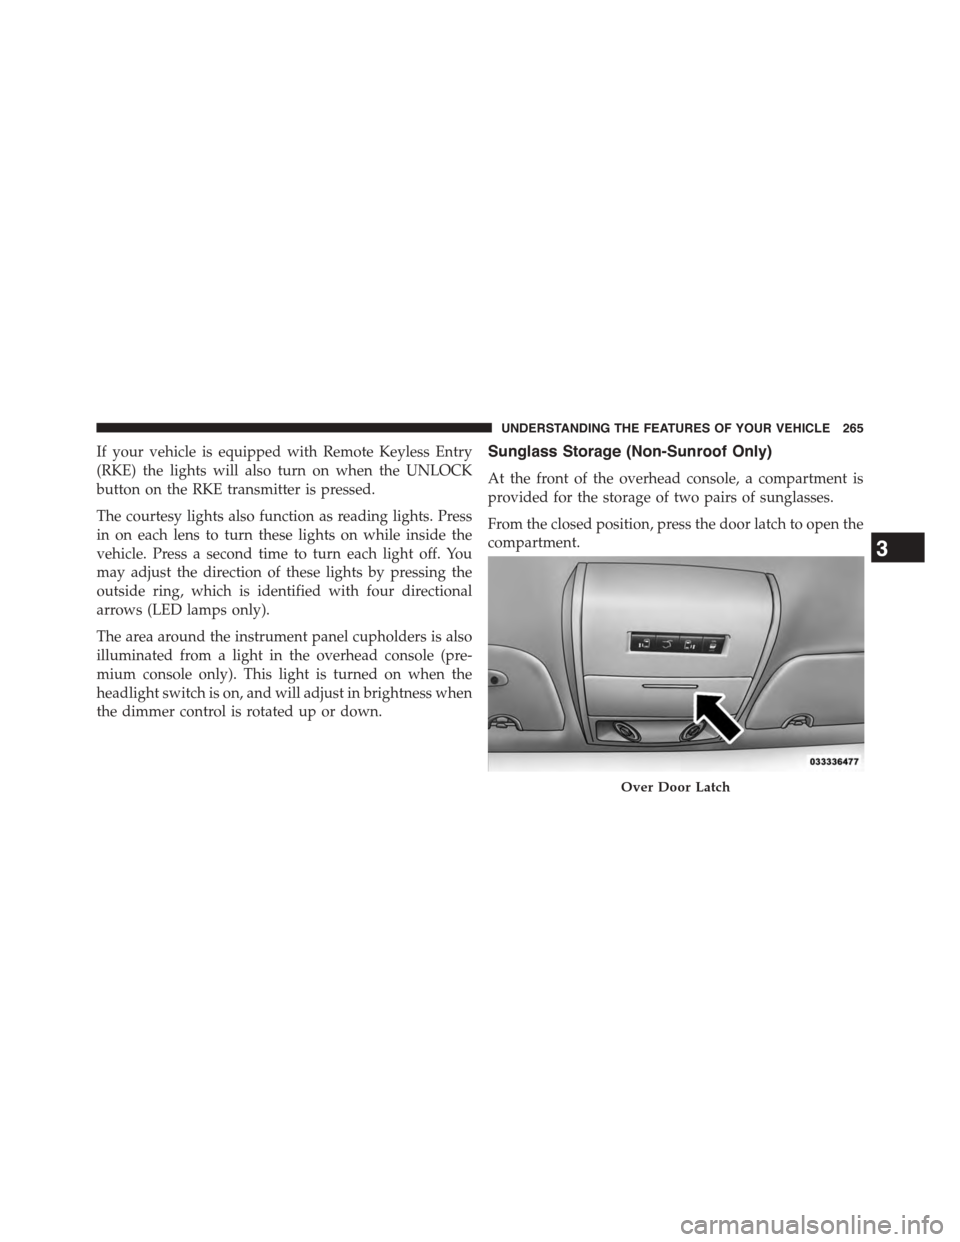
Sunglass Storage (Non-Sunroof Only)
At the front of the overhead console, a compartment is
provided for the storage of two pairs of sunglasses.
From the closed position, press the door latch to open the
compartment.
Over Door Latch
3
UNDERSTANDING THE FEATURES OF YOUR VEHICLE 265
Page 270 of 726
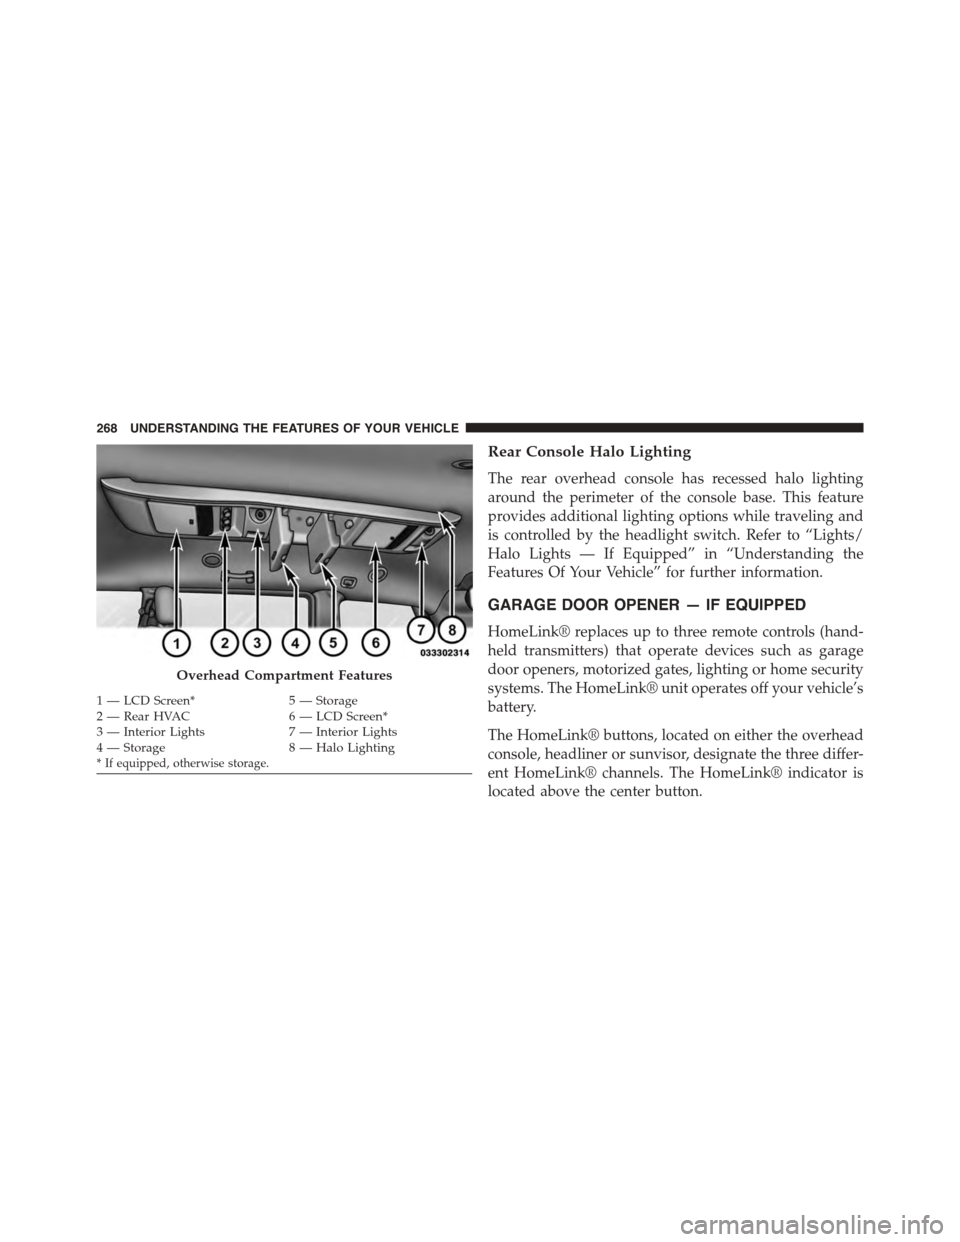
Rear Console Halo Lighting
The rear overhead console has recessed halo lighting
around the perimeter of the console base. This feature
provides additional lighting options while traveling and
is controlled by the headlight switch. Refer to “Lights/
Halo Lights — If Equipped” in “Understanding the
Features Of Your Vehicle” for further information.
GARAGE DOOR OPENER — IF EQUIPPED
HomeLink® replaces up to three remote controls (hand-
held transmitters) that operate devices such as garage
door openers, motorized gates, lighting or home security
systems. The HomeLink® unit operates off your vehicle’s
battery.
The HomeLink® buttons, located on either the overhead
console, headliner or sunvisor, designate the three differ-
ent HomeLink® channels. The HomeLink® indicator is
located above the center button.
Overhead Compartment Features
1—LCDScreen*5—Storage2—RearHVAC6—LCDScreen*3 — Interior Lights7 — Interior Lights4—Storage8—HaloLighting* If equipped, otherwise storage.
268 UNDERSTANDING THE FEATURES OF YOUR VEHICLE
Page 320 of 726
▫Listen To An Audio Source While A Video Is
Playing.............................414
▫Important Notes For Dual Video Screen
System.............................416
▫VES™ Remote Control — If Equipped.......417
▫Blu-ray™ Player Remote Control — If
Equipped...........................420
▫Remote Control Storage.................422
▫Locking The Remote Control.............423
▫Replacing The Remote Control Batteries......423
▫Headphones Operation.................424
▫Blu-ray™ Headphones Operation..........425
▫Controls............................426
▫Replacing The Headphone Batteries.........427
▫Unwired® Stereo Headphone Lifetime Limited
Warranty...........................427
▫System Information....................428
▫Shared Modes........................428
▫Information Mode Display...............430
▫Numeric Keypad Menu.................430
▫Station List Menu.....................431
▫Disc Menu..........................432
▫Display Settings.......................432
▫Listening To Audio With The Screen Closed . . .433
▫Disc Formats.........................433
▫Display.............................439
▫Product Agreement....................443
318 UNDERSTANDING YOUR INSTRUMENT PANEL
Page 342 of 726
EVIC’s compass/outside temp line. Examples of this
message type are#Right Front Turn Signal Lamp Out#
and#Low Tire Pressure#.
•Unstored Messages
This message type is displayed indefinitely or until the
condition that activated the message is cleared. Examples
of this message type are#Turn Signal On#(if a turn signal
is left on) and#Lights On#(if driver leaves the vehicle).
•Unstored Messages Until RUN
These messages deal primarily with the Remote Start
feature. This message type is displayed until the ignition
is in the RUN state. Examples of this message type are
#Remote Start Aborted - Door Ajar#and#Press Brake
Pedal and Push Button to Start#.
•Five Second Unstored Messages
When the appropriate conditions occur, this type of
message takes control of the main display area for five
seconds and then returns to the previous screen. Ex-
amples of this message type are#Memory System Un-
available - Not in Park#and#Automatic High Beams On#.
The Reconfigurable Telltales section is divided into the
white telltales area on the right, amber telltales in the
middle, and red telltales on the left.
When the appropriate conditions exist, the EVIC displays
the following messages:
•Key in ignition
•Ignition or Accessory On
•Remote start aborted — Door ajar
•Remote start aborted — Hood ajar
•Remote start aborted — L/Gate ajar
•Remote start aborted — Fuel low
340 UNDERSTANDING YOUR INSTRUMENT PANEL
Page 400 of 726
•Your vehicle may be equipped with either a standard
DVD player or a Blu-ray™ Disc Player. If equipped
with a Blu-ray™ Disc Player, the icon will be present
on the Player.
•Turn on the Player (if equipped on Dual Screen Sys-
tem) by pushing the Power button, located on the far
left, or by pushing the button on the Remote Control.
•When the Video Screen(s) are open and a DVD/Blu-
ray™ Disc is inserted into the VES™ player, the
screen(s) turn(s) on automatically, the headphone
transmitters turn on and playback begins.
•For Dual Video Screen System, Channel 1 on the
Remote Control and Headphones refers to Screen 1
(second row) and Channel 2 on the Remote Control
and Headphones refers to Screen 2 (third row). Refer to
the Dual Video Screen section for more information.
•The system can be controlled by the front seat occu-
pants using either the touchscreen radio, the DVD or
Blu-ray™ Disc Player, or by the rear seat occupants
using the remote control.
Blu-ray™ Disc Player
Play A Blu-ray™ Disc
To view a Blu-ray™ disc, insert the disc into the Blu-
ray™ VES™ disc Player. Playback will begin automati-
cally after the Blu-ray™ is recognized by the disc drive. If
playback does not begin automatically after the disc is
inserted into the Blu-ray™ Player push the play button. If
playback does not begin automatically after the disc is
inserted into Blu-ray™ VES™ disc Player follow these
steps:
398 UNDERSTANDING YOUR INSTRUMENT PANEL
Page 401 of 726
Using The Touchscreen Radio
•Push the MENU button on the faceplate, then press the
Rear VES™ button on the touchscreen. If a chapter list
appears on the right side of the screen, press the hide
list button on the touchscreen to display the Rear
VES™ control screen.
•Press the 1 button on the touchscreen to select an audio
channel, then press the VES™ Disc button on the
touchscreen in the media column.
Using The Remote Control
•Select an audio channel (Channel 1 for 2nd row screen
and Channel 2 for 3rd row screen), then push the
source key and select VES™ Disc from the menu.
•Push popup/menu key to navigate disc menu and
options.
NOTE:
•Due to the size of the content on a Blu-ray™ Disc, the
disc may not start playing immediately.
•Not all Blu-ray™, CD or DVD discs will automatically
restart from where you left off at when turned off.
Some discs will restart from the beginning, others will
restart from where you left off at, and some will ask
you if you would like to continue or start from the
beginning.
4
UNDERSTANDING YOUR INSTRUMENT PANEL 399
Page 403 of 726
When connecting an external source to the AUX input, be
sure to follow the standard color coding for the VES™
jacks:
NOTE:Certain high-end video games, such as Playsta-
tion3 and XBox360 will exceed the power limit of the
vehicle’s Power Inverter. Refer to the Power Inverter
section in your vehicle’s Owner’s Manual for more
information.
Using The Remote Control
1. Push the MODE button on the Remote Control.
2. While looking at the video screen, highlight VES™
AUX 1, by either pushing Up/Down/Left/Right but-
tons or by repeatedly pushing the MODE button, then
push ENTER on the Remote Control.
Select VES™ AUX1 Mode On The VES™ Screen
4
UNDERSTANDING YOUR INSTRUMENT PANEL 401
Page 405 of 726
3. Press the 1 button on the touchscreen and then press
either AUX 1 or AUX 2 in the VES™ column (depend-
ing which AUX input is used). To exit press the back
arrow button at the top of the touchscreen.
Listen To An Audio Source On Channel 2 While A
Video Is Playing On Channel 1
Ensure the Remote Control and Headphone switch is on
Channel 2.
Using The Remote Control
1. Push the SOURCE button on the Remote Control and
the Mode Select Screen will display, unless a video is
playing then only a small banner will appear on the
bottom of the screen.
2. While looking at the video screen, either push Up/
Down/Left/Right on the Remote Control to highlight
the desired audio source or repeatedly push the
SOURCE button on the remote until the desired audio
source appears on the screen.
Select Channel/Screen 1 And AUX 1 In The VES™
Column
4
UNDERSTANDING YOUR INSTRUMENT PANEL 403