2015 CHRYSLER 300 radio
[x] Cancel search: radioPage 104 of 180

Audio Jack (AUX)
The AUX allows a portable device, such as an MP3 player or an iPod®, to be plugged into the radio
and utilize the vehicle’s sound system, using a 3.5 mm stereo audio cable, to amplify the source and
play through the vehicle speakers.
• Pressing the “AUX” button on the touchscreen will change the mode to auxiliary device if the
audio jack is connected, allowing the music from your portable device to be heard through the
vehicle's speakers. In order to activate the AUX, plug in the audio jack.
•Thefunctionsoftheportabledevicearecontrolledusingthedevicebuttons.Thevolumemay
be controlled using the radio or portable device.
• To route the audio cable out of the center console, use the access cut out in the front of the
console.
SD Card
• Play songs stored on an SD card inserted into the SD card slot.
•SongplaybackcanbecontrolledusingtheradioorSteeringWheelAudioControlstoplay,
skip to the next or previous track, browse, and list the contents.
Bluetooth® Streaming Audio
If using a Bluetooth® - equipped device, you may also be able to stream music to your vehicle's
sound system. Your connected device must be Bluetooth-compatible, and paired with your
system (see Uconnect® Phone for pairing instructions).
•YoucanaccessthemusicfromyourconnectedBluetooth®devicebypressingthe
“Bluetooth®”button on the touchscreen while in Media mode.
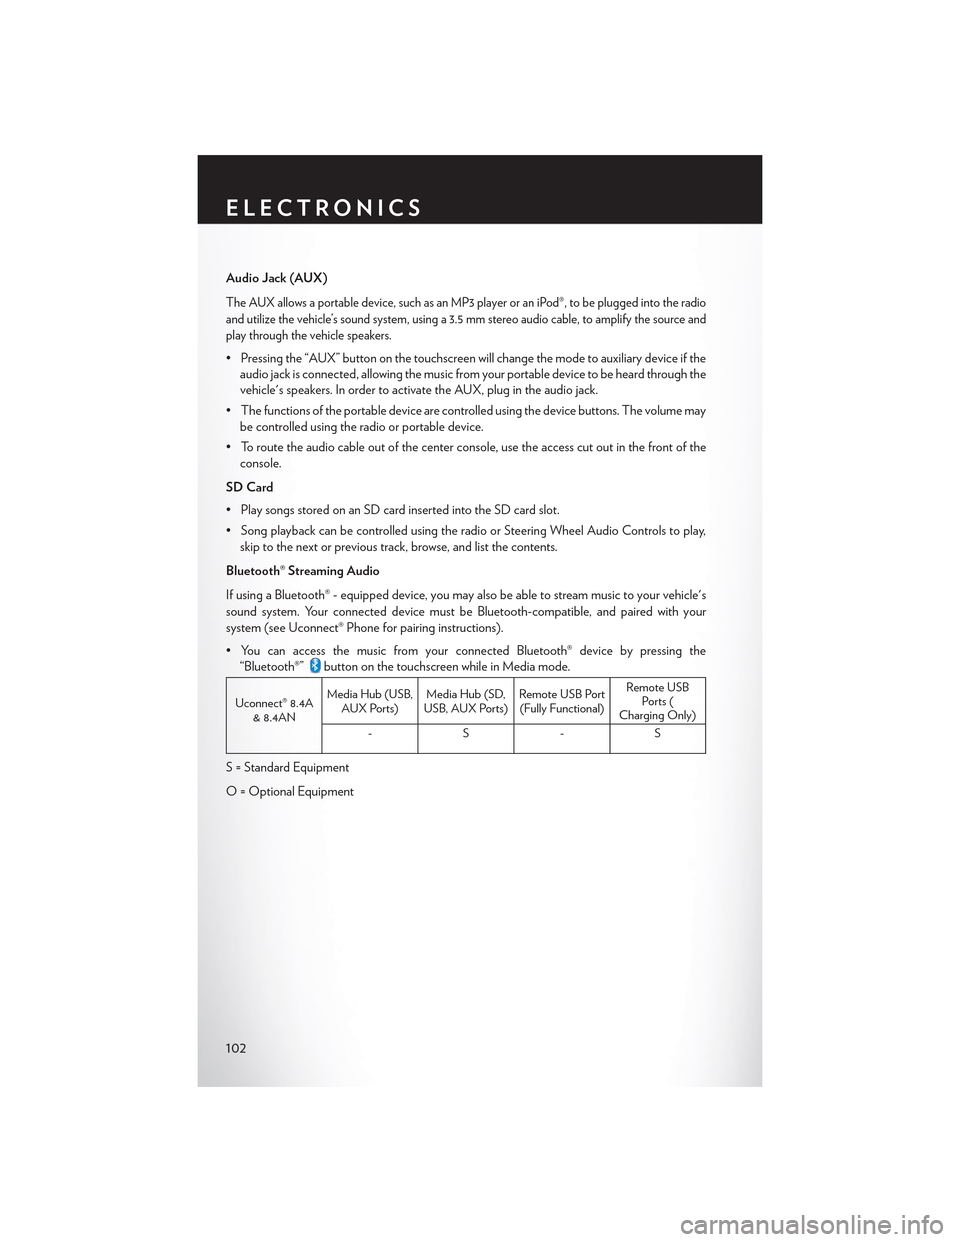
Uconnect® 8.4A& 8.4AN
Media Hub (USB,AUX Ports)Media Hub (SD,USB, AUX Ports)Remote USB Port(Fully Functional)
Remote USBPorts (Charging Only)
-S-S
S = Standard Equipment
O = Optional Equipment
ELECTRONICS
102
Page 112 of 180

Refer to theUnderstand The Features Of Your Vehiclesection of your vehicle's Owner's
Manual on the DVD for further details.
NOTE:
• The Uconnect® Phone requires a mobile phone equipped with the Bluetooth® Hands-Free
Profile, Version 1.0 or higher.
•Mostmobilephones/devicesarecompatiblewiththeUconnect®system,howeversome
mobile phones/devices may not be equipped with all of the required features to utilize all of
the Uconnect® system features.
•ForUconnect®CustomerCare:
• U.S. residents visit UconnectPhone.com or call 1-877-855-8400.
• Canadian Residents visit UconnectPhone.com or call, 1-800-465–2001 (English) or
1-800-387-9983 (French).
Pairing (Wirelessly Connecting) Your Mobile Phone To The Uconnect®
System
Mobile phone pairing is the process of establishing a wireless connection between a cellular
phone and the Uconnect system.
NOTE:
•TousetheUconnect®Phonefeature,youfirstmustdetermineifyourmobilephoneand
software are compatible with the Uconnect® system. Please visit UconnectPhone.com for
complete mobile phone compatibility information.
•Mobilephonepairingisnotavailablewhilethevehicleisinmotion.
•Amaximumof10mobilephonescanbepairedtotheUconnect®system.
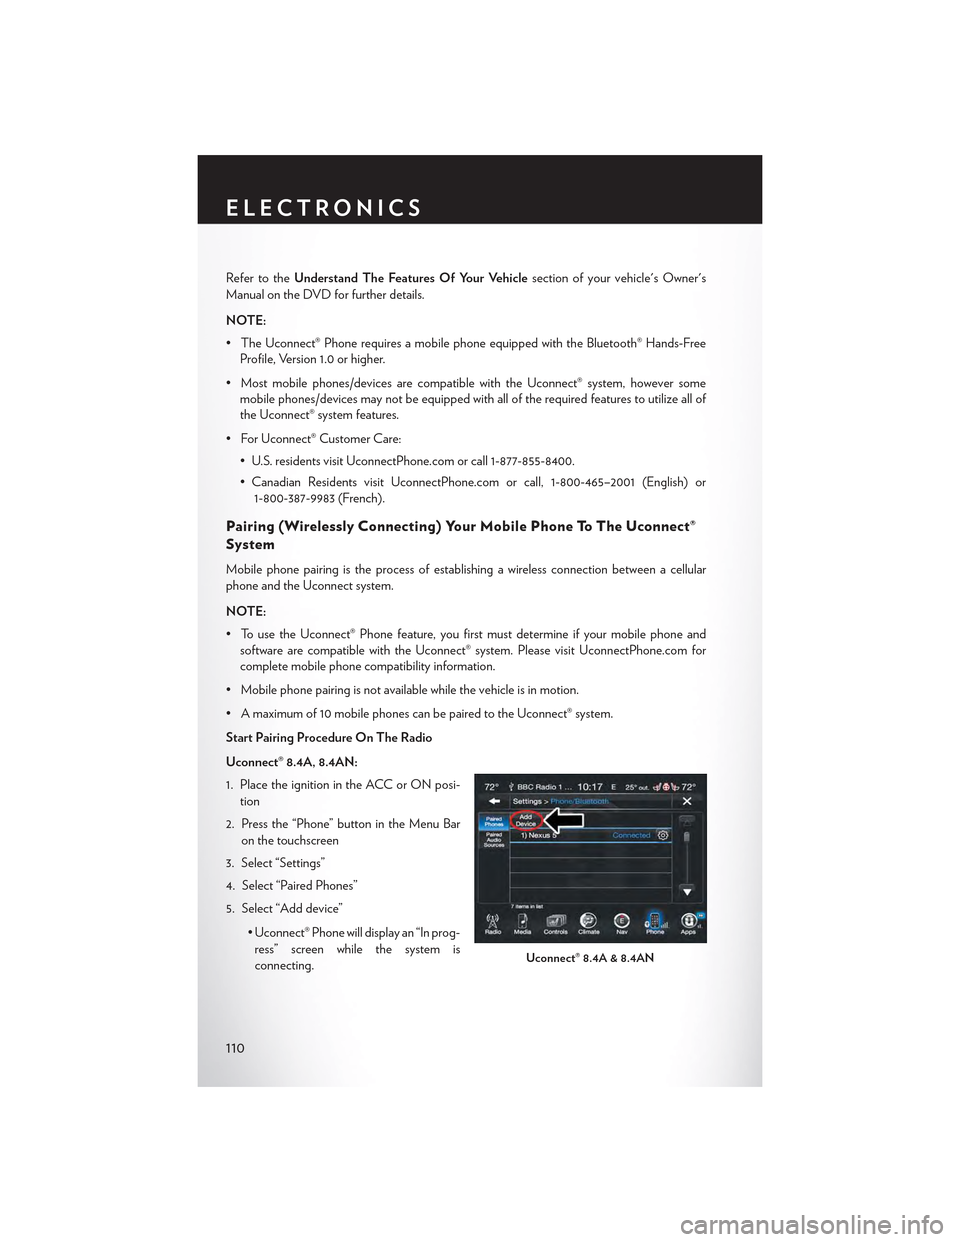
Start Pairing Procedure On The Radio
Uconnect® 8.4A, 8.4AN:
1. Place the ignition in the ACC or ON posi-
tion
2. Press the “Phone” button in the Menu Bar
on the touchscreen
3. Select “Settings”
4. Select “Paired Phones”
5. Select “Add device”
• Uconnect® Phone will display an “In prog-
ress” screen while the system is
connecting.Uconnect® 8.4A & 8.4AN
ELECTRONICS
110
Page 116 of 180

Vo i c e C o m m a n d T i p s
•Speakingcompletenames(i.e;CallJohnDoevs.CallJohn)willresultingreatersystem
accuracy.
• You can “link” commands together for faster results. Say “Call John Doe, mobile,” for example.
•Ifyouarelisteningtoavailablevoicecommandoptions,youdonothavetolistentotheentire
list. When you hear the command that you need, push thebutton on the steering
wheel, wait for the beep and say your command.
Changing The Volume
• Start a dialogue by pushing the Phone button, then say a command for example -
"Help".
•UsetheradioVOLUME/MUTErotaryknobtoadjustthevolumetoacomfortablelevelwhile
the Uconnect® system is speaking. Please note the volume setting for Uconnect® is different
than the audio system.
NOTE:
To access help, push the Uconnect® Phone buttonon the steering wheel and say "help."
Press the display or press either the Phoneor VRbutton and say "cancel" to cancel
the help session.
Incoming Text Messages
After pairing your Uconnect® system with a Bluetooth® enabled mobile device with the Message
Access Profile (MAP), the Uconnect® system can announce a new incoming text message and
read it to you over the vehicle’s audio system.
NOTE:
Only incoming text messages received during the current ignition cycle can be viewed/read.
ELECTRONICS
114
Page 120 of 180

STEERING WHEEL AUDIO CONTROLS
The steering wheel audio controls are located on the rear surface of the steering wheel.
Left Switch
• Push the switch up or down to search for the
next listenable station or select the next or
previous CD track.
• Push the button in the center to select the
next preset station (radio) or to change CDs
if equipped with a CD Changer.
Right Switch
• Push the switch up or down to increase or
decrease the volume.
• Push the button in the center to change
modes AM/FM/CD/SAT.
SETTING THE ANALOG CLOCK
•Tosettheanalogclockatthetopcenteroftheinstrumentpanel,pushandholdthebutton
until the setting is correct.
Steering Wheel Audio Controls
Setting The Analog Clock
ELECTRONICS
118
Page 123 of 180

UNIVERSAL GARAGE DOOR OPENER
(HomeLink®)
• HomeLink® replaces up to three hand-held transmitters that operate devices such as garage
door openers, motorized gates, lighting or home security systems. The HomeLink® unit is
powered by your vehicles 12 Volt battery.
•TheHomeLink®buttonsthatarelocatedintheoverheadconsoleorsunvisordesignatethe
three different HomeLink® channels.
•TheHomeLink®indicatorislocatedabovethecenterbutton.
Before You Begin Programming
HomeLink®
Ensure that your vehicle is parked outside of
the garage before you begin programming.
For efficient programming and accurate trans-
mission of the radio-frequency signal, it is rec-
ommended that a new battery be placed in the
hand-held transmitter of the device that is be-
ing programmed to the HomeLink® system.
To erase the channels, place the ignition switch
into the ON/RUN position, then push and hold
the two outside HomeLink® buttons (I and III) for up to 20 seconds or until the red indicator
flashes.
NOTE:
Erasing all channels should only be performed when programming HomeLink® for the first time.
Do not erase channels when programming additional buttons.
If you have any problems, or require assistance, please call toll-free 1-800-355-3515 or, on the
Internet at HomeLink.com for information or assistance.
Programming A Rolling Code
NOTE:
For programming Garage Door Openers that were manufactured after 1995. These Garage
Door Openers can be identified by the “LEARN” or “TRAIN” button located where the hanging
antenna is attached to the Garage Door Opener. It is NOT the button that is normally used to
open and close the door. The name and color of the button may vary by manufacturer.
1. Place the ignition switch into the ON/RUN position.
2. Place the hand-held transmitter 1 to 3 inches (3 to 8 cm) away from the HomeLink® button you
wish to program while keeping the HomeLink® indicator light in view.
3. Push and hold the HomeLink® button you want to program while you push and hold the
hand-held transmitter button.
HomeLink® Buttons
ELECTRONICS
121
Page 141 of 180

BATTERY LOCATION
The battery is stored under an access cover in the trunk. Remote battery posts are located on the
right side of the engine compartment for jump-starting.
JUMP-STARTING
If your vehicle has a discharged battery it can be jump-started using a set of jumper cables and a
battery in another vehicle or by using a portable battery booster pack.
Jump-starting can be dangerous if done improperly so please follow the procedures in this
section carefully.
NOTE:
When using a portable battery booster pack
follow the manufacturer’s operating instruc-
tions and precautions.
Preparations For Jump-Start
The battery is stored under an access cover in
the trunk. Remote battery posts are located on
the right side of the engine compartment for
jump-starting.
NOTE:
The remote battery posts are viewed by stand-
ing on the right side of the vehicle looking over
the fender.
•Settheparkingbrake,shifttheautomatic
transmission into PARK and turn the ignition
to OFF.
• Turn off the heater, radio, and all unnecessary
electrical accessories.
•Ifusinganothervehicletojump-startthebattery,parkthevehiclewithinthejumpercables
reach, set the parking brake and make sure the ignition is OFF.
Remote Battery Posts
1—PositiveBatteryPost2—NegativeBatteryPost
WHAT TO DO IN EMERGENCIES
139
Page 162 of 180

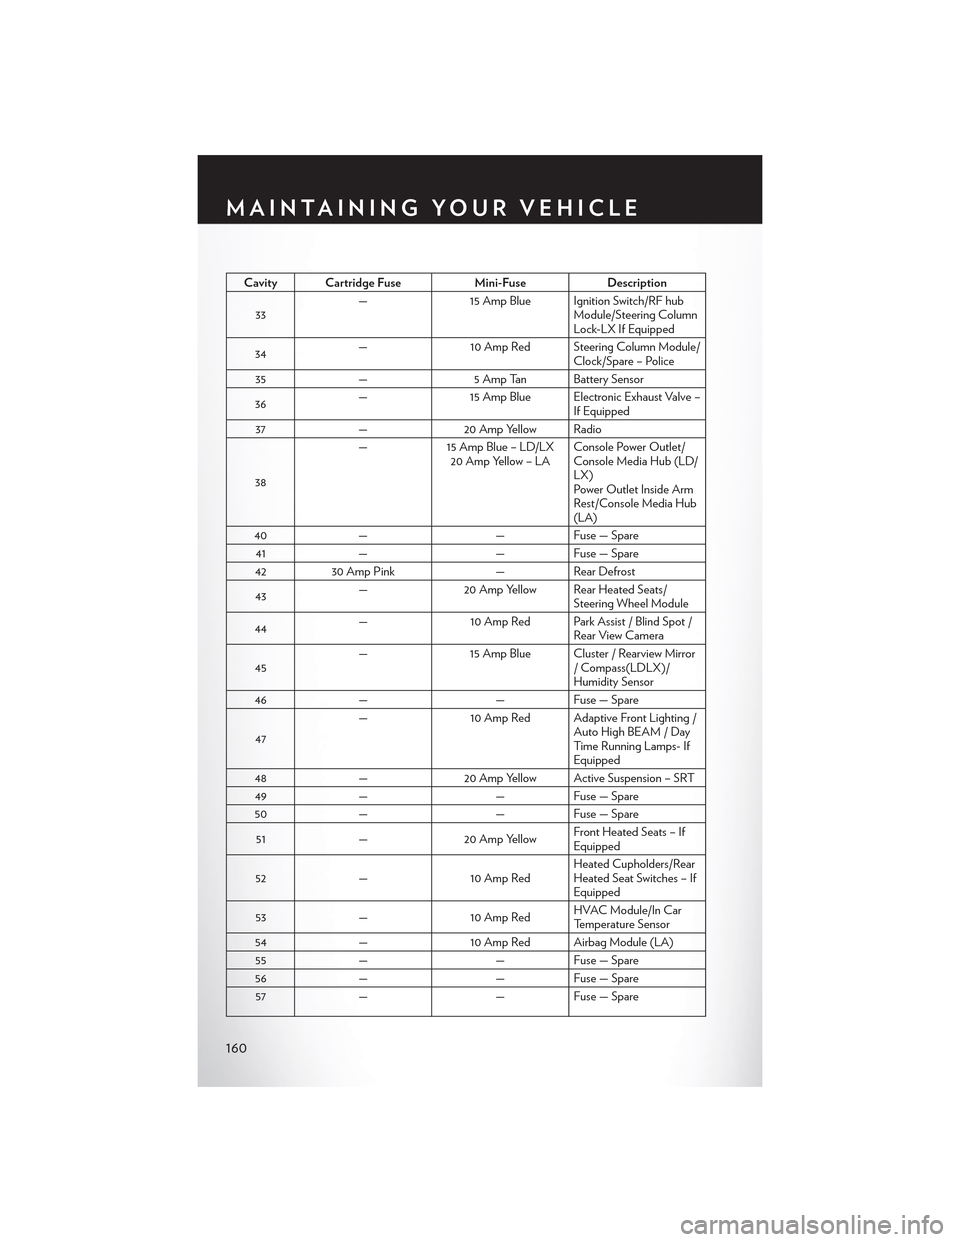
Cavity Cartridge FuseMini-FuseDescription
33—15 Amp Blue Ignition Switch/RF hubModule/Steering ColumnLock-LX If Equipped
34—10 Amp Red Steering Column Module/Clock/Spare – Police
35—5 Amp Tan Battery Sensor
36—15 Amp Blue Electronic Exhaust Valve –If Equipped
37—20 Amp Yellow Radio
38
—15 Amp Blue – LD/LX20 Amp Yellow – LAConsole Power Outlet/Console Media Hub (LD/LX)Power Outlet Inside ArmRest/Console Media Hub(LA)
40——Fuse — Spare
41——Fuse — Spare
4230 Amp Pink—Rear Defrost
43—20 Amp Yellow Rear Heated Seats/Steering Wheel Module
44—10 Amp Red Park Assist / Blind Spot /Rear View Camera
45—15 Amp Blue Cluster / Rearview Mirror/Compass(LDLX)/Humidity Sensor
46——Fuse — Spare
47
—10 Amp Red Adaptive Front Lighting /Auto High BEAM / DayTi m e R u n n i n g L a m p s- IfEquipped
48—20 Amp Yellow Active Suspension – SRT
49——Fuse — Spare
50——Fuse — Spare
51—20 Amp YellowFront Heated Seats – IfEquipped
52—10 Amp RedHeated Cupholders/RearHeated Seat Switches – IfEquipped
53—10 Amp RedHVAC Module/In CarTemperature Sensor
54—10 Amp Red Airbag Module (LA)
55——Fuse — Spare
56——Fuse — Spare
57——Fuse — Spare
MAINTAINING YOUR VEHICLE
160
Page 169 of 180

FCA US LLC CUSTOMER CENTER
P.O. Box 21–8004 Auburn Hills, MI 48321–8004 Phone: 1-800-247-9753
FCA CANADA INC. CUSTOMER CENTER
P.O. Box 1621 Windsor, Ontario N9A 4H6 Phone: 1-800-465-2001 (English) Phone:
1-800-387-9983 (French)
PUBLICATIONS ORDERING
•Ifyouarethefirstregisteredretailownerofyourvehicle,youmayobtainacomplimentary
printed copy of the Owner's Manual, Navigation/Uconnect® Manuals or Warranty Booklet.
United States customers may visit the Chrysler Contact Us page at www.chrysler.com scroll to
the bottom of the page and select the “Contact Us” link, then select the “Owner’s Manual and
Glove Box Material” from the left menu. You may also obtain a complimentary copy by calling
1-800-247-9753 (U.S.) or 1-800-387-1143 (Canada).
• Replacement User Guide kits or DVDs or, if you prefer, additional printed copies of the
Owner's Manual, Warranty Booklet or Radio Manuals may be purchased by visiting
www.techauthority.com or by calling 1-800-890-4038 (U.S.) or 1-800-387-1143 (Canada).
Visa, Master Card, American Express and Discover orders are accepted. If you prefer mailing
your order, please call the above numbers for an order form.
NOTE:
• A street address is required when ordering manuals (no P.O. Boxes).
•TheOwner'sManualandUserGuideelectronicfilesarealsoavailableontheChrysler,Jeep,
Ram Truck, Dodge and SRT websites.
•Clickonthe“ForOwners”tab,select“Owner/ServiceManuals”,thenselectyourdesired
model year and vehicle from the drop down lists.
ASSISTANCE FOR THE HEARING IMPAIRED
To a s s i s t c u s t o m e r s w h o h a v e h e a r i n g d i f f i c u l t i e s , t h e m a n u f a c t u r e r h a s i n s t a l l e d s p e c i a l T D D
(Telecommunication Devices for the Deaf ) equipment at its customer center. Any hearing or
speech impaired customer, who has access to a TDD or a conventional teletypewriter (TTY) in
the United States, can communicate with the manufacturer by dialing 1-800-380-CHRY. Cana-
dian residents with hearing difficulties that require assistance can use the special needs relay
service offered by Bell Canada. For TTY teletypewriter users, dial 711 and for Voice callers, dial
1-800-855-0511 to connect with a Bell Relay Service operator.
CONSUMER ASSISTANCE
167