2015 CHRYSLER 300 radio
[x] Cancel search: radioPage 63 of 180

Selling Your Vehicle
When you sell your vehicle, we recommend that you remove your Uconnect® Access Account
information from the vehicle. You can do this using the radio touchscreen in the vehicle or on the
Mopar Owner Connect website (moparownerconnect.com). Removing your account informa-
tion cancels your subscription and makes your vehicle factory-ready for a new owner/subscriber.
1. From your vehicle’s radio touchscreen, select “Uconnect® Store” from the Apps Menu.
2. Select “My Apps,” then “Settings.” Press “Remove Uconnect® Account.”
3. Enter your Uconnect® Security PIN, and select “Continue.”
For additional information on Uconnect®:
•U.S.residents-visitDriveUconnect.comorcall1-877-855-8400.
•CanadianResidents-visitDriveUconnect.caorcall,1-800-465-2001(English)or
1-800-387-9983 (French).
Built-In Features (Uconnect® 8.4A/8.4AN)
CAUTION!
•Ignoringtherearviewmirrorlightcouldmeanyoumaynothave9-1-1Callserviceif
needed. If the rearview mirror light is illuminated, have an authorized dealer service the
9-1-1 Call system immediately.
•TheOccupantRestraintController(ORC)turnsontheAirBagWarningLightonthe
instrument panel if a malfunction is detected in any part of the air bag system. If the Air
Bag Warning Light is illuminated, the air bag system may not be working properly and the
9-1-1 system may not be able to send a signal to a 9-1-1 operator. If the Air Bag Warning
Light is illuminated, have an authorized dealer service your vehicle immediately.
•Ifanyoneinthevehiclecouldbeindanger(e.g.,fireorsmokeisvisible,dangerousroad
conditions or location), do not wait for voice contact from a 9-1-1 operator. All occupants
should exit the vehicle immediately and move to a safe location.
•Donotaddanyaftermarketelectricalequipmenttothevehicle’selectricalsystem.This
may prevent your vehicle from sending a signal to initiate an emergency call. To avoid
interference that can cause the 9-1-1 Call system to fail, never add aftermarket equipment
(e.g., two-way mobile radio, CB radio, data recorder, etc.) to your vehicle’s electrical
system or modify the antennas on your vehicle. IF YOUR VEHICLE LOSES BATTERY
POWER FOR ANY REASON (INCLUDING DURING OR AFTER AN ACCI-
DENT), THE UCONNECT® FEATURES, APPS AND SERVICES, AMONG OTH-
ERS, WILL NOT OPERATE.
ELECTRONICS
61
Page 64 of 180

1.Assist Call— The rearview mirror contains an ASSIST push button which (once registered)
automatically connects the vehicle occupants to one of these predefined destinations for
immediate support:
•Roadside Assistance Call— If you get a
flat tire, or need a tow, you’ll be con-
nected to someone who can help any-
time. Additional fees may apply. Addi-
tional information in this section.
•Uconnect® Access Care— In vehicle
support for Uconnect® Access System,
Apps and Features.
•Vehicle Care—Totalsupportforyour
FCA US LLC vehicle.
2.Emergency 9-1-1 Call (If Equipped)—
The rearview mirror contains a 9-1-1 button
that, when pressed, may place a call from
your vehicle to a local 9-1-1 operator to re-
quest help from local police, fire or ambu-
lance personnel. If this button is accidentally pushed, you will have 10 seconds to stop the call.
To cancel, push the 9-1-1 Call button again or press the “cancel” button shown on the
touchscreen. After 10 seconds has passed, the 9-1-1 call will be placed and only the 9-1-1
operator can cancel it. The LED light on the rearview mirror will turn green once a connection
to a 9-1-1 operator has been made. The green LED light will turn off once the 9-1-1 call is
terminated. Have an authorized dealer service the vehicle if the rearview mirror light is
continuously red. On equipped vehicles, this feature requires a functioning electrical system
and wireless coverage to function properly.If a connection is made between a 9-1-1
operator and your vehicle, you understand and agree that 9-1-1 operators may, like any
other 9-1-1 call, record conversations and sounds in and near your vehicle upon connec-
tion.
3.Roadside Assistance (If Equipped)—Ifyourvehicleisequippedwiththisfeatureandwithin
wireless range, you may be able to connect to Roadside Assistance by pushing the “ASSIST”
button on the rearview mirror. You will be presented with Assist Care options. Make a selection
by pressing the prompts displayed on the radio. If Roadside Assistance is provided to your
vehicle, you agree to be responsible for any additional roadside assistance service costs that
you may incur. To provide Uconnect® Services to you, we may record and monitor your
conversations with Roadside Assistance, Uconnect® Care or Vehicle Care, whether such
conversations are initiated through the Uconnect® Services in your vehicle, or via a landline or
mobile telephone, and may share information obtained through such recording and monitor-
ing in accordance with regulatory requirements. You acknowledge, agree and consent to any
recording, monitoring or sharing of information obtained through any such call recordings.
ASSIST/9-1-1 Buttons
1 — ASSIST Button2 — 9-1-1 Button
ELECTRONICS
62
Page 68 of 180

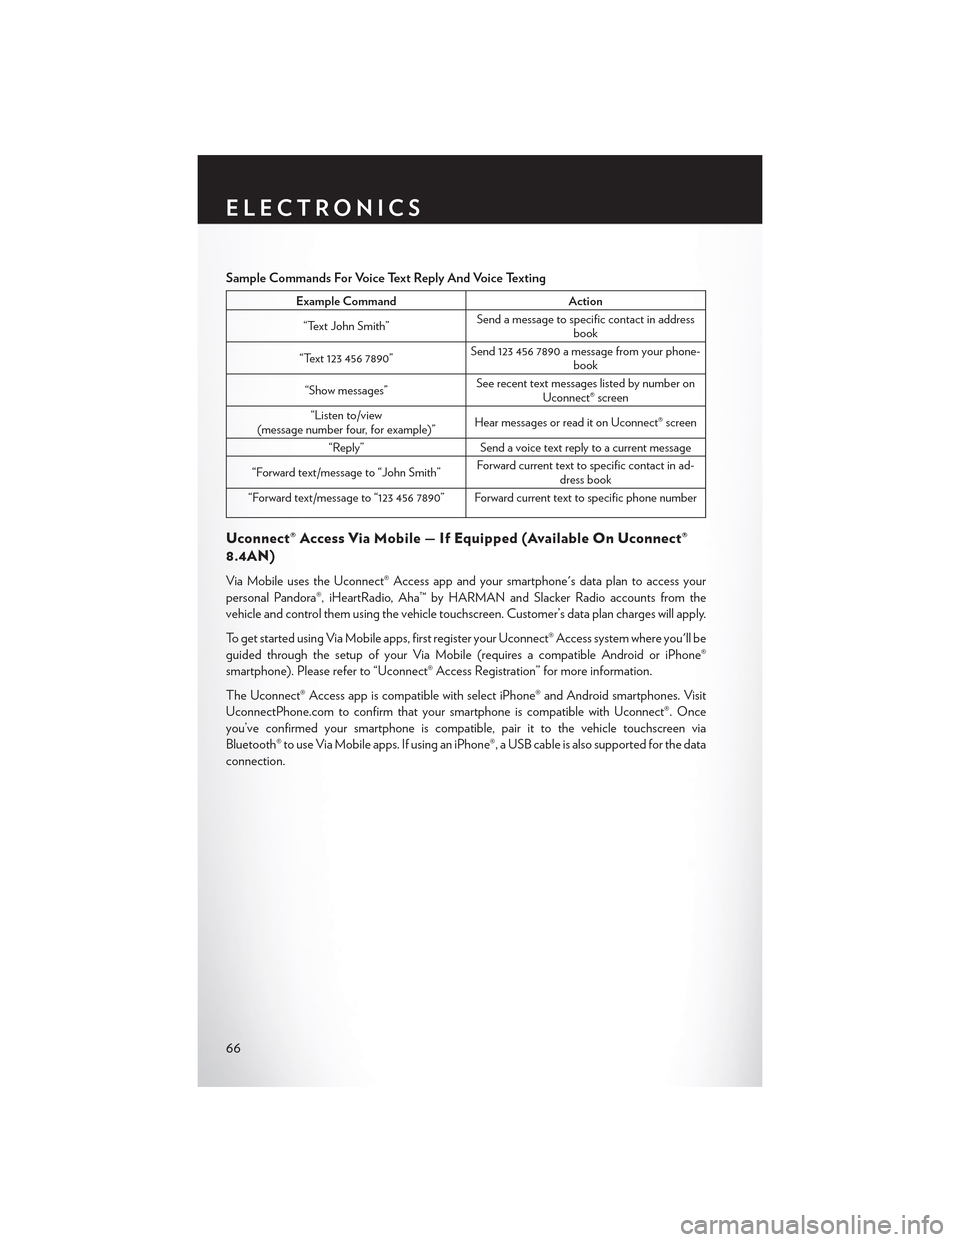
Sample Commands For Voice Text Reply And Voice Texting
Example CommandAction
“Text John Smith”Send a message to specific contact in addressbook
“Text 123 456 7890”Send 123 456 7890 a message from your phone-book
“Show messages”See recent text messages listed by number onUconnect® screen
“Listen to/view(message number four, for example)”Hear messages or read it on Uconnect® screen
“Reply”Send a voice text reply to a current message
“Forward text/message to “John Smith”Forward current text to specific contact in ad-dress book
“Forward text/message to “123 456 7890” Forward current text to specific phone number
Uconnect® Access Via Mobile — If Equipped (Available On Uconnect®
8.4AN)
Via Mobile uses the Uconnect® Access app and your smartphone's data plan to access your
personal Pandora®, iHeartRadio, Aha™ by HARMAN and Slacker Radio accounts from the
vehicle and control them using the vehicle touchscreen. Customer’s data plan charges will apply.
To g e t s t a r t e d u s i n g V i a M o b i l e a p p s , f i r s t r e g i s t e r y o u r U c o n n e c t ® A c c e s s s y s t e m w h e r e y o u ' l l b e
guided through the setup of your Via Mobile (requires a compatible Android or iPhone®
smartphone). Please refer to “Uconnect® Access Registration” for more information.
The Uconnect® Access app is compatible with select iPhone® and Android smartphones. Visit
UconnectPhone.com to confirm that your smartphone is compatible with Uconnect®. Once
you’ve confirmed your smartphone is compatible,pairittothevehicletouchscreenvia
Bluetooth® to use Via Mobile apps. If using an iPhone®, a USB cable is also supported for the data
connection.
ELECTRONICS
66
Page 69 of 180

Launch the Uconnect® Access App on your smartphone, and login with your username and
password that was set up during registration, (this is your moparownerconnect.com login).
Accept the Terms and Conditions.
• Ensure that Via Mobile data has been
turned on under “Settings” in the Uconnect®
Access App.
• A green indicator next to the words Via
Mobile will show when it is ready to provide
data to the radio (a blue indicator when data
is being sent). A red indicator means that it is
not ready to provide data.
•Onandroidphones,anorange/yellowindi-
cator signals the phone is connected to the
appropriate servers however, Bluetooth® is
turned off on their mobile phone.
Via Mobile Data Enabled
ELECTRONICS
67
Page 71 of 180

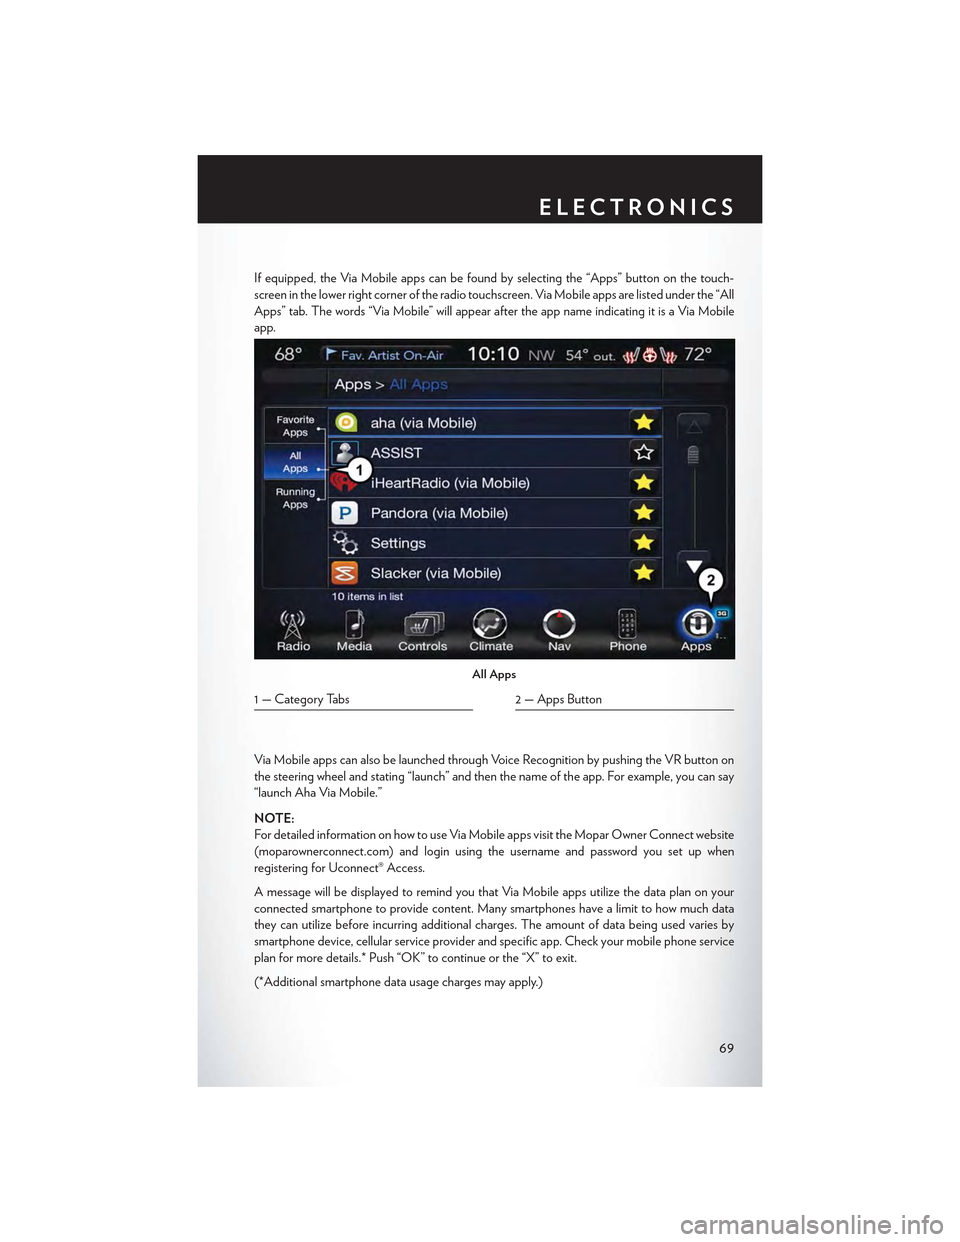
If equipped, the Via Mobile apps can be found by selecting the “Apps” button on the touch-
screen in the lower right corner of the radio touchscreen. Via Mobile apps are listed under the “All
Apps” tab. The words “Via Mobile” will appear after the app name indicating it is a Via Mobile
app.
Via Mobile apps can also be launched through Voice Recognition by pushing the VR button on
the steering wheel and stating “launch” and then the name of the app. For example, you can say
“launch Aha Via Mobile.”
NOTE:
For detailed information on how to use Via Mobile apps visit the Mopar Owner Connect website
(moparownerconnect.com) and login using the username and password you set up when
registering for Uconnect® Access.
AmessagewillbedisplayedtoremindyouthatViaMobileappsutilizethedataplanonyour
connected smartphone to provide content. Many smartphones have a limit to how much data
they can utilize before incurring additional charges. The amount of data being used varies by
smartphone device, cellular service provider and specific app. Check your mobile phone service
plan for more details.* Push “OK” to continue or the “X” to exit.
(*Additional smartphone data usage charges may apply.)
All Apps
1 — Category Tabs2 — Apps Button
ELECTRONICS
69
Page 72 of 180

Via Mobile Apps — If Equipped
•Aha™ by HARMAN—Aha™byHARMANmakesiteasytoinstantlyaccessyourfavorite
We b c o n t e n t o n t h e g o. C h o o s e f r o m o v e r 4 0 , 0 0 0 + s t a t i o n s s p a n n i n g i n t e r n e t r a d i o, p e r s o n -
alized music, news, entertainment, hotels, weather, audiobooks, Facebook®, Twitter®, and
more.
•iHeartRadio—iHeartRadioprovidesinstantaccesstomorethan1,500liveradiostations
from across the country and allows listeners to create custom music stations inspired by their
favorite artists or songs.
•Pandora®—Pandora®givespeoplethemusicandcomedytheyloveanytime,anywhere.
Personalized stations launch instantly, with the input of a favorite artist, track, comedian, or
genre.
•Slacker Radio— Enjoy millions of songs and hundreds of handcrafted stations.
NOTE:
For detailed information on how to use Via Mobile apps visit the Mopar Owner Connect website
(moparownerconnect.com) and log in using the username and password you set up when
registering for Uconnect® Access.
ELECTRONICS
70
Page 73 of 180

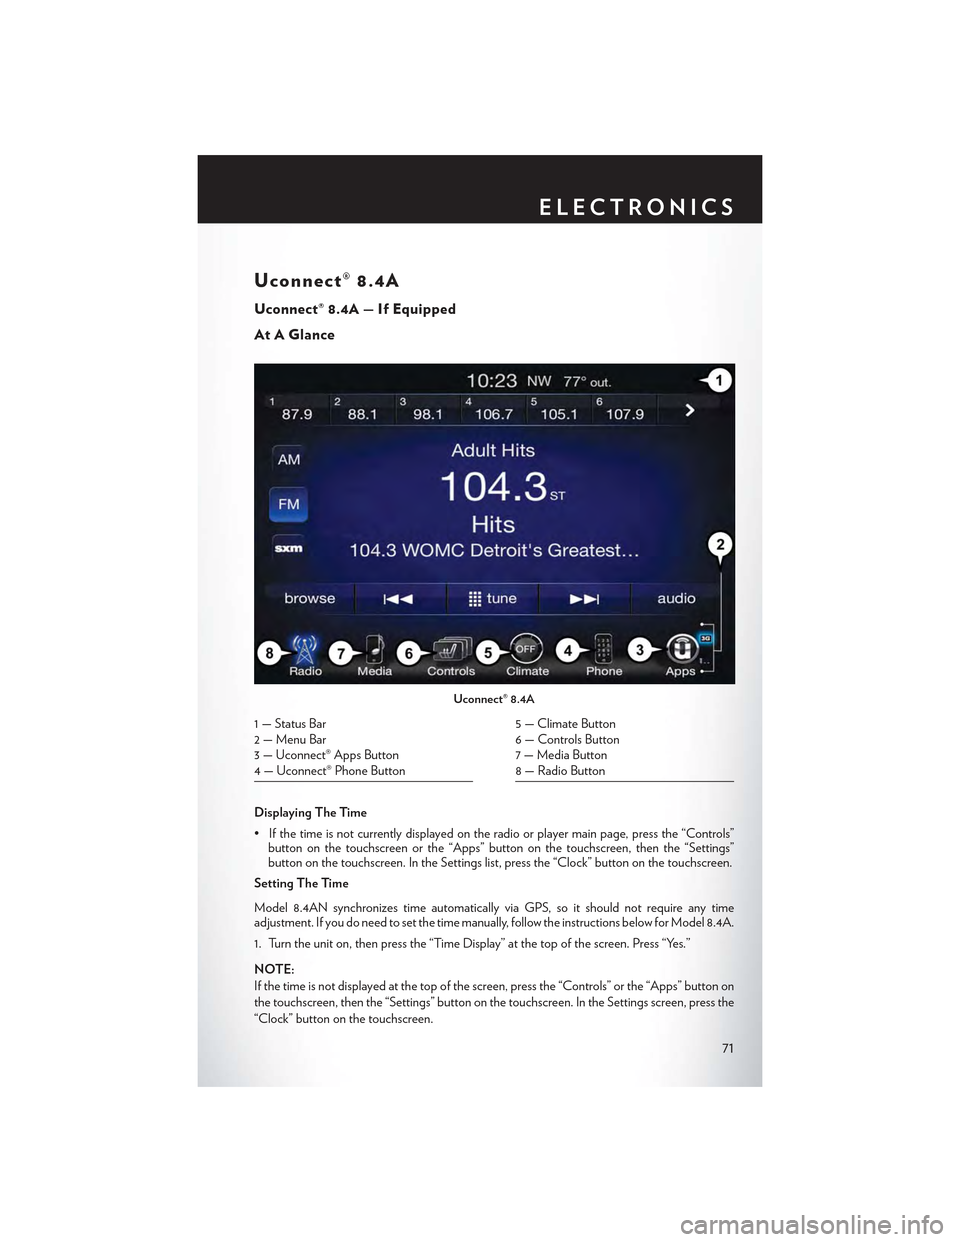
Uconnect® 8.4A
Uconnect® 8.4A — If Equipped
At A Glance
Displaying The Time
•Ifthetimeisnotcurrentlydisplayedontheradioorplayermainpage,pressthe“Controls”button on the touchscreen or the “Apps” button on the touchscreen, then the “Settings”button on the touchscreen. In the Settings list, press the “Clock” button on the touchscreen.
Setting The Time
Model 8.4AN synchronizes time automatically via GPS, so it should not require any timeadjustment. If you do need to set the time manually, follow the instructions below for Model 8.4A.
1. Turn the unit on, then press the “Time Display” at the top of the screen. Press “Yes.”
NOTE:
If the time is not displayed at the top of the screen, press the “Controls” or the “Apps” button on
the touchscreen, then the “Settings” button on the touchscreen. In the Settings screen, press the
“Clock” button on the touchscreen.
Uconnect® 8.4A
1 — Status Bar2 — Menu Bar3 — Uconnect® Apps Button4 — Uconnect® Phone Button
5 — Climate Button6 — Controls Button7 — Media Button8 — Radio Button
ELECTRONICS
71
Page 74 of 180

2. Press “+” or “–” next to Set Time Hours and Set Time Minutes to adjust the time.
3. If these features are not available, uncheck the Sync with GPS box.
4. Press “X” to save your settings and exit out of the Clock Setting screen.
Audio Settings
1. Press the “Media” or “Radio” button on the touchscreen.
2. Press the “Audio” button on the touchscreen to activate the Audio settings screen to adjust
Balance/Fade, Equalizer and Speed Adjusted Volume.
3. You can return to the Radio screen by pressing the “X” located at the top right.
Balance/Fade
1. Press the “Media” or “Radio” button on the touchscreen.
2. Press the “Audio” button on the touchscreen to activate the Audio settings screen to adjust
Balance/Fade, Equalizer and Speed Adjusted Volume.
3. Press the “Balance/Fade” button on the touchscreen to Balance audio between the front
speakers or fade the audio between the rear and front speakers.
4. Pressing the “Front,” “Rear,” “Left” or “Right” button on the touchscreens or press and drag the
Speaker Icon to adjust the Balance/Fade.
Equalizer
1. Press the “Media” or “Radio” button on the touchscreen.
2. Press the “Audio” button on the touchscreen to activate the Audio settings screen to adjust
Balance/Fade, Equalizer and Speed Adjusted Volume.
3. Press the “Equalizer” button on the touchscreen to activate the Equalizer screen.
4. Press the “+” or “–” button on the touchscreens, or by pressing and dragging over the “level
bar” for each of the equalizer bands. The level value, which spans between plus or minus 9, is
displayed at the bottom of each of the Bands.
Speed Adjusted Volume
1. Press the “Media” or “Radio” button on the touchscreen.
2. Press the “Audio” button on the touchscreen to activate the Audio settings screen to adjust
Balance/Fade, Equalizer and Speed Adjusted Volume.
3. Press the “Speed Adjusted Volume” button on the touchscreen to activate the Speed
Adjusted Volume screen. The Speed Adjusted Volume is adjusted by pressing the “volume
level” indicator. This alters the automatic adjustment of the audio volume with variation to
vehicle speed.
ELECTRONICS
72