2015 CHRYSLER 300 audio
[x] Cancel search: audioPage 79 of 180

•TheiPod®batterychargeswhenpluggedintotheUSBport(ifsupportedbythespecific
device).
• To route the USB/iPod® cable out of the center console, use the access cut out.
NOTE:
•WhenconnectingyouriPod®deviceforthefirsttime,thesystemmaytakeseveralminutesto
read your music, depending on the number of files. For example, the system will take
approximately five minutes for every 1,000 songs loaded on the device. Also during the
reading process, the Shuffle and Browse functions will be disabled. This process is needed to
ensure the full use of your iPod® features and only happens the first time it is connected. After
the first time, the reading process of your iPod® will take considerably less time unless changes
are made or new songs are added to the playlist.
• The USB port supports certain Mini, Classic, Nano, Touch, and iPhone® devices. The USB
port also supports playing music from compatible external USB Mass Storage Class memory
devices. Some iPod® software versions may not fully support the USB port features. Please visit
Apple’s website for iPod® software updates.
Rear USB Charging Ports
The USB “Charge Only” ports will recharge
battery operated USB devices when con-
nected.
Audio Jack (AUX)
• The AUX allows a portable device, such as
an MP3 player or an iPod®, to be plugged
into the radio and utilize the vehicle’s sound
system, using a 3.5 mm audio cable, to am-
plify the source and play through the vehicle
speakers.
• Pressing the “AUX” button on the touch-
screen will change the mode to auxiliary de-
vice if the audio jack is connected, allowing the music from your portable device to be heard
through the vehicle's speakers. In order to activate the AUX, plug in the audio jack.
•Thefunctionsoftheportabledevicearecontrolledusingthedevicebuttons.Thevolumemay
be controlled using the radio or portable device.
• To route the audio cable out of the center console, use the access cut out in the front of the
console.
SD Card
• Play songs stored on an SD card inserted into the SD card slot.
•SongplaybackcanbecontrolledusingtheradioorSteeringWheelAudioControlstoplay,
skip to the next or previous track, browse, and list the contents.
Rear USB Charging Ports
ELECTRONICS
77
Page 80 of 180

Bluetooth® Streaming Audio
•IfusingaBluetooth®-equippeddevice,youmayalsobeabletostreammusictoyourvehicle'ssound system. Your connected device must be Bluetooth-compatible, and paired with yoursystem (see Uconnect® Phone for pairing instructions).
•YoucanaccessthemusicfromyourconnectedBluetooth®devicebypressingthe
“Bluetooth®”button on the touchscreen while in Media mode.
Uconnect® 8.4A& 8.4AN
Media Hub (USB,AUX Ports)Media Hub (SD,USB, AUX Ports)Remote USB Port(Fully Functional)
Remote USBPorts(Charging Only)
-S-S
S = Standard Equipment
O = Optional Equipment
iPod®/CD/AUX CONTROLS
Uconnect® 8.4A Media
1—RepeatMusicTrack2 — Music Track And Time3—ShuffleMusicTracks4—MusicTrackInformation
5—SongsInCueToBePlayed6—BrowseMusicBy7 — Music Source
ELECTRONICS
78
Page 97 of 180

Setting The Time
Model 8.4AN synchronizes time automatically via GPS, so it should not require any time
adjustment. If you do need to set the time manually, follow the instructions below for Model 8.4A.
1. Turn the unit on, then press the “Time Display” at the top of the screen. Press “Yes.”
NOTE:
If the time is not displayed at the top of the screen, press the “Controls” or the “Apps” button on
the touchscreen, then the “Settings” button on the touchscreen. In the Settings screen, press the
“Clock” button on the touchscreen.
2. Press “+” or “–” next to Set Time Hours and Set Time Minutes to adjust the time.
3. If these features are not available, uncheck the Sync with GPS box.
4. Press “X” to save your settings and exit out of the Clock Setting screen.
Audio Settings
To adjust the Audio settings:
1. Press the “Media” or “Radio” button on the touchscreen.
2. Press the “Audio” button on the touchscreen to activate the Audio settings screen to adjust
Balance/Fade, Equalizer and Speed Adjusted Volume.
3. You can return to the Radio screen by pressing the “X” located at the top right.
Balance/Fade
To adjust the Balance/Fade settings:
1. Press the “Media” or “Radio” button on the touchscreen.
2. Press the “Audio” button on the touchscreen to activate the Audio settings screen to adjust
Balance/Fade, Equalizer and Speed Adjusted Volume.
3. Press the “Balance/Fade” button on the touchscreen to Balance audio between the front
speakers or fade the audio between the rear and front speakers.
4. Pressing the “Front,” “Rear,” “Left” or “Right” button on the touchscreens or press and drag the
Speaker Icon to adjust the Balance/Fade.
ELECTRONICS
95
Page 98 of 180

Equalizer
To adjust the equalizer settings:
1. Press the “Media” or “Radio” button on the touchscreen.
2. Press the “Audio” button on the touchscreen to activate the Audio settings screen to adjust
Balance/Fade, Equalizer and Speed Adjusted Volume.
3. Press the “Equalizer” button on the touchscreen to activate the Equalizer screen.
4. Press the “+” or “–” button on the touchscreens, or by pressing and dragging over the “level
bar” for each of the equalizer bands. The level value, which spans between plus or minus 9, is
displayed at the bottom of each of the Bands.
Speed Adjusted Volume
To a d j u s t t h e s p e e d a d j u s t e d v o l u m e s e t t i n g s :
1. Press the “Media” or “Radio” button on the touchscreen.
2. Press the “Audio” button on the touchscreen to activate the Audio settings screen to adjust
Balance/Fade, Equalizer and Speed Adjusted Volume.
3. Press the “Speed Adjusted Volume” button on the touchscreen to activate the Speed
Adjusted Volume screen. The Speed Adjusted Volume is adjusted by pressing the “volume
level” indicator. This alters the automatic adjustment of the audio volume with variation to
vehicle speed.
Surround Sound
To turn surround sound On/Off:
1. Press the “Media” or “Radio” button on the touchscreen.
2. Press the “Audio” button on the touchscreen to activate the Audio settings screen to adjust
Balance/Fade, Equalizer and Speed Adjusted Volume.
3. Press the “Surround Sound” button on the touchscreen, select On or Off followed by pressing
the “back arrow” button on the touchscreen. When this feature is activated, it provides
simulated surround sound mode.
ELECTRONICS
96
Page 99 of 180

RADIO
To a c c e s s t h e R a d i o m o d e :
•Pressthe“Radio”buttonatthelowerleftofthetouchscreen.
Selecting Radio Stations
•Pressthedesiredradioband(AM,FMorSXM)buttononthetouchscreen.
Seek Up/Seek Down
• Press the “Seek arrow” buttons on the touchscreen for less than two seconds to seek through
radio stations.
• Press and hold either “Seek arrow” button on the touchscreen for more than two seconds to
bypass stations without stopping. The radio will stop at the next listenable station once the
“arrow” button on the touchscreen is released.
Uconnect® 8.4AN Radio
1 — Radio Station Presets2—ToggleRadioStationPresets3—HDRadioAvailable4 — Audio Settings5 — Seek Up
6 — Direct Tune To A Radio Station7 — Seek Down8—BrowseAndManagePresets9—ChooseRadioBand
ELECTRONICS
97
Page 103 of 180

USB Port
Connect your iPod® or compatible device using a USB cable into the USB Port. USB Memory
sticks with audio files can also be used. Audio from the device can be played on the vehicle's
sound system while providing metadata (artist, track title, album, etc.) information on the radio
display.
When connected, the iPod®/compatible USB device can be controlled using the radio or
Steering Wheel Audio Controls to play, skip to the next or previous track, browse, and list the
contents.
The iPod® battery charges when plugged into the USB port (if supported by the specific device).
To route the USB/iPod® cable out of the center console, use the access cut out.
NOTE:
•WhenconnectingyouriPod®deviceforthefirsttime,thesystemmaytakeseveralminutesto
read your music, depending on the number of files. For example, the system will take
approximately five minutes for every 1000 songs loaded on the device. Also during the
reading process, the Shuffle and Browse functions will be disabled. This process is needed to
ensure the full use of your iPod® features and only happens the first time it is connected. After
the first time, the reading process of your iPod® will take considerably less time unless changes
are made or new songs are added to the playlist.
• The USB port supports certain Mini, Classic, Nano, Touch, and iPhone® devices. The USB
port also supports playing music from compatible external USB Mass Storage Class memory
devices. Some iPod® software versions may not fully support the USB port features. Please visit
Apple’s website for iPod® software updates.
Rear USB Charging Ports
The rear USB “Charge Only” ports will re-
charge battery operated USB devices when
connected.
Rear USB Charging Ports
ELECTRONICS
101
Page 104 of 180

Audio Jack (AUX)
The AUX allows a portable device, such as an MP3 player or an iPod®, to be plugged into the radio
and utilize the vehicle’s sound system, using a 3.5 mm stereo audio cable, to amplify the source and
play through the vehicle speakers.
• Pressing the “AUX” button on the touchscreen will change the mode to auxiliary device if the
audio jack is connected, allowing the music from your portable device to be heard through the
vehicle's speakers. In order to activate the AUX, plug in the audio jack.
•Thefunctionsoftheportabledevicearecontrolledusingthedevicebuttons.Thevolumemay
be controlled using the radio or portable device.
• To route the audio cable out of the center console, use the access cut out in the front of the
console.
SD Card
• Play songs stored on an SD card inserted into the SD card slot.
•SongplaybackcanbecontrolledusingtheradioorSteeringWheelAudioControlstoplay,
skip to the next or previous track, browse, and list the contents.
Bluetooth® Streaming Audio
If using a Bluetooth® - equipped device, you may also be able to stream music to your vehicle's
sound system. Your connected device must be Bluetooth-compatible, and paired with your
system (see Uconnect® Phone for pairing instructions).
•YoucanaccessthemusicfromyourconnectedBluetooth®devicebypressingthe
“Bluetooth®”button on the touchscreen while in Media mode.
Uconnect® 8.4A& 8.4AN
Media Hub (USB,AUX Ports)Media Hub (SD,USB, AUX Ports)Remote USB Port(Fully Functional)
Remote USBPorts (Charging Only)
-S-S
S = Standard Equipment
O = Optional Equipment
ELECTRONICS
102
Page 113 of 180

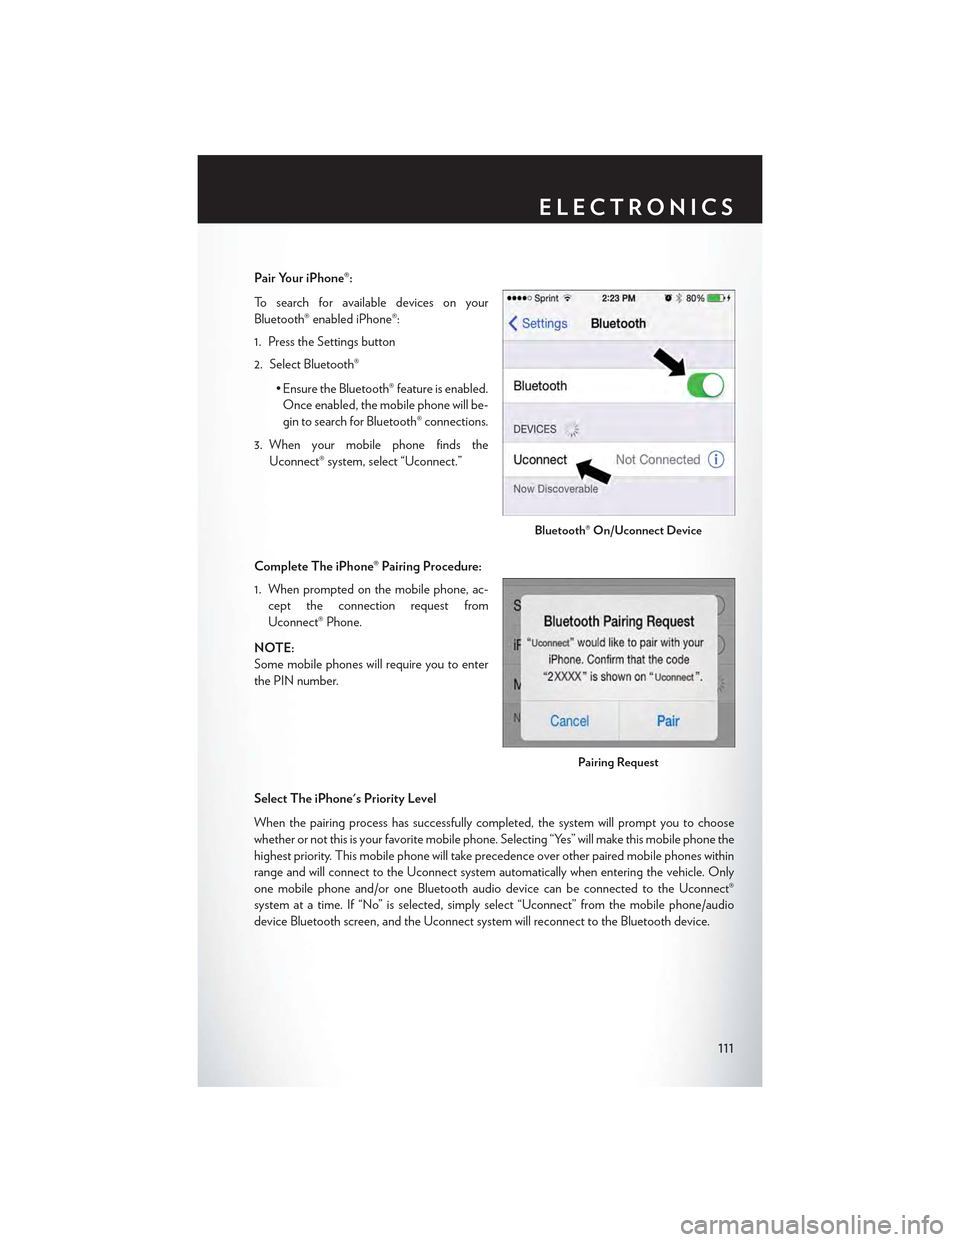
Pair Your iPhone®:
To s e a r c h f o r a v a i l a b l e d e v i c e s o n y o u r
Bluetooth® enabled iPhone®:
1. Press the Settings button
2. Select Bluetooth®
• Ensure the Bluetooth® feature is enabled.
Once enabled, the mobile phone will be-
gin to search for Bluetooth® connections.
3. When your mobile phone finds the
Uconnect® system, select “Uconnect.”
Complete The iPhone® Pairing Procedure:
1. When prompted on the mobile phone, ac-
cept the connection request from
Uconnect® Phone.
NOTE:
Some mobile phones will require you to enter
the PIN number.
Select The iPhone's Priority Level
When the pairing process has successfully completed, the system will prompt you to choose
whether or not this is your favorite mobile phone. Selecting “Yes” will make this mobile phone the
highest priority. This mobile phone will take precedence over other paired mobile phones within
range and will connect to the Uconnect system automatically when entering the vehicle. Only
one mobile phone and/or one Bluetooth audio device can be connected to the Uconnect®
system at a time. If “No” is selected, simply select “Uconnect” from the mobile phone/audio
device Bluetooth screen, and the Uconnect system will reconnect to the Bluetooth device.
Bluetooth® On/Uconnect Device
Pairing Request
ELECTRONICS
111