2015 CHEVROLET SILVERADO 1500 window
[x] Cancel search: windowPage 86 of 551
Black plate (23,1)Chevrolet 2015i Silverado Owner Manual (GMNA-Localizing-U.S./Canada/
Mexico-8425172) - 2015 - CRC - 6/20/14
Seats and Restraints 3-23
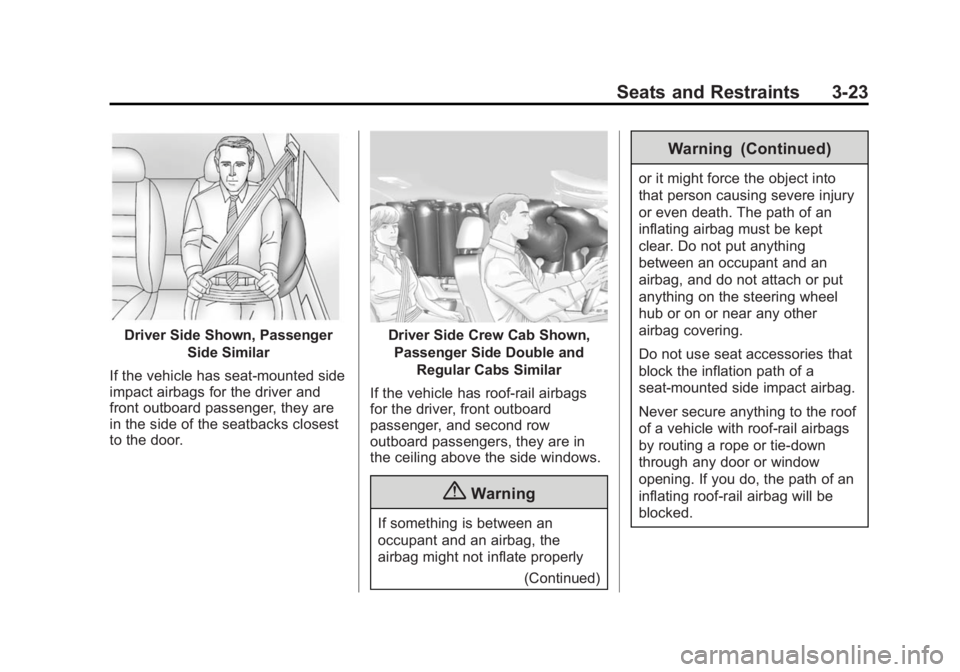
Driver Side Shown, PassengerSide Similar
If the vehicle has seat-mounted side
impact airbags for the driver and
front outboard passenger, they are
in the side of the seatbacks closest
to the door.Driver Side Crew Cab Shown, Passenger Side Double and Regular Cabs Similar
If the vehicle has roof-rail airbags
for the driver, front outboard
passenger, and second row
outboard passengers, they are in
the ceiling above the side windows.
{Warning
If something is between an
occupant and an airbag, the
airbag might not inflate properly (Continued)
Warning (Continued)
or it might force the object into
that person causing severe injury
or even death. The path of an
inflating airbag must be kept
clear. Do not put anything
between an occupant and an
airbag, and do not attach or put
anything on the steering wheel
hub or on or near any other
airbag covering.
Do not use seat accessories that
block the inflation path of a
seat-mounted side impact airbag.
Never secure anything to the roof
of a vehicle with roof-rail airbags
by routing a rope or tie‐down
through any door or window
opening. If you do, the path of an
inflating roof-rail airbag will be
blocked.
Page 89 of 551
Black plate (26,1)Chevrolet 2015i Silverado Owner Manual (GMNA-Localizing-U.S./Canada/
Mexico-8425172) - 2015 - CRC - 6/20/14
3-26 Seats and Restraints
How Does an Airbag
Restrain?
In moderate to severe frontal or
near frontal collisions, even belted
occupants can contact the steering
wheel or the instrument panel. In
moderate to severe side collisions,
even belted occupants can contact
the inside of the vehicle.
Airbags supplement the protection
provided by safety belts by
distributing the force of the impact
more evenly over the
occupant's body.
Rollover capable roof-rail airbags
are designed to help contain the
head and chest of occupants in the
outboard seating positions in the
first and second rows. The rollover
capable roof-rail airbags are
designed to help reduce the risk of
full or partial ejection in rollover
events, although no system can
prevent all such ejections.But airbags would not help in many
types of collisions, primarily
because the occupant's motion is
not toward those airbags. See
When
Should an Airbag Inflate? on
page 3-24.
Airbags should never be regarded
as anything more than a supplement
to safety belts.
What Will You See after
an Airbag Inflates?
After the frontal airbags and
seat-mounted side impact airbags
inflate, they quickly deflate, so
quickly that some people may not
even realize an airbag inflated.
Roof-rail airbags may still be at least
partially inflated for some time after
they inflate. Some components of
the airbag module may be hot for
several minutes. For location of the
airbags, see Where Are the
Airbags? on page 3-22.
The parts of the airbag that come
into contact with you may be warm,
but not too hot to touch. There may be some smoke and dust coming
from the vents in the deflated
airbags. Airbag inflation does not
prevent the driver from seeing out of
the windshield or being able to steer
the vehicle, nor does it prevent
people from leaving the vehicle.
{Warning
When an airbag inflates, there
may be dust in the air. This dust
could cause breathing problems
for people with a history of
asthma or other breathing trouble.
To avoid this, everyone in the
vehicle should get out as soon as
it is safe to do so. If you have
breathing problems but cannot
get out of the vehicle after an
airbag inflates, then get fresh air
by opening a window or a door.
If you experience breathing
problems following an airbag
deployment, you should seek
medical attention.
Page 105 of 551
Black plate (42,1)Chevrolet 2015i Silverado Owner Manual (GMNA-Localizing-U.S./Canada/
Mexico-8425172) - 2015 - CRC - 6/20/14
3-42 Seats and Restraints
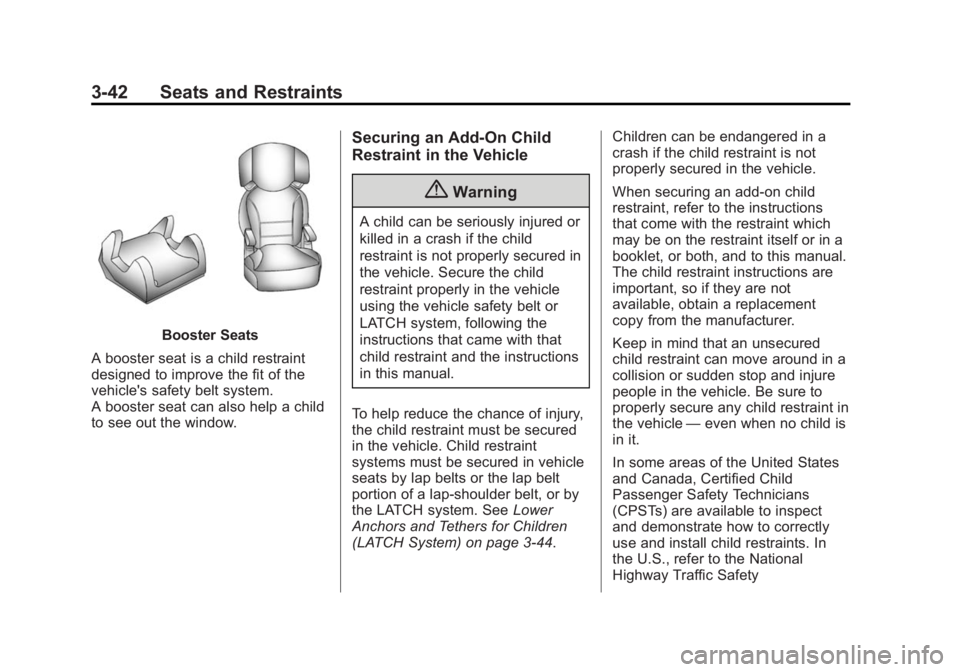
Booster Seats
A booster seat is a child restraint
designed to improve the fit of the
vehicle's safety belt system.
A booster seat can also help a child
to see out the window.
Securing an Add-On Child
Restraint in the Vehicle
{Warning
A child can be seriously injured or
killed in a crash if the child
restraint is not properly secured in
the vehicle. Secure the child
restraint properly in the vehicle
using the vehicle safety belt or
LATCH system, following the
instructions that came with that
child restraint and the instructions
in this manual.
To help reduce the chance of injury,
the child restraint must be secured
in the vehicle. Child restraint
systems must be secured in vehicle
seats by lap belts or the lap belt
portion of a lap-shoulder belt, or by
the LATCH system. See Lower
Anchors and Tethers for Children
(LATCH System) on page 3-44. Children can be endangered in a
crash if the child restraint is not
properly secured in the vehicle.
When securing an add-on child
restraint, refer to the instructions
that come with the restraint which
may be on the restraint itself or in a
booklet, or both, and to this manual.
The child restraint instructions are
important, so if they are not
available, obtain a replacement
copy from the manufacturer.
Keep in mind that an unsecured
child restraint can move around in a
collision or sudden stop and injure
people in the vehicle. Be sure to
properly secure any child restraint in
the vehicle
—even when no child is
in it.
In some areas of the United States
and Canada, Certified Child
Passenger Safety Technicians
(CPSTs) are available to inspect
and demonstrate how to correctly
use and install child restraints. In
the U.S., refer to the National
Highway Traffic Safety
Page 205 of 551
Black plate (8,1)Chevrolet 2015i Silverado Owner Manual (GMNA-Localizing-U.S./Canada/
Mexico-8425172) - 2015 - CRC - 6/20/14
6-8 Lighting
Lighting Features
Entry Lighting
The vehicle has an illuminated entry
feature.
When a door is opened, the dome
lamps and puddle lamps come on if
the dome lamp control is in the
DOOR position. If the dome lamp
control is in the OFF position, the
lamps do not come on.
The headlamps, parking lamps,
taillamps, and back-up lamps turn
on briefly at night, or in areas with
limited lighting, when
Kis pressed
on the Remote Keyless Entry (RKE)
transmitter. After about 30 seconds
the exterior lamps turn off. Entry
lighting can be disabled manually by
changing the ignition out of the OFF
position, or by pressing the RKE
transmitter
Qbutton.
This feature can be changed. See
“Vehicle Locator Lights” under
Vehicle Personalization on
page 5-47.
Exit Lighting
The interior lamps, headlamps,
parking lamps, back-up lamps, and
license plate lamps come on when
the key is removed from the ignition.
The interior lamps turn off
automatically in 20 seconds. The
interior lamps do not come on if the
dome lamp control is in the OFF
position.
The exterior lamps turn off
immediately by turning the exterior
lamps control off.
This feature can be changed. See
Vehicle Personalization on
page 5-47.
Battery Load
Management
The vehicle has Electric Power
Management (EPM), which
estimates the battery's temperature
and state of charge. It then adjusts
the voltage for best performance
and extended life of the battery. When the battery's state of charge
is low, the voltage is raised slightly
to quickly bring the charge back up.
When the state of charge is high,
the voltage is lowered slightly to
prevent overcharging. The voltmeter
gauge or the voltage display on the
Driver Information Center (DIC),
if equipped, may show the voltage
moving up or down. This is normal.
If there is a problem, an alert will be
displayed.
The battery can be discharged at
idle if the electrical loads are very
high. This is true for all vehicles.
This is because the generator
(alternator) may not be spinning fast
enough at idle to produce all the
power that is needed for very high
electrical loads.
A high electrical load occurs when
several of the following are on, such
as: headlamps, high beams, fog
lamps, rear window defogger,
climate control fan at high speed,
heated seats, engine cooling fans,
trailer loads, and loads plugged into
accessory power outlets.
Page 239 of 551
Black plate (32,1)Chevrolet 2015i Silverado Owner Manual (GMNA-Localizing-U.S./Canada/
Mexico-8425172) - 2015 - CRC - 6/20/14
7-32 Infotainment System
Bluetooth Controls
Use the buttons on the instrument
panel, faceplate, and the steering
wheel to operate the Bluetooth
system.
Steering Wheel Controls
g(Press to Talk):Press to answer
incoming calls, confirm system
information, and start voice
recognition.
i(End Call): Press to end a call,
reject a call, or cancel an operation.
Press to mute or unmute the
infotainment system.
Infotainment System Controls
For information about how to
navigate the menu system using the
infotainment controls, see Overview
on page 7-3.
MENU: Turn to scroll through a list.
Press to select the highlighted list
option.
{(Home Page): Press to go to the
Home Page. See Home Page on
page 7-5. PHONE:
Select to enter the phone
main menu. See Bluetooth
(Overview) on page 7-31 or
Bluetooth (Infotainment Controls -
Base Connected Radio) on
page 7-42 orBluetooth (Voice
Recognition - Base Connected
Radio) on page 7-46 orBluetooth
(Infotainment Controls - Base
Radio) on page 7-32 orBluetooth
(Voice Recognition - Base Radio) on
page 7-37.
Voice Recognition
The voice recognition system uses
commands to control the system
and dial phone numbers.
Noise: The system may not
recognize voice commands if there
is too much background noise, such
as noise from open windows or loud
talking inside the vehicle.
When to Speak: A tone sounds to
indicate that the system is ready for
a voice command. Wait for the tone
and then speak. How to Speak:
Speak clearly in a
calm and natural voice.
Audio System
When using the Bluetooth system,
sound comes through the vehicle's
front audio system speakers and
overrides the audio system. Use the
Oknob during a call to change the
volume level. The system maintains
a minimum volume level.
Bluetooth Audio Quality
Turn off the Echo and Noise
cancellation feature on your phone,
if supported, for the best hands-free
performance.
See www.gm.com/bluetooth.
Bluetooth (Infotainment
Controls - Base Radio)
For information about how to
navigate the menu system using the
infotainment controls, see Overview
on page 7-3.
Page 265 of 551
Black plate (2,1)Chevrolet 2015i Silverado Owner Manual (GMNA-Localizing-U.S./Canada/
Mexico-8425172) - 2015 - CRC - 6/20/14
8-2 Climate Controls
9(Fan Control):Turn clockwise
or counterclockwise to increase or
decrease the fan speed. Turn the
knob all the way counterclockwise
to turn the fan off.
Air Delivery Mode Control:
Press
Y,\,[, or-to change
the direction of the airflow. An
indicator light comes on in the
selected mode button.
Y(Vent): Air is directed to the
instrument panel outlets.
\(Bi-Level): Air is divided
between the instrument panel and
floor outlets.
[(Floor): Air is directed to the
floor outlets, with some air directed
to the windshield, side window, and
second row floor outlets.
-(Defog): This mode clears the
windows of fog or moisture. Air is
directed to the windshield, floor
outlets, and side window vents.
0(Defrost): Press to clear the
windshield of fog or frost more
quickly. Air is directed to the
windshield and the side window
vents. The system automatically
forces outside air into the vehicle. Do not drive the vehicle until all the
windows are clear.
See
Air Vents on page 8-8.
@(Recirculation): Press to turn
on recirculation. An indicator light
comes on. Air is recirculated to
quickly cool the inside of the
vehicle. It can also be used to help
reduce outside air and odors that
enter the vehicle.
Page 266 of 551
Black plate (3,1)Chevrolet 2015i Silverado Owner Manual (GMNA-Localizing-U.S./Canada/
Mexico-8425172) - 2015 - CRC - 6/20/14
Climate Controls 8-3
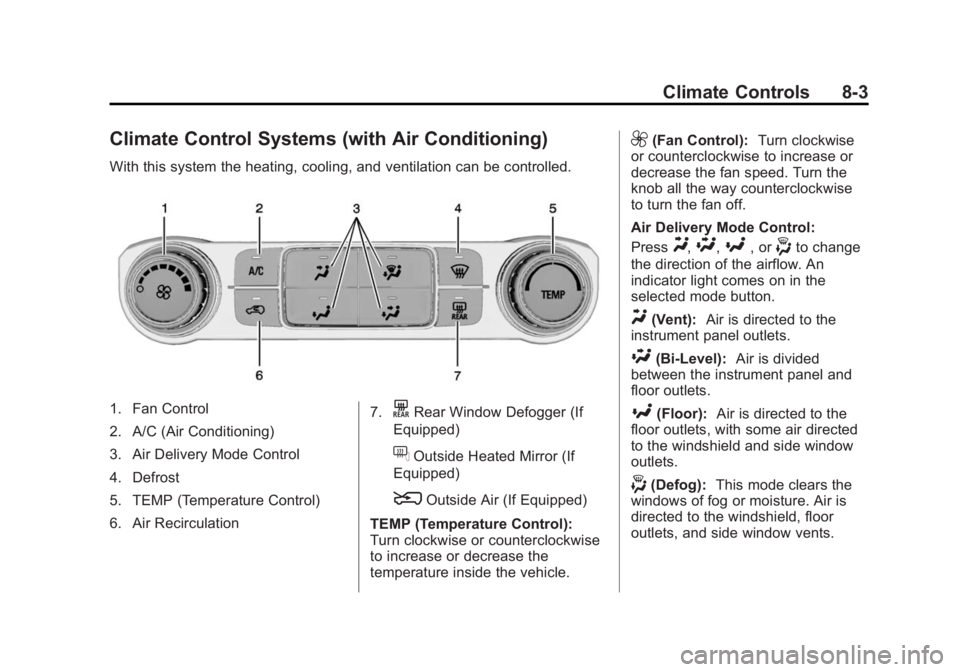
Climate Control Systems (with Air Conditioning)
With this system the heating, cooling, and ventilation can be controlled.
1. Fan Control
2. A/C (Air Conditioning)
3. Air Delivery Mode Control
4. Defrost
5. TEMP (Temperature Control)
6. Air Recirculation7.KRear Window Defogger (If
Equipped)
fOutside Heated Mirror (If
Equipped)
8Outside Air (If Equipped)
TEMP (Temperature Control):
Turn clockwise or counterclockwise
to increase or decrease the
temperature inside the vehicle.
9(Fan Control): Turn clockwise
or counterclockwise to increase or
decrease the fan speed. Turn the
knob all the way counterclockwise
to turn the fan off.
Air Delivery Mode Control:
Press
Y,\,[, or-to change
the direction of the airflow. An
indicator light comes on in the
selected mode button.
Y(Vent): Air is directed to the
instrument panel outlets.
\(Bi-Level): Air is divided
between the instrument panel and
floor outlets.
[(Floor): Air is directed to the
floor outlets, with some air directed
to the windshield and side window
outlets.
-(Defog): This mode clears the
windows of fog or moisture. Air is
directed to the windshield, floor
outlets, and side window vents.
Page 267 of 551
Black plate (4,1)Chevrolet 2015i Silverado Owner Manual (GMNA-Localizing-U.S./Canada/
Mexico-8425172) - 2015 - CRC - 6/20/14
8-4 Climate Controls
0(Defrost):Press to clear the
windshield of fog or frost more
quickly. Air is directed to the
windshield and the side window
vents. The system automatically
forces outside air into the vehicle
and the air conditioning compressor
will run, unless the outside
temperature is close to freezing.
Do not drive the vehicle until all the
windows are clear.
See Air Vents on page 8-8.
@(Recirculation): Press to turn
on recirculation. An indicator light
comes on. Air is recirculated to
quickly cool the inside of the
vehicle. It can also be used to help
reduce outside air and odors that
enter the vehicle.
8(Outside Air, If Equipped):
Press to turn the outside air mode
on. An indicator light on the button
comes on to show that outside is
on. When selected, air from outside
the vehicle circulates throughout the vehicle. The recirculation mode
cannot be used with the outside
air mode.
f(Outside Heated Mirror, If
Equipped): Press to turn the
heated mirrors on or off. See
Heated Mirrors on page 2-17.
A/C (Air Conditioning): Press to
turn the air conditioning system on
or off. An indicator light comes on to
show that the air conditioning is
enabled. If the fan is turned off, the
air conditioner will not run. The A/C
light will stay on even if the outside
temperatures are below freezing.
Rear Window Defogger
K(Rear Window Defogger, If
Equipped): Press to turn the rear
window defogger on or off. An
indicator light on the button comes
on to show that the rear window
defogger is on. The rear window defogger only
works when the ignition is in ON/
RUN. The defogger turns off if the
ignition is turned to ACC/
ACCESSORY or LOCK/OFF.
If equipped with heated outside
mirrors, they turn on when the rear
window defogger button is on. They
help to clear fog or frost from the
surface of the mirrors.
{Caution
Using a razor blade or sharp
object to clear the inside rear
window can damage the rear
window defogger. Repairs would
not be covered by the vehicle
warranty. Do not clear the inside
rear window with sharp objects.