2015 CHEVROLET SILVERADO 1500 ignition
[x] Cancel search: ignitionPage 424 of 551
Black plate (47,1)Chevrolet 2015i Silverado Owner Manual (GMNA-Localizing-U.S./Canada/
Mexico-8425172) - 2015 - CRC - 6/20/14
Vehicle Care 10-47
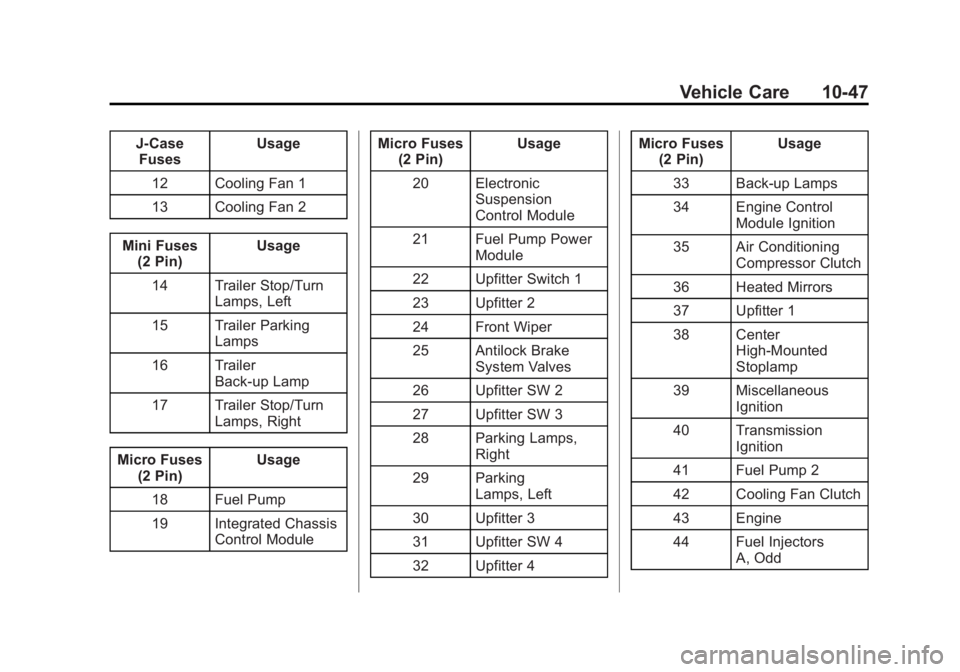
J-CaseFuses Usage
12 Cooling Fan 1
13 Cooling Fan 2
Mini Fuses (2 Pin) Usage
14 Trailer Stop/Turn Lamps, Left
15 Trailer Parking Lamps
16 Trailer Back-up Lamp
17 Trailer Stop/Turn Lamps, Right
Micro Fuses (2 Pin) Usage
18 Fuel Pump
19 Integrated Chassis Control Module Micro Fuses
(2 Pin) Usage
20 Electronic Suspension
Control Module
21 Fuel Pump Power Module
22 Upfitter Switch 1
23 Upfitter 2
24 Front Wiper
25 Antilock Brake System Valves
26 Upfitter SW 2
27 Upfitter SW 3
28 Parking Lamps, Right
29 Parking Lamps, Left
30 Upfitter 3
31 Upfitter SW 4
32 Upfitter 4 Micro Fuses
(2 Pin) Usage
33 Back-up Lamps
34 Engine Control Module Ignition
35 Air Conditioning Compressor Clutch
36 Heated Mirrors
37 Upfitter 1
38 Center High-Mounted
Stoplamp
39 Miscellaneous Ignition
40 Transmission Ignition
41 Fuel Pump 2
42 Cooling Fan Clutch
43 Engine
44 Fuel Injectors A, Odd
Page 427 of 551

Black plate (50,1)Chevrolet 2015i Silverado Owner Manual (GMNA-Localizing-U.S./Canada/
Mexico-8425172) - 2015 - CRC - 6/20/14
10-50 Vehicle Care
The vehicle may not be equipped
with all of the fuses, relays, and
features shown.Number Usage
1 Accessory Power Outlet 2
2 SEO Retained Accessory Power
3 Universal Garage Door Opener/Inside
Rearview Mirror
6 Body Control Module 3
7 Body Control Module 5
8 Driver Window Switch/Mirror Switch
9 Spare
10 Accessory Power Outlet Retained
Accessory Power
11 Accessory Power Outlet Battery Number Usage
12 Accessory Power Outlet 1/Cigarette
Lighter
13 Discrete Logic Ignition Switch
14 Switch Backlighting
17 Body Control Module 1
19 Spare
20 Spare
22 Heater, Ventilation, and Air Conditioning/
Auxiliary Heater,
Ventilation and Air
Conditioning Ignition
23 Instrument Cluster Ignition/Sensing
Diagnostic Module
Ignition
24 Spare
25 Data Link Connector/ Driver Seat Module Number Usage
26 Passive Entry Passive Start/Heater,
Ventilation, and Air
Conditioning
27 Spare
28 Spare
29 Park Enable/ Electrically Adjustable
Pedals
30 SEO
31 Accessory/Run Crank
32 Heated Steering Wheel
33 Spare
34 Instrument Cluster
36 Spare
37 Spare
40 Left Doors
41 Driver Power Seat
Page 443 of 551
Black plate (66,1)Chevrolet 2015i Silverado Owner Manual (GMNA-Localizing-U.S./Canada/
Mexico-8425172) - 2015 - CRC - 6/20/14
10-66 Vehicle Care
A message to check the pressure in
a specific tire displays in the Driver
Information Center (DIC). The low
tire pressure warning light and the
DIC warning message come on at
each ignition cycle until the tires are
inflated to the correct inflation
pressure. If the vehicle has DIC
buttons, tire pressure levels can be
viewed. For additional information
and details about the DIC operation
and displays, seeDriver Information
Center (DIC) (Base Level) on
page 5-30 orDriver Information
Center (DIC) (Uplevel) on page 5-32
and Tire Messages on page 5-43.
The low tire pressure warning light
may come on in cool weather when
the vehicle is first started, and then
turn off as the vehicle is driven. This
could be an early indicator that the
air pressure is getting low and
needs to be inflated to the proper
pressure. A Tire and Loading Information label
shows the size of the original
equipment tires and the correct
inflation pressure for the tires when
they are cold. See
Vehicle Load
Limits on page 9-15, for an example
of the Tire and Loading Information
label and its location. Also see Tire
Pressure on page 10-62.
The TPMS can warn about a low
tire pressure condition but it does
not replace normal tire
maintenance. See Tire Inspection
on page 10-69, Tire Rotation on
page 10-69 andTires on
page 10-53.
{Caution
Tire sealant materials are not all
the same. A non-approved tire
sealant could damage the TPMS
sensors. TPMS sensor damage
caused by using an incorrect tire
sealant is not covered by the
vehicle warranty. Always use only
(Continued)
Caution (Continued)
the GM approved tire sealant
available through your dealer or
included in the vehicle.
TPMS Malfunction Light and
Message
The TPMS will not function properly
if one or more of the TPMS sensors
are missing or inoperable. When the
system detects a malfunction, the
low tire pressure warning light
flashes for about one minute and
then stays on for the remainder of
the ignition cycle. A DIC warning
message also displays. The
malfunction light and DIC warning
message come on at each ignition
cycle until the problem is corrected.
Some of the conditions that can
cause these to come on are:
.One of the road tires has been
replaced with the spare tire. The
spare tire does not have a
TPMS sensor. The malfunction
Page 444 of 551
Black plate (67,1)Chevrolet 2015i Silverado Owner Manual (GMNA-Localizing-U.S./Canada/
Mexico-8425172) - 2015 - CRC - 6/20/14
Vehicle Care 10-67
light and the DIC message
should go off after the road tire
is replaced and the sensor
matching process is performed
successfully. See "TPMS Sensor
Matching Process" later in this
section.
.The TPMS sensor matching
process was not done or not
completed successfully after
rotating the tires. The
malfunction light and the DIC
message should go off after
successfully completing the
sensor matching process. See
"TPMS Sensor Matching
Process" later in this section.
.One or more TPMS sensors are
missing or damaged. The
malfunction light and the DIC
message should go off when the
TPMS sensors are installed and
the sensor matching process is
performed successfully. See
your dealer for service.
.Replacement tires or wheels do
not match the original equipment
tires or wheels. Tires and wheels
other than those recommended
could prevent the TPMS from
functioning properly. SeeBuying
New Tires on page 10-73.
.Operating electronic devices or
being near facilities using radio
wave frequencies similar to the
TPMS could cause the TPMS
sensors to malfunction.
If the TPMS is not functioning
properly, it cannot detect or signal a
low tire condition. See your dealer
for service if the TPMS malfunction
light and DIC message come on
and stay on.
TPMS Sensor Matching
Process
Each TPMS sensor has a unique
identification code. The identification
code needs to be matched to a new
tire/wheel position after rotating the
vehicle’s tires or replacing one or
more of the TPMS sensors. Also,
the TPMS sensor matching process should be performed after replacing
a spare tire with a road tire
containing the TPMS sensor. The
malfunction light and the DIC
message should go off at the next
ignition cycle. The sensors are
matched to the tire/wheel positions,
using a TPMS relearn tool, in the
following order: driver side front tire,
passenger side front tire, passenger
side rear tire, and driver side rear.
See your dealer for service or to
purchase a relearn tool. A TPMS
relearn tool can also be purchased.
See Tire Pressure Monitor
Sensor Activation Tool at
www.gmtoolsandequipment.com or
call 1-800-GM TOOLS
(1-800-468-6657).
There are two minutes to match the
first tire/wheel position, and
five minutes overall to match all four
tire/wheel positions. If it takes
longer, the matching process stops
and must be restarted.
Page 445 of 551
Black plate (68,1)Chevrolet 2015i Silverado Owner Manual (GMNA-Localizing-U.S./Canada/
Mexico-8425172) - 2015 - CRC - 6/20/14
10-68 Vehicle Care
The TPMS sensor matching
process is:
1. Set the parking brake.
2. Turn the ignition to ON/RUN withthe engine off.
3. Uplevel DIC Only: Make sure the Tire Pressure info page option is
turned on. The info pages on the
DIC can be turned on and off
through the Settings menu. See
Driver Information Center (DIC)
(Base Level) on page 5-30 or
Driver Information Center (DIC)
(Uplevel) on page 5-32.
4. If the vehicle has an uplevel DIC, use the DIC controls on the
right side of the steering wheel
to scroll to the Tire Pressure
screen under the DIC info page.
If the vehicle has a base level
DIC, use the trip odometer reset
stem to scroll to the Tire
Pressure screen. 5. If the vehicle has an uplevel
DIC, press and hold the
V(Set/
Reset) button located in the
center of the DIC controls.
If the vehicle has a base level
DIC, press and hold the trip
odometer reset stem for about
five seconds. A message asking
if the process should begin
should appear. Select yes and
press the trip odometer reset
stem to confirm the selection.
The horn sounds twice to signal
the receiver is in relearn mode
and the TIRE LEARNING
ACTIVE message displays on
the DIC screen.
6. Start with the driver side front tire.
7. Place the relearn tool against the tire sidewall, near the valve
stem. Then press the button to
activate the TPMS sensor.
A horn chirp confirms that the
sensor identification code has
been matched to this tire and
wheel position. 8. Proceed to the passenger side
front tire, and repeat the
procedure in Step 7.
9. Proceed to the passenger side rear tire, and repeat the
procedure in Step 7.
10. Proceed to the driver side rear tire, and repeat the procedure
in Step 7. The horn sounds two
times to indicate the sensor
identification code has been
matched to the driver side rear
tire, and the TPMS sensor
matching process is no longer
active. The TIRE LEARNING
ACTIVE message on the DIC
display screen goes off.
11. Turn the ignition switch to LOCK/OFF.
12. Set all four tires to the recommended air pressure
level as indicated on the Tire
and Loading Information label.
Page 459 of 551
Black plate (82,1)Chevrolet 2015i Silverado Owner Manual (GMNA-Localizing-U.S./Canada/
Mexico-8425172) - 2015 - CRC - 6/20/14
10-82 Vehicle Care
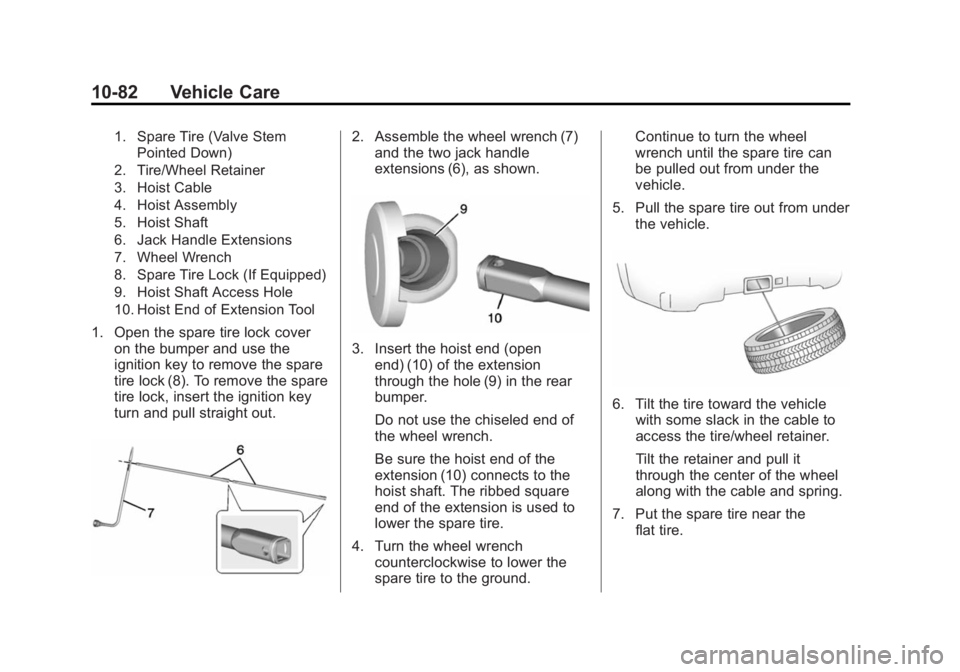
1. Spare Tire (Valve StemPointed Down)
2. Tire/Wheel Retainer
3. Hoist Cable
4. Hoist Assembly
5. Hoist Shaft
6. Jack Handle Extensions
7. Wheel Wrench
8. Spare Tire Lock (If Equipped)
9. Hoist Shaft Access Hole
10. Hoist End of Extension Tool
1. Open the spare tire lock cover on the bumper and use the
ignition key to remove the spare
tire lock (8). To remove the spare
tire lock, insert the ignition key
turn and pull straight out.
2. Assemble the wheel wrench (7)and the two jack handle
extensions (6), as shown.
3. Insert the hoist end (open
end) (10) of the extension
through the hole (9) in the rear
bumper.
Do not use the chiseled end of
the wheel wrench.
Be sure the hoist end of the
extension (10) connects to the
hoist shaft. The ribbed square
end of the extension is used to
lower the spare tire.
4. Turn the wheel wrench counterclockwise to lower the
spare tire to the ground. Continue to turn the wheel
wrench until the spare tire can
be pulled out from under the
vehicle.
5. Pull the spare tire out from under the vehicle.
6. Tilt the tire toward the vehiclewith some slack in the cable to
access the tire/wheel retainer.
Tilt the retainer and pull it
through the center of the wheel
along with the cable and spring.
7. Put the spare tire near the flat tire.
Page 469 of 551
Black plate (92,1)Chevrolet 2015i Silverado Owner Manual (GMNA-Localizing-U.S./Canada/
Mexico-8425172) - 2015 - CRC - 6/20/14
10-92 Vehicle Care
begin that, especially in cold
weather, you may not be able to
get enough power from a single
battery in another vehicle to start
your diesel engine. If your
vehicle has more than one
battery, using the battery that is
closer to the starter will reduce
electrical resistance. This is
located on the passenger side,
in the rear of the engine
compartment.
3. Get the vehicles close enough so the jumper cables can reach,
but be sure the vehicles are not
touching each other. If they are,
it could cause an unwanted
ground connection. You would
not be able to start your vehicle,
and the bad grounding could
damage the electrical systems.
To avoid the possibility of the
vehicles rolling, set the parking
brake firmly on both vehicles
involved in the jump start
procedure. Put the automatic
transmission in P (Park) or a
manual transmission in Neutral before setting the parking brake.
If you have a four-wheel-drive
vehicle, be sure the transfer
case is in a drive gear, not in
N (Neutral).
{Caution
If any accessories are left on or
plugged in during the jump
starting procedure, they could be
damaged. The repairs would not
be covered by the vehicle
warranty. Whenever possible, turn
off or unplug all accessories on
either vehicle when jump starting.
4. Turn off the ignition on both vehicles. Unplug unnecessary
accessories plugged into the
accessory power outlets. Turn
off the radio and all the lamps
that are not needed. This will
avoid sparks and help save both
batteries. And it could save the
radio! 5. Open the hood on the other
vehicle and locate the
positive (+) and negative (−)
terminal locations on that
vehicle.
The positive (+) terminal is under
a red plastic cover at the positive
battery post. To uncover the
positive (+) terminal, open the
red plastic cover.
For more information on the
location of the remote
positive (+) and remote negative
(−) terminals, see Engine
Compartment Overview on
page 10-6.
{Warning
An electric fan can start up even
when the engine is not running
and can injure you. Keep hands,
clothing and tools away from any
underhood electric fan.
Page 474 of 551
Black plate (97,1)Chevrolet 2015i Silverado Owner Manual (GMNA-Localizing-U.S./Canada/
Mexico-8425172) - 2015 - CRC - 6/20/14
Vehicle Care 10-97
{Warning
Shifting a four-wheel-drive
vehicle's transfer case into
N (Neutral) can cause the vehicle
to roll even if the transmission is
in P (Park). You or others could
be injured. Set the parking brake
before shifting the transfer case
to N (Neutral).
Follow these steps to dinghy tow:
1. Position the vehicle being towed behind the tow vehicle, facing
forward and on a level surface.
2. Securely attach the vehicle being towed to the tow vehicle.
3. Apply the parking brake and start the engine.
4. Shift the transfer case to N (Neutral). See “Shifting into
N (Neutral)” underFour-Wheel
Drive on page 9-42 for the
proper procedure. Check that
the vehicle is in N (Neutral) by shifting the transmission to
R (Reverse) and then to D
(Drive). There should be no
movement of the vehicle while
shifting.
5. With the transmission in D (Drive), turn the ignition to ACC/
ACCESSORY.
{Caution
Failure to disconnect the negative
battery cable or to have it contact
the terminals can cause damage
to the vehicle.
6. Disconnect the negative battery cable at the battery and secure
the nut and bolt. Cover the
negative battery post with a
non-conductive material to
prevent any contact with the
negative battery terminal.
7. Shift the transmission to P (Park).
{Caution
If the steering column is locked,
vehicle damage may occur.
8. Move the steering wheel to make sure the steering column
is unlocked.
9. Release the parking brake.
10. Keep the ignition key in the towed vehicle in ACC/
ACCESSORY to prevent the
steering column from locking.
Disconnecting the Towed Vehicle
Before disconnecting the towed
vehicle:
1. Park on a level surface.
2. Set the parking brake, shift the transmission to P (Park), and
move the ignition key to OFF.
3. Connect the battery.
4. Apply the brake pedal.