2015 CHEVROLET ORLANDO CD player
[x] Cancel search: CD playerPage 1 of 372

Black plate (1,1)Chevrolet Orlando Owner Manual - 2013 - CRC - 6/5/12
2013 Chevrolet Orlando Owner ManualM
In Brief. . . . . . . . . . . . . . . . . . . . . . . . 1-1
Instrument Panel . . . . . . . . . . . . . . 1-2
Initial Drive Information . . . . . . . . 1-4
Vehicle Features . . . . . . . . . . . . . 1-14
Performance and Maintenance . . . . . . . . . . . . . . . . 1-18
Keys, Doors, and Windows . . . . . . . . . . . . . . . . . . . . 2-1
Keys and Locks . . . . . . . . . . . . . . . 2-1
Doors . . . . . . . . . . . . . . . . . . . . . . . . . . 2-8
Vehicle Security . . . . . . . . . . . . . . . . 2-9
Exterior Mirrors . . . . . . . . . . . . . . . 2-11
Interior Mirrors . . . . . . . . . . . . . . . . 2-12
Windows . . . . . . . . . . . . . . . . . . . . . 2-14
Roof . . . . . . . . . . . . . . . . . . . . . . . . . . 2-16
Seats and Restraints . . . . . . . . . 3-1
Head Restraints . . . . . . . . . . . . . . . 3-2
Front Seats . . . . . . . . . . . . . . . . . . . . 3-3
Rear Seats . . . . . . . . . . . . . . . . . . . . 3-8
Safety Belts . . . . . . . . . . . . . . . . . . 3-15
Airbag System . . . . . . . . . . . . . . . . 3-24
Child Restraints . . . . . . . . . . . . . . 3-32 Storage
. . . . . . . . . . . . . . . . . . . . . . . 4-1
Storage Compartments . . . . . . . . 4-1
Additional Storage Features . . . 4-2
Roof Rack System . . . . . . . . . . . . . 4-5
Instruments and Controls . . . . 5-1
Controls . . . . . . . . . . . . . . . . . . . . . . . 5-2
Warning Lights, Gauges, and
Indicators . . . . . . . . . . . . . . . . . . . . 5-7
Information Displays . . . . . . . . . . 5-21
Vehicle Messages . . . . . . . . . . . . 5-24
Vehicle Personalization . . . . . . . 5-30
Lighting . . . . . . . . . . . . . . . . . . . . . . . 6-1
Exterior Lighting . . . . . . . . . . . . . . . 6-1
Interior Lighting . . . . . . . . . . . . . . . . 6-6
Lighting Features . . . . . . . . . . . . . . 6-7
Infotainment System . . . . . . . . . 7-1
Introduction . . . . . . . . . . . . . . . . . . . . 7-1
Radio . . . . . . . . . . . . . . . . . . . . . . . . . . 7-7
Audio Players . . . . . . . . . . . . . . . . 7-13
Phone . . . . . . . . . . . . . . . . . . . . . . . . 7-18
Trademarks and License Agreements . . . . . . . . . . . . . . . . . 7-29 Climate Controls
. . . . . . . . . . . . . 8-1
Climate Control Systems . . . . . . 8-1
Air Vents . . . . . . . . . . . . . . . . . . . . . . . 8-6
Driving and Operating . . . . . . . . 9-1
Driving Information . . . . . . . . . . . . . 9-2
Starting and Operating . . . . . . . 9-13
Engine Exhaust . . . . . . . . . . . . . . 9-20
Automatic Transmission . . . . . . 9-21
Manual Transmission . . . . . . . . . 9-24
Brakes . . . . . . . . . . . . . . . . . . . . . . . 9-26
Ride Control Systems . . . . . . . . 9-28
Cruise Control . . . . . . . . . . . . . . . . 9-31
Object Detection Systems . . . . 9-33
Fuel . . . . . . . . . . . . . . . . . . . . . . . . . . 9-38
Towing . . . . . . . . . . . . . . . . . . . . . . . 9-42
Conversions and Add-Ons . . . 9-47
Vehicle Care . . . . . . . . . . . . . . . . . 10-1
General Information . . . . . . . . . . 10-2
Vehicle Checks . . . . . . . . . . . . . . . 10-4
Headlamp Aiming . . . . . . . . . . . 10-25
Bulb Replacement . . . . . . . . . . 10-25
Electrical System . . . . . . . . . . . . 10-30
Wheels and Tires . . . . . . . . . . . 10-37
Page 9 of 372
Black plate (3,1)Chevrolet Orlando Owner Manual - 2013 - CRC - 6/5/12
In Brief 1-3
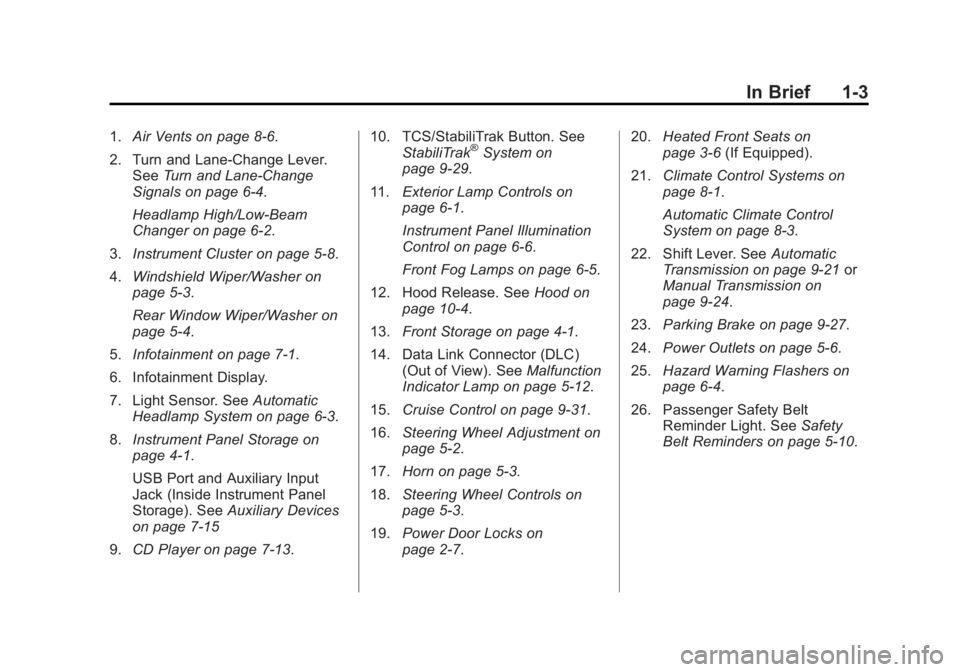
1.Air Vents on page 8‑6.
2. Turn and Lane-Change Lever. See Turn and Lane-Change
Signals on page 6‑4.
Headlamp High/Low-Beam
Changer on page 6‑2.
3. Instrument Cluster on page 5‑8.
4. Windshield Wiper/Washer on
page 5‑3.
Rear Window Wiper/Washer on
page 5‑4.
5. Infotainment on page 7‑1.
6. Infotainment Display.
7. Light Sensor. See Automatic
Headlamp System on page 6‑3.
8. Instrument Panel Storage on
page 4‑1.
USB Port and Auxiliary Input
Jack (Inside Instrument Panel
Storage). See Auxiliary Devices
on page 7‑15
9. CD Player on page 7‑13. 10. TCS/StabiliTrak Button. See
StabiliTrak®System on
page 9‑29.
11. Exterior Lamp Controls on
page 6‑1.
Instrument Panel Illumination
Control on page 6‑6.
Front Fog Lamps on page 6‑5.
12. Hood Release. See Hood on
page 10‑4.
13. Front Storage on page 4‑1.
14. Data Link Connector (DLC) (Out of View). See Malfunction
Indicator Lamp on page 5‑12.
15. Cruise Control on page 9‑31.
16. Steering Wheel Adjustment on
page 5‑2.
17. Horn on page 5‑3.
18. Steering Wheel Controls on
page 5‑3.
19. Power Door Locks on
page 2‑7. 20.
Heated Front Seats on
page 3‑6 (If Equipped).
21. Climate Control Systems on
page 8‑1.
Automatic Climate Control
System on page 8‑3.
22. Shift Lever. See Automatic
Transmission on page 9‑21 or
Manual Transmission on
page 9‑24.
23. Parking Brake on page 9‑27.
24. Power Outlets on page 5‑6.
25. Hazard Warning Flashers on
page 6‑4.
26. Passenger Safety Belt Reminder Light. See Safety
Belt Reminders on page 5‑10.
Page 22 of 372
Black plate (16,1)Chevrolet Orlando Owner Manual - 2013 - CRC - 6/5/12
1-16 In Brief
Portable Audio Devices
Some vehicles have a 3.5 mm
(1/8 in) auxiliary input and a USB
port in the center console bin.
External devices such as iPods®,
laptop computers, MP3 players, CD
changers, and USB drives may be
connected, depending on the audio
system.
SeeAuxiliary Devices on page 7‑15.
Bluetooth®
The Bluetooth® system allows
users with a Bluetooth-enabled
mobile phone to make and receive
hands-free calls using the vehicle
audio system and controls.
The Bluetooth-enabled mobile
phone must be paired with the
in-vehicle Bluetooth system before it
can be used in the vehicle. Not all
phones will support all functions. See
Bluetooth (Overview) on
page 7‑18 orBluetooth (Voice
Recognition) on page 7‑23 or
Bluetooth (Infotainment Controls) on
page 7‑19.
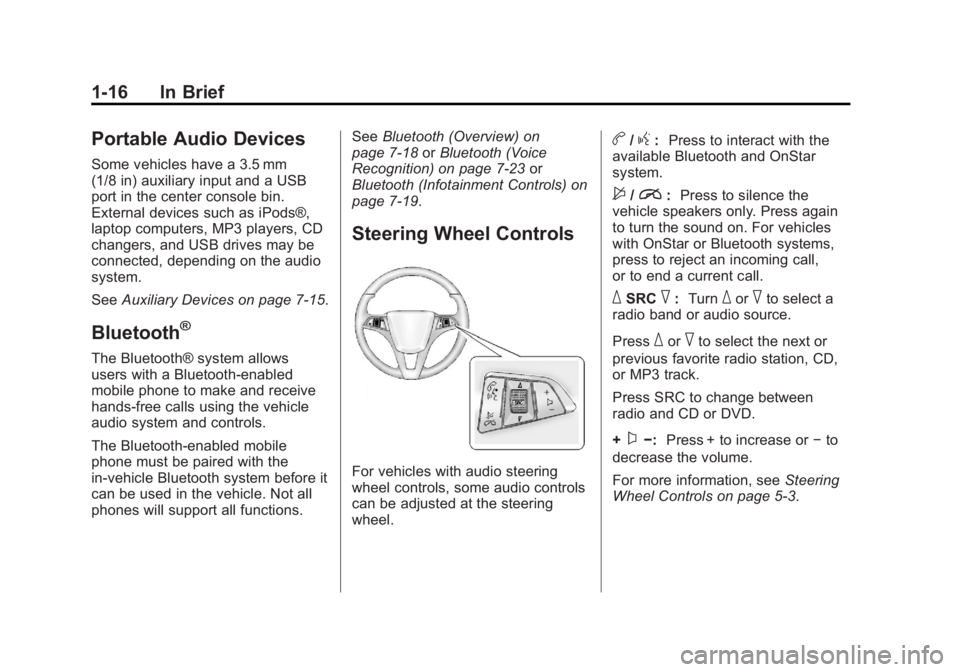
Steering Wheel Controls
For vehicles with audio steering
wheel controls, some audio controls
can be adjusted at the steering
wheel.
b/g: Press to interact with the
available Bluetooth and OnStar
system.
$/i: Press to silence the
vehicle speakers only. Press again
to turn the sound on. For vehicles
with OnStar or Bluetooth systems,
press to reject an incoming call,
or to end a current call.
_SRC^: Turn_or^to select a
radio band or audio source.
Press
_or^to select the next or
previous favorite radio station, CD,
or MP3 track.
Press SRC to change between
radio and CD or DVD.
+
x−: Press + to increase or −to
decrease the volume.
For more information, see Steering
Wheel Controls on page 5‑3.
Page 24 of 372
Black plate (18,1)Chevrolet Orlando Owner Manual - 2013 - CRC - 6/5/12
1-18 In Brief
Storage Compartments
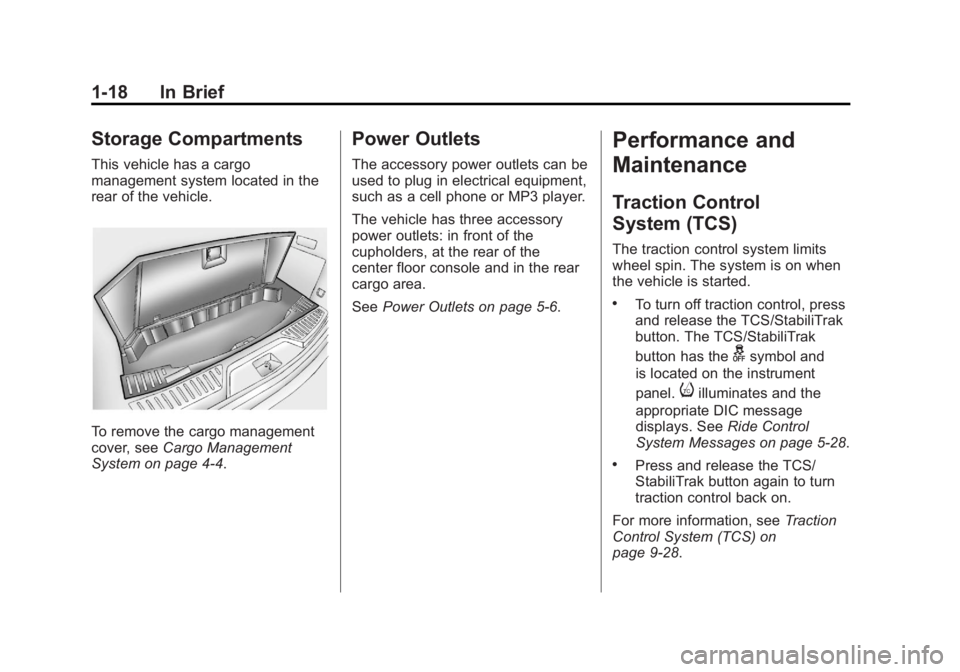
This vehicle has a cargo
management system located in the
rear of the vehicle.
To remove the cargo management
cover, seeCargo Management
System on page 4‑4.
Power Outlets
The accessory power outlets can be
used to plug in electrical equipment,
such as a cell phone or MP3 player.
The vehicle has three accessory
power outlets: in front of the
cupholders, at the rear of the
center floor console and in the rear
cargo area.
See Power Outlets on page 5‑6.
Performance and
Maintenance
Traction Control
System (TCS)
The traction control system limits
wheel spin. The system is on when
the vehicle is started.
.To turn off traction control, press
and release the TCS/StabiliTrak
button. The TCS/StabiliTrak
button has the
gsymbol and
is located on the instrument
panel.
iilluminates and the
appropriate DIC message
displays. See Ride Control
System Messages on page 5‑28.
.Press and release the TCS/
StabiliTrak button again to turn
traction control back on.
For more information, see Traction
Control System (TCS) on
page 9‑28.
Page 106 of 372
Black plate (6,1)Chevrolet Orlando Owner Manual - 2013 - CRC - 6/5/12
5-6 Instruments and Controls
Setting the 12/24 Hour Format
1. Press the CONFIG button andselect Time Settings.
2. Highlight 12/24 Hour Format.
3. Press the MENU knob to select the 12 hour or 24 hour display
format.
Power Outlets
The accessory power outlets can be
used to plug in electrical equipment,
such as a cell phone or MP3 player.
The vehicle has three accessory
power outlets: in front of the
cupholders, at the rear of the center
floor console and in the rear
cargo area.
Remove the cover to access, and
replace when not in use.
{WARNING
Power is always supplied to the
outlets. Do not leave electrical
equipment plugged in when the
vehicle is not in use because the
vehicle could catch fire and cause
injury or death.
Notice: Leaving electrical
equipment plugged in for an
extended period of time while the
vehicle is off will drain the
battery. Always unplug electrical
equipment when not in use and
do not plug in equipment that
exceeds the maximum 20 ampere
rating.
Certain accessory power plugs may
not be compatible with the
accessory power outlet and could
overload vehicle or adapter fuses.
If a problem is experienced, see
your dealer. When adding electrical equipment,
be sure to follow the proper
installation instructions included with
the equipment. See
Add-On
Electrical Equipment on page 9‑47.
Notice: Hanging heavy
equipment from the power outlet
can cause damage not covered
by the vehicle warranty. The
power outlets are designed for
accessory power plugs only, such
as cell phone charge cords.
Cigarette Lighter
For vehicles with a cigarette lighter,
it is located in the center floor
console.
The ignition must be turned to ACC/
ACCESSORY or ON/RUN.
To activate the cigarette lighter,
push it into the heating element and
let go. When the lighter is ready it
will pop back out.
Notice: Holding a cigarette lighter
in while it is heating does not let
the lighter back away from the
Page 143 of 372
Black plate (1,1)Chevrolet Orlando Owner Manual - 2013 - CRC - 6/5/12
Infotainment System 7-1
Infotainment
System
Introduction
Infotainment . . . . . . . . . . . . . . . . . . . 7-1
Theft-Deterrent Feature . . . . . . . 7-2
Overview . . . . . . . . . . . . . . . . . . . . . . 7-3
Operation . . . . . . . . . . . . . . . . . . . . . 7-4
Radio
AM-FM Radio . . . . . . . . . . . . . . . . . 7-7
Satellite Radio . . . . . . . . . . . . . . . . 7-9
Radio Reception . . . . . . . . . . . . . 7-12
Satellite Radio Antenna . . . . . . 7-12
Multi-Band Antenna . . . . . . . . . . 7-12
Audio Players
CD Player . . . . . . . . . . . . . . . . . . . 7-13
Auxiliary Devices . . . . . . . . . . . . 7-15
Phone
Bluetooth (Overview) . . . . . . . . 7-18
Bluetooth (InfotainmentControls) . . . . . . . . . . . . . . . . . . . 7-19
Bluetooth (Voice Recognition) . . . . . . . . . . . . . . . 7-23
Trademarks and License
Agreements
Trademarks and LicenseAgreements . . . . . . . . . . . . . . . . 7-29
Introduction
Infotainment
Read the following pages to
become familiar with the audio
system's features.
{WARNING
Taking your eyes off the road for
extended periods could cause a
crash resulting in injury or death
to you or others. Do not give
extended attention to infotainment
tasks while driving.
This system provides access to
many audio and non-audio listings.
Page 146 of 372
Black plate (4,1)Chevrolet Orlando Owner Manual - 2013 - CRC - 6/5/12
7-4 Infotainment System
9. AS
.Radio: Opens the autostore
stations list.
10. BAND
.Changes the band while
listening to the radio.
.Selects the radio when
listening to a different
audio source.
11. CD/AUX
.Selects the CD player or
an external audio source.
12. CONFIG
.Opens the settings menu.
13.
5\>
.Opens the phone
main menu.
.Mutes the audio system.
14. FAV
.Radio: Opens the
favorites list. 15. BACK
.Menu: Moves one
level back.
.Character Input: Deletes
the last character.
16. MENU
.Turn to open menus,
highlight menu items,
or set numeric values
while in a menu.
.Press to select menu
items.
.Radio: Manually selects
radio stations.
.CD: Selects tracks.
Operation
Controls
The infotainment system is operated
by using the pushbuttons,
multifunction knobs, menus shown
on the display, and steering wheel
controls, if equipped.
Turning the System On or Off
O(Volume/Power): Press to turn
the system on and off.
Automatic Switch-Off
If the infotainment system has been
turned on after the ignition is turned
off, the system will turn off
automatically after 10 minutes.
Volume Control
O(Volume/Power): Turn to adjust
the volume.
5/>(Phone/Mute): Press5/>to mute the infotainment system.
Press
5/>again, or turn
the
Oknob to cancel mute.
Menu System
The menu system appears on the
display screen.
Controls
The MENU knob and the BACK
button are used to navigate the
menu system.
Page 148 of 372
Black plate (6,1)Chevrolet Orlando Owner Manual - 2013 - CRC - 6/5/12
7-6 Infotainment System
2. Press the MENU knob to turnthe function on or off.
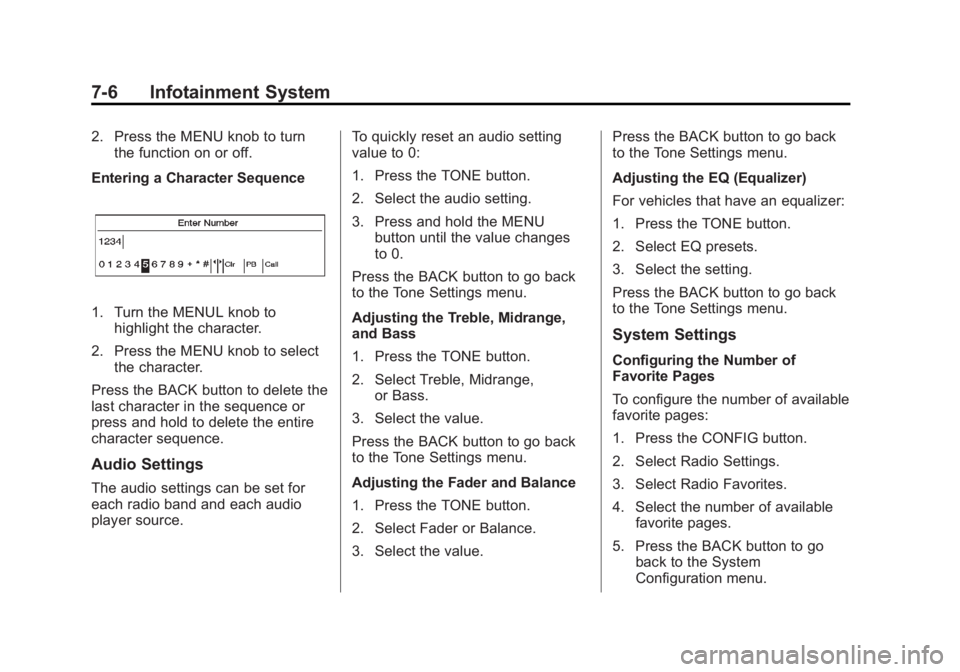
Entering a Character Sequence
1. Turn the MENUL knob to highlight the character.
2. Press the MENU knob to select the character.
Press the BACK button to delete the
last character in the sequence or
press and hold to delete the entire
character sequence.
Audio Settings
The audio settings can be set for
each radio band and each audio
player source. To quickly reset an audio setting
value to 0:
1. Press the TONE button.
2. Select the audio setting.
3. Press and hold the MENU
button until the value changes
to 0.
Press the BACK button to go back
to the Tone Settings menu.
Adjusting the Treble, Midrange,
and Bass
1. Press the TONE button.
2. Select Treble, Midrange, or Bass.
3. Select the value.
Press the BACK button to go back
to the Tone Settings menu.
Adjusting the Fader and Balance
1. Press the TONE button.
2. Select Fader or Balance.
3. Select the value. Press the BACK button to go back
to the Tone Settings menu.
Adjusting the EQ (Equalizer)
For vehicles that have an equalizer:
1. Press the TONE button.
2. Select EQ presets.
3. Select the setting.
Press the BACK button to go back
to the Tone Settings menu.
System Settings
Configuring the Number of
Favorite Pages
To configure the number of available
favorite pages:
1. Press the CONFIG button.
2. Select Radio Settings.
3. Select Radio Favorites.
4. Select the number of available
favorite pages.
5. Press the BACK button to go back to the System
Configuration menu.