2015 CHEVROLET MALIBU open hood
[x] Cancel search: open hoodPage 45 of 399
Black plate (16,1)Chevrolet Malibu Owner Manual (GMNA-Localizing-U.S./Canada/Mexico-
7575972) - 2015 - crc - 4/1/14
2-16 Keys, Doors, and Windows
On Solid:Vehicle is secured
during the delay to arm the system.
Fast Flash: Vehicle is unsecured.
A door, the hood, or the trunk
is open.
Slow Flash: Alarm system is
armed.
Arming the Alarm System
1. Close the trunk and the hood. Turn off the vehicle.
2. Lock the vehicle in one of three ways:
.Use the RKE transmitter.
.Use the Keyless Access
system, if equipped.
.With a door open, press on
the inside
Q.
3. After 30 seconds the alarm system will arm, and the
indicator light will begin to slowly
flash indicating the alarm system
is operating. Pressing
Qon the
RKE transmitter a second time will bypass the 30-second delay
and immediately arm the alarm
system.
The vehicle alarm system will not
arm if the doors are locked with
the key.
If the driver door is opened without
first unlocking with the RKE
transmitter, the horn will chirp and
the lights will flash to indicate
pre-alarm. If the vehicle is not
started, or the door is not unlocked
by pressing
Kon the RKE
transmitter during the 10-second
pre-alarm, the alarm will be
activated.
If a door, the hood, or the trunk is
opened without first disarming the
system, the turn signals will flash
and the horn will sound for about
30 seconds. The alarm system will
then re-arm to monitor for the next
unauthorized event.
Disarming the Alarm System
Do one of the following to disarm
the alarm system or turn off the
alarm if it has been activated:
.PressKon the RKE transmitter.
.Unlock the vehicle using the
Keyless Access system,
if equipped.
.Start the vehicle.
To avoid setting off the alarm by
accident:
.Lock the vehicle after all
occupants have left the vehicle
and all doors are closed.
.Always unlock a door with the
RKE transmitter or use the
Keyless Access system,
if equipped.
Unlocking the driver door with the
key will not disarm the system or
turn off the alarm.
Page 132 of 399
Black plate (25,1)Chevrolet Malibu Owner Manual (GMNA-Localizing-U.S./Canada/Mexico-
7575972) - 2015 - crc - 4/1/14
Instruments and Controls 5-25
Brake System Messages
BRAKE FLUID LOW
This message is displayed when the
brake fluid level is low. SeeBrake
Fluid on page 10-20.
SERVICE BRAKE ASSIST
This message may be displayed
when there is a problem with the
brake boost assist system. When
this message is displayed, the brake
boost assist motor might be heard
operating and you might notice
pulsation in the brake pedal. This is
normal under these conditions. Take
the vehicle to your dealer for
service.
Compass Messages
CAL
This message is displayed when the
compass needs to be calibrated.
See Compass on page 5-4.
– –
Dashes will be displayed if the
compass needs service. See your
dealer for service.
Cruise Control Messages
CRUISE SET TO XXX
This message displays when the
cruise control is set and shows the
speed it was set to. See Cruise
Control on page 9-31.
Door Ajar Messages
DRIVER DOOR OPEN
This message will display when the
driver door is open. Close the door
completely.
HOOD OPEN
This message will display when the
hood is open. Close the hood
completely.
LEFT REAR DOOR OPEN
This message will display when the
driver side rear door is open. Close
the door completely.
PASSENGER DOOR OPEN
This message will display when the
front passenger door is open. Close
the door completely.
RIGHT REAR DOOR OPEN
This message will display when the
passenger side rear door is open.
Close the door completely.
TRUNK OPEN
This message will display when the
trunk is open. Close the trunk
completely.
Page 217 of 399
Black plate (20,1)Chevrolet Malibu Owner Manual (GMNA-Localizing-U.S./Canada/Mexico-
7575972) - 2015 - crc - 4/1/14
9-20 Driving and Operating
efficiency. SeeDual Automatic
Climate Control System on
page 8-4.
.The Auto Stop time is greater
than two minutes.
Engine Heater
The engine coolant heater,
if available, can help in cold weather
conditions at or below −18°C (0°F)
for easier starting and better fuel
economy during engine warm-up.
Plug in the coolant heater at least
four hours before starting the
vehicle. An internal thermostat in
the plug end of the cord will prevent
engine coolant heater operation at
temperatures above −18°C (0°F).
To Use the Engine Coolant
Heater
1. Turn off the engine. 2. Open the hood and unwrap the
electrical cord.
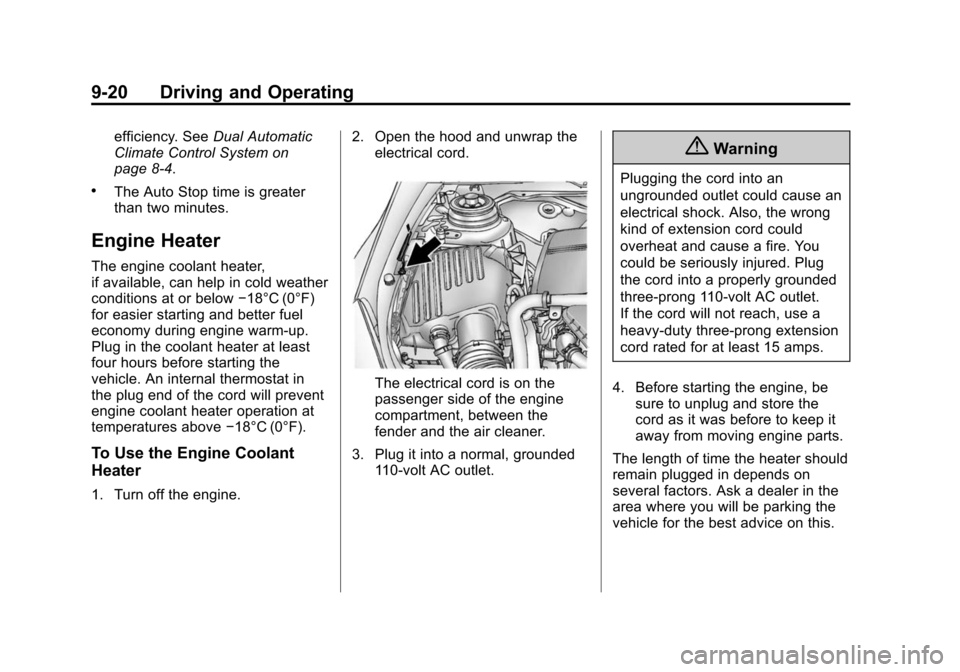
The electrical cord is on the
passenger side of the engine
compartment, between the
fender and the air cleaner.
3. Plug it into a normal, grounded 110-volt AC outlet.
{Warning
Plugging the cord into an
ungrounded outlet could cause an
electrical shock. Also, the wrong
kind of extension cord could
overheat and cause a fire. You
could be seriously injured. Plug
the cord into a properly grounded
three-prong 110-volt AC outlet.
If the cord will not reach, use a
heavy-duty three-prong extension
cord rated for at least 15 amps.
4. Before starting the engine, be sure to unplug and store the
cord as it was before to keep it
away from moving engine parts.
The length of time the heater should
remain plugged in depends on
several factors. Ask a dealer in the
area where you will be parking the
vehicle for the best advice on this.
Page 241 of 399
Black plate (44,1)Chevrolet Malibu Owner Manual (GMNA-Localizing-U.S./Canada/Mexico-
7575972) - 2015 - crc - 4/1/14
9-44 Driving and Operating
knocking is heard when using
gasoline with a 91 octane rating or
higher, the engine needs service.
Use of Seasonal Fuels
Use summer and winter fuels in the
appropriate season. The fuels
industry automatically modifies the
fuel for the appropriate season.
If fuel is left in the vehicle tank for
long periods of time, driving or
starting could be affected. Drive the
vehicle until the fuel is at one-half
tank or less, then refuel with the
current seasonal fuel.
Prohibited Fuels
Gasolines containing oxygenates
such as ethers and ethanol, as well
as reformulated gasolines, are
available in some cities. If these
gasolines comply with the
previously described specification,
then they are acceptable to use.
However, E85 (85% ethanol) and
other fuels containing more than
15% ethanol must be used only in
FlexFuel vehicles.{Caution
Do not use fuel containing
methanol. It can corrode metal
parts in the fuel system and also
damage plastic and rubber parts.
That damage would not be
covered under the vehicle
warranty.
Some gasolines, mainly high octane
racing gasolines, can contain an
octane-enhancing additive called
methylcyclopentadienyl manganese
tricarbonyl (MMT). Do not use
gasolines and/or fuel additives with
MMT as they can reduce spark plug
life and affect emission control
system performance. The
malfunction indicator lamp may turn
on. If this occurs, see your dealer
for service.
California Fuel
Requirements
If the vehicle is certified to meet
California Emissions Standards, it is
designed to operate on fuels that
meet California specifications. See
the underhood emission control
label. If this fuel is not available in
states adopting California Emissions
Standards, the vehicle will operate
satisfactorily on fuels meeting
federal specifications, but emission
control system performance might
be affected. The malfunction
indicator lamp could turn on and the
vehicle may not pass a smog-check
test. See Malfunction Indicator
Lamp on page 5-13. If this occurs,
return to your authorized dealer for
diagnosis. If it is determined that the
condition is caused by the type of
fuel used, repairs may not be
covered by the vehicle warranty.
Page 255 of 399
Black plate (4,1)Chevrolet Malibu Owner Manual (GMNA-Localizing-U.S./Canada/Mexico-
7575972) - 2015 - crc - 4/1/14
10-4 Vehicle Care
This vehicle has an airbag system.
Before attempting to do your own
service work, seeServicing the
Airbag-Equipped Vehicle on
page 3-29.
Keep a record with all parts receipts
and list the mileage and the date of
any service work performed. See
Maintenance Records on
page 11-13.
{Caution
Even small amounts of
contamination can cause damage
to vehicle systems. Do not allow
contaminants to contact the fluids,
reservoir caps, or dipsticks.
Hood
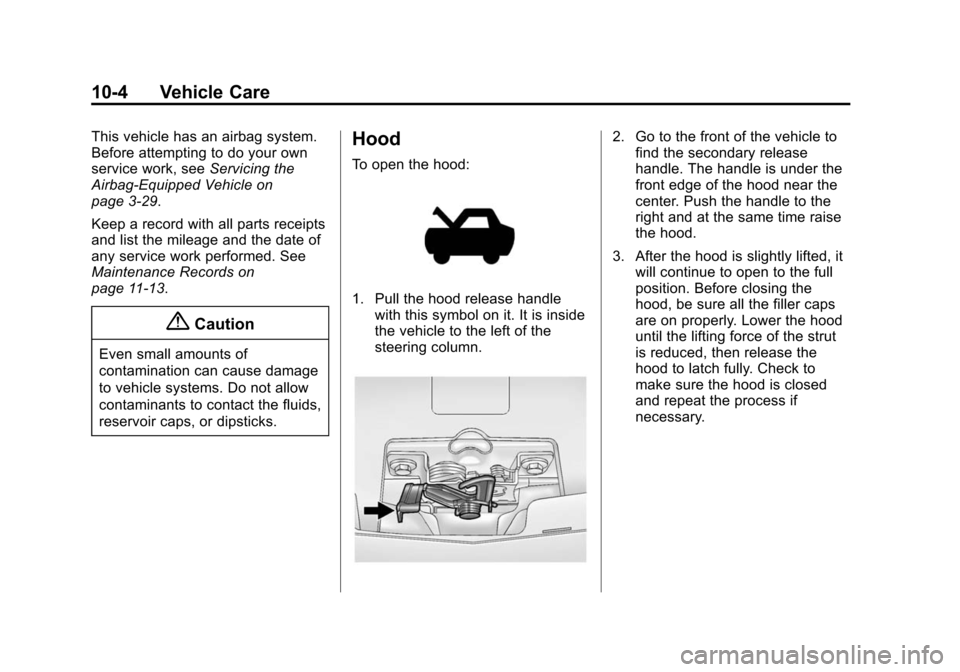
To open the hood:
1. Pull the hood release handle with this symbol on it. It is inside
the vehicle to the left of the
steering column.
2. Go to the front of the vehicle tofind the secondary release
handle. The handle is under the
front edge of the hood near the
center. Push the handle to the
right and at the same time raise
the hood.
3. After the hood is slightly lifted, it will continue to open to the full
position. Before closing the
hood, be sure all the filler caps
are on properly. Lower the hood
until the lifting force of the strut
is reduced, then release the
hood to latch fully. Check to
make sure the hood is closed
and repeat the process if
necessary.
Page 268 of 399
Black plate (17,1)Chevrolet Malibu Owner Manual (GMNA-Localizing-U.S./Canada/Mexico-
7575972) - 2015 - crc - 4/1/14
Vehicle Care 10-17
reaches the mark pointed to on
the front of the coolant
surge tank.
5. Replace the cap tightly.
{Caution
If the pressure cap is not tightly
installed, coolant loss and
possible engine damage may
occur. Be sure the cap is properly
and tightly secured.
Engine Overheating
The vehicle has an engine coolant
temperature gauge on the
instrument cluster to warn of engine
overheating. See Engine Coolant
Temperature Gauge on page 5-10.
If the decision is made not to lift the
hood when this warning appears,
get service help right away. Contact
your dealer for additional
information. If the decision is made to lift the
hood, make sure the vehicle is
parked on a level surface.
Then check to see if the engine
cooling fans are running. If the
engine is overheating, both fans
should be running. If they are not,
do not continue to run the engine
and have the vehicle serviced.
{Caution
Running the engine without
coolant may cause damage or a
fire. Vehicle damage would not be
covered by the vehicle warranty.
If Steam Is Coming from the
Engine Compartment
{Warning
Steam from an overheated engine
can burn you badly, even if you
just open the hood. Stay away
(Continued)
Warning (Continued)
from the engine if you see or hear
steam coming from it. Just turn it
off and get everyone away from
the vehicle until it cools down.
Wait until there is no sign of
steam or coolant before you open
the hood.
If you keep driving when the
engine is overheated, the liquids
in it can catch fire. You or others
could be badly burned. Stop the
engine if it overheats, and get out
of the vehicle until the engine
is cool.
Page 277 of 399
Black plate (26,1)Chevrolet Malibu Owner Manual (GMNA-Localizing-U.S./Canada/Mexico-
7575972) - 2015 - crc - 4/1/14
10-26 Vehicle Care
Headlamps, Front Turn
Signal, Sidemarker, and
Parking Lamps
Base Headlamp Assembly
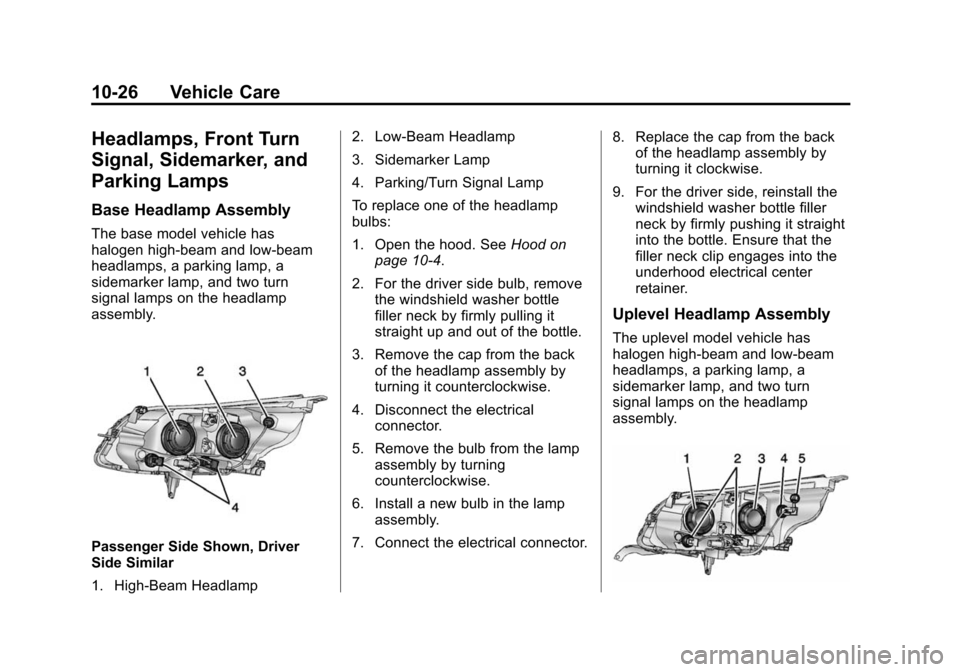
The base model vehicle has
halogen high-beam and low-beam
headlamps, a parking lamp, a
sidemarker lamp, and two turn
signal lamps on the headlamp
assembly.
Passenger Side Shown, Driver
Side Similar
1. High-Beam Headlamp2. Low-Beam Headlamp
3. Sidemarker Lamp
4. Parking/Turn Signal Lamp
To replace one of the headlamp
bulbs:
1. Open the hood. See
Hood on
page 10-4.
2. For the driver side bulb, remove the windshield washer bottle
filler neck by firmly pulling it
straight up and out of the bottle.
3. Remove the cap from the back of the headlamp assembly by
turning it counterclockwise.
4. Disconnect the electrical connector.
5. Remove the bulb from the lamp assembly by turning
counterclockwise.
6. Install a new bulb in the lamp assembly.
7. Connect the electrical connector. 8. Replace the cap from the back
of the headlamp assembly by
turning it clockwise.
9. For the driver side, reinstall the windshield washer bottle filler
neck by firmly pushing it straight
into the bottle. Ensure that the
filler neck clip engages into the
underhood electrical center
retainer.
Uplevel Headlamp Assembly
The uplevel model vehicle has
halogen high-beam and low-beam
headlamps, a parking lamp, a
sidemarker lamp, and two turn
signal lamps on the headlamp
assembly.
Page 278 of 399
Black plate (27,1)Chevrolet Malibu Owner Manual (GMNA-Localizing-U.S./Canada/Mexico-
7575972) - 2015 - crc - 4/1/14
Vehicle Care 10-27
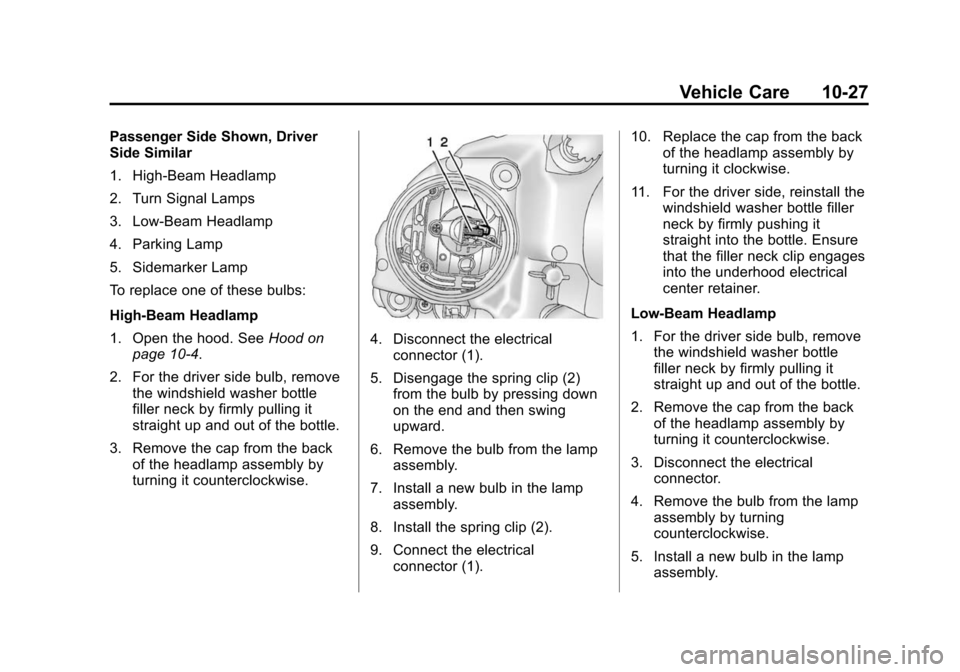
Passenger Side Shown, Driver
Side Similar
1. High-Beam Headlamp
2. Turn Signal Lamps
3. Low-Beam Headlamp
4. Parking Lamp
5. Sidemarker Lamp
To replace one of these bulbs:
High-Beam Headlamp
1. Open the hood. SeeHood on
page 10-4.
2. For the driver side bulb, remove the windshield washer bottle
filler neck by firmly pulling it
straight up and out of the bottle.
3. Remove the cap from the back of the headlamp assembly by
turning it counterclockwise.
4. Disconnect the electrical
connector (1).
5. Disengage the spring clip (2) from the bulb by pressing down
on the end and then swing
upward.
6. Remove the bulb from the lamp assembly.
7. Install a new bulb in the lamp assembly.
8. Install the spring clip (2).
9. Connect the electrical connector (1). 10. Replace the cap from the back
of the headlamp assembly by
turning it clockwise.
11. For the driver side, reinstall the windshield washer bottle filler
neck by firmly pushing it
straight into the bottle. Ensure
that the filler neck clip engages
into the underhood electrical
center retainer.
Low-Beam Headlamp
1. For the driver side bulb, remove the windshield washer bottle
filler neck by firmly pulling it
straight up and out of the bottle.
2. Remove the cap from the back of the headlamp assembly by
turning it counterclockwise.
3. Disconnect the electrical connector.
4. Remove the bulb from the lamp assembly by turning
counterclockwise.
5. Install a new bulb in the lamp assembly.