2015 CHEVROLET MALIBU manual radio set
[x] Cancel search: manual radio setPage 22 of 399
Black plate (15,1)Chevrolet Malibu Owner Manual (GMNA-Localizing-U.S./Canada/Mexico-
7575972) - 2015 - crc - 4/1/14
In Brief 1-15
Vehicle Features
Infotainment System
See the infotainment manual for
information on the radio, audio
players, phone, navigation system,
and voice or speech recognition.
It also includes information on
settings.
Radio(s)
VOL/O:Press to turn the system
on and off. Turn to increase or
decrease the volume.
RADIO/BAND: Press to choose
between FM, AM, or SiriusXM
®,
if equipped.
TUNE/MENU: Turn to select radio
stations. Press to select a menu.
©SEEK¨: Press to seek the
previous or next station or track.
INFO: Press to show available
information about the current station
or track. See
Overview on page 7-2.
Satellite Radio
If equipped, vehicles with a
SiriusXM®satellite radio tuner and a
valid SiriusXM satellite radio
subscription can receive SiriusXM
programming.
SiriusXM Satellite Radio
Service
SiriusXM is a satellite radio service
based in the 48 contiguous United
States and 10 Canadian provinces.
SiriusXM satellite radio has a wide
variety of programming and
commercial-free music, coast to
coast, and in digital-quality sound.
A fee is required to receive the
SiriusXM service.
Refer to:
.www.siriusxm.com or call
1-866-635-2349 (U.S.).
.www.xmradio.ca or call
1-877-209-0079 (Canada).
See Satellite Radio on page 7-10.
Portable Audio Devices
This vehicle may have a 3.5 mm
(1/8 in) auxiliary input and a USB
port in the center console. External
devices such as iPods
®, laptop
computers, MP3 players, and USB
storage devices may be connected.
See Auxiliary Devices on page 7-14.
Bluetooth®
The Bluetooth®system allows users
with a Bluetooth-enabled mobile
phone to make and receive
hands-free calls using the vehicle
audio system and controls.
The Bluetooth-enabled mobile
phone must be paired with the
in-vehicle Bluetooth system before it
can be used in the vehicle. Not all
phones will support all functions.
See Bluetooth (Infotainment
Controls) on page 7-21 orBluetooth
(Voice Recognition) on page 7-24 or
Bluetooth (Overview) on page 7-19.
Page 23 of 399

Black plate (16,1)Chevrolet Malibu Owner Manual (GMNA-Localizing-U.S./Canada/Mexico-
7575972) - 2015 - crc - 4/1/14
1-16 In Brief
Steering Wheel Controls
b/g:Press to interact with
OnStar, Bluetooth, or navigation,
if equipped.
$/i: Press to mute. Press
again to turn the sound on. Press to
reject an incoming call, or to end a
current call.
_SRC^: Use to select a radio
band or audio source. Use
_or^to select the next or
previous favorite radio station, CD
track, or MP3 track.
Press SRC to change between
radio and CD.
Press and hold SRC to interact with
the navigation system, if equipped.
+
x−: Press + to increase or −to
decrease the volume.
See Steering Wheel Controls on
page 5-2.
Cruise Control
1: Press to turn the cruise control
on or off. A white indicator comes
on in the instrument cluster.
*: Press to disengage cruise
control without erasing the set
speed from memory.
RES/+: If there is a set speed in
memory, press the control up briefly
to resume to that speed or hold to
accelerate. If cruise control is
already active, use to increase
vehicle speed.
Page 111 of 399
Black plate (4,1)Chevrolet Malibu Owner Manual (GMNA-Localizing-U.S./Canada/Mexico-
7575972) - 2015 - crc - 4/1/14
5-4 Instruments and Controls
Wiper Parking
If the ignition is put in OFF while the
wipers are on LO, HI, or INT, they
will immediately stop.
If the windshield wiper lever is then
moved to OFF before the driver
door is opened or within 10 minutes,
the wipers will restart and move to
the base of the windshield.
If the ignition is put in OFF while the
wipers are performing wipes due to
windshield washing, the wipers
continue to run until they reach the
base of the windshield.
nL(Windshield Washer): Pull
the windshield wiper lever toward
you to spray washer fluid and
activate the wipers. The wipers will
continue until the lever is released
or the maximum wash time is
reached. When the lever is
released, additional wipes may
occur depending on how long the
windshield washer had been
activated. See
Washer Fluid on page 10-18 for
information on filling the windshield
washer fluid reservoir.
{Warning
In freezing weather, do not use
the washer until the windshield is
warmed. Otherwise the washer
fluid can form ice on the
windshield, blocking your vision.
Compass
The vehicle may have a compass
display on the center stack. The
compass receives its heading and
other information from the Global
Positioning System (GPS) antenna,
StabiliTrak
®, and vehicle speed
information.
The compass system is designed to
operate for a certain number of
miles or degrees of turn before
needing a signal from the GPS
satellites. When the compass
display shows CAL, drive the
vehicle for a short distance in an open area where it can receive a
GPS signal. The compass system
will automatically determine when a
GPS signal is restored and provide
a heading again. See
Compass
Messages on page 5-25 for the
messages that may be displayed for
the compass.
Clock
The infotainment system controls
are used to access the time and
date settings through the menu
system. The clock menu can only
be used with the radio on while in
ON/RUN or ACC/ACCESSORY.
See Overview on page 7-2 for
information about how to use the
menu system. For vehicles with a
navigation system, see the
navigation manual.
Setting the Clock (Radio
with CD)
To set the time:
1. Press the CONFIG button and select Time Settings.
Page 112 of 399
Black plate (5,1)Chevrolet Malibu Owner Manual (GMNA-Localizing-U.S./Canada/Mexico-
7575972) - 2015 - crc - 4/1/14
Instruments and Controls 5-5
2. Select Set Time.
3. Turn the TUNE/MENU knob toadjust the highlighted number.
4. Press the TUNE/MENU knob to select the next number.
5. To save the time and return to the Time Settings menu, press
the BACK
/button at any time
or press the TUNE/MENU knob
after adjusting the minutes.
Setting the 12/24 Hour Format
1. Press the CONFIG button and select Time Settings.
2. Highlight 12/24 Hour Format.
3. Press the TUNE/MENU knob to select the 12 hour or 24 hour
display format.
Setting the Clock (Radio with
Touchscreen)
To set the time:
1. Press the CONFIG button toenter the menu options. Turn the
TUNE/MENU knob to scroll
through the available setup features. Press the TUNE/MENU
knob or press the Time screen
button to display other options
within that feature.
2. Press + or −to increase or
decrease the Hours and Minutes
displayed on the clock.
To turn Auto Set on and off, press
the Auto Set button.
If auto timing is set, the time
displayed on the clock may not
update immediately when driving
into a new time zone.
12/24 HR Format: Press the 12 HR
screen button for standard time;
press the 24 HR screen button for
military time.
Day + or Day −:Press the Day +
or Day −display buttons to increase
or decrease the day.
Display: Press Display to turn the
display of the time on the screen on
or off.
Power Outlets
The accessory power outlets can be
used to plug in electrical equipment,
such as a cell phone or MP3 player.
There are two accessory power
outlets: one on the center stack
below the climate control system,
and one under the armrest inside
the center console storage.
The outlet is powered when the
ignition is in ON/RUN or ACC/
ACCESSORY, or until the driver
door is opened within 10 minutes of
turning off the vehicle. See Retained
Accessory Power (RAP) on
page 9-21.
Open the protective cover to use the
accessory power outlet.
Certain electrical accessories may
not be compatible with the
accessory power outlets and could
overload vehicle or adapter fuses.
If there is a problem, see your
dealer.
Page 128 of 399
Black plate (21,1)Chevrolet Malibu Owner Manual (GMNA-Localizing-U.S./Canada/Mexico-
7575972) - 2015 - crc - 4/1/14
Instruments and Controls 5-21
Information Displays
Center Stack Display
Infotainment and vehicle
personalization information displays
in the center stack screen. See:
.The navigation system manual
andInfotainment on page 7-1.
.Vehicle Personalization on
page 5-31.
The center stack controls only need
a light touch to operate and work
best with bare hands. The controls
will work with most gloves although
they may take longer to respond.
Use the finger pad rather than the
finger tip to minimize response time.
If the controls are not responding,
remove the gloves.
Driver Information
Center (DIC)
The DIC displays information about
the vehicle. It also displays warning
messages if a system problem is detected. See
Vehicle Messages on
page 5-24. All messages appear in
the DIC display in the center of the
instrument cluster.
The vehicle may also have features
that can be customized through the
controls on the radio. See Vehicle
Personalization on page 5-31.
DIC Operation and Displays
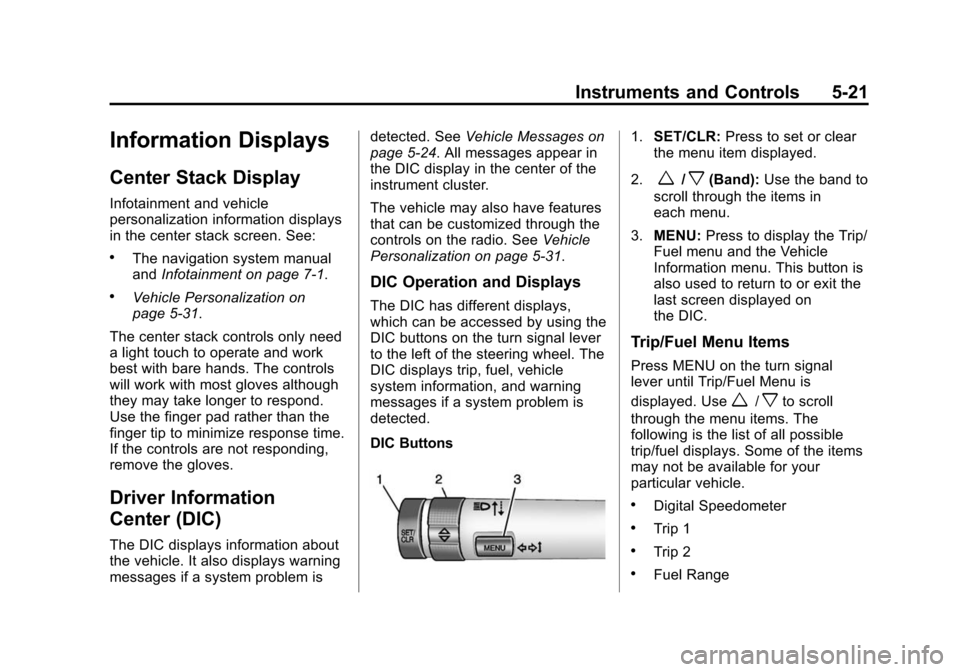
The DIC has different displays,
which can be accessed by using the
DIC buttons on the turn signal lever
to the left of the steering wheel. The
DIC displays trip, fuel, vehicle
system information, and warning
messages if a system problem is
detected.
DIC Buttons
1. SET/CLR: Press to set or clear
the menu item displayed.
2.
w/x(Band): Use the band to
scroll through the items in
each menu.
3. MENU: Press to display the Trip/
Fuel menu and the Vehicle
Information menu. This button is
also used to return to or exit the
last screen displayed on
the DIC.
Trip/Fuel Menu Items
Press MENU on the turn signal
lever until Trip/Fuel Menu is
displayed. Use
w/xto scroll
through the menu items. The
following is the list of all possible
trip/fuel displays. Some of the items
may not be available for your
particular vehicle.
.Digital Speedometer
.Trip 1
.Trip 2
.Fuel Range
Page 138 of 399
Black plate (31,1)Chevrolet Malibu Owner Manual (GMNA-Localizing-U.S./Canada/Mexico-
7575972) - 2015 - crc - 4/1/14
Instruments and Controls 5-31
Vehicle
Personalization
Use the audio system controls to
access the personalization menus
for customizing vehicle features.
The following are all possible
personalization features. Depending
on the vehicle, some may not be
available.
Infotainment System Audio
System Controls
Using the Faceplate
TUNE/MENU Knob
.Press to enter, select, or activate
a highlighted menu option.
.Turn to highlight a menu option.
.Press to enable or disable a
system setting.
}BACK
.Press to exit a menu.
.Press to return to a previous
screen.Using the Touch Screen
Press a screen feature to:
.View more feature options.
.Enable or disable the feature.
w:
Press to scroll up.
x:Press to scroll down.
Back: Press to return to the
previous menu.
To access the
personalization menu:
1. Press Config on the Home page
on the infotainment system
display or CONFIG on the
faceplate.
2. Select the desired feature to display a list of available
options.
3. Select the desired feature setting.
Personalization Menus
The following list of menu items may
be available:
.Languages
.Time and Date
.Radio Settings
.Phone Settings
.Navigation Settings
.Display Settings
.Vehicle Settings
Each menu is detailed in the
following information.
Languages
Select Languages, then select from
the available language(s).
Time and Date
Manually set the time and date. See
Clock on page 5-4.
Radio Settings
Select and the following may
display:
.Auto Volume
.Gracenote Options
.XM Channel Art
.Max Startup Volume
Page 140 of 399
Black plate (33,1)Chevrolet Malibu Owner Manual (GMNA-Localizing-U.S./Canada/Mexico-
7575972) - 2015 - crc - 4/1/14
Instruments and Controls 5-33
Navigation Settings
See“Navigation Settings” in
“Configure Menu” in the
infotainment manual.
Display Settings
Press and the following may
display:
.Home Page Menu
.Rear Camera Options
.Display Off
.Map Settings
Home Page Menu
Select and the following may
display:
.Customize
.Sort
.Restore Home Page Defaults
Customize
This feature allows the selection of
what icons will be on the first
Home Page. Select and follow the screen
prompts.
Sort
This feature allows the icons on the
Home Page to be moved.
Select and follow the screen
prompts.
Restore Home Page Defaults
This feature will restore the Home
Page to the factory settings.
Select and follow the screen
prompts.
Rear Camera Options
Select and the following may
display:
.Symbols
Symbols
Select to turn the rear camera
symbols on or off. See Rear Vision
Camera (RVC) on page 9-39. Display Off
Press to turn the display off. The
display will return when any radio
buttons are pressed or the screen is
touched (if equipped).
Map Settings
See
“Map Settings” in“Configure
Menu” in the infotainment manual.
Vehicle Settings
Select and the following may
display:
.Climate and Air Quality
.Comfort and Convenience
.Collision/Detection Systems
.Lighting
.Power Door Locks
.Remote Lock/Unlock/Start
.Return to Factory Settings?
Page 143 of 399
Black plate (36,1)Chevrolet Malibu Owner Manual (GMNA-Localizing-U.S./Canada/Mexico-
7575972) - 2015 - crc - 4/1/14
5-36 Instruments and Controls
Select to turn On or Off.
Auto Door Lock
This allows selection of which of the
doors will automatically lock when
the vehicle is shifted out of P (Park).
Select All Doors, Driver Door, or Off.
Remote Lock/Unlock/Start
Select and depending on the radio
the following may display:
.Remote Unlock Feedback
.Unlock Feedback (Lights)
.Remote Lock Feedback
.Locking Feedback
.Remote Door Unlock
.Door Unlock Options
.Memory Remote Recall
.Remote Left in Vehicle Reminder
.Relock Remote Door
.Passive Door Unlock
.Passive Door LockRemote Unlock Feedback or
Unlock Feedback (Lights)
When on, the exterior lamps will
flash when unlocking the vehicle
with the RKE transmitter.
Select On or Off. Press TUNE/
MENU to confirm and go back to the
last menu.
Remote Lock Feedback or
Locking Feedback
This allows selection of what type of
feedback is given when locking the
vehicle with the RKE transmitter.
Press TUNE/MENU when Locking
Feedback is highlighted. Turn the
TUNE/MENU knob to select Lights
and Horn, Lights Only, Horn Only,
or Off. Press TUNE/MENU to
confirm and go back to the
last menu.
Remote Door Unlock or Door
Unlock Options
This allows selection of which doors
will unlock when pressingKon the
RKE transmitter. Press TUNE/MENU when Door
Unlock Options is highlighted. Turn
the TUNE/MENU knob to select All
Doors or Driver Door Only. When
set to Driver Door Only, the driver
door will unlock the first time
Kis
pressed and all doors will unlock
when
Kis pressed a second time.
When set to All Doors, all of the
doors will unlock at the first press of
K. Press TUNE/MENU to confirm
and go back to the last menu.
Memory Remote Recall
This allows the Memory Remote
Recall feature to be turned on or off.
When on, this feature will recall the
current driver's last seat and outside
mirror positions upon unlocking the
driver door with the RKE transmitter,
and opening that door. The current
driver is identified when the RKE
transmitter is used to unlock the
driver door. If equipped with Keyless
Access, the recall will occur upon
opening the driver door. See
“Recalling RKE Memory Positions”
under Memory Seats on page 3-6.