2015 CHEVROLET IMPALA change time
[x] Cancel search: change timePage 30 of 413

Black plate (23,1)Chevrolet Impala Owner Manual (GMNA-Localizing-U.S./Canada-7576026) -
2015 - crc 2nd edition - 8/21/14
In Brief 1-23
.Press and release thegbutton
again to turn on both systems.
See Traction Control/Electronic
Stability Control on page 9-31.
Tire Pressure Monitor
This vehicle may have a Tire
Pressure Monitor System (TPMS).
The low tire pressure warning light
alerts to a significant loss in
pressure of one of the vehicle's
tires. If the warning light comes on,
stop as soon as possible and inflate
the tires to the recommended
pressure shown on the Tire and
Loading Information label. See
Vehicle Load Limits on page 9-10.
The warning light will remain on until
the tire pressure is corrected. The low tire pressure warning light
may come on in cool weather when
the vehicle is first started, and then
turn off as the vehicle is driven. This
may be an early indicator that the
tire pressures are getting low and
the tires need to be inflated to the
proper pressure.
The TPMS does not replace normal
monthly tire maintenance. Maintain
the correct tire pressures.
See
Tire Pressure Monitor System
on page 10-46.
Engine Oil Life System
The engine oil life system calculates
engine oil life based on vehicle use
and displays the CHANGE ENGINE
OIL SOON message when it is time
to change the engine oil and filter.
The oil life system should be reset
to 100% only following an oil
change. Resetting the Oil Life System
1. Using the DIC controls on the
right side of the steering wheel,
display REMAINING OIL LIFE
on the DIC. See Driver
Information Center (DIC) on
page 5-25. When remaining oil
life is low, the CHANGE
ENGINE OIL SOON message
will appear on the display. See
Engine Oil Messages on
page 5-31.
2. Press
Von the DIC controls and
hold down for a few seconds to
clear the CHANGE ENGINE OIL
SOON message and reset the
oil life at 100%.
Be careful not to reset the oil life
display accidentally at any time
other than after the oil is
changed. It cannot be reset
accurately until the next oil
change.
Page 31 of 413

Black plate (24,1)Chevrolet Impala Owner Manual (GMNA-Localizing-U.S./Canada-7576026) -
2015 - crc 2nd edition - 8/21/14
1-24 In Brief
The oil life system can also be reset
as follows:
1. Turn the ignition on with theengine off.
2. Fully press and release the accelerator pedal three times
within five seconds.
If the CHANGE ENGINE OIL
SOON message is not on, the
system is reset.
See Engine Oil Life System on
page 10-10.
E85 or FlexFuel
Vehicles with a yellow fuel cap can
use either unleaded gasoline or
ethanol fuel containing up to 85%
ethanol (E85). See E85 or FlexFuel
on page 9-55. For all other vehicles,
use only the unleaded gasoline
described under Fuel on page 9-54.
Driving for Better Fuel
Economy
Driving habits can affect fuel
mileage. Here are some driving tips
to get the best fuel economy
possible.
.Avoid fast starts and accelerate
smoothly.
.Brake gradually and avoid
abrupt stops.
.Avoid idling the engine for long
periods of time.
.When road and weather
conditions are appropriate, use
cruise control.
.Always follow posted speed
limits or drive more slowly when
conditions require.
.Keep vehicle tires properly
inflated.
.Combine several trips into a
single trip.
.Replace the vehicle's tires with
the same TPC Spec number
molded into the tire's sidewall
near the size.
.Follow recommended scheduled
maintenance.
Roadside Assistance
Program
U.S.: 1-800-243-8872
TTY Users (U.S. Only):
1-888-889-2438
Canada: 1-800-268-6800
As the owner of a new Chevrolet,
you are automatically enrolled in the
Roadside Assistance program.
SeeRoadside Assistance Program
on page 13-5.
Page 43 of 413
Black plate (10,1)Chevrolet Impala Owner Manual (GMNA-Localizing-U.S./Canada-7576026) -
2015 - crc 2nd edition - 8/21/14
2-10 Keys, Doors, and Windows
to have the vehicle in view. Check
local regulations for any
requirements.
Other conditions can affect the
performance of the transmitter. See
Remote Keyless Entry (RKE)
System on page 2-2.
Starting the Vehicle
To start the engine using the remote
start feature:
1. Aim the RKE transmitter at thevehicle.
2. Press and release
Q.
3. Immediately after completing Step 2, press and hold
/for at
least four seconds or until the
turn signal lamps flash. The turn
signal lamps flashing confirms
the request to remote start the
vehicle has been received.
When the engine starts, the parking
lamps will turn on and remain on as
long as the engine is running. The
doors will be locked and the climate
control system may come on. The engine will continue to run for
10 minutes. After 30 seconds,
repeat the steps if a 10-minute
extension is desired. Remote start
can be extended only once.
To drive the vehicle, turn the ignition
to ON/RUN for Key Access
vehicles, or press the brake pedal
and the ENGINE START/STOP
button for Keyless Access vehicles.
Extending Engine Run Time
The engine run time can also be
extended by another 10 minutes,
if during the first 10 minutes
Steps 1–3 are repeated while the
engine is still running. An extension
can be requested, 30 seconds after
starting. This provides a total of
20 minutes.
The remote start can only be
extended once.
When the remote start is extended,
the second 10-minute period is
added on to the first 10 minutes and
the engine will run for a total of
20 minutes.
A maximum of two remote starts,
or a remote start with an extension,
is allowed between ignition cycles.
The vehicle's ignition must be
changed to ON/RUN/START and
then back to OFF before the remote
start procedure can be used again.
Canceling a Remote Start
To cancel a remote start, do one of
the following:
.Aim the RKE transmitter at the
vehicle and press and hold
/
until the parking lamps turn off.
.Turn on the hazard warning
flashers.
.Turn the vehicle on and then off.
Conditions in Which Remote Start
Will Not Work
The remote vehicle start feature will
not operate if:
.The key is in the ignition (Key
Access) or if the key is in the
vehicle (Keyless Access).
.The hood is not closed.
Page 69 of 413
Black plate (10,1)Chevrolet Impala Owner Manual (GMNA-Localizing-U.S./Canada-7576026) -
2015 - crc 2nd edition - 8/21/14
3-10 Seats and Restraints
Heated and Ventilated
Front Seats
{Warning
If you cannot feel temperature
change or pain to the skin, the
seat heater may cause burns. To
reduce the risk of burns, people
with such a condition should use
care when using the seat heater,
especially for long periods of
time. Do not place anything on
the seat that insulates against
heat, such as a blanket, cushion,
cover, or similar item. This may
cause the seat heater to
overheat. An overheated seat
heater may cause a burn or may
damage the seat.
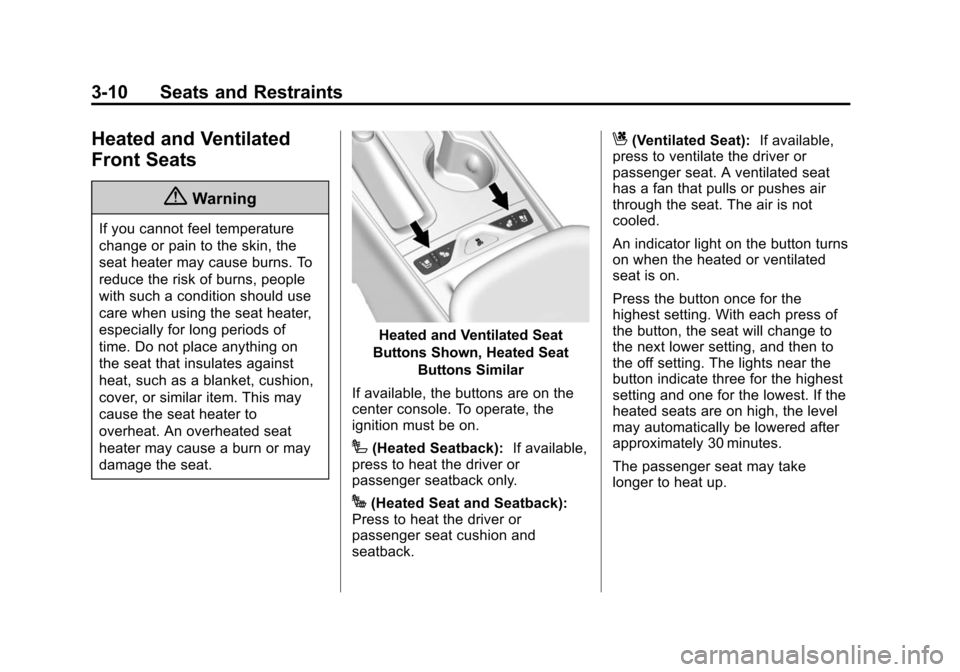
Heated and Ventilated Seat
Buttons Shown, Heated Seat Buttons Similar
If available, the buttons are on the
center console. To operate, the
ignition must be on.
I(Heated Seatback): If available,
press to heat the driver or
passenger seatback only.
J(Heated Seat and Seatback):
Press to heat the driver or
passenger seat cushion and
seatback.
C(Ventilated Seat): If available,
press to ventilate the driver or
passenger seat. A ventilated seat
has a fan that pulls or pushes air
through the seat. The air is not
cooled.
An indicator light on the button turns
on when the heated or ventilated
seat is on.
Press the button once for the
highest setting. With each press of
the button, the seat will change to
the next lower setting, and then to
the off setting. The lights near the
button indicate three for the highest
setting and one for the lowest. If the
heated seats are on high, the level
may automatically be lowered after
approximately 30 minutes.
The passenger seat may take
longer to heat up.
Page 94 of 413
Black plate (35,1)Chevrolet Impala Owner Manual (GMNA-Localizing-U.S./Canada-7576026) -
2015 - crc 2nd edition - 8/21/14
Seats and Restraints 3-35
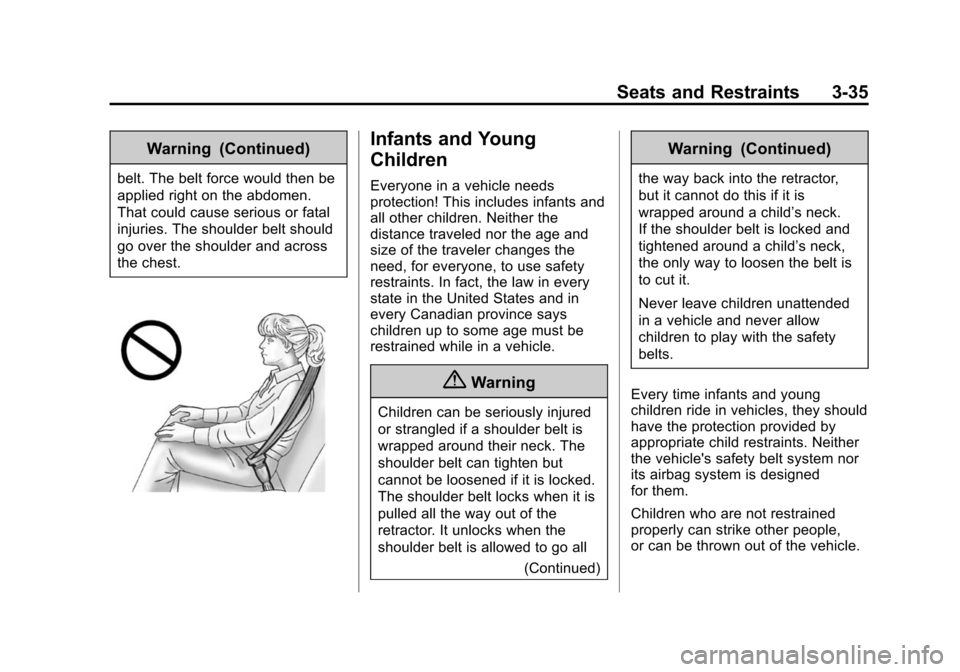
Warning (Continued)
belt. The belt force would then be
applied right on the abdomen.
That could cause serious or fatal
injuries. The shoulder belt should
go over the shoulder and across
the chest.
Infants and Young
Children
Everyone in a vehicle needs
protection! This includes infants and
all other children. Neither the
distance traveled nor the age and
size of the traveler changes the
need, for everyone, to use safety
restraints. In fact, the law in every
state in the United States and in
every Canadian province says
children up to some age must be
restrained while in a vehicle.
{Warning
Children can be seriously injured
or strangled if a shoulder belt is
wrapped around their neck. The
shoulder belt can tighten but
cannot be loosened if it is locked.
The shoulder belt locks when it is
pulled all the way out of the
retractor. It unlocks when the
shoulder belt is allowed to go all(Continued)
Warning (Continued)
the way back into the retractor,
but it cannot do this if it is
wrapped around a child’s neck.
If the shoulder belt is locked and
tightened around a child’s neck,
the only way to loosen the belt is
to cut it.
Never leave children unattended
in a vehicle and never allow
children to play with the safety
belts.
Every time infants and young
children ride in vehicles, they should
have the protection provided by
appropriate child restraints. Neither
the vehicle's safety belt system nor
its airbag system is designed
for them.
Children who are not restrained
properly can strike other people,
or can be thrown out of the vehicle.
Page 120 of 413

Black plate (5,1)Chevrolet Impala Owner Manual (GMNA-Localizing-U.S./Canada-7576026) -
2015 - crc 2nd edition - 8/21/14
Instruments and Controls 5-5
If the windshield wiper lever is then
moved to off before the driver door
is opened or within 10 minutes, the
wipers will restart and move to the
base of the windshield.
If the ignition is turned to LOCK/
OFF while the wipers are performing
wipes due to windshield washing,
the wipers continue to run until they
reach the base of the windshield.
Compass
The vehicle may have a compass
display on the Driver Information
Center (DIC). The compass receives
its heading and other information
from the Global Positioning
System (GPS) antenna,
StabiliTrak
®, and vehicle speed
information.
The compass system is designed to
operate for a certain number of
miles or degrees of turn before
needing a signal from the GPS
satellites. When the compass
display shows CAL, drive the
vehicle for a short distance in an open area where it can receive a
GPS signal. The compass system
will automatically determine when a
GPS signal is restored and provide
a heading again. See
Compass
Messages on page 5-29 for the
messages that may be displayed for
the compass.
Clock (Base Radio)
Setting the Time and Date
To set the time or date:
1. Select SETTINGS from the Home Page, then select Time
and Date Settings.
2. Select the desired function.
3. Turn the MENU knob to increase or decrease the value.
4. Press the MENU knob to go to the next value. After the last
value is selected the system will
update and return to the
SETTINGS menu. Press
q
BACK to go to the last menu and
save the changes. To set the Auto Set:
1. Select Settings from the Home
Page, then select Time and Date
Settings.
2. Select Auto Set.
3. Press the faceplate button just below Auto Set to turn it on
or off.
Press
qBACK to go to the last
menu and save the changes.
Auto Set requires an OnStar
subscription.
If Auto Set is on, the time displayed
on the clock may not update
immediately when driving into a new
time zone.
To set the clock display:
1. Select Settings from the Home Page, then select Time and Date
Settings.
2. Select Clock Display.
3. Turn the MENU knob to Off or On.
4. Press the MENU knob to select.
Page 121 of 413
Black plate (6,1)Chevrolet Impala Owner Manual (GMNA-Localizing-U.S./Canada-7576026) -
2015 - crc 2nd edition - 8/21/14
5-6 Instruments and Controls
PressqBACK to go to the last
menu and save the changes.
Clock (Uplevel Radio)
Setting the Time and Date
To set the time or date:
1. Select Settings from the Home Page, then select Time and Date
Settings.
2. Select the desired function.
To set the time or date, press
«or
ªto change the hour, minutes,
AM, or PM.
To change the 12-24Hr setting,
press the 12-24Hr button.
To turn Auto Set on and off, press
the Auto Set screen button.
Auto Set requires an OnStar
subscription.
If Auto Set is on, the time displayed
on the clock may not update
immediately when driving into a new
time zone. Press
qBACK to go to the last
menu and save the changes or
{to
return to the Home Page.
Power Outlets
The accessory power outlets can be
used to plug in electrical equipment,
such as a cell phone or MP3 player.
There are three accessory power
outlets:
.Inside the front storage area
below the climate control
system.
.Inside the center console.
.On the rear of the center
console.
The outlet is powered when the
ignition is in ON/RUN or ACC/
ACCESSORY, or until the driver
door is opened within 10 minutes of
turning off the vehicle. See Retained
Accessory Power (RAP) on
page 9-22.
Open the protective cover to use the
accessory power outlet. Certain electrical accessories may
not be compatible with the
accessory power outlets and could
overload vehicle or adapter fuses.
If there is a problem, see your
dealer.
When adding electrical equipment,
be sure to follow the installation
instructions included with the
equipment. See
Add-On Electrical
Equipment on page 9-63.
{Caution
Hanging heavy equipment from
the power outlet can cause
damage not covered by the
vehicle warranty. The power
outlets are designed for
accessory power plugs only, such
as cell phone charge cords.
Always unplug electrical equipment
when not in use and do not plug in
equipment that exceeds the
maximum 20 amps rating.
Page 141 of 413
Black plate (26,1)Chevrolet Impala Owner Manual (GMNA-Localizing-U.S./Canada-7576026) -
2015 - crc 2nd edition - 8/21/14
5-26 Instruments and Controls
worx:Press to move up or
down in a list, or on the main view
press to cycle through the different
Info app pages.
oorp: Pressoto open
application menus on the left. Press
pto open interaction menus on the
right.
V(Select/Reset): Press to select a
menu item. Press and hold to reset
values on certain screens, or on the
main view reset info pages to the
original setting.
DIC Info Page Options
The info pages on the DIC can be
turned on or off through the
Settings app.
1. Press
oto access the cluster
applications.
2. Press
worxto scroll to the
Settings application.
3. Press
Vto select the
Settings app. 4. Scroll to Info Pages and
press
p.
5. Select Edit List.
6. Press
worxto move through
the list of possible information
displays.
7. Press
Vwhile an item is
highlighted to select or deselect
that item. When an item is
selected, a checkmark will
appear next to it.
DIC Info Pages
The following is the list of all
possible DIC info page displays.
Some may not be available for your
particular vehicle. Some items may
not be turned on by default but can
be turned on through the Settings
app. See “DIC Info Page Options”
earlier in this section.
Current Speed: Displays the
vehicle speed in either kilometers
per hour (km/h) or miles per
hour (mph). Trip A and Average Fuel Economy
or Trip B and Average Fuel
Economy:
The Trip display shows
the current distance traveled, in
either kilometers (km) or miles (mi),
since the trip odometer was last
reset.
The Average Fuel Economy display
shows the approximate average
liters per 100 kilometers (L/100 km)
or miles per gallon (mpg). This
number reflects only the
approximate average fuel economy
that the vehicle has right now, and
will change as driving conditions
change. This number is calculated
based on the number of L/
100 km (mpg) recorded since the
last time this menu item was reset.
The Average Fuel Economy and trip
odometer can be reset together by
pressing and holding
Vwhile this
display is active.
Fuel Range: Displays the
approximate distance the vehicle
can be driven without refueling.
LOW will be displayed when the