2015 CHEVROLET EQUINOX ECU
[x] Cancel search: ECUPage 221 of 391
Black plate (24,1)Chevrolet Equinox Owner Manual (GMNA-Localizing-U.S./Canada-
7707483) - 2015 - crc - 9/29/14
9-24 Driving and Operating
Warning (Continued)
vehicle. Possible heater cord
and thermostat damage could
occur.
.While in use, do not let the
heater cord touch vehicle
parts or sharp edges. Never
close the hood on the
heater cord.
.Before starting the vehicle,
unplug the cord, reattach the
cover to the plug, and
securely fasten the cord.
Keep the cord away from any
moving parts.
4. Before starting the engine, be sure to unplug and store the
cord as it was before to keep it
away from moving engine parts.
If you do not it could be
damaged. The length of time the heater should
remain plugged in depends on
several factors. Ask a dealer in the
area where you will be parking the
vehicle for the best advice on this.
Shifting Into Park
{Warning
It can be dangerous to get out of
the vehicle if the shift lever is not
fully in P (Park) with the parking
brake firmly set. The vehicle can
roll. If you have left the engine
running, the vehicle can move
suddenly. You or others could be
injured. To be sure the vehicle will
not move, even when you are on
fairly level ground, use the steps
that follow. If you are pulling a
trailer, see
Driving Characteristics
and Towing Tips on page 9-49. Use this procedure to shift into
P (Park):
1. Hold the brake pedal down and
set the parking brake.
See Parking Brake on page 9-31
for more information.
2. Hold the button on the shift lever and push the lever toward the
front of the vehicle into P (Park).
3. Turn the ignition to LOCK/OFF.
4. Remove the key.
Leaving the Vehicle With the
Engine Running
{Warning
It can be dangerous to leave the
vehicle with the engine running.
It could overheat and catch fire.
It is dangerous to get out of the
vehicle if the shift lever is not fully
in P (Park) with the parking brake
firmly set. The vehicle can roll. (Continued)
Page 247 of 391
Black plate (50,1)Chevrolet Equinox Owner Manual (GMNA-Localizing-U.S./Canada-
7707483) - 2015 - crc - 9/29/14
9-50 Driving and Operating
Before starting, check all trailer hitch
parts and attachments, safety
chains, electrical connectors, lamps,
tires and mirrors. If the trailer has
electric brakes, start the
combination moving and then apply
the trailer brake controller by hand
to be sure the brakes work.
During the trip, check occasionally
to be sure that the load is secure
and the lamps and any trailer
brakes still work.
Towing with a Stability Control
System
When towing, the sound of the
stability control system might be
heard. The system is reacting to the
vehicle movement caused by the
trailer, which mainly occurs during
cornering. This is normal when
towing heavier trailers.
Following Distance
Stay at least twice as far behind the
vehicle ahead as you would when
driving the vehicle without a trailer.This can help to avoid situations
that require heavy braking and
sudden turns.
Passing
More passing distance is needed
when towing a trailer. Because the
rig is longer, it is necessary to go
farther beyond the passed vehicle
before returning to the lane.
Backing Up
Hold the bottom of the steering
wheel with one hand. To move the
trailer to the left, move your hand to
the left. To move the trailer to the
right, move your hand to the right.
Always back up slowly and,
if possible, have someone
guide you.
Making Turns
{Caution
Making very sharp turns while
trailering could cause the trailer to
come in contact with the vehicle.
The vehicle could be damaged.
Avoid making very sharp turns
while trailering.
When turning with a trailer, make
wider turns than normal so the
trailer will not strike soft shoulders,
curbs, road signs, trees or other
objects. Use the turn signal well in
advance and avoid jerky or sudden
maneuvers.
Turn Signals When Towing a
Trailer
The turn signal indicators on the
instrument panel flash whenever
signaling a turn or lane change.
Properly hooked up, the trailer
Page 271 of 391
Black plate (18,1)Chevrolet Equinox Owner Manual (GMNA-Localizing-U.S./Canada-
7707483) - 2015 - crc - 9/29/14
10-18 Vehicle Care
will allow any pressure still left to
be vented out the
discharge hose.
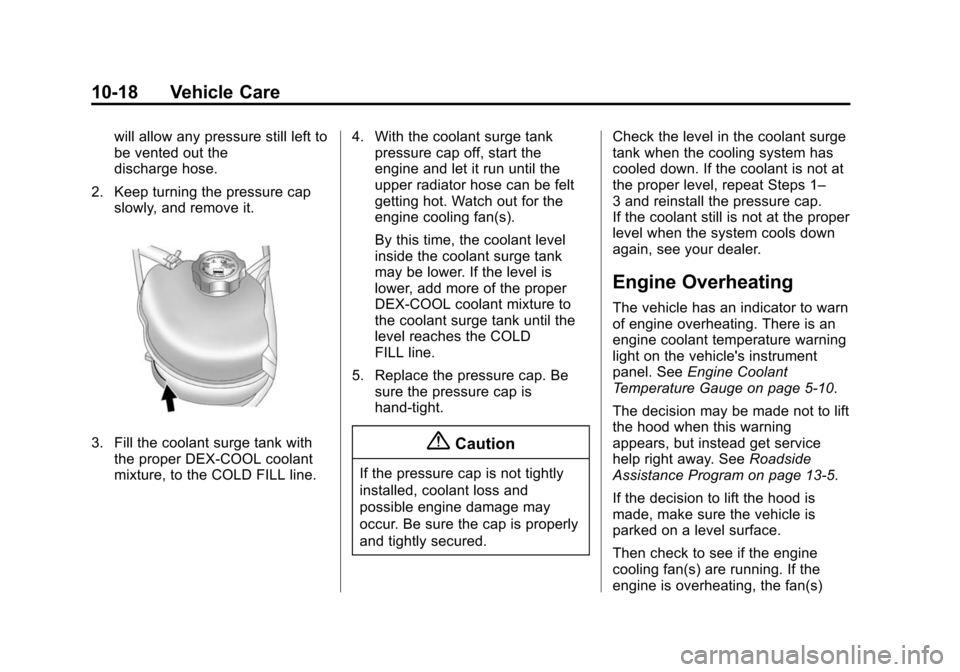
2. Keep turning the pressure cap slowly, and remove it.
3. Fill the coolant surge tank withthe proper DEX-COOL coolant
mixture, to the COLD FILL line. 4. With the coolant surge tank
pressure cap off, start the
engine and let it run until the
upper radiator hose can be felt
getting hot. Watch out for the
engine cooling fan(s).
By this time, the coolant level
inside the coolant surge tank
may be lower. If the level is
lower, add more of the proper
DEX-COOL coolant mixture to
the coolant surge tank until the
level reaches the COLD
FILL line.
5. Replace the pressure cap. Be sure the pressure cap is
hand-tight.{Caution
If the pressure cap is not tightly
installed, coolant loss and
possible engine damage may
occur. Be sure the cap is properly
and tightly secured. Check the level in the coolant surge
tank when the cooling system has
cooled down. If the coolant is not at
the proper level, repeat Steps 1–
3 and reinstall the pressure cap.
If the coolant still is not at the proper
level when the system cools down
again, see your dealer.
Engine Overheating
The vehicle has an indicator to warn
of engine overheating. There is an
engine coolant temperature warning
light on the vehicle's instrument
panel. See
Engine Coolant
Temperature Gauge on page 5-10.
The decision may be made not to lift
the hood when this warning
appears, but instead get service
help right away. See Roadside
Assistance Program on page 13-5.
If the decision to lift the hood is
made, make sure the vehicle is
parked on a level surface.
Then check to see if the engine
cooling fan(s) are running. If the
engine is overheating, the fan(s)
Page 279 of 391
Black plate (26,1)Chevrolet Equinox Owner Manual (GMNA-Localizing-U.S./Canada-
7707483) - 2015 - crc - 9/29/14
10-26 Vehicle Care
Caution (Continued)
the windshield. Any damage that
occurs would not be covered by
the vehicle warranty. Do not allow
the wiper arm to touch the
windshield.
Front Wiper Blade
Replacement
To replace the front wiper blades:
1. Lift the wiper arm from thewindshield until no further
movement is possible.
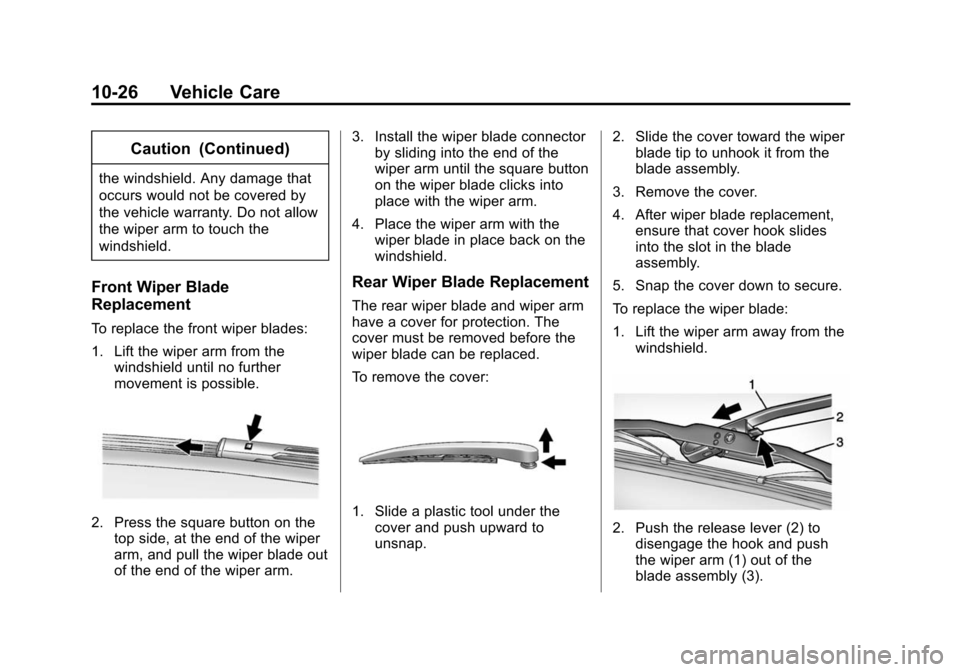
2. Press the square button on thetop side, at the end of the wiper
arm, and pull the wiper blade out
of the end of the wiper arm. 3. Install the wiper blade connector
by sliding into the end of the
wiper arm until the square button
on the wiper blade clicks into
place with the wiper arm.
4. Place the wiper arm with the wiper blade in place back on the
windshield.
Rear Wiper Blade Replacement
The rear wiper blade and wiper arm
have a cover for protection. The
cover must be removed before the
wiper blade can be replaced.
To remove the cover:
1. Slide a plastic tool under thecover and push upward to
unsnap. 2. Slide the cover toward the wiper
blade tip to unhook it from the
blade assembly.
3. Remove the cover.
4. After wiper blade replacement, ensure that cover hook slides
into the slot in the blade
assembly.
5. Snap the cover down to secure.
To replace the wiper blade:
1. Lift the wiper arm away from the windshield.
2. Push the release lever (2) todisengage the hook and push
the wiper arm (1) out of the
blade assembly (3).
Page 280 of 391
Black plate (27,1)Chevrolet Equinox Owner Manual (GMNA-Localizing-U.S./Canada-
7707483) - 2015 - crc - 9/29/14
Vehicle Care 10-27
3. Push the new blade assemblysecurely on the wiper arm until
the release lever clicks into
place.
4. Replace the wiper cover.Headlamp Aiming
Headlamp aim has been preset and
should need no further adjustment.
If the vehicle is damaged in a crash,
the headlamp aim may be affected.
If adjustment to the headlamps is
necessary, see your dealer.
Bulb Replacement
For the proper type of replacement
bulbs, see Replacement Bulbs on
page 10-30.
For any bulb changing procedure
not listed in this section, contact
your dealer.
Halogen Bulbs
{Warning
Halogen bulbs have pressurized
gas inside and can burst if you
drop or scratch the bulb. You or
others could be injured. Be sure
to read and follow the instructions
on the bulb package.
Page 281 of 391
Black plate (28,1)Chevrolet Equinox Owner Manual (GMNA-Localizing-U.S./Canada-
7707483) - 2015 - crc - 9/29/14
10-28 Vehicle Care
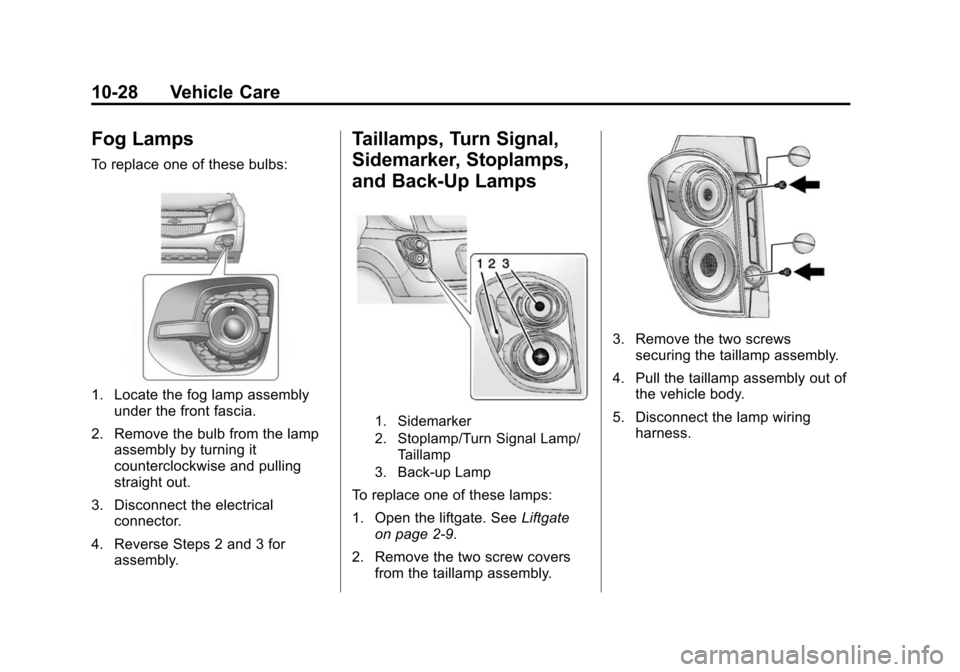
Fog Lamps
To replace one of these bulbs:
1. Locate the fog lamp assemblyunder the front fascia.
2. Remove the bulb from the lamp assembly by turning it
counterclockwise and pulling
straight out.
3. Disconnect the electrical connector.
4. Reverse Steps 2 and 3 for assembly.
Taillamps, Turn Signal,
Sidemarker, Stoplamps,
and Back-Up Lamps
1. Sidemarker
2. Stoplamp/Turn Signal Lamp/
Taillamp
3. Back-up Lamp
To replace one of these lamps:
1. Open the liftgate. See Liftgate
on page 2-9.
2. Remove the two screw covers from the taillamp assembly.
3. Remove the two screws
securing the taillamp assembly.
4. Pull the taillamp assembly out of the vehicle body.
5. Disconnect the lamp wiring harness.
Page 316 of 391
Black plate (63,1)Chevrolet Equinox Owner Manual (GMNA-Localizing-U.S./Canada-
7707483) - 2015 - crc - 9/29/14
Vehicle Care 10-63
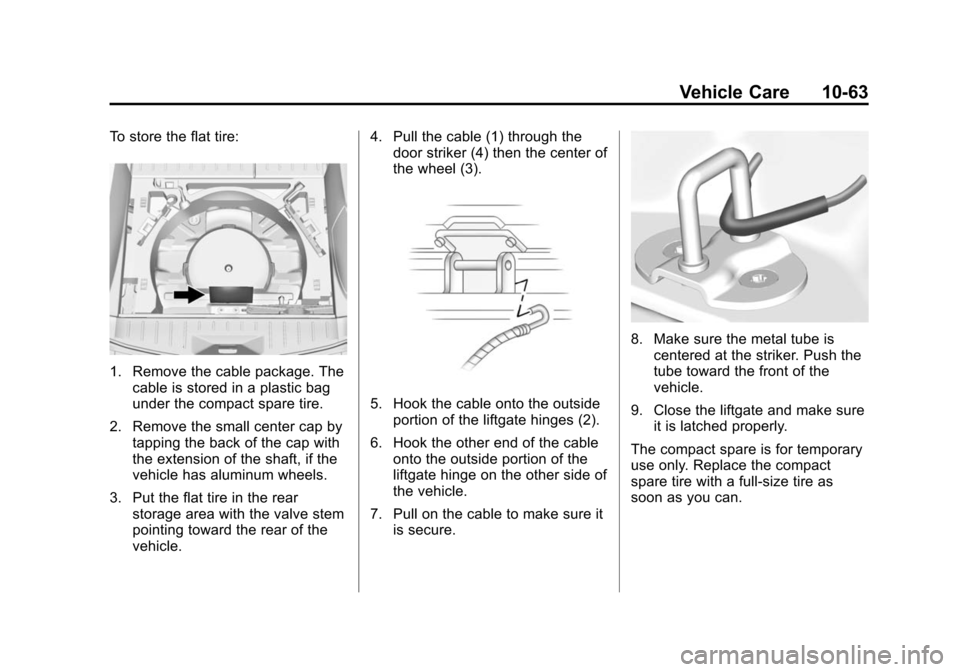
To store the flat tire:
1. Remove the cable package. Thecable is stored in a plastic bag
under the compact spare tire.
2. Remove the small center cap by tapping the back of the cap with
the extension of the shaft, if the
vehicle has aluminum wheels.
3. Put the flat tire in the rear storage area with the valve stem
pointing toward the rear of the
vehicle. 4. Pull the cable (1) through the
door striker (4) then the center of
the wheel (3).
5. Hook the cable onto the outside
portion of the liftgate hinges (2).
6. Hook the other end of the cable onto the outside portion of the
liftgate hinge on the other side of
the vehicle.
7. Pull on the cable to make sure it is secure.
8. Make sure the metal tube iscentered at the striker. Push the
tube toward the front of the
vehicle.
9. Close the liftgate and make sure it is latched properly.
The compact spare is for temporary
use only. Replace the compact
spare tire with a full-size tire as
soon as you can.
Page 320 of 391
Black plate (67,1)Chevrolet Equinox Owner Manual (GMNA-Localizing-U.S./Canada-
7707483) - 2015 - crc - 9/29/14
Vehicle Care 10-67
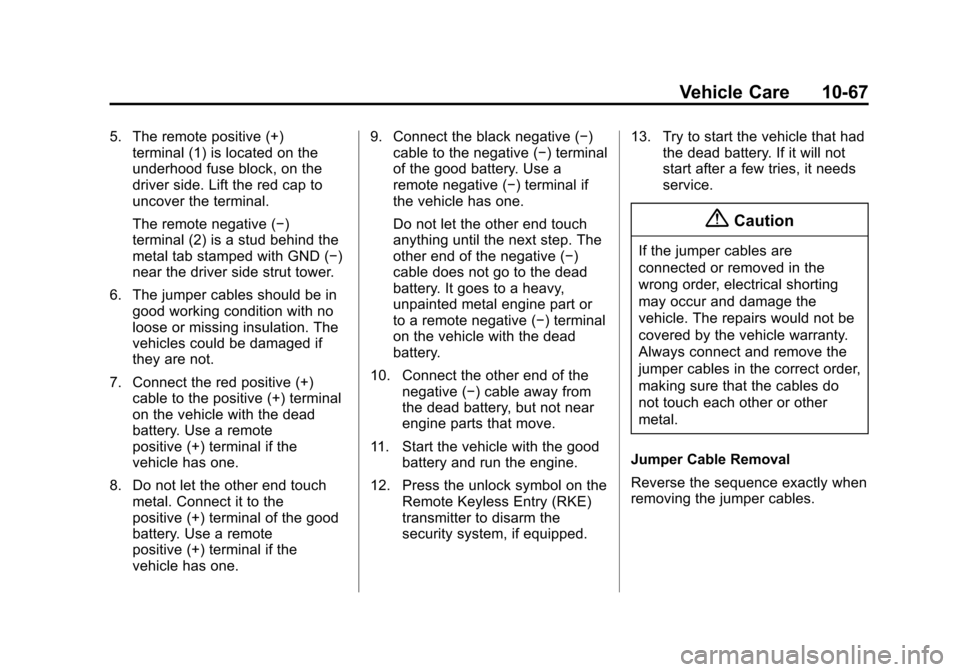
5. The remote positive (+)terminal (1) is located on the
underhood fuse block, on the
driver side. Lift the red cap to
uncover the terminal.
The remote negative (−)
terminal (2) is a stud behind the
metal tab stamped with GND (−)
near the driver side strut tower.
6. The jumper cables should be in good working condition with no
loose or missing insulation. The
vehicles could be damaged if
they are not.
7. Connect the red positive (+) cable to the positive (+) terminal
on the vehicle with the dead
battery. Use a remote
positive (+) terminal if the
vehicle has one.
8. Do not let the other end touch metal. Connect it to the
positive (+) terminal of the good
battery. Use a remote
positive (+) terminal if the
vehicle has one. 9. Connect the black negative (−)
cable to the negative (−) terminal
of the good battery. Use a
remote negative (−) terminal if
the vehicle has one.
Do not let the other end touch
anything until the next step. The
other end of the negative (−)
cable does not go to the dead
battery. It goes to a heavy,
unpainted metal engine part or
to a remote negative (−) terminal
on the vehicle with the dead
battery.
10. Connect the other end of the negative (−) cable away from
the dead battery, but not near
engine parts that move.
11. Start the vehicle with the good battery and run the engine.
12. Press the unlock symbol on the Remote Keyless Entry (RKE)
transmitter to disarm the
security system, if equipped. 13. Try to start the vehicle that had
the dead battery. If it will not
start after a few tries, it needs
service.
{Caution
If the jumper cables are
connected or removed in the
wrong order, electrical shorting
may occur and damage the
vehicle. The repairs would not be
covered by the vehicle warranty.
Always connect and remove the
jumper cables in the correct order,
making sure that the cables do
not touch each other or other
metal.
Jumper Cable Removal
Reverse the sequence exactly when
removing the jumper cables.