2015 CHEVROLET CORVETTE automatic transmission
[x] Cancel search: automatic transmissionPage 232 of 393
Black plate (51,1)Chevrolet Corvette Owner Manual (GMNA-Localizing-U.S./Canada/Mexico-
7576293) - 2015 - crc - 10/31/14
Driving and Operating 9-51
While pressing the accelerator pedal
or shortly following the release to
override cruise control, briefly
pressing SET/–will result in cruise
set to the current vehicle speed.
Using Cruise Control on Hills
How well the cruise control works
on hills depends upon the vehicle
speed, load, and the steepness of
the hills. When going up steep hills,
you might have to step on the
accelerator pedal to maintain your
speed. When going downhill, you
might have to brake or shift to a
lower gear to keep your speed
down. If the brake pedal is applied,
cruise control will disengage.
Cruise Control in Manual Paddle
Shift Gear Selection
When the vehicle is in M (Manual
Mode) and the manual paddle shift
controls are not being used, cruise
control operates in the same
manner as D (Drive). When the vehicle is in M (Manual
Mode) and the manual paddle shift
controls are being used, cruise
control operates as follows:
.If cruise control is active and a
gear is selected with the manual
paddle shift controls, the vehicle
speed is maintained in the driver
selected gear and will not
automatically upshift or
downshift the transmission while
the driver
’s gear selection is
active.
.If driving in hilly terrain, cruise
control may not be able to
maintain vehicle speed if an
upshift or downshift is not
selected by the driver. While
driving on hilly terrain and cruise
control is active with a manual
paddle shift gear selection, the
driver must select the proper
gear for the terrain or select D
(Drive) on the gear range
selector for full automatic
transmission operation. Ending Cruise Control
.Step lightly on the brake pedal.
.If equipped with a manual
transmission, press the clutch
pedal for several seconds or
shift to Neutral to disengage
cruise control.
.Press*.
.To turn off cruise control,
press
1.
Erasing Speed Memory
The cruise control set speed is
erased from memory if
1is pressed
or if the ignition is turned off.
Page 233 of 393
Black plate (52,1)Chevrolet Corvette Owner Manual (GMNA-Localizing-U.S./Canada/Mexico-
7576293) - 2015 - crc - 10/31/14
9-52 Driving and Operating
Driver Assistance
Systems
Rear Vision
Camera (RVC)
The RVC system can assist the
driver when backing up by
displaying a view of the area behind
the vehicle.
{Warning
The RVC system does not display
children, pedestrians, bicyclists,
crossing traffic, animals, or any
other object located outside the
camera's field of view, below the
bumper, or under the vehicle.
Perceived distances may be
different from actual distances.
Do not back the vehicle using
only the RVC screen. Failure to
use proper care before backing
may result in injury, death,(Continued)
Warning (Continued)
or vehicle damage. Always check
behind and around the vehicle
before backing.
An image appears on the
infotainment screen when the
vehicle is shifted into R (Reverse).
The infotainment screen goes to the
previous screen after approximately
10 seconds once the vehicle is
shifted out of R (Reverse).
To return to the previous screen
sooner, do one of the following:
.Press a hard key on the
infotainment system.
.Shift into P (Park), for an
automatic transmission.
.Reach a vehicle speed of
8 km/h (5 mph). Guidance Lines
The RVC system may have a
guidance line overlay that can help
the driver align the vehicle when
backing into a parking spot.
To turn the guidance lines on or off:
1. On the infotainment system,
press the Settings screen
button, or turn the MENU knob
to highlight Settings and
press MENU.
2. Select Rear Camera.
3. Select Guidance Lines and then select Off or On.
Rear Vision Camera Error
Messages
SERVICE REAR VISION CAMERA
SYSTEM: This message can
display when the system is not
operating properly.
If any other problem occurs or if a
problem persists, see your dealer.
Page 240 of 393

Black plate (1,1)Chevrolet Corvette Owner Manual (GMNA-Localizing-U.S./Canada/Mexico-
7576293) - 2015 - crc - 10/31/14
Vehicle Care 10-1
Vehicle Care
General Information
General Information . . . . . . . . . . 10-2
California Proposition65 Warning . . . . . . . . . . . . . . . . . 10-2
California Perchlorate Materials Requirements . . . . 10-2
Accessories and Modifications . . . . . . . . . . . . . . . 10-2
Lifting the Vehicle . . . . . . . . . . . . 10-3
Vehicle Checks
Doing Your Own Service Work . . . . . . . . . . . . . . . 10-5
Hood . . . . . . . . . . . . . . . . . . . . . . . . 10-6
Engine Compartment Overview . . . . . . . . . . . . . . . . . . . 10-7
Engine Oil . . . . . . . . . . . . . . . . . . 10-12
Engine Oil Life System . . . . . 10-18
Automatic Transmission Fluid . . . . . . . . . . . . . . . . . . . . . . 10-19
Manual Transmission Fluid . . . . . . . . . . . . . . . . . . . . . . 10-19
Hydraulic Clutch . . . . . . . . . . . . 10-19
Engine Air Cleaner/Filter . . . . 10-20
Cooling System (Engine) . . . 10-22 Cooling System (Aero
Panel) . . . . . . . . . . . . . . . . . . . . . 10-24
Engine Coolant . . . . . . . . . . . . . 10-25
Engine Overheating . . . . . . . . 10-27
Washer Fluid . . . . . . . . . . . . . . . 10-29
Brakes . . . . . . . . . . . . . . . . . . . . . 10-30
Brake Fluid . . . . . . . . . . . . . . . . . 10-32
Battery . . . . . . . . . . . . . . . . . . . . . 10-34
Rear Axle . . . . . . . . . . . . . . . . . . 10-35
Starter Switch Check . . . . . . . 10-35
Automatic Transmission Shift Lock Control Function
Check . . . . . . . . . . . . . . . . . . . . . 10-36
Park Brake and P (Park) Mechanism Check . . . . . . . . 10-36
Wiper Blade Replacement . . . . . . . . . . . . . . 10-37
Windshield Replacement . . . 10-37
Headlamp Aiming
Headlamp Aiming . . . . . . . . . . 10-38
Bulb Replacement
Bulb Replacement . . . . . . . . . . 10-38
High Intensity Discharge (HID) Lighting . . . . . . . . . . . . . 10-38
LED Lighting . . . . . . . . . . . . . . . 10-38
License Plate Lamp . . . . . . . . 10-38
Replacement Bulbs . . . . . . . . . 10-39
Electrical System
Electrical System Overload . . . . . . . . . . . . . . . . . . 10-39
Fuses . . . . . . . . . . . . . . . . . . . . . . 10-40
Engine Compartment Fuse Block . . . . . . . . . . . . . . . . . . . . . 10-40
Rear Compartment Fuse Block . . . . . . . . . . . . . . . . . . . . . 10-44
Wheels and Tires
Tires . . . . . . . . . . . . . . . . . . . . . . . . 10-47
Winter Tires . . . . . . . . . . . . . . . . 10-48
Run-Flat Tires . . . . . . . . . . . . . . 10-49
Low-Profile Tires . . . . . . . . . . . 10-50
Competition OrientedTires . . . . . . . . . . . . . . . . . . . . . . 10-50
Summer Tires . . . . . . . . . . . . . . 10-51
Tire Sidewall Labeling . . . . . . 10-52
Tire Designations . . . . . . . . . . . 10-53
Tire Terminology and Definitions . . . . . . . . . . . . . . . . 10-54
Tire Pressure . . . . . . . . . . . . . . . 10-57
Tire Pressure for High-Speed Operation . . . . . . . . . . . . . . . . . 10-58
Tire Pressure Monitor System . . . . . . . . . . . . . . . . . . . 10-59
Tire Pressure Monitor Operation . . . . . . . . . . . . . . . . . 10-60
Tire Inspection . . . . . . . . . . . . . . 10-62
Page 242 of 393
Black plate (3,1)Chevrolet Corvette Owner Manual (GMNA-Localizing-U.S./Canada/Mexico-
7576293) - 2015 - crc - 10/31/14
Vehicle Care 10-3
handling, emissions systems,
aerodynamics, durability, and
electronic systems like antilock
brakes, traction control, and stability
control. These accessories or
modifications could even cause
malfunction or damage not covered
by the vehicle warranty.
Damage to vehicle components
resulting from modifications or the
installation or use of non‐GM
certified parts, including control
module or software modifications, is
not covered under the terms of the
vehicle warranty and may affect
remaining warranty coverage for
affected parts.
GM Accessories are designed to
complement and function with other
systems on the vehicle. See your
dealer to accessorize the vehicle
using genuine GM Accessories
installed by a dealer technician.
Also, seeAdding Equipment to the
Airbag-Equipped Vehicle on
page 3-25.Lifting the Vehicle
{Warning
Lifting a vehicle can cause an
injury. The vehicle can slip off the
jack and roll over you or other
people. You and they could be
badly injured. Find a level place
to lift your vehicle. To help
prevent the vehicle from moving:
1. Set the parking brake firmly.
2. Put an automatic transmission in P (Park) or a
manual transmission in
1 (First) or R (Reverse).
3. Turn off the engine.
To be even more certain the
vehicle will not move, put blocks
in front of and behind the wheels.
{Warning
Getting under a vehicle when it is
lifted on a jack is dangerous.
If the vehicle slips off the jack,
you could be badly injured or
killed. Never get under a vehicle
when it is supported only by
a jack.
{Warning
Raising the vehicle with the jack
improperly positioned can
damage the vehicle or the vehicle
may fall and cause injury to you
or others.
If a jack is used to lift the vehicle,
follow the instructions that came
with the jack, and be sure to use the
correct lifting points to avoid
damaging the vehicle.
Page 258 of 393

Black plate (19,1)Chevrolet Corvette Owner Manual (GMNA-Localizing-U.S./Canada/Mexico-
7576293) - 2015 - crc - 10/31/14
Vehicle Care 10-19
If the CHANGE ENGINE OIL SOON
message comes back on when the
vehicle is started, the engine oil life
system has not reset. Repeat the
procedure.
Automatic Transmission
Fluid
How to Check Automatic
Transmission Fluid
It is not necessary to check the
transmission fluid level.
A transmission fluid leak is the only
reason for fluid loss. If a leak
occurs, take the vehicle to the
dealer and have it repaired as soon
as possible.
The vehicle is not equipped with a
transmission fluid level dipstick.
There is a special procedure for
checking and changing the
transmission fluid. Because this
procedure is difficult, this should be
done at the dealer. Contact the
dealer for additional information or
the procedure can be found in theservice manual. To purchase a
service manual, see
Service
Publications Ordering Information
on page 13-11.
{Caution
Use of the incorrect automatic
transmission fluid may damage
the vehicle, and the damage may
not be covered by the vehicle
warranty. Always use the
automatic transmission fluid listed
in Recommended Fluids and
Lubricants on page 11-12.
Change the fluid and filter at the
intervals listed in Maintenance
Schedule on page 11-2, and be sure
to use the fluid listed in
Recommended Fluids and
Lubricants on page 11-12.
Manual Transmission
Fluid
It is not necessary to check the
manual transmission fluid level.
A transmission fluid leak is the only
reason for fluid loss. If a leak
occurs, take the vehicle to the
dealer and have it repaired as soon
as possible. See Recommended
Fluids and Lubricants on page 11-12
for the proper fluid to use.
Hydraulic Clutch
It is not necessary to regularly
check clutch fluid unless you
suspect there is a leak in the
system. Adding fluid will not correct
a leak. A fluid loss in this system
could indicate a problem. Have the
system inspected and repaired.
The fluid will darken over time. See
Maintenance Schedule on
page 11-2 for when to replace the
fluid.
Page 275 of 393
Black plate (36,1)Chevrolet Corvette Owner Manual (GMNA-Localizing-U.S./Canada/Mexico-
7576293) - 2015 - crc - 10/31/14
10-36 Vehicle Care
2. Firmly apply both the parkingbrake and the regular brake.
See Electric Parking Brake on
page 9-36.
Do not use the accelerator
pedal, and be ready to turn off
the engine immediately if it
starts.
3. For automatic transmission vehicles, try to start the engine
in each gear. The vehicle should
start only in P (Park) or
N (Neutral). If the vehicle starts
in any other position, contact
your dealer for service.
For manual transmission
vehicles, put the shift lever in
Neutral, push the clutch pedal
down halfway, and try to start
the engine. The vehicle should
start only when the clutch pedal
is pushed down all the way to
the floor. If the vehicle starts
when the clutch pedal is not
pushed all the way down,
contact your dealer for service.Automatic Transmission
Shift Lock Control
Function Check
{Warning
When you are doing this
inspection, the vehicle could
move suddenly. If the vehicle
moves, you or others could be
injured.
1. Before starting this check, be sure there is enough room
around the vehicle. It should be
parked on a level surface.
2. Apply the parking brake. See Electric Parking Brake on
page 9-36.
Be ready to apply the regular
brake immediately if the vehicle
begins to move.
3. With the engine off, turn the ignition on, but do not start the
engine. Without applying the
regular brake, try to move the shift lever out of P (Park) with
normal effort. If the shift lever
moves out of P (Park), contact
your dealer for service.
Park Brake and P (Park)
Mechanism Check
{Warning
When you are doing this check,
the vehicle could begin to move.
You or others could be injured
and property could be damaged.
Make sure there is room in front
of the vehicle in case it begins to
roll. Be ready to apply the regular
brake at once should the vehicle
begin to move.
Park on a fairly steep hill, with the
vehicle facing downhill. Keeping
your foot on the regular brake, set
the parking brake.
.To check the parking brake's
holding ability: With the engine
running and the transmission in
Page 282 of 393
Black plate (43,1)Chevrolet Corvette Owner Manual (GMNA-Localizing-U.S./Canada/Mexico-
7576293) - 2015 - crc - 10/31/14
Vehicle Care 10-43
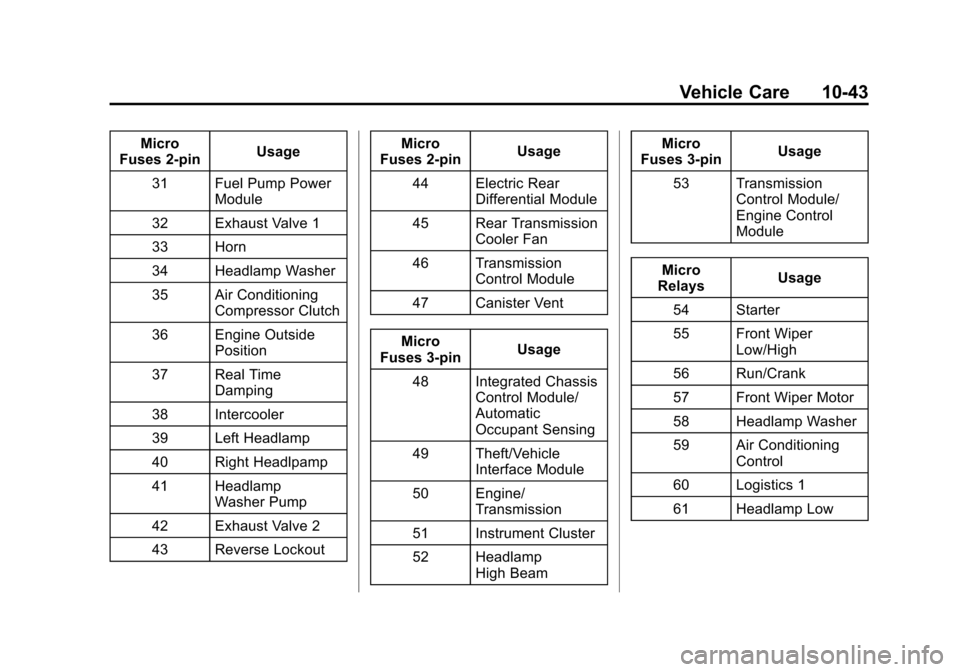
Micro
Fuses 2-pin Usage
31 Fuel Pump Power Module
32 Exhaust Valve 1
33 Horn
34 Headlamp Washer
35 Air Conditioning Compressor Clutch
36 Engine Outside Position
37 Real Time Damping
38 Intercooler
39 Left Headlamp
40 Right Headlpamp
41 Headlamp Washer Pump
42 Exhaust Valve 2
43 Reverse Lockout Micro
Fuses 2-pin Usage
44 Electric Rear Differential Module
45 Rear Transmission Cooler Fan
46 Transmission Control Module
47 Canister Vent
Micro
Fuses 3-pin Usage
48 Integrated Chassis Control Module/
Automatic
Occupant Sensing
49 Theft/Vehicle Interface Module
50 Engine/ Transmission
51 Instrument Cluster
52 Headlamp High Beam Micro
Fuses 3-pin Usage
53 Transmission Control Module/
Engine Control
Module
Micro
Relays Usage
54 Starter
55 Front Wiper Low/High
56 Run/Crank
57 Front Wiper Motor
58 Headlamp Washer
59 Air Conditioning Control
60 Logistics 1
61 Headlamp Low
Page 293 of 393
Black plate (54,1)Chevrolet Corvette Owner Manual (GMNA-Localizing-U.S./Canada/Mexico-
7576293) - 2015 - crc - 10/31/14
10-54 Vehicle Care
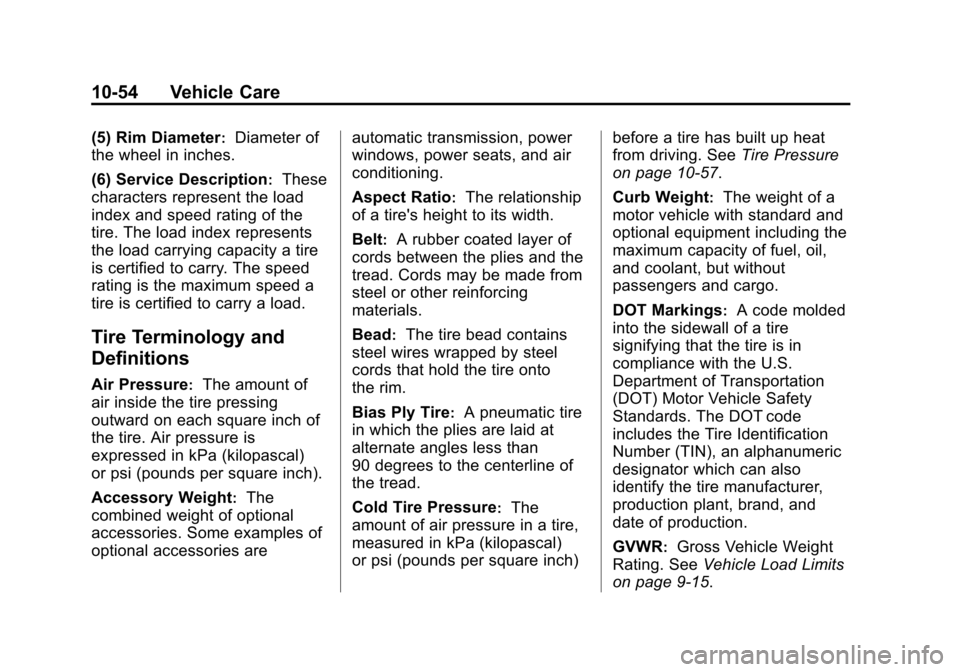
(5) Rim Diameter:Diameter of
the wheel in inches.
(6) Service Description
:These
characters represent the load
index and speed rating of the
tire. The load index represents
the load carrying capacity a tire
is certified to carry. The speed
rating is the maximum speed a
tire is certified to carry a load.
Tire Terminology and
Definitions
Air Pressure:The amount of
air inside the tire pressing
outward on each square inch of
the tire. Air pressure is
expressed in kPa (kilopascal)
or psi (pounds per square inch).
Accessory Weight
:The
combined weight of optional
accessories. Some examples of
optional accessories are automatic transmission, power
windows, power seats, and air
conditioning.
Aspect Ratio
:The relationship
of a tire's height to its width.
Belt
:A rubber coated layer of
cords between the plies and the
tread. Cords may be made from
steel or other reinforcing
materials.
Bead
:The tire bead contains
steel wires wrapped by steel
cords that hold the tire onto
the rim.
Bias Ply Tire
:A pneumatic tire
in which the plies are laid at
alternate angles less than
90 degrees to the centerline of
the tread.
Cold Tire Pressure
:The
amount of air pressure in a tire,
measured in kPa (kilopascal)
or psi (pounds per square inch) before a tire has built up heat
from driving. See
Tire Pressure
on page 10-57.
Curb Weight
:The weight of a
motor vehicle with standard and
optional equipment including the
maximum capacity of fuel, oil,
and coolant, but without
passengers and cargo.
DOT Markings
:A code molded
into the sidewall of a tire
signifying that the tire is in
compliance with the U.S.
Department of Transportation
(DOT) Motor Vehicle Safety
Standards. The DOT code
includes the Tire Identification
Number (TIN), an alphanumeric
designator which can also
identify the tire manufacturer,
production plant, brand, and
date of production.
GVWR
:Gross Vehicle Weight
Rating. See Vehicle Load Limits
on page 9-15.