2015 CHEVROLET CORVETTE open hood
[x] Cancel search: open hoodPage 46 of 393
Black plate (17,1)Chevrolet Corvette Owner Manual (GMNA-Localizing-U.S./Canada/Mexico-
7576293) - 2015 - crc - 10/31/14
Keys, Doors, and Windows 2-17
On Solid:Vehicle is secured
during the delay to arm the system.
Fast Flash: Vehicle is unsecured.
A door, the hood, or the hatch/trunk
is open.
Slow Flash: Alarm system is
armed.
Arming the Alarm System
1. Turn off the vehicle.
2. Lock the vehicle in one of three ways:
.Use the RKE transmitter.
.Use the Keyless Access
system.
.With a door open, pressQ
on the interior of the door.
3. After 30 seconds the alarm system will arm, and the
indicator light will begin to slowly
flash indicating the alarm system
is operating. Pressing
Qon the
RKE transmitter a second time will bypass the 30-second delay
and immediately arm the alarm
system.
The vehicle alarm system will not
arm if the doors are locked with
the key.
If the driver door is opened without
first unlocking with the RKE
transmitter, the horn will chirp and
the lights will flash to indicate
pre-alarm. If the vehicle is not
started, or the door is not unlocked
by pressing
Kon the RKE
transmitter during the 10-second
pre-alarm, the alarm will be
activated.
The alarm will also be activated if
the passenger door, the hatch/trunk,
or the hood is opened without first
disarming the system. When the
alarm is activated, the turn signals
flash and the horn sounds for about
30 seconds. The alarm system will
then re-arm to monitor for the next
unauthorized event.
Disarming the Alarm System
To disarm the alarm system or turn
off the alarm if it has been activated,
do one of the following:
.PressKon the RKE transmitter.
.Unlock the vehicle using the
Keyless Access system.
.Start the vehicle.
To avoid setting off the alarm by
accident:
.Lock the vehicle after all
occupants have left the vehicle
and both doors are closed.
.Always unlock a door with the
RKE transmitter or use the
Keyless Access system.
Unlocking the driver door with the
key will not disarm the system or
turn off the alarm.
Page 142 of 393
Black plate (37,1)Chevrolet Corvette Owner Manual (GMNA-Localizing-U.S./Canada/Mexico-
7576293) - 2015 - crc - 10/31/14
Instruments and Controls 5-37
HOOD OPEN
This message will display along with
a hood open symbol when the hood
is open. Close the hood completely.
TRUNK OPEN
This message will display along with
a symbol when the trunk is open.
Close the trunk completely.
Engine Cooling System
Messages
A/C OFF DUE TO HIGH
ENGINE TEMP
This message displays when the
engine coolant becomes hotter than
the normal operating temperature.
To avoid added strain on a hot
engine, the air conditioning
compressor automatically turns off.
When the coolant temperature
returns to normal, the air
conditioning compressor turns back
on. The vehicle can continue to be
driven.If this message continues to appear,
have the system repaired by your
dealer as soon as possible to avoid
damage to the engine.
ENGINE OVERHEATING
—
IDLE ENGINE
This message displays when the
engine coolant temperature is too
hot. Stop and allow the vehicle to
idle until it cools down.
ENGINE OVERHEATED —
TURN VEHICLE OFF
This message displays and a
continuous chime sounds if the
engine cooling system reaches
unsafe temperatures for operation.
Stop and turn off the vehicle as
soon as it is safe to do so to avoid
severe damage. This message
clears when the engine has cooled
to a safe operating temperature.
Engine Oil Messages
CHANGE ENGINE OIL SOON
This message displays when the
engine oil needs to be changed.
When you change the engine oil, be
sure to reset the Oil Life System.
See Engine Oil Life System on
page 10-18, Driver Information
Center (DIC) on page 5-26, Engine
Oil on page 10-12, and Maintenance
Schedule on page 11-2.
ENGINE OIL HOT, IDLE
ENGINE
This message displays when the
engine oil temperature is too hot.
Stop and allow the vehicle to idle
until it cools down.
ENGINE OIL LOW —ADD OIL
On some vehicles, this message
displays when the engine oil level
may be too low. Check the oil level
before filling to the recommended
level. If the oil is not low and this
Page 236 of 393
Black plate (55,1)Chevrolet Corvette Owner Manual (GMNA-Localizing-U.S./Canada/Mexico-
7576293) - 2015 - crc - 10/31/14
Driving and Operating 9-55
{Caution
Do not use fuel containing
methanol. It can corrode metal
parts in the fuel system and also
damage plastic and rubber parts.
That damage would not be
covered under the vehicle
warranty.
Some gasolines, mainly high octane
racing gasolines, can contain an
octane-enhancing additive called
methylcyclopentadienyl manganese
tricarbonyl (MMT). Do not use
gasolines and/or fuel additives with
MMT as they can reduce spark plug
life and affect emission control
system performance. The
malfunction indicator lamp may turn
on. If this occurs, see your dealer
for service.
California Fuel
Requirements
If the vehicle is certified to meet
California Emissions Standards, it is
designed to operate on fuels that
meet California specifications. See
the underhood emission control
label. If this fuel is not available in
states adopting California Emissions
Standards, the vehicle will operate
satisfactorily on fuels meeting
federal specifications, but emission
control system performance might
be affected. The malfunction
indicator lamp could turn on and the
vehicle may not pass a smog-check
test. See Malfunction Indicator
Lamp on page 5-18. If this occurs,
return to your authorized dealer for
diagnosis. If it is determined that the
condition is caused by the type of
fuel used, repairs may not be
covered by the vehicle warranty.
Fuels in Foreign
Countries
If planning to drive in countries
outside the U.S. or Canada, the
proper fuel might be hard to find.
Check regional auto club or fuel
retail brand websites for availability
in the country where driving. Never
use leaded gasoline, fuel containing
methanol, manganese, or any other
fuel not recommended. Costly
repairs caused by use of improper
fuel would not be covered by the
vehicle warranty.
Fuel Additives
To keep fuel systems clean, TOP
TIER Detergent Gasoline is
recommended. See Fuel on
page 9-54.
If TOP TIER Detergent Gasoline is
not available, one bottle of Fuel
System Treatment PLUS added to
the fuel tank at every engine oil
change, can help. Fuel System
Treatment PLUS is the only
Page 245 of 393
Black plate (6,1)Chevrolet Corvette Owner Manual (GMNA-Localizing-U.S./Canada/Mexico-
7576293) - 2015 - crc - 10/31/14
10-6 Vehicle Care
This vehicle has an airbag system.
Before attempting to do your own
service work, seeServicing the
Airbag-Equipped Vehicle on
page 3-25.
Keep a record with all parts receipts
and list the mileage and the date of
any service work performed. See
Maintenance Records on
page 11-15.
{Caution
Even small amounts of
contamination can cause damage
to vehicle systems. Do not allow
contaminants to contact the fluids,
reservoir caps, or dipsticks.
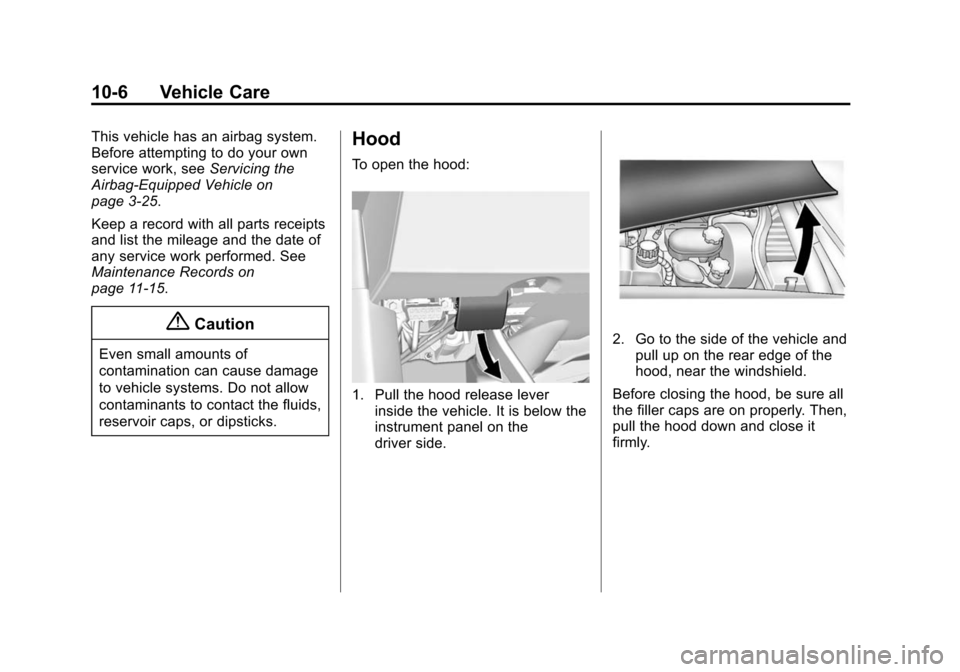
Hood
To open the hood:
1. Pull the hood release lever inside the vehicle. It is below the
instrument panel on the
driver side.
2. Go to the side of the vehicle andpull up on the rear edge of the
hood, near the windshield.
Before closing the hood, be sure all
the filler caps are on properly. Then,
pull the hood down and close it
firmly.
Page 260 of 393

Black plate (21,1)Chevrolet Corvette Owner Manual (GMNA-Localizing-U.S./Canada/Mexico-
7576293) - 2015 - crc - 10/31/14
Vehicle Care 10-21
To remove the hood extractor duct
to gain access:
1. Bolts (4)
2. Hood Extractor Duct
1. Open the hood. SeeHood on
page 10-6.
2. Remove the four bolts (1) and the hood extractor duct (2).
3. Reverse Step 2 to replace the hood extractor duct. To inspect or replace the engine air
cleaner/filter:
1. Surge Tank Coolant Hose
2. Screws (2)
3. Hose Retainers (2)
4. Air Duct Clamp
5. Electrical Connector
{Caution
If the engine coolant surge tank
hose is not carefully lifted out of
the hose retainers on the air
(Continued)
Caution (Continued)
cleaner/filter cover assembly, it
may be damaged and cause
engine coolant to leak. Damage
would not be covered by the
vehicle warranty.
1. Carefully lift the surge tank coolant hose (1) from both hose
retainers (3) and position the
hose to be able to remove the
screws securing the air cleaner/
filter endcap.
2. Loosen the air duct clamp (4) at the air cleaner/filter housing
endcap and move the duct out of
the way.
3. Remove the electrical connector (5) from the sensor.
4. Remove the two screws (2).
Page 267 of 393
Black plate (28,1)Chevrolet Corvette Owner Manual (GMNA-Localizing-U.S./Canada/Mexico-
7576293) - 2015 - crc - 10/31/14
10-28 Vehicle Care
If the decision is made to lift the
hood, make sure the vehicle is
parked on a level surface.
Then check to see if the engine
cooling fan is running. If the engine
is overheating, the fan should be
running. If it is not, do not continue
to run the engine and have the
vehicle serviced.
{Caution
Running the engine without
coolant may cause damage or a
fire. Vehicle damage would not be
covered by the vehicle warranty.
If Steam Is Coming from the
Engine
{Warning
Steam from an overheated engine
can burn you badly, even if you
just open the hood. Stay away
from the engine if you see or hear
steam coming from it. Just turn it
off and get everyone away from
the vehicle until it cools down.
Wait until there is no sign of
steam or coolant before you open
the hood.
If you keep driving when the
engine is overheated, the liquids
in it can catch fire. You or others
could be badly burned. Stop the
engine if it overheats, and get out
of the vehicle until the engine
is cool.
If No Steam Is Coming from
the Engine
If an engine overheat warning is
displayed but no steam can be seen
or heard, the problem may not be
too serious. Sometimes the engine
can get a little too hot when the
vehicle:
.Climbs a long hill on a hot day.
.Stops after high-speed driving.
.Idles for long periods in traffic.
If the overheat warning is displayed
with no sign of steam:
1. Turn the air conditioning off.
2. Turn the heater on to the highest temperature and to the highest
fan speed. Open the windows as
necessary.
3. When it is safe to do so, pull off the road, shift to P (Park) or
N (Neutral) and let the
engine idle.
If the temperature overheat gauge is
no longer in the shaded area or an
overheat warning no longer
Page 276 of 393
Black plate (37,1)Chevrolet Corvette Owner Manual (GMNA-Localizing-U.S./Canada/Mexico-
7576293) - 2015 - crc - 10/31/14
Vehicle Care 10-37
N (Neutral), slowly remove foot
pressure from the regular brake
pedal. Do this until the vehicle is
held by the parking brake only.
.To check the P (Park)
mechanism's holding ability:
With the engine running, shift to
P (Park). Then release the
parking brake followed by the
regular brake.
Contact your dealer if service is
required.
Wiper Blade Replacement
Windshield wiper blades should be
inspected for wear and cracking.
Replacement blades come in
different types and are removed in
different ways. For proper type and
length, see Maintenance
Replacement Parts on page 11-13.
To replace the windshield wiper
blade:
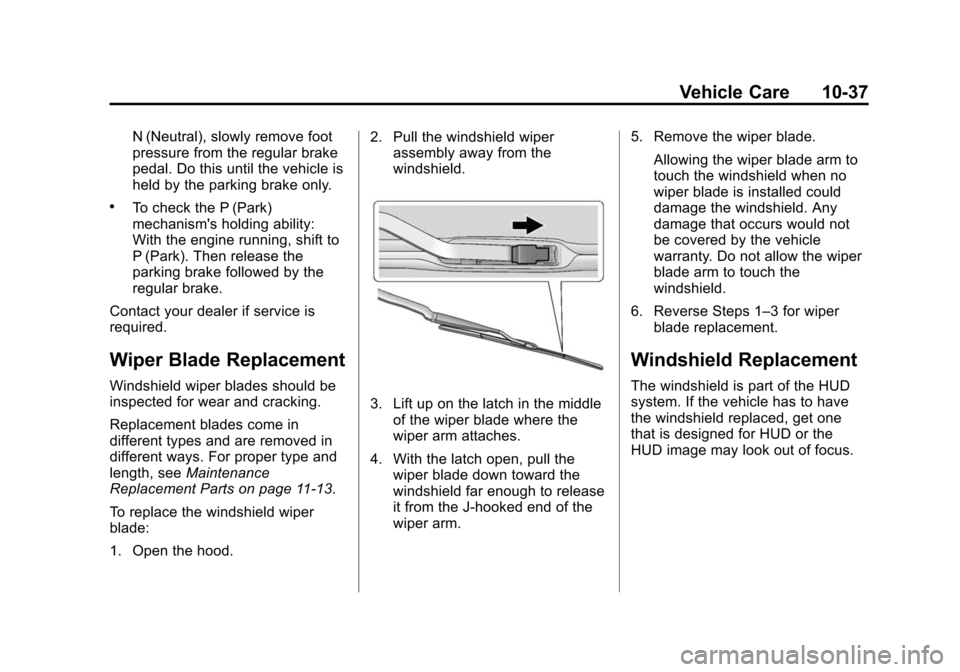
1. Open the hood. 2. Pull the windshield wiper
assembly away from the
windshield.
3. Lift up on the latch in the middle
of the wiper blade where the
wiper arm attaches.
4. With the latch open, pull the wiper blade down toward the
windshield far enough to release
it from the J-hooked end of the
wiper arm. 5. Remove the wiper blade.
Allowing the wiper blade arm to
touch the windshield when no
wiper blade is installed could
damage the windshield. Any
damage that occurs would not
be covered by the vehicle
warranty. Do not allow the wiper
blade arm to touch the
windshield.
6. Reverse Steps 1–3 for wiper blade replacement.
Windshield Replacement
The windshield is part of the HUD
system. If the vehicle has to have
the windshield replaced, get one
that is designed for HUD or the
HUD image may look out of focus.
Page 386 of 393

Black plate (5,1)Chevrolet Corvette Owner Manual (GMNA-Localizing-U.S./Canada/Mexico-
7576293) - 2015 - crc - 10/31/14
INDEX i-5
Fuses . . . . . . . . . . . . . . . . . . . . . . . . 10-40Engine Compartment
Fuse Block . . . . . . . . . . . . . . . . 10-40
Rear Compartment Fuse Block . . . . . . . . . . . . . . . . . . . . . . 10-44
G
Garage Door Opener . . . . . . . . . . 5-52Programming . . . . . . . . . . . . . . . . . 5-52
Gauges Boost . . . . . . . . . . . . . . . . . . . . . . . . . 5-14
Engine CoolantTemperature . . . . . . . . . . . . . . . . 5-15
Fuel . . . . . . . . . . . . . . . . . . . . . . . . . . 5-13
Odometer . . . . . . . . . . . . . . . . . . . . . 5-12
Speedometer . . . . . . . . . . . . . . . . . 5-12
Tachometer . . . . . . . . . . . . . . . . . . . 5-12
Trip Odometer . . . . . . . . . . . . . . . . 5-12
Warning Lights and Indicators . . . . . . . . . . . . . . . . . . . . 5-6
General Information Service and Maintenance . . . . . 11-1
Towing . . . . . . . . . . . . . . . . . . . . . . . . 9-58
Vehicle Care . . . . . . . . . . . . . . . . . . 10-2
Glove Box . . . . . . . . . . . . . . . . . . . . . . 4-2 GM Mobility Reimbursement
Program . . . . . . . . . . . . . . . . . . . . . . 13-5
H
Hatch . . . . . . . . . . . . . . . . . . . . . . . . . . 2-14
Hazard Warning Flashers . . . . . . . 6-4
Head Restraints . . . . . . . . . . . . . . . . 3-2
Head-up Display . . . . . . . . . . . . . . . 5-29
Headlamps
Aiming . . . . . . . . . . . . . . . . . . . . . . 10-38
Automatic . . . . . . . . . . . . . . . . . . . . . . 6-3
Bulb Replacement . . . . . . . . . . 10-38
Daytime RunningLamps (DRL) . . . . . . . . . . . . . . . . . 6-2
Flash-to-Pass . . . . . . . . . . . . . . . . . . 6-2
High Intensity Discharge (HID) Lighting . . . . . . . . . . . . . 10-38
High-Beam On Light . . . . . . . . . . 5-25
High/Low Beam Changer . . . . . . 6-2
Lamps On Reminder . . . . . . . . . 5-26
Heated and Ventilated Front Seats . . . . . . . . . . . . . . . . . . . . . . . . . 3-7
Heated Mirrors . . . . . . . . . . . . . . . . . 2-20
High-Beam On Light . . . . . . . . . . . 5-25
High-Speed Operation . . . . . . . . 10-58
Hill and Mountain Roads . . . . . . . 9-12 Hill Start Assist (HSA) . . . . . . . . . 9-38
Hood . . . . . . . . . . . . . . . . . . . . . . . . . . 10-6
Horn . . . . . . . . . . . . . . . . . . . . . . . . . . . . 5-2
How to Wear Safety Belts
Properly . . . . . . . . . . . . . . . . . . . . . . 3-10
Hydraulic Clutch . . . . . . . . . . . . . . 10-19
I
Ignition Positions . . . . . . . . . . . . . . 9-20
Immobilizer . . . . . . . . . . . . . . . . . . . . 2-18
Infants and Young Children, Restraints . . . . . . . . . . . . . . . . . . . . 3-28
Infotainment . . . . . . . . . . . . . . . . . . . . 7-1
Infotainment System . . . . . . . . . . 13-15
Instrument Cluster . . . . . . . . . . . . . . 5-7
Instrument Panel
Storage Area . . . . . . . . . . . . . . . . . . 4-1
Interior Rearview Mirrors . . . . . . . 2-21
Introduction . . . . . . . . . . . . . . . . . . . . . . . iii
J
Jump Starting . . . . . . . . . . . . . . . . . 10-80