Page 138 of 297

Black plate (1,1)Chevrolet City Express Owner Manual (GMNA-Localizing-U.S./Canada-
7707496) - 2015 - CRC - 11/26/14
Climate Controls 8-1
Climate Controls Climate Control Systems Climate Control Systems . . . . . . 8-1
Air Vents Air Vents . . . . . . . . . . . . . . . . . . . . . . 8-3
Maintenance Service . . . . . . . . . . . . . . . . . . . . . . . 8-4
Climate Control
Systems The vehicle ’ s heating, cooling, and
ventilation can be controlled with
this system.
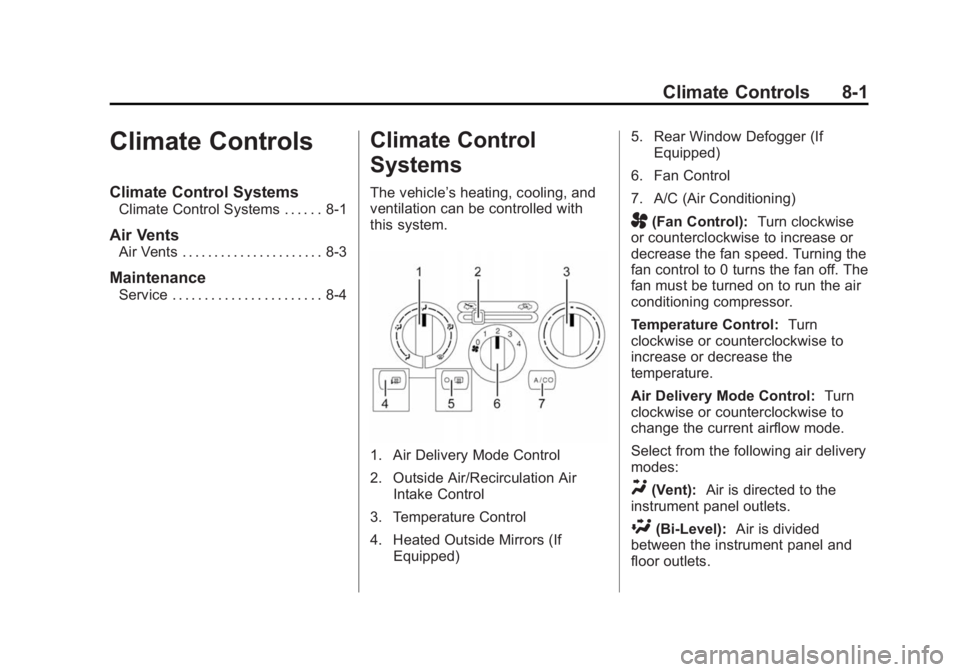
1. Air Delivery Mode Control
2. Outside Air/Recirculation Air
Intake Control
3. Temperature Control
4. Heated Outside Mirrors (If
Equipped) 5. Rear Window Defogger (If
Equipped)
6. Fan Control
7. A/C (Air Conditioning)
A (Fan Control): Turn clockwise
or counterclockwise to increase or
decrease the fan speed. Turning the
fan control to 0 turns the fan off. The
fan must be turned on to run the air
conditioning compressor.
Temperature Control: Turn
clockwise or counterclockwise to
increase or decrease the
temperature.
Air Delivery Mode Control: Turn
clockwise or counterclockwise to
change the current airflow mode.
Select from the following air delivery
modes:
Y (Vent): Air is directed to the
instrument panel outlets.
\ (Bi-Level): Air is divided
between the instrument panel and
floor outlets.
Page 180 of 297

Black plate (39,1)Chevrolet City Express Owner Manual (GMNA-Localizing-U.S./Canada-
7707496) - 2015 - CRC - 11/26/14
Driving and Operating 9-39
Filling the Tank
{ WarningFuel vapors and fuel fires burn
violently and can cause injury or
death. .
To help avoid injuries to you
and others, read and follow
all the instructions on the fuel
pump island. .
Turn off the engine when
refueling. .
Keep sparks, flames, and
smoking materials away
from fuel. .
Do not leave the fuel pump
unattended. .
Do not reenter the vehicle
while pumping fuel. .
Keep children away from the
fuel pump and never let
children pump fuel.
(Continued) Warning (Continued) .
Fuel can spray out if the fuel
cap is opened too quickly.
This spray can happen if the
tank is nearly full, and is
more likely in hot weather.
Open the fuel cap slowly and
wait for any hiss noise to stop
then unscrew the cap all
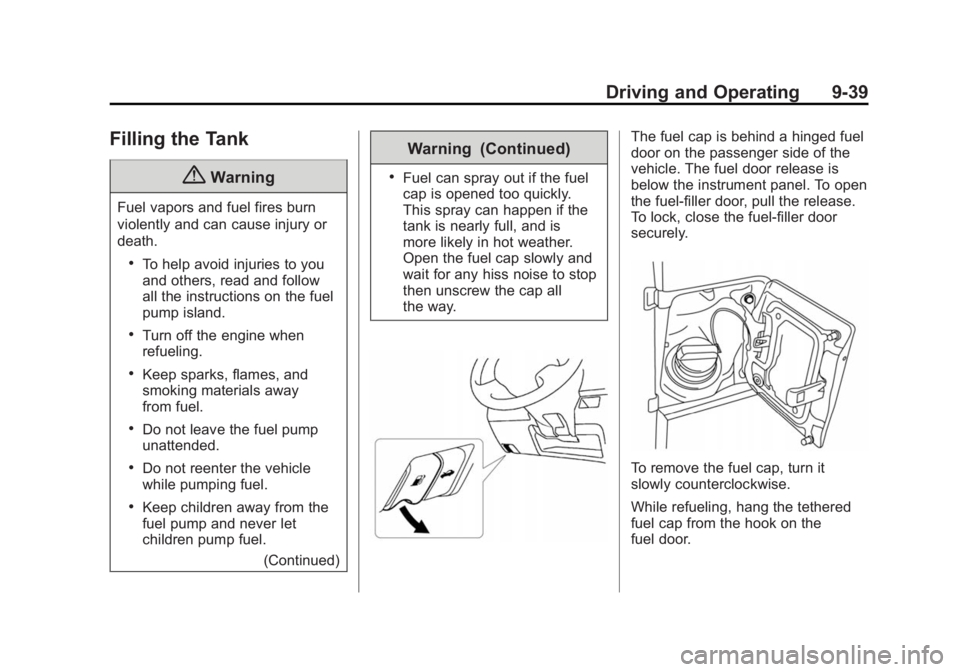
the way. The fuel cap is behind a hinged fuel
door on the passenger side of the
vehicle. The fuel door release is
below the instrument panel. To open
the fuel-filler door, pull the release.
To lock, close the fuel-filler door
securely.
To remove the fuel cap, turn it
slowly counterclockwise.
While refueling, hang the tethered
fuel cap from the hook on the
fuel door.
Page 181 of 297

Black plate (40,1)Chevrolet City Express Owner Manual (GMNA-Localizing-U.S./Canada-
7707496) - 2015 - CRC - 11/26/14
9-40 Driving and Operating Be careful not to spill fuel. Do not
top off or overfill the tank and wait a
few seconds after you have finished
pumping before removing the
nozzle. Clean fuel from painted
surfaces as soon as possible. See
Exterior Care on page 10-61 .
When replacing the fuel cap, turn it
clockwise until it clicks. Make sure
the cap is fully installed.
{ WarningIf a fire starts while you are
refueling, do not remove the
nozzle. Shut off the flow of fuel by
shutting off the pump or by
notifying the station attendant.
Leave the area immediately. { CautionIf a new fuel cap is needed, be
sure to get the right type of cap
from your dealer. The wrong type
of fuel cap may not fit properly,
may cause the malfunction
indicator lamp to light, and could
damage the fuel tank and
emissions system. See
Malfunction Indicator Lamp on
page 5-11 .
LOOSE FUEL CAP Warning
Message
The LOOSE FUEL CAP message
displays in the odometer when the
fuel cap is not tightened correctly
after the vehicle has been refueled.
See Fuel System Messages on
page 5-20 .
Failure to tighten the fuel cap
properly after the LOOSE FUEL
CAP warning message is displayed
may cause the malfunction indicator light (MIL) to turn on. See
Malfunction Indicator Lamp on
page 5-11 .
Filling a Portable Fuel
Container
{ WarningFilling a portable fuel container
while it is in the vehicle can cause
fuel vapors that can ignite either
by static electricity or other
means. You or others could be
badly burned and the vehicle
could be damaged. Always: .
Use approved fuel
containers. .
Remove the container from
the vehicle, trunk, or pickup
bed before filling. .
Place the container on the
ground.
(Continued)
Page 206 of 297

Black plate (23,1)Chevrolet City Express Owner Manual (GMNA-Localizing-U.S./Canada-
7707496) - 2015 - CRC - 11/26/14
Vehicle Care 10-23
Headlamp Aiming Headlamp aim has been preset and
should need no further adjustment.
If the vehicle is damaged in a crash,
the headlamp aim may be affected.
If adjustment to the headlamps is
necessary, see your dealer.
Bulb Replacement For the proper type of replacement
bulbs, see Replacement Bulbs on
page 10-23 .
For any bulb ‐ changing procedure
not listed in this section, contact
your dealer.
Halogen Bulbs
{ WarningHalogen bulbs have pressurized
gas inside and can burst if you
drop or scratch the bulb. You or
others could be injured. Be sure
to read and follow the instructions
on the bulb package. Headlamps, Front Turn
Signal and Parking
Lamps High-Beam Headlamp/
Low-Beam Headlamp 1. Open the hood.
2. Release the clip on the
connector.
3. Turn the bulb counterclockwise
and pull straight back.
Turn Signal and Parking Lamp 1. Open the hood.
2. Turn the bulb counterclockwise
and pull straight back.
Replacement Bulbs Lamp Bulb
Number
Headlamp H13
Front Turn Signal
and Parking Lamp 3457K
Map Lamp W5W
Page 232 of 297
Black plate (49,1)Chevrolet City Express Owner Manual (GMNA-Localizing-U.S./Canada-
7707496) - 2015 - CRC - 11/26/14
Vehicle Care 10-49
2. Remove the tray under the
passenger seat.
3. Turn the jack screw
counterclockwise to loosen it.
4. Lift the jack up. 5. Pull the jack forward.
6. Release the strap to remove the
tool bag.
The spare tire is mounted in the rear
underbody of the vehicle.
To lower the spare tire from the
vehicle:
1. Open the rear door.
Page 233 of 297
Black plate (50,1)Chevrolet City Express Owner Manual (GMNA-Localizing-U.S./Canada-
7707496) - 2015 - CRC - 11/26/14
10-50 Vehicle Care 2. Turn the bolt (1)
counterclockwise about 40 turns
to lower the spare tire.
Stop turning the bolt when the
spare tire is low enough that the
tire basket (2) can be removed
from the hook (3).
3. Push the tire basket (2) upward
to remove it.
4. Lower the tire basket (2) to the
ground and remove the
spare tire. Removing the Flat Tire and
Installing the Spare Tire
1. Jack Rod
2. Cloth
If the vehicle has wheel covers, use
the jack rod (1) to remove it. Apply a
cloth (2) between the wheel and
jack rod (1) to prevent damage.
1. Do a safety check before
proceeding. See If a Tire Goes
Flat on page 10-47 .
Page 234 of 297
Black plate (51,1)Chevrolet City Express Owner Manual (GMNA-Localizing-U.S./Canada-
7707496) - 2015 - CRC - 11/26/14
Vehicle Care 10-512. Turn the wheel wrench
counterclockwise to loosen all
the wheel nuts. Do not remove
the wheel nuts until the tire is off
the ground.
3. Position the jack under the
vehicle, as shown.
The jacking points are indicated
by stamped arrows on the side
of the frame. { WarningGetting under a vehicle when it is
jacked up is dangerous. If the
vehicle slips off the jack you could
be badly injured or killed. Never
get under a vehicle when it is
supported only by a jack.
{ WarningRaising the vehicle with the jack
improperly positioned can
damage the vehicle and even
make the vehicle fall. To help
avoid personal injury and vehicle
damage, be sure to fit the jack lift
head into the proper location
before raising the vehicle.
Page 235 of 297
Black plate (52,1)Chevrolet City Express Owner Manual (GMNA-Localizing-U.S./Canada-
7707496) - 2015 - CRC - 11/26/14
10-52 Vehicle Care
4. Install the assembled jack rod
into the jack, as shown.
5. Turn the jack lever and rod
clockwise to raise the vehicle.
Raise the vehicle until the tire is
off the ground.
6. Remove all the wheel nuts.
7. Remove the flat tire from the
mounting surface. { WarningRust or dirt on a wheel, or on the
parts to which it is fastened, can
make wheel nuts become loose
after time. The wheel could come
off and cause an accident. When
changing a wheel, remove any
rust or dirt from places where the
wheel attaches to the vehicle. In
an emergency, a cloth or a paper
(Continued) Warning (Continued) towel can be used; however, use
a scraper or wire brush later to
remove all rust or dirt.
8. Remove any rust or dirt from the
wheel bolts, mounting surfaces,
and spare wheel.
9. Place the spare tire on the
wheel-mounting surface.