2015 CHEVROLET CAMARO steering
[x] Cancel search: steeringPage 232 of 435

Black plate (31,1)Chevrolet Camaro Owner Manual (GMNA-Localizing-U.S./Canada/Mexico-
7695163) - 2015 - crc - 9/4/14
Driving and Operating 9-31
shifting to 6 (Sixth) gear, or coming
to a complete stop, the transmission
will return to normal Sport Mode
shifting.
ZL1
While driving in Sport Mode, if Tap
Shift has not been activated, the
transmission determines when the
vehicle is being driven in a
competitive manner, in a straight
line or while turning. The
transmission may remain in a gear
longer than it would in the normal
driving mode based on throttle input
and vehicle lateral acceleration.
If there is a rapid reduction in
throttle from a heavy throttle
position, the transmission will
maintain the current gear up to
approximately 4600 rpm. While
braking, the transmission will
automatically downshift to the next
lower gear keeping engine speed
below approximately 3000 rpm.
If the vehicle is then driven for a
short time at a steady speed, and
without high cornering loads, the
transmission will up-shift one gearat a time, until 6 (Sixth) gear. After
shifting to 6 (Sixth) gear, or coming
to a complete stop, the transmission
will return to normal sport mode
shifting.
If the vehicle detects aggressive
cornering, even without a heavy
application of the throttle, the
transmission will downshift and hold
a lower gear to near redline rpm, to
aid in vehicle handling balance and
to improve corner exit speeds.
Manual Mode
Electronic Range Select
(ERS) Mode
Vehicles with axle code GW8 have
an ERS Mode. ERS Mode allows
you to choose the top-gear limit of
the transmission with fully automatic
gear selection. This can help control
the vehicle's speed while driving
downhill or towing a trailer. The
vehicle has an electronic shift
position indicator within the
instrument cluster. When using the
ERS mode a number will display
next to the M, indicating the current
maximum gear allowed. Vehicles
with this feature have indicators on
the steering wheel. The controls are
on the back of the steering wheel.
To use this feature:
1. Move the shift lever to
M (Manual Mode).
2. Press the plus/minus paddles on the back of the steering wheel,
to increase or decrease the gear
range available.
When you shift from D (Drive) to
M (Manual Mode), the transmission
will shift to a lower gear range. The
highest gear available for this range
is displayed next to the M in the
DIC. The number displayed in the
DIC is the highest gear that the
transmission will be allowed to
operate in. This means that all
gears below that number are
available. For example, when
4 (Fourth) is shown next to the M,
1 (First) through 4 (Fourth) gears are
automatically shifted by the vehicle.
Page 233 of 435
Black plate (32,1)Chevrolet Camaro Owner Manual (GMNA-Localizing-U.S./Canada/Mexico-
7695163) - 2015 - crc - 9/4/14
9-32 Driving and Operating
The transmission will not shift into
5 (Fifth) until the + (Plus) paddle is
used or you shift back into D (Drive).
While in M (Manual Mode), the
transmission will prevent shifting to
a lower gear range if the engine
speed is too high. The DIC will still
indicate the lower gear range
selected, but the transmission will
not initiate the downshift until the
vehicle has met a minimum speed
requirement.
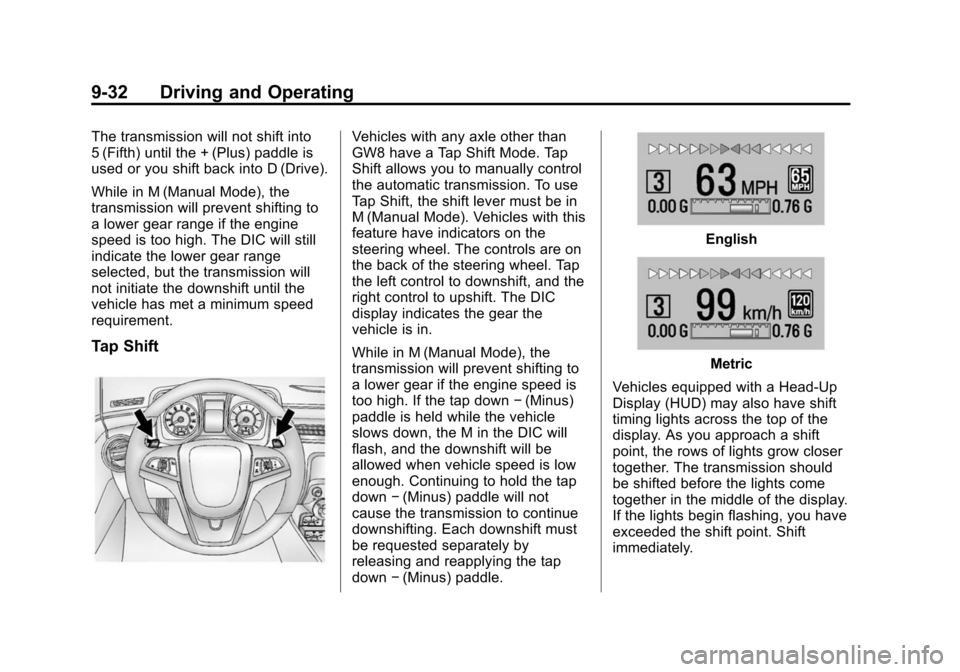
Tap Shift
Vehicles with any axle other than
GW8 have a Tap Shift Mode. Tap
Shift allows you to manually control
the automatic transmission. To use
Tap Shift, the shift lever must be in
M (Manual Mode). Vehicles with this
feature have indicators on the
steering wheel. The controls are on
the back of the steering wheel. Tap
the left control to downshift, and the
right control to upshift. The DIC
display indicates the gear the
vehicle is in.
While in M (Manual Mode), the
transmission will prevent shifting to
a lower gear if the engine speed is
too high. If the tap down−(Minus)
paddle is held while the vehicle
slows down, the M in the DIC will
flash, and the downshift will be
allowed when vehicle speed is low
enough. Continuing to hold the tap
down −(Minus) paddle will not
cause the transmission to continue
downshifting. Each downshift must
be requested separately by
releasing and reapplying the tap
down −(Minus) paddle.
English
Metric
Vehicles equipped with a Head-Up
Display (HUD) may also have shift
timing lights across the top of the
display. As you approach a shift
point, the rows of lights grow closer
together. The transmission should
be shifted before the lights come
together in the middle of the display.
If the lights begin flashing, you have
exceeded the shift point. Shift
immediately.
Page 238 of 435
Black plate (37,1)Chevrolet Camaro Owner Manual (GMNA-Localizing-U.S./Canada/Mexico-
7695163) - 2015 - crc - 9/4/14
Driving and Operating 9-37
suddenly slows or stops. Always
leave enough room up ahead to
stop, even with ABS.
Using ABS
Do not pump the brakes. Just hold
the brake pedal down firmly and let
ABS work. You may hear the ABS
pump or motor operating and feel
the brake pedal pulsate. This is
normal.
Braking in Emergencies
ABS allows you to steer and brake
at the same time. In many
emergencies, steering can help
more than even the very best
braking.
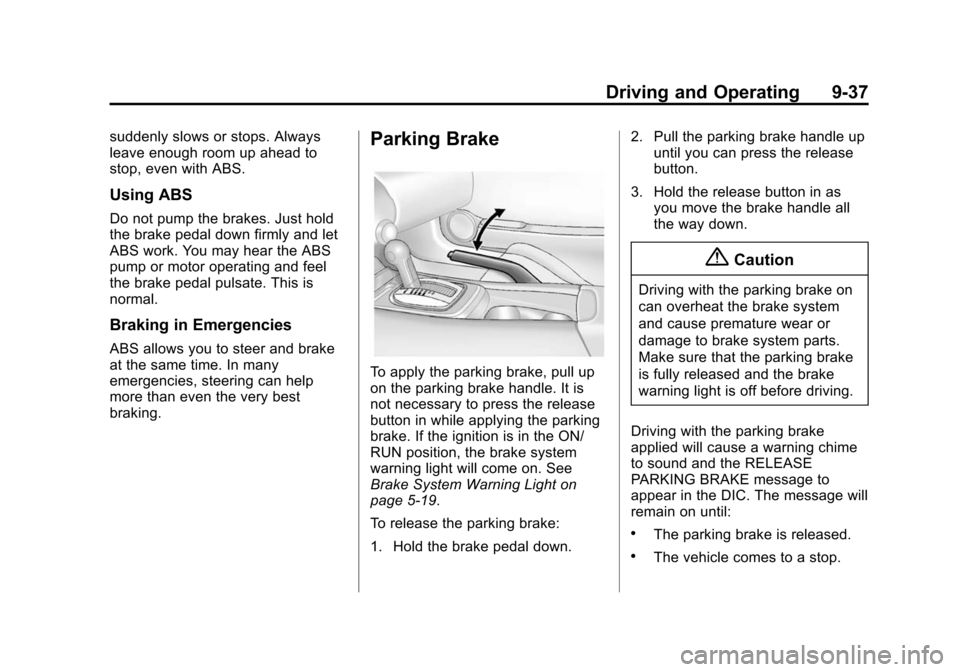
Parking Brake
To apply the parking brake, pull up
on the parking brake handle. It is
not necessary to press the release
button in while applying the parking
brake. If the ignition is in the ON/
RUN position, the brake system
warning light will come on. See
Brake System Warning Light on
page 5-19.
To release the parking brake:
1. Hold the brake pedal down.2. Pull the parking brake handle up
until you can press the release
button.
3. Hold the release button in as you move the brake handle all
the way down.
{Caution
Driving with the parking brake on
can overheat the brake system
and cause premature wear or
damage to brake system parts.
Make sure that the parking brake
is fully released and the brake
warning light is off before driving.
Driving with the parking brake
applied will cause a warning chime
to sound and the RELEASE
PARKING BRAKE message to
appear in the DIC. The message will
remain on until:
.The parking brake is released.
.The vehicle comes to a stop.
Page 244 of 435
Black plate (43,1)Chevrolet Camaro Owner Manual (GMNA-Localizing-U.S./Canada/Mexico-
7695163) - 2015 - crc - 9/4/14
Driving and Operating 9-43
PERF TRACTION 3–SPORT 1
ACTIVE HANDLING ON
CHASSIS MODE SPORT (ZL1
Coupe and Z/28 Only)
.For use by drivers who are
familiar with the track.
.Requires more driving skill than
mode 2.
.Dry conditions only.
.StabiliTrak is on and more
engine power is available than in
mode 2.
PERF TRACTION 4 –SPORT 2
ACTIVE HANDLING OFF
CHASSIS MODE SPORT (ZL1
Coupe and Z/28 Only)
.For use by drivers who are
familiar with the track.
.Requires more driving skill than
modes 2 or 3.
.Dry conditions only.
.StabiliTrak is off and available
engine power is the same as
mode 3.
PERF TRACTION 5 –RACE
ACTIVE HANDLING OFF
CHASSIS MODE TRACK (ZL1
Coupe and Z/28 Only)
.For use by drivers who are
familiar with the track.
.Requires more driving skill than
other modes.
.Dry conditions only.
.StabiliTrak is off and engine
power is available for maximum
cornering speed.
Use mode 5 for most consistent
performance during drag strip use.
When the TCS/StabiliTrak button is
pressed again, the vehicle exits
PTM mode and the TCS and
StabiliTrak systems are on.
Launch Control (V8 with
Manual Transmissions except
Z/28)
A Launch Control feature is
available, within Competitive Driving
Mode or PTM, on vehicles with a manual transmission to allow the
driver to achieve high levels of
vehicle acceleration in a straight
line. Launch Control is a form of
traction control that manages tire
spin while launching the vehicle.
This feature is intended for use
during closed course race events
where consistent zero to sixty
and quarter mile times are
desirable.
Launch Control is only available
when the following criteria are met:
.Competitive Driving Mode is
selected or any of the PTM
modes are selected.
.The vehicle is not moving.
.The steering wheel is pointing
straight.
.The clutch is pressed and the
vehicle is in 1 (First) gear.
.The accelerator pedal is rapidly
applied to wide open throttle.
The Launch Control feature will
initially limit engine speed as the
driver rapidly applies the accelerator
Page 245 of 435
Black plate (44,1)Chevrolet Camaro Owner Manual (GMNA-Localizing-U.S./Canada/Mexico-
7695163) - 2015 - crc - 9/4/14
9-44 Driving and Operating
pedal to wide open throttle.
A smooth, quick release of the
clutch, while maintaining the fully
pressed accelerator pedal, will
manage wheel slip. Complete shifts
are described inManual
Transmission on page 9-34.
After the vehicle is launched, the
system continues in Competitive
Driving Mode or PTM.
Competitive Driving Mode, PTM,
and Launch Control are systems
designed for a closed course race
track and not intended for use on
public roads. The systems are not
intended to compensate for lack of
driver experience or familiarity with
the race track.
ZL1 Coupe Only
Use mode 5 for the most consistent
performance during drag strip use.
Limited-Slip Rear Axle
Vehicles with a limited-slip rear axle
can give more traction on snow,
mud, ice, sand, or gravel. When
traction is low, this feature allows
the drive wheel with the most
traction to move the vehicle. The
limited-slip rear axle also gives the
driver enhanced control when
cornering hard or completing a
maneuver, such as a lane change.
For vehicles with limited slip
differential, driven under severe
conditions, the rear axle fluid should
be changed. See Competitive
Driving Mode on page 9-40 and
Maintenance Schedule on
page 11-2.
Selective Ride Control
ZL1 Only
The vehicle has a ride control
system called Magnetic Selective
Ride Control. The system provides
the following performance benefits:
.Reduced Impact Harshness
.Improved Road Isolation
.Improved High-Speed Stability
.Improved Handling Response
.Better Control of Body Ride
Motions
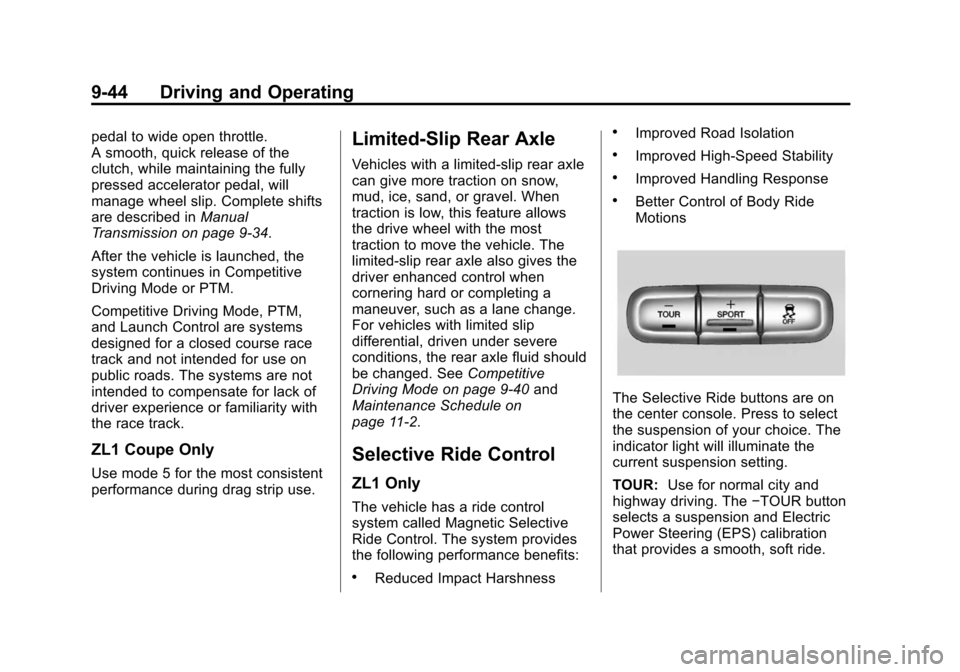
The Selective Ride buttons are on
the center console. Press to select
the suspension of your choice. The
indicator light will illuminate the
current suspension setting.
TOUR: Use for normal city and
highway driving. The −TOUR button
selects a suspension and Electric
Power Steering (EPS) calibration
that provides a smooth, soft ride.
Page 246 of 435
Black plate (45,1)Chevrolet Camaro Owner Manual (GMNA-Localizing-U.S./Canada/Mexico-
7695163) - 2015 - crc - 9/4/14
Driving and Operating 9-45
SPORT:Use where road conditions
or personal preference demand
more control. The +SPORT button
selects a suspension and EPS
calibration that provides more “feel,”
or response to the road conditions.
The setting can be changed at any
time. Based on road conditions,
steering wheel angle, and the
vehicle speed, the system
automatically adjusts to provide the
best handling while providing a
smooth ride. The Tour and Sport
modes will feel similar on a smooth
road. Select a new setting whenever
driving conditions change. The Selective Ride button indicator
lights will not illuminate when any
PTM mode is selected. When this
mode is selected, pressing the
Selective Ride button will change
the PTM mode and the suspension
setting will be determined
automatically. See
Competitive
Driving Mode on page 9-40.
If a malfunction occurs with the
Selective Ride Control system, the
appropriate messages will be
displayed in the DIC. See Ride
Control System Messages on
page 5-38.Cruise Control
With cruise control, the vehicle can
maintain a speed of about 40 km/h
(25 mph) or more without keeping
your foot on the accelerator. Cruise
control does not work at speeds
below 40 km/h (25 mph).
For Z/28 vehicles first sold in
Canada, cruise control does not
work at speeds below 52 km/h
(32 mph).
{Warning
Cruise control can be dangerous
where you cannot drive safely at
a steady speed. Do not use
cruise control on winding roads or
in heavy traffic.
Cruise control can be dangerous
on slippery roads. On such roads,
fast changes in tire traction can
cause excessive wheel slip, and
you could lose control. Do not use
cruise control on slippery roads.
Page 258 of 435
Black plate (57,1)Chevrolet Camaro Owner Manual (GMNA-Localizing-U.S./Canada/Mexico-
7695163) - 2015 - crc - 9/4/14
Driving and Operating 9-57
Towing a trailer requires a certain
amount of experience. The
combination you are driving is
longer and not as responsive as the
vehicle itself. Get acquainted with
the handling and braking of the rig
before setting out for the open road.
Before starting, check all trailer hitch
parts and attachments, safety
chains, electrical connectors, lamps,
tires and mirrors. If the trailer has
electric brakes, start the
combination moving and then apply
the trailer brake controller by hand
to be sure the brakes work.
During the trip, check occasionally
to be sure that the load is secure
and the lamps and any trailer
brakes still work.
Towing with a Stability Control
System
When towing, the sound of the
stability control system might be
heard. The system is reacting to the
vehicle movement caused by thetrailer, which mainly occurs during
cornering. This is normal when
towing heavier trailers.
Following Distance
Stay at least twice as far behind the
vehicle ahead as you would when
driving the vehicle without a trailer.
This can help to avoid situations
that require heavy braking and
sudden turns.
Passing
More passing distance is needed
when towing a trailer. Because the
rig is longer, it is necessary to go
farther beyond the passed vehicle
before returning to the lane.
Backing Up
Hold the bottom of the steering
wheel with one hand. To move the
trailer to the left, move your hand to
the left. To move the trailer to the
right, move your hand to the right.
Always back up slowly and,
if possible, have someone
guide you.
Making Turns
{Caution
Making very sharp turns while
trailering could cause the trailer to
come in contact with the vehicle.
The vehicle could be damaged.
Avoid making very sharp turns
while trailering.
When turning with a trailer, make
wider turns than normal so the
trailer will not strike soft shoulders,
curbs, road signs, trees or other
objects. Use the turn signal well in
advance and avoid jerky or sudden
maneuvers.
Turn Signals When Towing a
Trailer
The turn signal indicators on the
instrument cluster flash whenever
signaling a turn or lane change.
Properly hooked up, the trailer
Page 264 of 435

Black plate (1,1)Chevrolet Camaro Owner Manual (GMNA-Localizing-U.S./Canada/Mexico-
7695163) - 2015 - crc - 9/4/14
Vehicle Care 10-1
Vehicle Care
General Information
General Information . . . . . . . . . . 10-3
California Proposition65 Warning . . . . . . . . . . . . . . . . . 10-3
California Perchlorate Materials Requirements . . . . 10-3
Accessories and Modifications . . . . . . . . . . . . . . . 10-3
Vehicle Checks
Doing Your OwnService Work . . . . . . . . . . . . . . . 10-4
Hood . . . . . . . . . . . . . . . . . . . . . . . . 10-5
Engine Compartment Overview . . . . . . . . . . . . . . . . . . . 10-6
Engine Cover . . . . . . . . . . . . . . . 10-13
Engine Oil . . . . . . . . . . . . . . . . . . 10-15
Engine Oil Life System . . . . . 10-19
Automatic Transmission Fluid . . . . . . . . . . . . . . . . . . . . . . 10-20
Manual Transmission Fluid . . . . . . . . . . . . . . . . . . . . . . 10-21
Hydraulic Clutch . . . . . . . . . . . . 10-21
Engine Air Cleaner/Filter (Except ZL1 and Z/28)) . . . 10-21 Engine Air Cleaner/Filter
(ZL1 Only) . . . . . . . . . . . . . . . . 10-23
Engine Air Cleaner/Filter (Z/ 28 Only) . . . . . . . . . . . . . . . . . . 10-24
Cooling System (Except
ZL1 and Z/28 Engines) . . . . 10-25
Cooling System (ZL1 Engine Only) . . . . . . . . . . . . . . 10-27
Cooling System (Intercooler) . . . . . . . . . . . . . . . 10-28
Cooling System (Z/28 Engine Only) . . . . . . . . . . . . . . 10-29
Engine Coolant . . . . . . . . . . . . . 10-30
Engine Overheating . . . . . . . . 10-35
Power Steering Fluid (L99, LS3, ZL1 and Z/28) . . . . . . . 10-36
Power Steering Fluid (LFX) . . . . . . . . . . . . . . . . 10-36
Washer Fluid . . . . . . . . . . . . . . . 10-37
Brakes . . . . . . . . . . . . . . . . . . . . . 10-38
Brake Fluid . . . . . . . . . . . . . . . . . 10-39
Battery . . . . . . . . . . . . . . . . . . . . . 10-40
Rear Axle . . . . . . . . . . . . . . . . . . 10-41
Starter Switch Check . . . . . . . 10-41
Automatic Transmission Shift Lock Control Function
Check . . . . . . . . . . . . . . . . . . . . . 10-42
Ignition Transmission Lock Check . . . . . . . . . . . . . . . . . . . . . 10-42 Park Brake and P (Park)
Mechanism Check . . . . . . . . 10-42
Wiper Blade Replacement . . . . . . . . . . . . . . 10-43
Windshield Replacement . . . 10-43
Headlamp Aiming
Headlamp Aiming . . . . . . . . . . 10-44
Bulb Replacement
Bulb Replacement . . . . . . . . . . 10-44
Halogen Bulbs . . . . . . . . . . . . . . 10-44
High Intensity Discharge
(HID) Lighting . . . . . . . . . . . . . 10-44
Headlamps, Front Turn Signal and Parking Lamps
(Uplevel Vehicle) . . . . . . . . . . 10-44
Headlamps, Front Turn Signal and Parking Lamps
(Base Vehicle) . . . . . . . . . . . . 10-45
Taillamps, Turn Signal, and Stoplamps . . . . . . . . . . . . . . . . 10-46
License Plate Lamp . . . . . . . . 10-47
Replacement Bulbs . . . . . . . . . 10-47
Electrical System
Electrical System Overload . . . . . . . . . . . . . . . . . . 10-48
Fuses and Circuit Breakers . . . . . . . . . . . . . . . . . . 10-48