2015 CHEVROLET CAMARO warning light
[x] Cancel search: warning lightPage 237 of 435
Black plate (36,1)Chevrolet Camaro Owner Manual (GMNA-Localizing-U.S./Canada/Mexico-
7695163) - 2015 - crc - 9/4/14
9-36 Driving and Operating
together in the middle of the display.
If the lights begin flashing, you have
exceeded the shift point. Shift
immediately.
SeeDriver Information Center (DIC)
on page 5-24 andHead-Up Display
(HUD) on page 5-28.Brakes
Antilock Brake
System (ABS)
This vehicle has ABS, an advanced
electronic braking system that helps
prevent a braking skid.
When the vehicle begins to drive
away, ABS checks itself.
A momentary motor or clicking noise
might be heard while this test is
going on, and it might even be
noticed that the brake pedal moves
a little. This is normal.
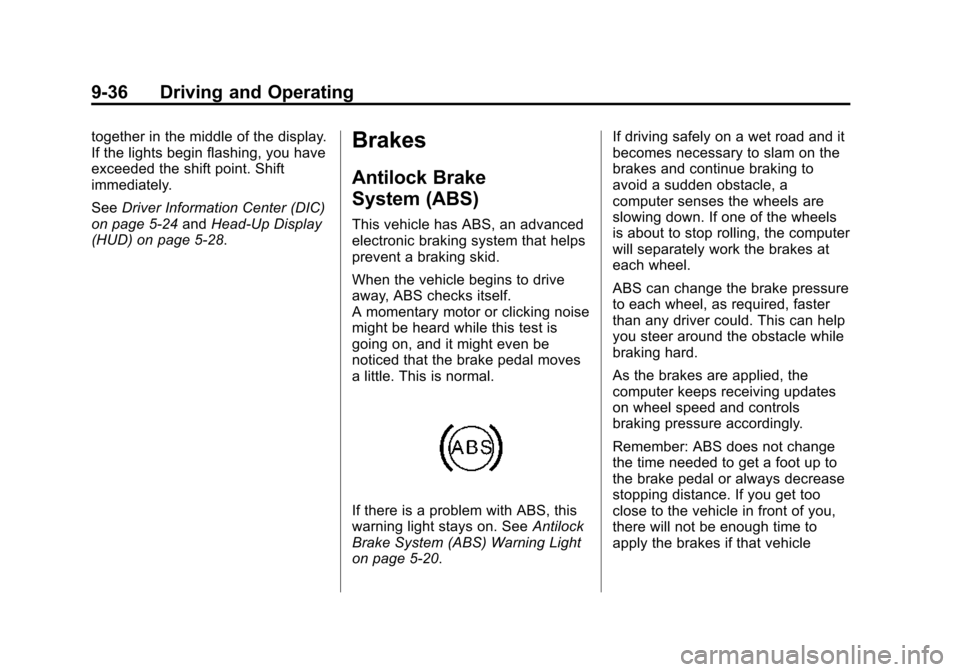
If there is a problem with ABS, this
warning light stays on. See Antilock
Brake System (ABS) Warning Light
on page 5-20. If driving safely on a wet road and it
becomes necessary to slam on the
brakes and continue braking to
avoid a sudden obstacle, a
computer senses the wheels are
slowing down. If one of the wheels
is about to stop rolling, the computer
will separately work the brakes at
each wheel.
ABS can change the brake pressure
to each wheel, as required, faster
than any driver could. This can help
you steer around the obstacle while
braking hard.
As the brakes are applied, the
computer keeps receiving updates
on wheel speed and controls
braking pressure accordingly.
Remember: ABS does not change
the time needed to get a foot up to
the brake pedal or always decrease
stopping distance. If you get too
close to the vehicle in front of you,
there will not be enough time to
apply the brakes if that vehicle
Page 238 of 435
Black plate (37,1)Chevrolet Camaro Owner Manual (GMNA-Localizing-U.S./Canada/Mexico-
7695163) - 2015 - crc - 9/4/14
Driving and Operating 9-37
suddenly slows or stops. Always
leave enough room up ahead to
stop, even with ABS.
Using ABS
Do not pump the brakes. Just hold
the brake pedal down firmly and let
ABS work. You may hear the ABS
pump or motor operating and feel
the brake pedal pulsate. This is
normal.
Braking in Emergencies
ABS allows you to steer and brake
at the same time. In many
emergencies, steering can help
more than even the very best
braking.
Parking Brake
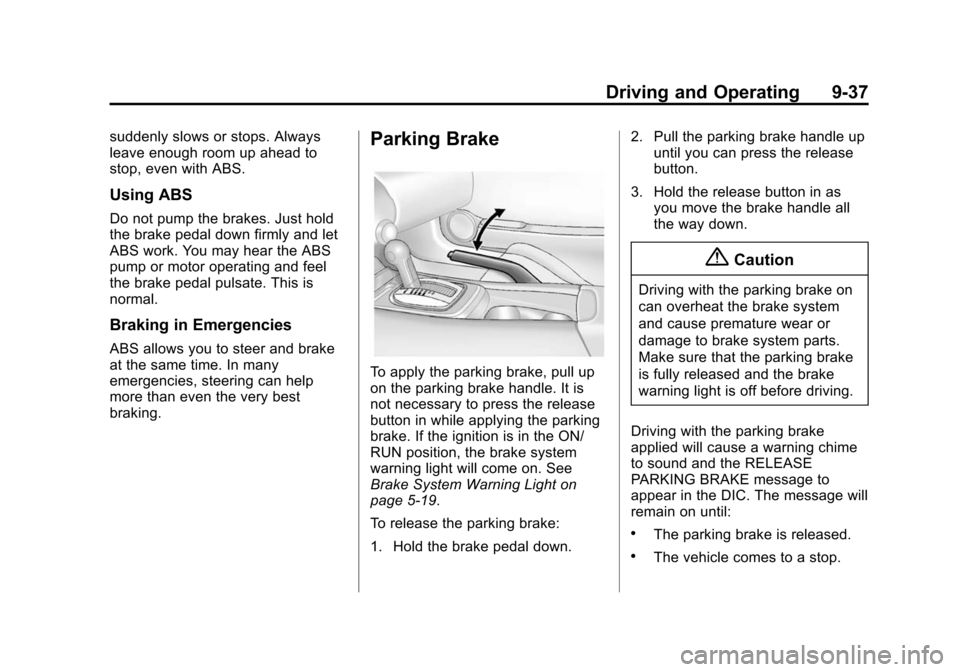
To apply the parking brake, pull up
on the parking brake handle. It is
not necessary to press the release
button in while applying the parking
brake. If the ignition is in the ON/
RUN position, the brake system
warning light will come on. See
Brake System Warning Light on
page 5-19.
To release the parking brake:
1. Hold the brake pedal down.2. Pull the parking brake handle up
until you can press the release
button.
3. Hold the release button in as you move the brake handle all
the way down.
{Caution
Driving with the parking brake on
can overheat the brake system
and cause premature wear or
damage to brake system parts.
Make sure that the parking brake
is fully released and the brake
warning light is off before driving.
Driving with the parking brake
applied will cause a warning chime
to sound and the RELEASE
PARKING BRAKE message to
appear in the DIC. The message will
remain on until:
.The parking brake is released.
.The vehicle comes to a stop.
Page 246 of 435
Black plate (45,1)Chevrolet Camaro Owner Manual (GMNA-Localizing-U.S./Canada/Mexico-
7695163) - 2015 - crc - 9/4/14
Driving and Operating 9-45
SPORT:Use where road conditions
or personal preference demand
more control. The +SPORT button
selects a suspension and EPS
calibration that provides more “feel,”
or response to the road conditions.
The setting can be changed at any
time. Based on road conditions,
steering wheel angle, and the
vehicle speed, the system
automatically adjusts to provide the
best handling while providing a
smooth ride. The Tour and Sport
modes will feel similar on a smooth
road. Select a new setting whenever
driving conditions change. The Selective Ride button indicator
lights will not illuminate when any
PTM mode is selected. When this
mode is selected, pressing the
Selective Ride button will change
the PTM mode and the suspension
setting will be determined
automatically. See
Competitive
Driving Mode on page 9-40.
If a malfunction occurs with the
Selective Ride Control system, the
appropriate messages will be
displayed in the DIC. See Ride
Control System Messages on
page 5-38.Cruise Control
With cruise control, the vehicle can
maintain a speed of about 40 km/h
(25 mph) or more without keeping
your foot on the accelerator. Cruise
control does not work at speeds
below 40 km/h (25 mph).
For Z/28 vehicles first sold in
Canada, cruise control does not
work at speeds below 52 km/h
(32 mph).
{Warning
Cruise control can be dangerous
where you cannot drive safely at
a steady speed. Do not use
cruise control on winding roads or
in heavy traffic.
Cruise control can be dangerous
on slippery roads. On such roads,
fast changes in tire traction can
cause excessive wheel slip, and
you could lose control. Do not use
cruise control on slippery roads.
Page 249 of 435
Black plate (48,1)Chevrolet Camaro Owner Manual (GMNA-Localizing-U.S./Canada/Mexico-
7695163) - 2015 - crc - 9/4/14
9-48 Driving and Operating
Ending Cruise Control
There are four ways to end cruise
control:
.To disengage cruise control,
step lightly on the brake pedal or
clutch. The indicator light on the
instrument cluster goes out.
.Press*.
.Shift the transmission to
N (Neutral).
.To turn off cruise control,
press
1.
Erasing Speed Memory
The cruise control set speed is
erased from memory if
1is pressed
or if the vehicle is turned off.
Driver Assistance
Systems
Parking Assist
If equipped, the Rear Parking Assist
(RPA) system assists the driver with
parking and avoiding objects while
in R (Reverse). RPA operates at
speeds less than 8 km/h (5 mph).
The sensors on the rear bumper
detect objects up to 2.5 m (8 ft)
behind the vehicle, and at least
20 cm (8 in) off the ground. The
distance objects can be detected
may be less during warmer or humid
weather.
{Warning
The parking assist system does
not detect children, pedestrians,
bicyclists, animals, or objects
below the bumper or that are too
close or too far from the vehicle.
It is not available at speeds
(Continued)
Warning (Continued)
greater than 8 km/h (5 mph). To
prevent injury, death, or vehicle
damage, even with parking assist,
always check the area around the
vehicle and check all mirrors
before backing.
How the System Works
RPA comes on automatically when
the shift lever is moved into
R (Reverse). A single beep sounds
to indicate the system is working.
An obstacle detection is indicated
by beeps. The time between the
beeps becomes shorter as the
vehicle gets closer to the obstacle.
When the distance is less than
30 cm (12 in), the beeping is a
continuous beep for five seconds.
Page 256 of 435
Black plate (55,1)Chevrolet Camaro Owner Manual (GMNA-Localizing-U.S./Canada/Mexico-
7695163) - 2015 - crc - 9/4/14
Driving and Operating 9-55
When replacing the fuel cap, turn it
clockwise until it clicks, otherwise
the malfunction indicator lamp may
turn on. The diagnostic system can
determine if the fuel cap has been
left off or improperly installed. This
would allow fuel to evaporate into
the atmosphere. SeeMalfunction
Indicator Lamp on page 5-16.
{Warning
If a fire starts while you are
refueling, do not remove the
nozzle. Shut off the flow of fuel by
shutting off the pump or by
notifying the station attendant.
Leave the area immediately.
{Caution
If a new fuel cap is needed, be
sure to get the right type of cap
from your dealer. The wrong type
of fuel cap may not fit properly,
(Continued)
Caution (Continued)
may cause the malfunction
indicator lamp to light, and could
damage the fuel tank and
emissions system. See
Malfunction Indicator Lamp on
page 5-16.
Filling a Portable Fuel
Container
{Warning
Filling a portable fuel container
while it is in the vehicle can cause
fuel vapors that can ignite either
by static electricity or other
means. You or others could be
badly burned and the vehicle
could be damaged. Always:
.Use approved fuel
containers.(Continued)
Warning (Continued)
.Remove the container from
the vehicle, trunk, or pickup
bed before filling.
.Place the container on the
ground.
.Place the nozzle inside the fill
opening of the container
before dispensing fuel, and
keep it in contact with the fill
opening until filling is
complete.
.Fill the container no more
than 95% full to allow for
expansion.
.Do not smoke, light matches,
or use lighters while
pumping fuel.
.Avoid using cell phones or
other electronic devices.
Page 264 of 435

Black plate (1,1)Chevrolet Camaro Owner Manual (GMNA-Localizing-U.S./Canada/Mexico-
7695163) - 2015 - crc - 9/4/14
Vehicle Care 10-1
Vehicle Care
General Information
General Information . . . . . . . . . . 10-3
California Proposition65 Warning . . . . . . . . . . . . . . . . . 10-3
California Perchlorate Materials Requirements . . . . 10-3
Accessories and Modifications . . . . . . . . . . . . . . . 10-3
Vehicle Checks
Doing Your OwnService Work . . . . . . . . . . . . . . . 10-4
Hood . . . . . . . . . . . . . . . . . . . . . . . . 10-5
Engine Compartment Overview . . . . . . . . . . . . . . . . . . . 10-6
Engine Cover . . . . . . . . . . . . . . . 10-13
Engine Oil . . . . . . . . . . . . . . . . . . 10-15
Engine Oil Life System . . . . . 10-19
Automatic Transmission Fluid . . . . . . . . . . . . . . . . . . . . . . 10-20
Manual Transmission Fluid . . . . . . . . . . . . . . . . . . . . . . 10-21
Hydraulic Clutch . . . . . . . . . . . . 10-21
Engine Air Cleaner/Filter (Except ZL1 and Z/28)) . . . 10-21 Engine Air Cleaner/Filter
(ZL1 Only) . . . . . . . . . . . . . . . . 10-23
Engine Air Cleaner/Filter (Z/ 28 Only) . . . . . . . . . . . . . . . . . . 10-24
Cooling System (Except
ZL1 and Z/28 Engines) . . . . 10-25
Cooling System (ZL1 Engine Only) . . . . . . . . . . . . . . 10-27
Cooling System (Intercooler) . . . . . . . . . . . . . . . 10-28
Cooling System (Z/28 Engine Only) . . . . . . . . . . . . . . 10-29
Engine Coolant . . . . . . . . . . . . . 10-30
Engine Overheating . . . . . . . . 10-35
Power Steering Fluid (L99, LS3, ZL1 and Z/28) . . . . . . . 10-36
Power Steering Fluid (LFX) . . . . . . . . . . . . . . . . 10-36
Washer Fluid . . . . . . . . . . . . . . . 10-37
Brakes . . . . . . . . . . . . . . . . . . . . . 10-38
Brake Fluid . . . . . . . . . . . . . . . . . 10-39
Battery . . . . . . . . . . . . . . . . . . . . . 10-40
Rear Axle . . . . . . . . . . . . . . . . . . 10-41
Starter Switch Check . . . . . . . 10-41
Automatic Transmission Shift Lock Control Function
Check . . . . . . . . . . . . . . . . . . . . . 10-42
Ignition Transmission Lock Check . . . . . . . . . . . . . . . . . . . . . 10-42 Park Brake and P (Park)
Mechanism Check . . . . . . . . 10-42
Wiper Blade Replacement . . . . . . . . . . . . . . 10-43
Windshield Replacement . . . 10-43
Headlamp Aiming
Headlamp Aiming . . . . . . . . . . 10-44
Bulb Replacement
Bulb Replacement . . . . . . . . . . 10-44
Halogen Bulbs . . . . . . . . . . . . . . 10-44
High Intensity Discharge
(HID) Lighting . . . . . . . . . . . . . 10-44
Headlamps, Front Turn Signal and Parking Lamps
(Uplevel Vehicle) . . . . . . . . . . 10-44
Headlamps, Front Turn Signal and Parking Lamps
(Base Vehicle) . . . . . . . . . . . . 10-45
Taillamps, Turn Signal, and Stoplamps . . . . . . . . . . . . . . . . 10-46
License Plate Lamp . . . . . . . . 10-47
Replacement Bulbs . . . . . . . . . 10-47
Electrical System
Electrical System Overload . . . . . . . . . . . . . . . . . . 10-48
Fuses and Circuit Breakers . . . . . . . . . . . . . . . . . . 10-48
Page 285 of 435
Black plate (22,1)Chevrolet Camaro Owner Manual (GMNA-Localizing-U.S./Canada/Mexico-
7695163) - 2015 - crc - 9/4/14
10-22 Vehicle Care
How to Inspect the Engine Air
Cleaner/Filter
To inspect the air cleaner/filter,
remove the filter from the vehicle
and lightly shake the filter to release
loose dust and dirt. If the filter
remains covered with dirt, a new
filter is required.
To inspect or replace the engine air
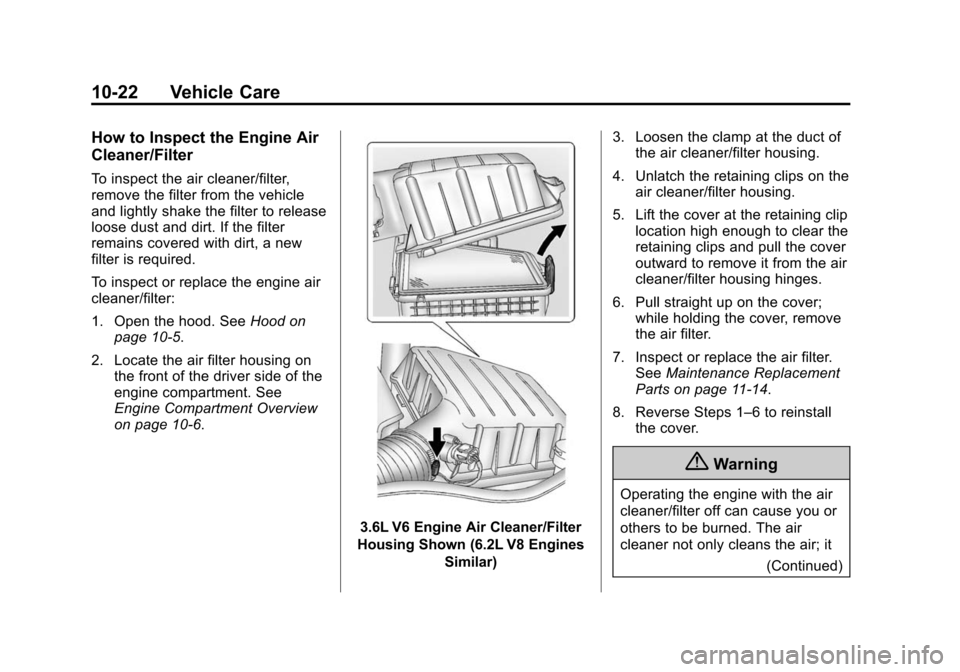
cleaner/filter:
1. Open the hood. SeeHood on
page 10-5.
2. Locate the air filter housing on the front of the driver side of the
engine compartment. See
Engine Compartment Overview
on page 10-6.
3.6L V6 Engine Air Cleaner/Filter
Housing Shown (6.2L V8 Engines Similar) 3. Loosen the clamp at the duct of
the air cleaner/filter housing.
4. Unlatch the retaining clips on the air cleaner/filter housing.
5. Lift the cover at the retaining clip location high enough to clear the
retaining clips and pull the cover
outward to remove it from the air
cleaner/filter housing hinges.
6. Pull straight up on the cover; while holding the cover, remove
the air filter.
7. Inspect or replace the air filter. See Maintenance Replacement
Parts on page 11-14.
8. Reverse Steps 1–6 to reinstall the cover.
{Warning
Operating the engine with the air
cleaner/filter off can cause you or
others to be burned. The air
cleaner not only cleans the air; it
(Continued)
Page 286 of 435
Black plate (23,1)Chevrolet Camaro Owner Manual (GMNA-Localizing-U.S./Canada/Mexico-
7695163) - 2015 - crc - 9/4/14
Vehicle Care 10-23
Warning (Continued)
helps to stop flames if the engine
backfires. Use caution when
working on the engine and do not
drive with the air cleaner/filter off.
{Caution
If the air cleaner/filter is off, dirt
can easily get into the engine,
which could damage it. Always
have the air cleaner/filter in place
when you are driving.
Engine Air Cleaner/Filter
(ZL1 Only)
SeeEngine Compartment Overview
on page 10-6 for the location of the
engine air cleaner/filter.
{Caution
If water is sprayed and enters the
engine air cleaner/filter intake and
housing, the engine could be
damaged. The repairs would not
be covered by the vehicle
warranty.
When to Inspect the Engine Air
Cleaner/Filter
Inspect the air cleaner/filter at the
scheduled maintenance intervals
and replace it at the appropriate
interval. See Maintenance Schedule
on page 11-2 for more information.
If driving in dusty/dirty conditions,
inspect the filter at each engine oil
change.
How to Inspect the Engine Air
Cleaner/Filter
To inspect the air cleaner/filter,
remove the filter from the vehicle
and lightly shake the filter to release loose dust and dirt. If the filter
remains covered with dirt, a new
filter is required.
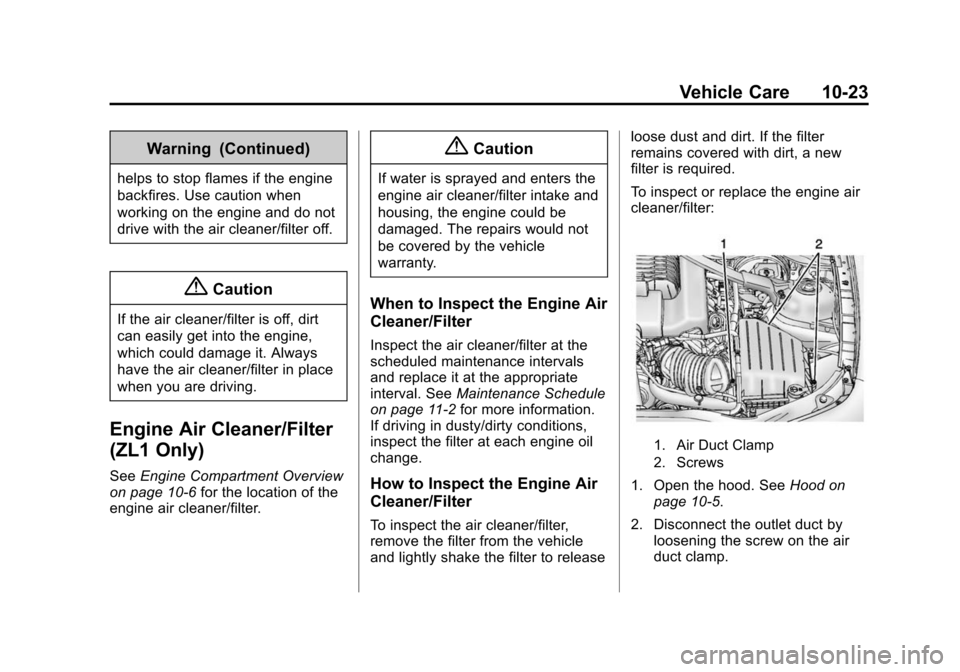
To inspect or replace the engine air
cleaner/filter:
1. Air Duct Clamp
2. Screws
1. Open the hood. See
Hood on
page 10-5.
2. Disconnect the outlet duct by loosening the screw on the air
duct clamp.