2015 CHEVROLET CAMARO lock
[x] Cancel search: lockPage 333 of 435

Black plate (70,1)Chevrolet Camaro Owner Manual (GMNA-Localizing-U.S./Canada/Mexico-
7695163) - 2015 - crc - 9/4/14
10-70 Vehicle Care
A horn chirp confirms that the
sensor identification code has
been matched to this tire and
wheel position.
9. Proceed to the passenger side front tire, and repeat the
procedure in Step 8.
10. Proceed to the passenger side rear tire, and repeat the
procedure in Step 8.
11. Proceed to the driver side rear tire, and repeat the procedure
in Step 8. The horn sounds two
times to indicate the sensor
identification code has been
matched to the driver side rear
tire, and the TPMS sensor
matching process is no longer
active. The TIRE LEARNING
ACTIVE message on the DIC
display screen goes off.
12. Turn the ignition to LOCK/OFF.
13. Set all four tires to the recommended air pressure
level as indicated on the Tire
and Loading Information label.Tire Inspection
We recommend that the tires,
including the spare tire, if the
vehicle has one, be inspected
for signs of wear or damage at
least once a month.
Replace the tire if:
.The indicators at three or
more places around the tire
can be seen.
.There is cord or fabric
showing through the tire's
rubber.
.The tread or sidewall is
cracked, cut, or snagged
deep enough to show cord or
fabric.
.The tire has a bump, bulge,
or split.
.The tire has a puncture, cut,
or other damage that cannot
be repaired well because of
the size or location of the
damage.
Tire Rotation
If the vehicle has non-directional
tires, they should be rotated
every 12 000 km/7,500 mi. See
Maintenance Schedule on
page 11-2.
Tires are rotated to achieve a
uniform wear for all tires. The
first rotation is the most
important.
Anytime unusual wear is
noticed, rotate the tires as soon
as possible, check for proper tire
inflation pressure, and check for
damaged tires or wheels. If the
unusual wear continues after the
rotation, check the wheel
alignment.
Page 337 of 435
Black plate (74,1)Chevrolet Camaro Owner Manual (GMNA-Localizing-U.S./Canada/Mexico-
7695163) - 2015 - crc - 9/4/14
10-74 Vehicle Care
Warning (Continued)
could cause injury or death.
Only your dealer or authorized
tire service center should
mount or dismount the tires.
{Warning
Mixing tires of different sizes,
brands, or types may cause
loss of control of the vehicle,
resulting in a crash or other
vehicle damage. Use the
correct size, brand, and type
of tires on all wheels.
{Warning
Using bias-ply tires on the
vehicle may cause the wheel
rim flanges to develop cracks
(Continued)
Warning (Continued)
after many miles of driving.
A tire and/or wheel could fail
suddenly and cause a crash.
Use only radial-ply tires with
the wheels on the vehicle.
If the vehicle tires must be
replaced with a tire that does not
have a TPC Spec number, make
sure they are the same size,
load range, speed rating, and
construction (radial) as the
original tires.
Vehicles that have a tire
pressure monitoring system
could give an inaccurate
low-pressure warning if non-TPC
Spec rated tires are installed.
See Tire Pressure Monitor
System on page 10-66. The Tire and Loading
Information label indicates the
original equipment tires on the
vehicle. See
Vehicle Load Limits
on page 9-14.
Different Size Tires and
Wheels
If wheels or tires are installed that
are a different size than the original
equipment wheels and tires, vehicle
performance, including its braking,
ride and handling characteristics,
stability, and resistance to rollover
may be affected. If the vehicle has
electronic systems such as antilock
brakes, rollover airbags, traction
control, electronic stability control,
or All-Wheel Drive, the performance
of these systems can also be
affected.
Page 342 of 435

Black plate (79,1)Chevrolet Camaro Owner Manual (GMNA-Localizing-U.S./Canada/Mexico-
7695163) - 2015 - crc - 9/4/14
Vehicle Care 10-79
Warning (Continued)
changing a flat tire. If it is used for
anything else, you or others could
be badly injured or killed if the
vehicle slips off the jack. If a jack
is provided with the vehicle, only
use it for changing a flat tire.
If a tire goes flat, avoid further tire
and wheel damage by driving slowly
to a level place, well off the road,
if possible. Turn on the hazard
warning flashers. See Hazard
Warning Flashers on page 6-4.
{Warning
Changing a tire can be
dangerous. The vehicle can slip
off the jack and roll over or fall
causing injury or death. Find a
level place to change the tire. To
help prevent the vehicle from
moving:
(Continued)
Warning (Continued)
1. Set the parking brake firmly.
2. Put an automatictransmission in P (Park) or a
manual transmission in
1 (First) or R (Reverse).
3. Turn off the engine and do not restart while the vehicle
is raised.
4. Do not allow passengers to remain in the vehicle.
5. Place wheel blocks, if equipped, on both sides of
the tire at the opposite
corner of the tire being
changed.
This vehicle may come with a jack
and spare tire or a tire sealant and
compressor kit. To use the jacking
equipment to change a spare tire
safely, follow the instructions below.
Then see Tire Changing on
page 10-88. To use the tire sealant and compressor kit, see
Tire
Sealant and Compressor Kit on
page 10-80.
When the vehicle has a flat tire (2),
use the following example as a
guide to assist you in the placement
of wheel blocks (1), if equipped.
1. Wheel Block (If Equipped)
2. Flat Tire
The following information explains
how to repair or change a tire.
Page 345 of 435
Black plate (82,1)Chevrolet Camaro Owner Manual (GMNA-Localizing-U.S./Canada/Mexico-
7695163) - 2015 - crc - 9/4/14
10-82 Vehicle Care
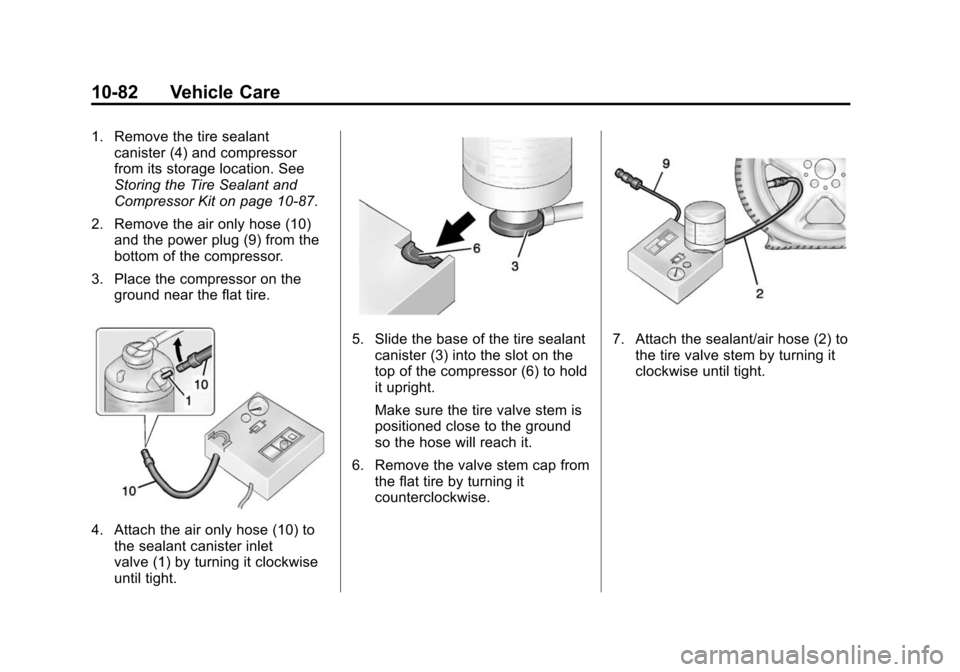
1. Remove the tire sealantcanister (4) and compressor
from its storage location. See
Storing the Tire Sealant and
Compressor Kit on page 10-87.
2. Remove the air only hose (10) and the power plug (9) from the
bottom of the compressor.
3. Place the compressor on the ground near the flat tire.
4. Attach the air only hose (10) tothe sealant canister inlet
valve (1) by turning it clockwise
until tight.
5. Slide the base of the tire sealant
canister (3) into the slot on the
top of the compressor (6) to hold
it upright.
Make sure the tire valve stem is
positioned close to the ground
so the hose will reach it.
6. Remove the valve stem cap from the flat tire by turning it
counterclockwise.7. Attach the sealant/air hose (2) tothe tire valve stem by turning it
clockwise until tight.
Page 347 of 435
Black plate (84,1)Chevrolet Camaro Owner Manual (GMNA-Localizing-U.S./Canada/Mexico-
7695163) - 2015 - crc - 9/4/14
10-84 Vehicle Care
13. Unplug the power plug (9) fromthe accessory power outlet in
the vehicle.
14. Turn the sealant/air hose (2) counterclockwise to remove it
from the tire valve stem.
15. Replace the tire valve stem cap.
16. Remove the tire sealant canister (4) from the slot on top
of the compressor (6).
17. Turn the air only hose (10) counterclockwise to remove it
from the tire sealant canister
inlet valve (1).
18. Turn the sealant/air hose (2) clockwise onto the sealant
canister inlet valve (1) to
prevent sealant leakage.
19. Return the air only hose (10) and power plug (9) back to
their original storage location.
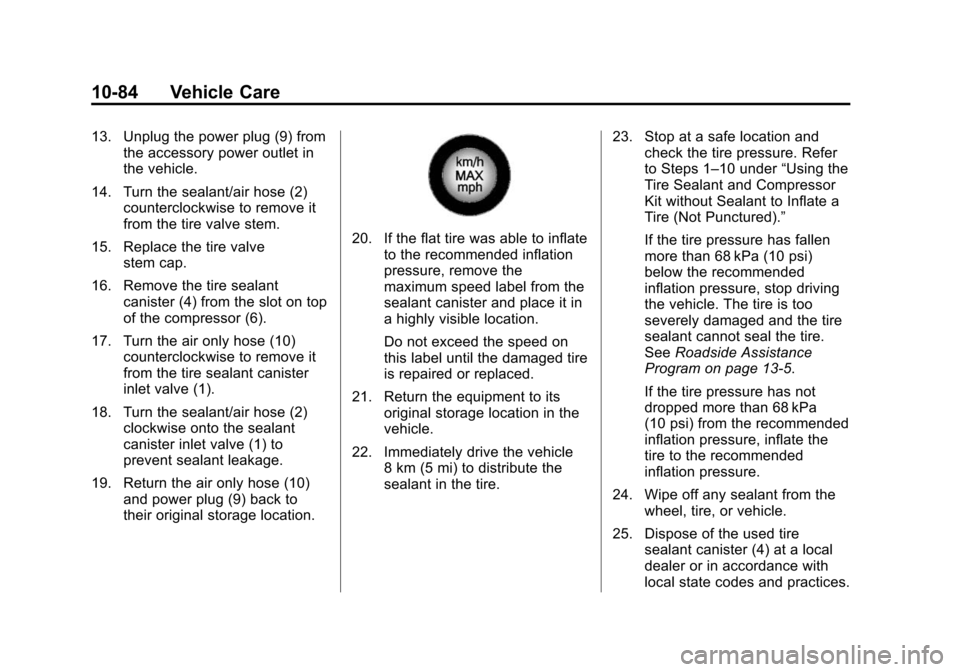
20. If the flat tire was able to inflateto the recommended inflation
pressure, remove the
maximum speed label from the
sealant canister and place it in
a highly visible location.
Do not exceed the speed on
this label until the damaged tire
is repaired or replaced.
21. Return the equipment to its original storage location in the
vehicle.
22. Immediately drive the vehicle 8 km (5 mi) to distribute the
sealant in the tire. 23. Stop at a safe location and
check the tire pressure. Refer
to Steps 1–10 under “Using the
Tire Sealant and Compressor
Kit without Sealant to Inflate a
Tire (Not Punctured).”
If the tire pressure has fallen
more than 68 kPa (10 psi)
below the recommended
inflation pressure, stop driving
the vehicle. The tire is too
severely damaged and the tire
sealant cannot seal the tire.
See Roadside Assistance
Program on page 13-5.
If the tire pressure has not
dropped more than 68 kPa
(10 psi) from the recommended
inflation pressure, inflate the
tire to the recommended
inflation pressure.
24. Wipe off any sealant from the wheel, tire, or vehicle.
25. Dispose of the used tire sealant canister (4) at a local
dealer or in accordance with
local state codes and practices.
Page 349 of 435

Black plate (86,1)Chevrolet Camaro Owner Manual (GMNA-Localizing-U.S./Canada/Mexico-
7695163) - 2015 - crc - 9/4/14
10-86 Vehicle Care
2. Remove the air only hose (10)and the power plug (9) from the
bottom of the compressor.
3. Place the compressor on the ground near the flat tire.
Make sure the tire valve stem is
positioned close to the ground
so the hose will reach it.
4. Remove the valve stem cap from the flat tire by turning it
counterclockwise.
5. Attach the air only hose (10) to the tire valve stem by turning it
clockwise until tight.
6. Plug the power plug (9) into the accessory power outlet in the
vehicle. Unplug all items from
other accessory power outlets.
See Power Outlets on page 5-5.
If the vehicle has an accessory
power outlet, do not use the
cigarette lighter.
If the vehicle only has a cigarette
lighter, use the cigarette lighter. Do not pinch the power plug
cord in the door or window.
7. Start the vehicle. The vehicle must be running while using the
air compressor.
8. Press the on/off button (5) to turn the tire sealant and
compressor kit on.
The compressor will inflate the
tire with air only.
9. Inflate the tire to the recommended inflation pressure
using the pressure gauge (8).
The recommended inflation
pressure can be found on the
Tire and Loading Information
label. See Tire Pressure on
page 10-64.
The pressure gauge (8) may
read higher than the actual tire
pressure while the compressor is
on. Turn the compressor off to
get an accurate pressure
reading. The compressor may
be turned on/off until the correct
pressure is reached.{Caution
If the recommended pressure
cannot be reached after
approximately 25 minutes, the
vehicle should not be driven
farther. The tire is too severely
damaged and the tire sealant and
compressor kit cannot inflate the
tire. Remove the power plug from
the accessory power outlet and
unscrew the inflating hose from
the tire valve. See Roadside
Assistance Program on
page 13-5.
10. Press the on/off button (5) to turn the tire sealant and
compressor kit off.
Be careful while handling the
compressor as it could be
warm after usage.
11. Unplug the power plug (9) from the accessory power outlet in
the vehicle.
Page 350 of 435
Black plate (87,1)Chevrolet Camaro Owner Manual (GMNA-Localizing-U.S./Canada/Mexico-
7695163) - 2015 - crc - 9/4/14
Vehicle Care 10-87
12. Turn the air only hose (10)counterclockwise to remove it
from the tire valve stem.
13. Replace the tire valve stem cap.
14. Return the air only hose (10) and power plug (9) back to
their original storage location.
15. Return the equipment to its original storage location in the
vehicle.
The tire sealant and compressor kit
has accessory adapters located in a
compartment on the bottom of its
housing that can be used to inflate
air mattresses, balls, etc.
Storing the Tire Sealant
and Compressor Kit
The tire sealant and compressor kit
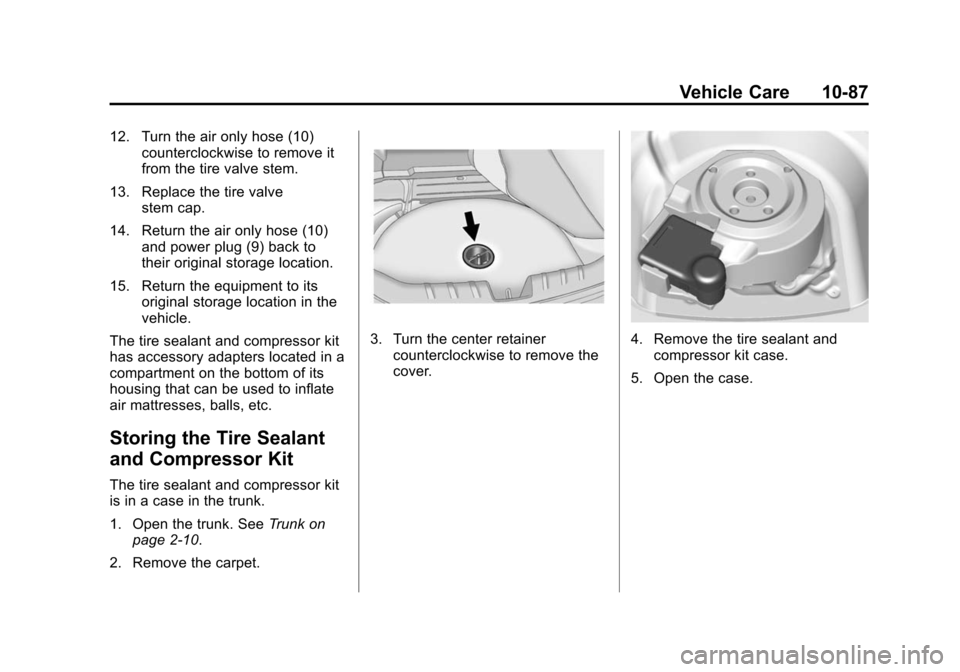
is in a case in the trunk.
1. Open the trunk. See Trunk on
page 2-10.
2. Remove the carpet.
3. Turn the center retainer counterclockwise to remove the
cover.4. Remove the tire sealant andcompressor kit case.
5. Open the case.
Page 351 of 435
Black plate (88,1)Chevrolet Camaro Owner Manual (GMNA-Localizing-U.S./Canada/Mexico-
7695163) - 2015 - crc - 9/4/14
10-88 Vehicle Care
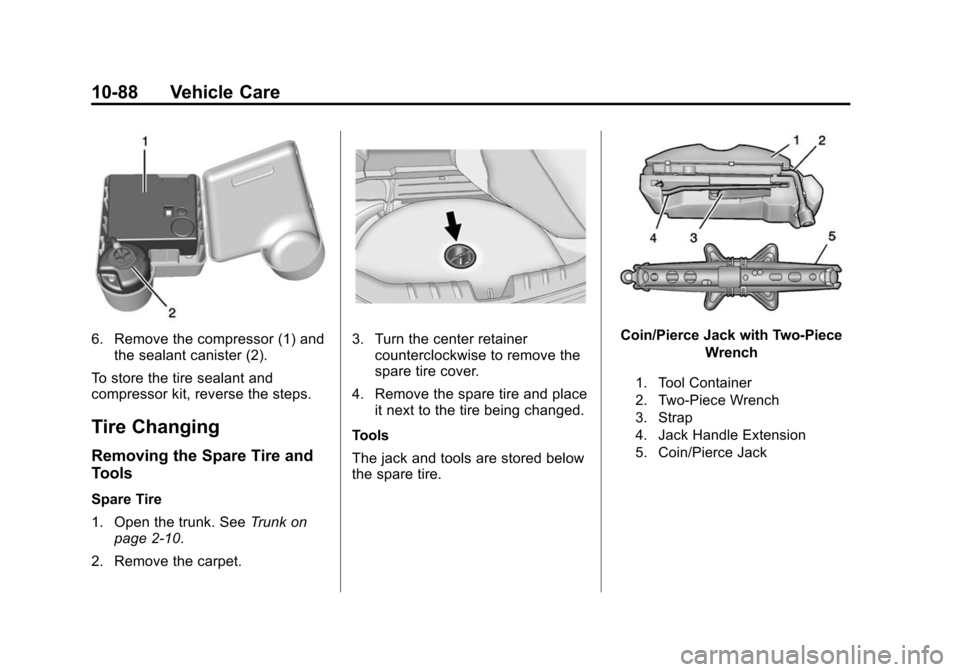
6. Remove the compressor (1) andthe sealant canister (2).
To store the tire sealant and
compressor kit, reverse the steps.
Tire Changing
Removing the Spare Tire and
Tools
Spare Tire
1. Open the trunk. See Trunk on
page 2-10.
2. Remove the carpet.
3. Turn the center retainer counterclockwise to remove the
spare tire cover.
4. Remove the spare tire and place it next to the tire being changed.
Tools
The jack and tools are stored below
the spare tire.Coin/Pierce Jack with Two-Piece Wrench
1. Tool Container
2. Two-Piece Wrench
3. Strap
4. Jack Handle Extension
5. Coin/Pierce Jack