Page 17 of 435

Black plate (10,1)Cadillac Escalade Owner Manual (GMNA-Localizing-U.S./Canada/Mexico-
7063683) - 2015 - crc - 2/24/14
1-10 In Brief
Safety Belts
Refer to the following sections for
important information on how to use
safety belts properly:
.Safety Belts on page 3-16.
.How to Wear Safety Belts
Properly on page 3-17.
.Lap-Shoulder Belt on page 3-18.
.Lower Anchors and Tethers for
Children (LATCH System) on
page 3-46.
Passenger Sensing
System
United States
Canada and Mexico
The passenger sensing system will
turn off the front outboard
passenger frontal airbag under
certain conditions. No other airbag
is affected by the passenger
sensing system. See Passenger
Sensing System on page 3-32 The passenger airbag status
indicator will light on the overhead
console when the vehicle is started.
See
Passenger Airbag Status
Indicator on page 5-16.
Mirror Adjustment
Interior Mirror
Adjustment
Adjust the rearview mirror for a clear
view of the area behind the vehicle.
Automatic Dimming Rearview
Mirror
The mirror automatically dims to
reduce the glare of headlamps from
behind. The dimming feature comes
on when the vehicle is started.
Page 18 of 435

Black plate (11,1)Cadillac Escalade Owner Manual (GMNA-Localizing-U.S./Canada/Mexico-
7063683) - 2015 - crc - 2/24/14
In Brief 1-11
Exterior Mirrors
Power Mirrors
To adjust the mirrors:
1. Press (1) or (2) to select thedriver or passenger side mirror.
2. Press the arrows on the control pad to move each mirror in the
desired direction.
3. Press either (1) or (2) again to deselect the mirror.
See Power Mirrors on page 2-22. Power Folding Mirrors
The vehicle has power folding
mirrors. To adjust:
1. Press
{to fold the mirrors
inward.
2. Press
{again to return the
mirrors to the driving position.
Heated Mirrors
Press
1to heat the outside
mirrors. See
“Rear Window Defogger” under
Dual Automatic Climate Control
System on page 8-1.
Reverse Tilt Mirrors
If the vehicle has the memory
package, the exterior mirrors tilt to a
preselected position when the
vehicle is in R (Reverse). This
feature lets the driver view the curb
when parallel parking. The mirrors
return to the original position when
the vehicle is shifted out of
R (Reverse), or the ignition is
turned off.
This feature can be programed
through the Driver Information
Center (DIC). See Vehicle
Personalization on page 5-45.
Page 19 of 435
Black plate (12,1)Cadillac Escalade Owner Manual (GMNA-Localizing-U.S./Canada/Mexico-
7063683) - 2015 - crc - 2/24/14
1-12 In Brief
Steering Wheel
Adjustment
To adjust the power tilt and
telescoping steering wheel,
if equipped:
Press the control to move the
steering wheel up and down or
forward and rearward.
Do not adjust the steering wheel
while driving.
Throttle and Brake Pedal
Adjustment
If equipped, the position of the
throttle and brake pedals can be
changed.
The switch used to adjust the
pedals is on the center stack, to the
left of the touch screen.
Press the top of the switch to move
the pedals closer to your body.
Press the bottom of the switch to
move the pedals away.See
Adjustable Throttle and Brake
Pedal on page 9-19.
The vehicle may have a memory
function, which lets pedal settings
be saved and recalled. See Memory
Seats on page 3-5.
Interior Lighting
Dome Lamps
There are dome lamps in the
overhead console and the headliner,
if equipped.
Page 20 of 435

Black plate (13,1)Cadillac Escalade Owner Manual (GMNA-Localizing-U.S./Canada/Mexico-
7063683) - 2015 - crc - 2/24/14
In Brief 1-13
To change the dome lamp settings,
press the following:
OFF:Turns the lamps off, even
when a door is open.
DOOR: The lamps come on
automatically when a door is
opened.
ON: Turns all dome lamps on.
Reading Lamps
There are reading lamps in the
overhead console and the headliner,
if equipped. To operate, the ignition must be in the ACC/ACCESSORY
or ON/RUN position or using
Retained Accessory Power (RAP).
Pressmornnext to each reading
lamp to turn it on or off.
For more information about interior
lighting, see Instrument Panel
Illumination Control on page 6-7.
Exterior Lighting
The exterior lamp control is on the
instrument panel to the left of the
steering wheel.
P: Turns off the automatic
headlamps and Daytime Running
Lamps (DRL). Turning the headlamp
control to the off position again will
turn the automatic headlamps and
DRL back on.
For vehicles first sold in Canada,
the off position only works when the
vehicle is shifted into the P (Park)
position.
AUTO: Automatically turns the
exterior lamps on and off,
depending on outside lighting.
Page 21 of 435

Black plate (14,1)Cadillac Escalade Owner Manual (GMNA-Localizing-U.S./Canada/Mexico-
7063683) - 2015 - crc - 2/24/14
1-14 In Brief
;:Turns on the parking lamps
including all lamps, except the
headlamps.
5: Turns on the headlamps
together with the parking lamps and
instrument panel lights.
See:
.Exterior Lamp Controls on
page 6-1
.Daytime Running Lamps (DRL)
on page 6-4
.Automatic Headlamp System on
page 6-4
Windshield Wiper/Washer
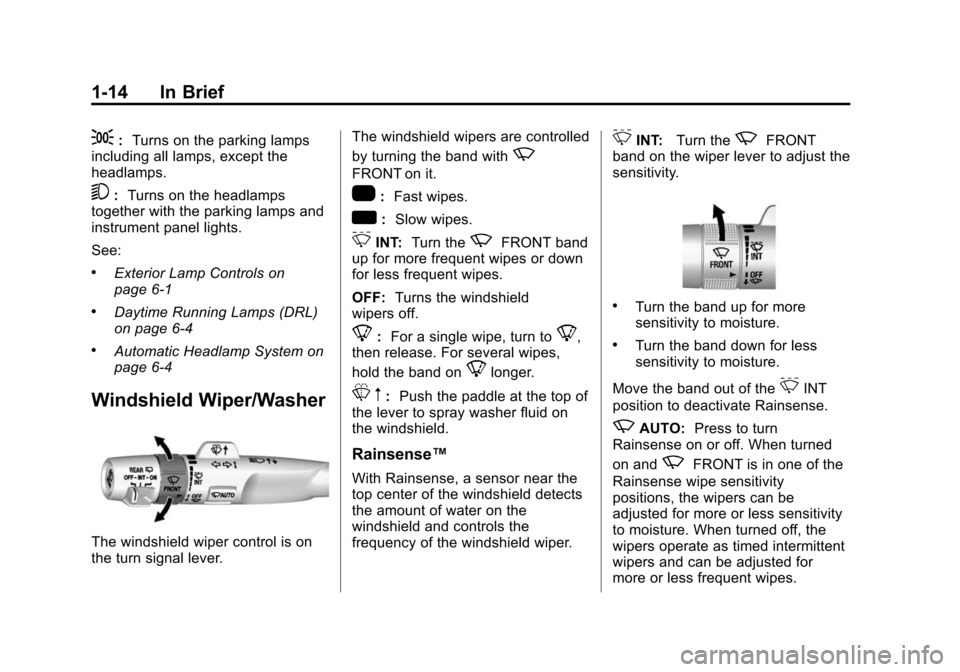
The windshield wiper control is on
the turn signal lever. The windshield wipers are controlled
by turning the band with
z
FRONT on it.
1:
Fast wipes.
w:Slow wipes.
3INT: Turn thezFRONT band
up for more frequent wipes or down
for less frequent wipes.
OFF: Turns the windshield
wipers off.
8: For a single wipe, turn to8,
then release. For several wipes,
hold the band on
8longer.
L m:Push the paddle at the top of
the lever to spray washer fluid on
the windshield.
Rainsense™
With Rainsense, a sensor near the
top center of the windshield detects
the amount of water on the
windshield and controls the
frequency of the windshield wiper.
3INT: Turn thezFRONT
band on the wiper lever to adjust the
sensitivity.
.Turn the band up for more
sensitivity to moisture.
.Turn the band down for less
sensitivity to moisture.
Move the band out of the
3INT
position to deactivate Rainsense.
zAUTO: Press to turn
Rainsense on or off. When turned
on and
zFRONT is in one of the
Rainsense wipe sensitivity
positions, the wipers can be
adjusted for more or less sensitivity
to moisture. When turned off, the
wipers operate as timed intermittent
wipers and can be adjusted for
more or less frequent wipes.
Page 22 of 435

Black plate (15,1)Cadillac Escalade Owner Manual (GMNA-Localizing-U.S./Canada/Mexico-
7063683) - 2015 - crc - 2/24/14
In Brief 1-15
SeeWindshield Wiper/Washer on
page 5-3.
Climate Controls
The climate control buttons and the
touch screen are used to adjust the
heating, cooling, and ventilation.
Climate Control Buttons
1. Driver and Passenger Temperature Controls
2. Fan Control
3. OFF (Fan) 4. Driver and Passenger Heated
and Cooled Seats (If Equipped)
5. AUTO (Automatic Operation)
6. Defrost
7. Rear Window Defogger
8. RecirculationClimate Touch Screen Controls
1. Outside Temperature Display
2. Driver and Passenger Temperature Controls
3. Fan Control 4. SYNC (Synchronized
Temperature)
5. A/C Mode (Air Conditioning)
6. Climate Control Selection (Application Tray Button)
7. Rear (Rear Climate Control Touch Screen)
8. Air Delivery Mode Control
See Dual Automatic Climate Control
System on page 8-1 andRear
Climate Control System on page 8-6
(If Equipped).
Transmission
Range Selection Mode
The Range Selection Mode switch,
if equipped, is located on the shift
lever.
Page 23 of 435

Black plate (16,1)Cadillac Escalade Owner Manual (GMNA-Localizing-U.S./Canada/Mexico-
7063683) - 2015 - crc - 2/24/14
1-16 In Brief
1. To enable the Range Selectionfeature, move the shift lever to
the M (Manual Mode) position.
The current range will appear
next to the M. This is the highest
attainable range with all lower
gears accessible. As an
example, when 5 (Fifth) gear is
selected, 1 (First) through
5 (Fifth) gears are available.
2. Press the plus/minus buttons on the shift lever to select the
desired range of gears for
current driving conditions. See
Manual Mode on page 9-30.
While using Range Selection Mode,
cruise control and the Tow/Haul
Mode can be used.
Grade Braking is not available when
Range Selection Mode is active.
See Tow/Haul Mode on page 9-31.
Four-Wheel Drive
If the vehicle has Four-Wheel Drive,
you can send the engine's driving
power to all four wheels for extra
traction.
Automatic Transfer Case
Single Speed Automatic
Transfer Case
The transfer case knob is to the left
of the instrument cluster. Use this
knob to shift into and out of the
different Four-Wheel Drive modes.
2
m: This setting is used for driving
in most street and highway
situations.
AUTO: This setting is ideal for use
when road surface traction
conditions are variable. Do not use AUTO mode to park on
a steep grade with poor traction
such as ice, snow, mud, or gravel.
In AUTO mode only the rear wheels
will hold the vehicle from sliding
when parked. If parking on a steep
grade, use 4
mto keep all four
wheels engaged.
4
m: Use the Four-Wheel Drive
High position when extra traction is
needed, such as on snowy or icy
roads or in most off-road situations.
See Four-Wheel Drive on
page 9-32.
Page 24 of 435

Black plate (17,1)Cadillac Escalade Owner Manual (GMNA-Localizing-U.S./Canada/Mexico-
7063683) - 2015 - crc - 2/24/14
In Brief 1-17
Vehicle Features
Infotainment System
See the infotainment manual for
information on the radio, audio
players, phone, navigation system,
and voice or speech recognition.
It also includes information on
settings.
Steering Wheel Controls
The infotainment system can be
operated by using the steering
wheel controls. See "Steering
Wheel Controls" in the infotainment
manual.
Cruise Control
J:Press to turn the system on
and off. A white indicator appears in
the instrument cluster when cruise
is turned on.
+RES : If there is a set speed in
memory, press the control up briefly
to resume that speed or press and
hold to accelerate. If the cruise
control is already active, use to
increase vehicle speed. SET−
:Press the control down
briefly to set the speed and activate
cruise control. If the cruise control is
already active, use to decrease
vehicle speed.
*: Press to disengage cruise
control without erasing the set
speed from memory.
See Cruise Control on page 9-41 or
Adaptive Cruise Control on
page 9-44 (if equipped).
Driver Information
Center (DIC)
The DIC display is in the instrument
cluster. It shows the status of many
vehicle systems.