Page 9 of 20

9
Infotainment System
Setting the Time
1. Touch Settings on the home page.
2. Touch Time and Date.
3. Touch Set Time.
4. Touch the arrows to adjust the hours, minutes and AM or PM.
5. Touch ◄BACK to exit the menu.
Storing Favorites
Up to 60 radio stations from all bands (AM, FM or XMF), media (song, artist, album, etc.), phone contacts and navigation destina-tionsF can be stored in any order.
1. Display the desired radio station, media favorite, contact or destination.
2. Touch the Interaction Selector at the bottom of the screen to display the favorite screen buttons.
3. Touch and hold one of the favorite screen buttons until a beep is heard.
4. Repeat the steps to store another favorite item.
Note: To change the number of favorites displayed, go to Radio in the Vehicle Settings menu.
Portable Audio Devices – MEDIA
An accessory power outlet, 3.5-mm auxiliary input jack, an SD card slot and two USB ports are located in the center console.
An iPod®, iPhone®, MP3 Player, a USB flash drive or a USB mass storage device can be connected to the USB port. Search for music on-screen or by voice commands.
Press the MEDIA button to select a
portable device as the audio source.
Note: Connect an iPod/iPhone USB cord after starting the vehicle for optimum performance.
See your Infotainment System Owner Manual.
F Optional equipment
Page 10 of 20

10
IntelliLink System
IntelliLink uses a Bluetooth or USB connection to link to a compatible device, such as a smartphone, cell phone, USB flash drive or portable audio player/iPod®. IntelliLink enables streaming audio through a smartphone and hands-free voice control. For a\
ssistance with the IntelliLink system, contact Customer Assistance at 1-855-4-SUPPORT (\
1-855-478-7767) go to www.buick.com and click the Owners link.
Natural Voice Recognition
Control the music source and make phone calls hands-free (after pairing\
your Bluetooth-enabled phone) using the natural voice recognition system.
1. Press the Push to Talk button on the steering wheel.
2. The radio will say “Command please,” followed by a beep.
3. After the beep, say what you want it to do.
• Phone (using your paired phone):
Example command: “Call Amanda” or “Dial 555-1212”
• Media Music Device Search (when connected to USB only):
Example command: “Play artist [name]” or “Play song [name]”
• Radio control:
Example command: “Tune FM 104.3” or “Tune XM Classic Vinyl”
• Help:
Say “Help” for voice recognition assistance
PANDORA® Internet Radio
Listen to personalized radio stations based on favorite artists or genres.
Download the Pandora app to your smartphone. Restart the smartphone and \
sign in to Pandora.
Create a station on your phone to listen to a customized song list in the vehicle.
Connect your smartphone/device to the system by Bluetooth or, for Apple devices, by a USB cable.
Touch the Pandora icon on the touch screen to access Pandora. A slight delay may occur when loading a song or changing a station.
SiriusXM™ Satellite RadioF (Subscription required)
SiriusXM provides access to over 180 channels of commercial-free music, sports, talk, entertainment, comedy and weather using the radio controls or voice comm\
ands.
• XM Tune Select finds your favorite artists or songs on all XM stations and alerts you.
• XM Travel Link includes fuel locations and prices, weather, and movies with theater locations. Additional subscription fee required.
See your Infotainment System Owner Manual.
F Optional equipment
Page 11 of 20

11
Audio Steering Wheel Controls
+ – Volume
Press up or down to adjust the volume.
Next/Previous
Press or to go to the next or
previous radio station or track.
Push to Talk
Press to answer an incoming call or to interact with the audio, Bluetooth, navigationF or OnStar® system.
End Call/Mute
Press to end or reject a call.
Press to mute the vehicle speakers.
See your Infotainment System Owner Manual.
Bluetooth® System
Before using a Bluetooth-enabled device in the vehicle, it must be paired with the in-vehicle Bluetooth system. Not all devices will support all functions. The pairing process is disabled when the vehicle is moving. For more information, visit www.gmtotalconnect.com.
Pair a Phone
1. To use voice recognition, press the Push to Talk button; after the beep, say “Pair Phone,” or
Use the MENU knob or the touch screen to select the Phone icon > Phones > Pair Device.
2. Start the pairing process on the phone. Locate your vehicle name or IntelliLink on the phone.
3. Enter the four-digit code that appears on the touch screen into the phone or, if a six-digit code appears on the phone, confirm it on the touch screen.
4. If your phone prompts you to accept the connection or phone book download, click “yes” and always allow.
Streaming Audio
With a paired device connected via Bluetooth, press the MEDIA button and select Bluetooth Audio to stream audio from the device. Control audio operation\
using the device controls.
See your Infotainment System Owner Manual.
F Optional equipment
Page 12 of 20

12
Refer to your Owner Manual for important safety information about using \
the infotainment system while driving.
Touch the Navigation icon on the home page to access the navigation functions.
Entering a Destination
Destinations can be entered by Voice Recognition, Address, Recent Destin\
ation, Contacts and Places of Interest (POI).
To enter a destination using the single line destination feature:
1. Touch Navigation on the home page.
2. Touch Destination.
3. To enter a specific address, touch Address and type the address,
intersection or road.
4. Touch Go.
5. Select the desired name from the generated list.
6. Touch Go.
To enter a destination using voice recognition:
1. Press the Push to Talk button.
2. Say “Destination” to enter specific
destination information.
3. Say the address or other destination
information.
See your Infotainment System Owner Manual.
Navigation SystemF
F Optional equipment
OnStar® with 4G LTEF
Use the OnStar 4G LTE connection to stream data to your personal mobile devices. Up to seven compatible devices (smartphones, tablets and lap tops) can be connected to high-speed Internet through the vehicle’s built-in Wi-Fi® hotspot.
Go to onstar.com or call 1-888-4-ONSTAR (1-888-466-7827) for assistance.
Note: See onstar.com for a detailed instruction guide, vehicle availability, details, and system limita-tions. Services and apps vary by make, model, year, carrier, availabilit\
y, and conditions. 4G LTE service is available in select markets. 4G LTE performance is based on industry averages and \
vehicle systems design. Some services require a data plan.
See your Infotainment System Owner Manual.
Page 13 of 20
13
The Driver Information Center (DIC) on the instrument cluster displays a variety of vehicle system information and warning messages.
Driver Information Center
Menu Items
Use the controls on the right side of the steering wheel to view the Info (includes the trip odometers and fuel information), GSF, Audio, Phone, Navigation, and Settings menus.
Press the or button to move between the display zones.
Press the or button to move through the displayed menu or submenu.
Press the button to open a menu or select/deselect a setting.
Reset an Item
1. Use the controls to display the item.
2. Use the controls to display the Reset option.
3. Press the button to reset or clear the item.
Reconfigurable Instrument Cluster
1. Use the controls to display the Settings menu.
2. Select Display Theme.
3. Select the desired cluster theme.
See Instruments and Controls in your Owner Manual.
F Optional equipment
Page 14 of 20

14
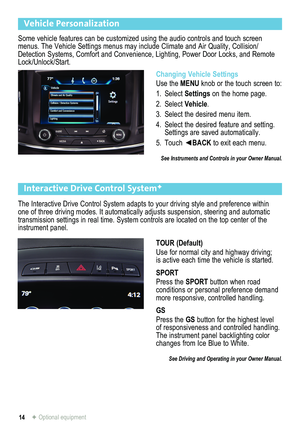
The Interactive Drive Control System adapts to your driving style and pr\
eference within one of three driving modes. It automatically adjusts suspension, steering and automatic transmission settings in real time. System controls are located on the top center of \
the instrument panel.
Interactive Drive Control SystemF
F Optional equipment
TOUR (Default)
Use for normal city and highway driving; is active each time the vehicle is started.
SPORT
Press the SPORT button when road
conditions or personal preference demand more responsive, controlled handling.
GS
Press the GS button for the highest level of responsiveness and controlled handling. The instrument panel backlighting color changes from Ice Blue to White.
See Driving and Operating in your Owner Manual.
Some vehicle features can be customized using the audio controls and touch screen menus. The Vehicle Settings menus may include Climate and Air Quality, Collision/Detection Systems, Comfort and Convenience, Lighting, Power Door Locks, \
and Remote Lock/Unlock/Start.
Vehicle Personalization
Changing Vehicle Settings
Use the MENU knob or the touch screen to:
1. Select Settings on the home page.
2. Select Vehicle.
3. Select the desired menu item.
4. Select the desired feature and setting. Settings are saved automatically.
5. Touch ◄BACK to exit each menu.
See Instruments and Controls in your Owner Manual.
Page 15 of 20

15
Cruise Control
Adjusting Cruise Control
RES+ Resume/Accelerate
Press up to resume a set speed. When the system is active, press up to i\
ncrease speed.
SET– Set/Coast
When the system is active, press down to decrease speed.
Follow Distance Gap (Adaptive Cruise ControlF only)
Press to select a setting of Far, Medium, or Near.
Cancel
Press to cancel the cruise control without erasing the set speed from me\
mory.
Pressing the brake pedal also will cancel the cruise control.
The cruise control set speed is erased when cruise control or the vehicl\
e ignition is turned off.
See Driving and Operating in your Owner Manual.
Setting Cruise Control
1. Press the On/Off button (or button if equipped with Adaptive Cruise ControlF). The Cruise Control symbol will illuminate in white on the instrument cluster.
2. When traveling at the desired speed, press the switch down to the SET–
position to set the speed. The symbol will illuminate in green on the instrument cluster.
Sunroof
Express Open/Close
Fully press the rear of the switch to express open the sunroof. Gently press and hold the switch to partially open the sunroof.
Fully press the front of the switch to express close the sunroof. Gently press and hold the switch to partially close the sunroof.
Tilt/Close
Press the rear of the switch to tilt the sunroof.
Press the front of the switch to close the sunroof.
See Keys, Doors and Windows in your Owner Manual.
F Optional equipment
Page 16 of 20

16
Automatic Transmission
StabiliTrak®/Traction Control Systems
The traction control system limits wheelspin and the StabiliTrak electro\
nic stability control system assists with directional control of the vehicle in difficult driving conditions. Both
systems turn on automatically every time the vehicle is started.
Driver Shift Control
Driver Shift Control allows the driver to shift gears manually. This feature can be used to drive the vehicle in a sportier manner or to downshift when driving on a\
downhill grade to provide engine braking.
Move the shift lever to the left of the Drive (D) position. Tap the shift lever forward (+) to upshift or rearward to downshift (–). The currently selected gear will be displayed on the instrument cluster.
If vehicle speed is too high or too low for the requested gear, the shift will not occur. When coming to a stop, the transmission will automatically downshift.
See Driving and Operating in your Owner Manual.
Turning Off Traction Control
Turn off traction control if the vehicle is stuck and rocking the vehicle is required.
Press the StabiliTrak/Traction Control button on the top center of the instrument panel to turn the system on/off. The Traction Control Off light will illuminate on the instrument cluster when the system is off.
See Driving and Operating in your Owner Manual.
Electric Parking Brake
To apply the parking brake, pull up the Parking Brake switch by the shift lever.
To release the parking brake, turn on the ignition, press the brake pedal and press down the Parking Brake switch.
See Driving and Operating in your Owner Manual.


 on the instrument cluster displays a variety of vehicle system information and warning messages.
Driver Information Center
Menu Items
Use the controls on the rig")