2015 BMW I8 low beam
[x] Cancel search: low beamPage 30 of 224

CockpitVehicle features and options
This chapter describes all standard, country-
specific and optional features offered with the
series. It also describes features that are not
necessarily available in your car, e. g., due tothe selected options or country versions. This
also applies to safety-related functions and
systems. The respectively applicable country
provisions must be observed when using the
respective features and systems.
All around the steering wheel
1Open the tailgate 442Power windows 493Exterior mirror operation 544Open fuel filler flap,
Tank vent 1585Lock, unlock vehicle 446Opening the door 447LightsParking lights 92Low beams 92Automatic headlight con‐
trol 93
Daytime running lights 93
High-beam Assistant 94Instrument lighting 958Left steering column stalkSeite 14At a glanceCockpit14
Online Edition for Part no. 01 40 2 960 891 - II/15
Page 77 of 224
DrivingVehicle features and options
This chapter describes all standard, country-
specific and optional features offered with the
series. It also describes features that are not
necessarily available in your car, e. g., due to
the selected options or country versions. This
also applies to safety-related functions and
systems. The respectively applicable country
provisions must be observed when using the
respective features and systems.
Start/Stop button, drive readiness
The concept The following ready states can
be attained by pressing the
Start/Stop button:▷Radio ready state on/off.▷Operating readiness on/off.▷Activating/deactivating drive readiness.
To activate drive readiness, press the brake
pedal.
Switching radio-ready state on/off
The radio-ready state is activated by pressing
the Start/Stop button in the following situa‐
tions:
▷When the engine is running.▷When drive readiness is activated.
Some electronic systems/power consumers
remain ready for operation.
The radio-ready state is switched off automati‐
cally:
▷After approx. 8 minutes.▷When the vehicle is locked using the cen‐
tral locking system.▷Shortly before the battery is discharged
completely, so that drive readiness is
maintained.
The radio-ready state remains active if, e.g.,
the operating readiness is automatically
switched off for the following reasons:
▷Opening or closing the driver's door.▷Unfastening of the driver's safety belt.▷When automatically switching from low
beams to parking lights.
Operating readiness on
The switched on operating readiness corre‐
sponds to the switched on ignition for conven‐
tional vehicles.
Press the Start/Stop button, and do not press
on the brake pedal at the same time.
All vehicle systems are ready for operation.
Most of the indicator and warning lights in the
instrument cluster light up for a varied length
of time.
To save battery power when the engine is off,
switch off operating readiness and any unnec‐
essary electronic systems/power consumers.
Operating readiness is switched off automati‐
cally in the following situations:
▷When locking the vehicle, even if the low
beams are activated.▷Shortly before the battery is discharged
completely, so that drive readiness is
maintained.
Note
If the engine is switched off and operating
readiness is switched on, the system automati‐
cally switches to the radio-ready state when
the door is opened if the lights are turned off
or, if correspondingly equipped, the daytime
running lights are activated.
Seite 61DrivingControls61
Online Edition for Part no. 01 40 2 960 891 - II/15
Page 78 of 224
Operating readiness offPress the Start/Stop button again without
stepping on the brake.
All indicator lights in the instrument cluster go
out.
To save battery power when the engine is off,
switch off operating readiness and any unnec‐
essary electronic systems/power consumers.
Operating readiness is switched off automati‐
cally in the following situations while the vehi‐
cle is stationary and the engine is off:▷When locking the vehicle, and when the
low beams are activated.▷Shortly before the battery is discharged
completely, so that drive readiness is
maintained. This function is only available
when the low beams are turned off.▷When opening or closing the driver door, if
the driver's safety belt is unbuckled and
the low beams are turned off.▷While the driver's safety belt is unbuckled
with driver's door open and low beams off.
The low beams switch to parking lights after
approx. 15 minutes of no use.
Selector lever position P is automatically en‐
gaged when operating readiness is switched
off. In order for the vehicle to be able to roll,
e.g. into a car wash, heed the information re‐
garding washing in automatic car washes, refer
to page 187.
Drive readiness
When drive readiness is activated, the vehicle
is operational. Activated drive readiness is the
equivalent of a running engine in conventional
vehicles. Deactivated engine readiness is
equivalent to switching the ignition off.
Selector lever position P is automatically en‐
gaged when drive readiness is switched off. In
order for the vehicle to be able to roll, e.g. into
a car wash, heed the information regarding
washing in automatic car washes, refer to
page 187.
Drive readiness in detail
The concept The following are the different drive readiness
variants:▷Electric drive readiness, Silent Start, refer
to page 63.
The vehicle is powered by the electric mo‐
tor.▷Starting the combustion engine, refer to
page 63.
The vehicle is powered by the combustion
engine.
Hints
Do not leave the vehicle unattended
Do not leave the vehicle unattended with
drive readiness active; otherwise, it may pose a
risk.◀
Awareness of vehicle reduced when
driven in electric mode
When driving in electric mode, note that due to
the lack of engine noise pedestrians and other traffic might pay less attention to the vehicle
due to missing engine noises. Please take spe‐
cial care when parking or leaving a parking
space.◀
Display on the Start/Stop buttonGeneral information Drive readiness is also displayed
through light indicators on the
Start/Stop button.
Lighting pulses orange
▷After unlocking and opening the door.▷After switching off drive readiness.
When the brake pedal is depressed, the light‐
ing becomes more intense.
Seite 62ControlsDriving62
Online Edition for Part no. 01 40 2 960 891 - II/15
Page 83 of 224
If the vehicle is slowed down down to a speed
of approx. 2 mph/3 km/h the parking brake is
set.
Releasing
With drive readiness switched on:
Press the reel while stepping on the
brake pedal or selector lever position P is
set.
The LED and indicator lamp go out.
The parking brake is released.
Automatic release For automatic release, step on the accelerator
pedal.
The LED and indicator lamp go out.
The parking brake is automatically released
when you step on the accelerator:▷Drive readiness switched on.▷Drive mode engaged.▷Driver buckled in and doors closed.
Inadvertent operation of the accelerator
pedal
Make sure that the accelerator pedal is not op‐
erated unintentionally; otherwise, the vehicle is
set in motion and there is a risk of an acci‐
dent.◀
Malfunction In the event of a failure or malfunction of the
parking brake, secure the vehicle against roll‐
ing using a wheel chock, e.g., when leaving it.
After a power failure
Putting the parking brake into
operation
1.Switch on the ignition.2. Press the reel while stepping on the
brake pedal or selector lever position P is
set.
It may take several seconds for the brake to be
put into operation. Any sounds associated with
this are normal.
The indicator lamp in the instrument
cluster goes out as soon as the parking
brake is ready for operation.
Turn signal, high beams,
headlight flasher
Turn signal
Hints Do not adjust the exterior mirrors
Do not adjust the exterior mirror while
driving and when turn signals/hazard warning
flashers are on, or else the additional turn sig‐
nal lights in the exterior mirror are out of posi‐
tion and can't be seen.◀
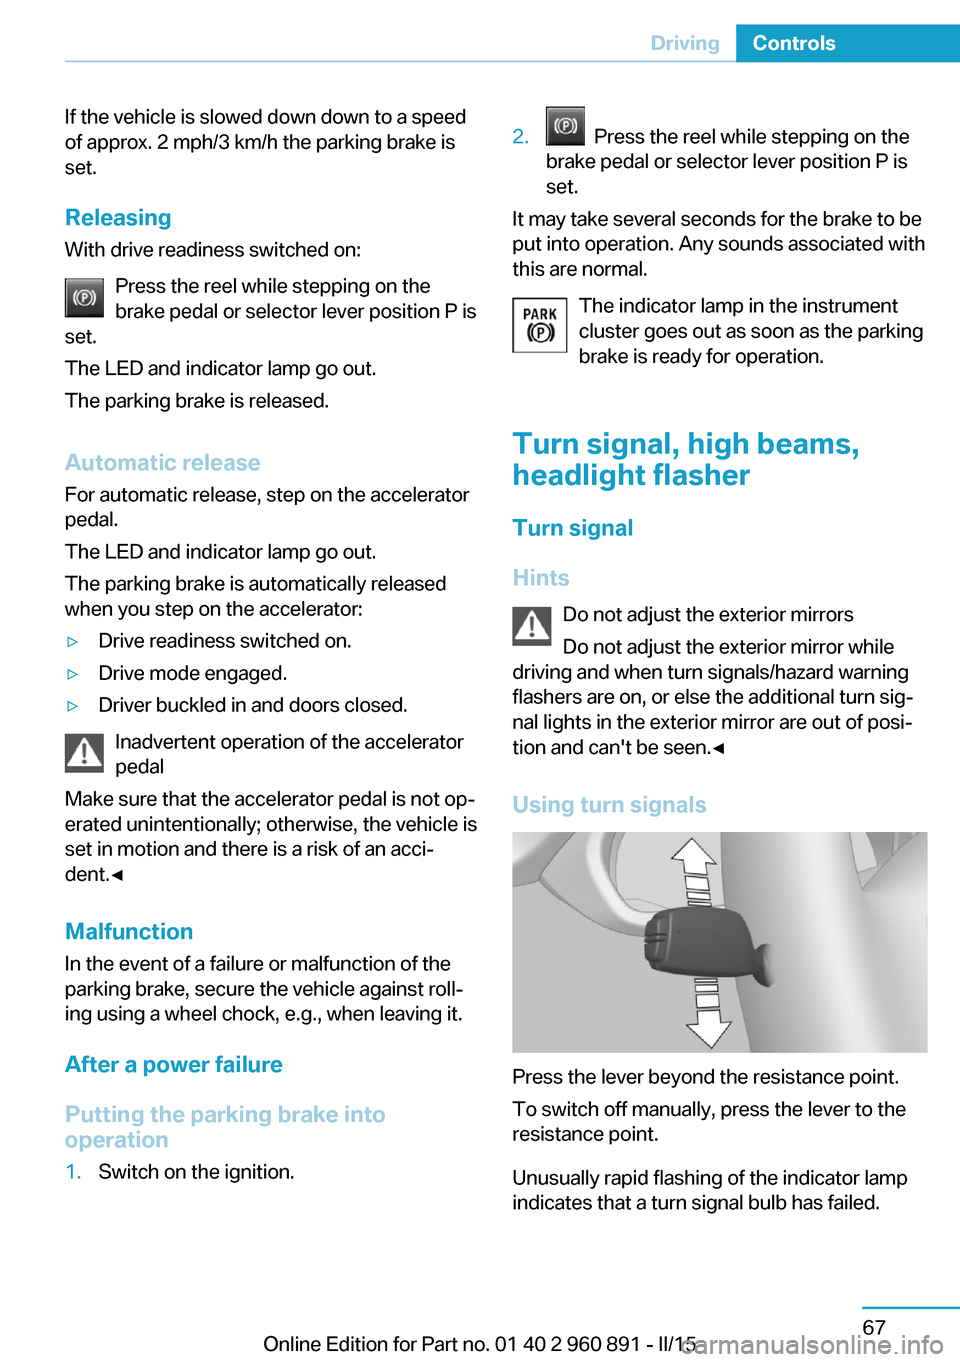
Using turn signals
Press the lever beyond the resistance point.
To switch off manually, press the lever to the
resistance point.
Unusually rapid flashing of the indicator lamp
indicates that a turn signal bulb has failed.
Seite 67DrivingControls67
Online Edition for Part no. 01 40 2 960 891 - II/15
Page 97 of 224

ing the area of the interference, the system
automatically becomes active again.▷TPM could not conclude the reset: perform
the reset of the system again.▷A wheel without TPM electronics is fitted:
have the service center check it if needed.▷Malfunction: have the system checked by
your service center.
For more information, see Tire Pressure Moni‐
tor, refer to page 99.
Steering system Steering system in some cases defec‐
tive.
Have the steering system checked by
the service center.
Engine functions Have the vehicle checked by the serv‐ice center.
For additional information, refer to On-
board Diagnostics socket, refer to page 179.
Acoustic pedestrian protection inactive Acoustic pedestrian protection possi‐
bly defective.
Have the system checked by the serv‐
ice center.
Green lights Turn signal Turn signal on.
Unusually rapid flashing of the indicator
lamp indicates that a turn signal bulb
has failed.
For additional information, refer to Turn signal, refer to page 67.
Parking lights, headlight control
Parking lights or headlights are acti‐
vated.
For additional information, refer to
Parking lights/low beams, headlight control, re‐
fer to page 92.
High-beam Assistant High-beam Assistant is switched on.
High beams are activated and off auto‐
matically as a function of the traffic sit‐
uation.
For additional information, refer to High-beam
Assistant, refer to page 94.
Cruise control The system is switched on. It maintains
the speed that was set using the con‐
trol elements on the steering wheel.
Blue lights
High beams High beams are activated.
For additional information, refer to High
beams, refer to page 68.
General lamps
Check Control At least one Check Control message is
displayed or is stored. The symbol is
shown in the display of the instrument
cluster.
Text messagesText messages in combination with a symbol
in the instrument cluster explain a Check Con‐ trol message and the meaning of the indicator
and warning lights.Seite 81DisplaysControls81
Online Edition for Part no. 01 40 2 960 891 - II/15
Page 107 of 224
If the image is distorted, check the basic set‐
tings.
Switching on/off1."Settings"2."Head-Up Display"3."Head-Up Display"
Display
Overview
▷Speed.▷Navigation system.▷Check Control messages.▷Selection list from the instrument cluster.▷Driver assistance systems.
Some of this information is only displayed
briefly as needed.
Selecting displays in the Head-up
Display
On the Control Display:
1."Settings"2."Head-Up Display"3."Displayed information"4.Select the desired displays in the Head-up
Display.
Settings are stored for the profile currently in
use.
Setting the brightness
The brightness is automatically adjusted to the
ambient brightness.
The basic setting can be adjusted manually.
On the Control Display:
1."Settings"2."Head-Up Display"3."Brightness"4.Turn the controller.When the low beams are activated, the bright‐
ness of the Head-up Display can be addition‐
ally influenced using the instrument lighting.
Settings are stored for the profile currently in
use.
Adjusting the height
On the Control Display:1."Settings"2."Head-Up Display"3."Height"4.Turn the controller.
Settings are stored for the profile currently in
use.
Setting the rotation
On the Control Display:
1."Settings"2."Head-Up Display"3."Rotation"4.Turn the controller.
Settings are stored for the profile currently in
use.
Special windshield
The windshield is part of the system.
The shape of the windshield makes it possible
to display a precise image.
A film in the windshield prevents double im‐
ages from being displayed.
Therefore, have the special windshield re‐
placed by a service center only.
Seite 91DisplaysControls91
Online Edition for Part no. 01 40 2 960 891 - II/15
Page 108 of 224
LightsVehicle features and optionsThis chapter describes all standard, country-
specific and optional features offered with the
series. It also describes features that are not
necessarily available in your car, e. g., due to
the selected options or country versions. This
also applies to safety-related functions and
systems. The respectively applicable country
provisions must be observed when using the
respective features and systems.
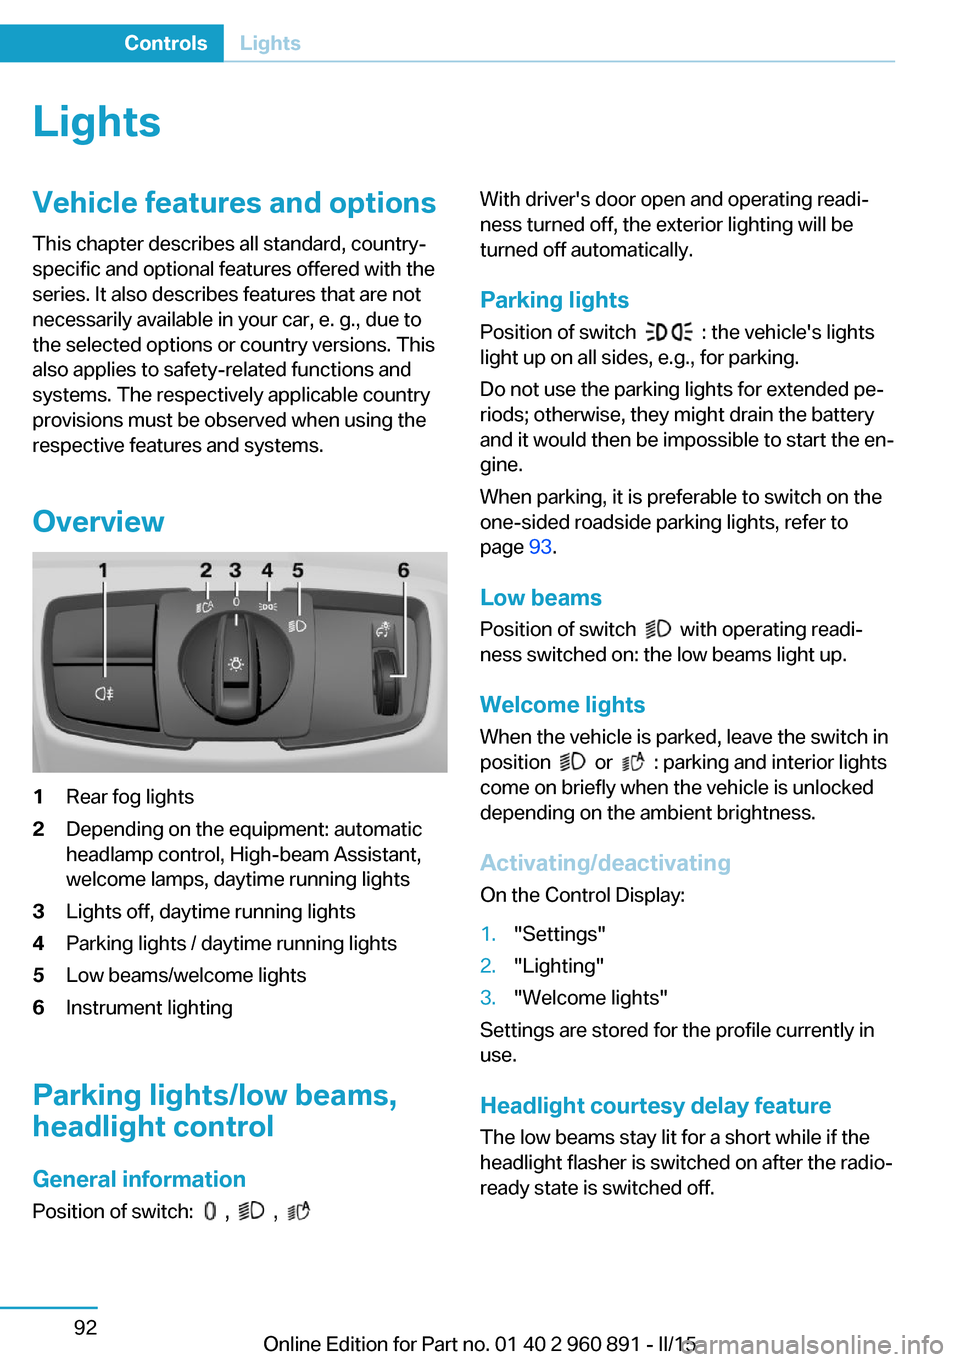
Overview1Rear fog lights2Depending on the equipment: automatic
headlamp control, High-beam Assistant,
welcome lamps, daytime running lights3Lights off, daytime running lights4Parking lights / daytime running lights5Low beams/welcome lights6Instrument lighting
Parking lights/low beams,
headlight control
General information
Position of switch:
, ,
With driver's door open and operating readi‐
ness turned off, the exterior lighting will be
turned off automatically.
Parking lights
Position of switch
: the vehicle's lights
light up on all sides, e.g., for parking.
Do not use the parking lights for extended pe‐
riods; otherwise, they might drain the battery
and it would then be impossible to start the en‐
gine.
When parking, it is preferable to switch on the
one-sided roadside parking lights, refer to
page 93.
Low beams Position of switch
with operating readi‐
ness switched on: the low beams light up.
Welcome lights When the vehicle is parked, leave the switch in
position
or : parking and interior lights
come on briefly when the vehicle is unlocked
depending on the ambient brightness.
Activating/deactivating
On the Control Display:
1."Settings"2."Lighting"3."Welcome lights"
Settings are stored for the profile currently in
use.
Headlight courtesy delay featureThe low beams stay lit for a short while if the
headlight flasher is switched on after the radio-
ready state is switched off.
Seite 92ControlsLights92
Online Edition for Part no. 01 40 2 960 891 - II/15
Page 109 of 224

Setting the durationOn the Control Display:1."Settings"2."Lighting"3."Pathway lighting:"4.Set length of time.
Settings are stored for the profile currently in
use.
Automatic headlight control
Position of switch
: the low beams are acti‐
vated and off automatically, e.g., in tunnels, in
twilight or if there is precipitation. The indicator
lamp in the instrument cluster lights up.
When emerging from a tunnel during the day,
the low beams are not switched off immedi‐
ately but instead only after approx. 2 minutes.
A blue sky with the sun low on the horizon can
cause the lights to be switched on.
Personal responsibility
The automatic headlight control cannot
serve as a substitute for your personal judg‐
ment in determining when to turn the lights on
in response to ambient lighting conditions.
E. g. the sensors are unable to detect fog or
hazy weather. To avoid safety risks under
these conditions, you should always switch on
the lights manually.◀
Daytime running lights With the ignition switched on, the daytime run‐
ning lights light up in position
, or
. After operating readiness is switched off,
the parking lights light up in position
.
Activating/deactivating In some countries, daytime running lights are
mandatory, so it may not be possible to deacti‐
vate the daytime running lights.
On the Control Display:
1."Settings"2."Lighting"3."Daytime running lamps"
Settings are stored for the profile currently in
use.
Roadside parking lights
The vehicle can be illuminated on one side.
Switching on With operating readiness switched off, press
the lever either up or down past the resistance
point for approx. 2 seconds.
Switch off Briefly press the lever to the resistance point in
the opposite direction.
Variable light distribution The concept This variable light distribution ensures that the
roadway is still more effectively illuminated,
depending on the vehicle speed.
The light distribution is automatically adjusted
to the speed. The freeway lights are activated
at speeds above 110 km/h after approx.
30 seconds or at a speed of 140 km/h.
Activating Position of switch
with the ignition
switched on.
Seite 93LightsControls93
Online Edition for Part no. 01 40 2 960 891 - II/15