2015 BMW I8 key
[x] Cancel search: keyPage 39 of 224
Additional symbolsSymbolMeaning Spoken instructions are turned off. Check the current vehicle position.
Split screen
General information Additional information can be displayed on the
right side of the split screen, e.g., information
from the on-board comupter.
In the divided screen view, the so-called split
screen, this information remains visible even when you change to another menu.
Switching the split screen on and off On the Control Display:
1. Press button.2."Split screen"
Selecting the display
On the Control Display:
1. Press button.2."Split screen"3.Move the controller until the split screen is
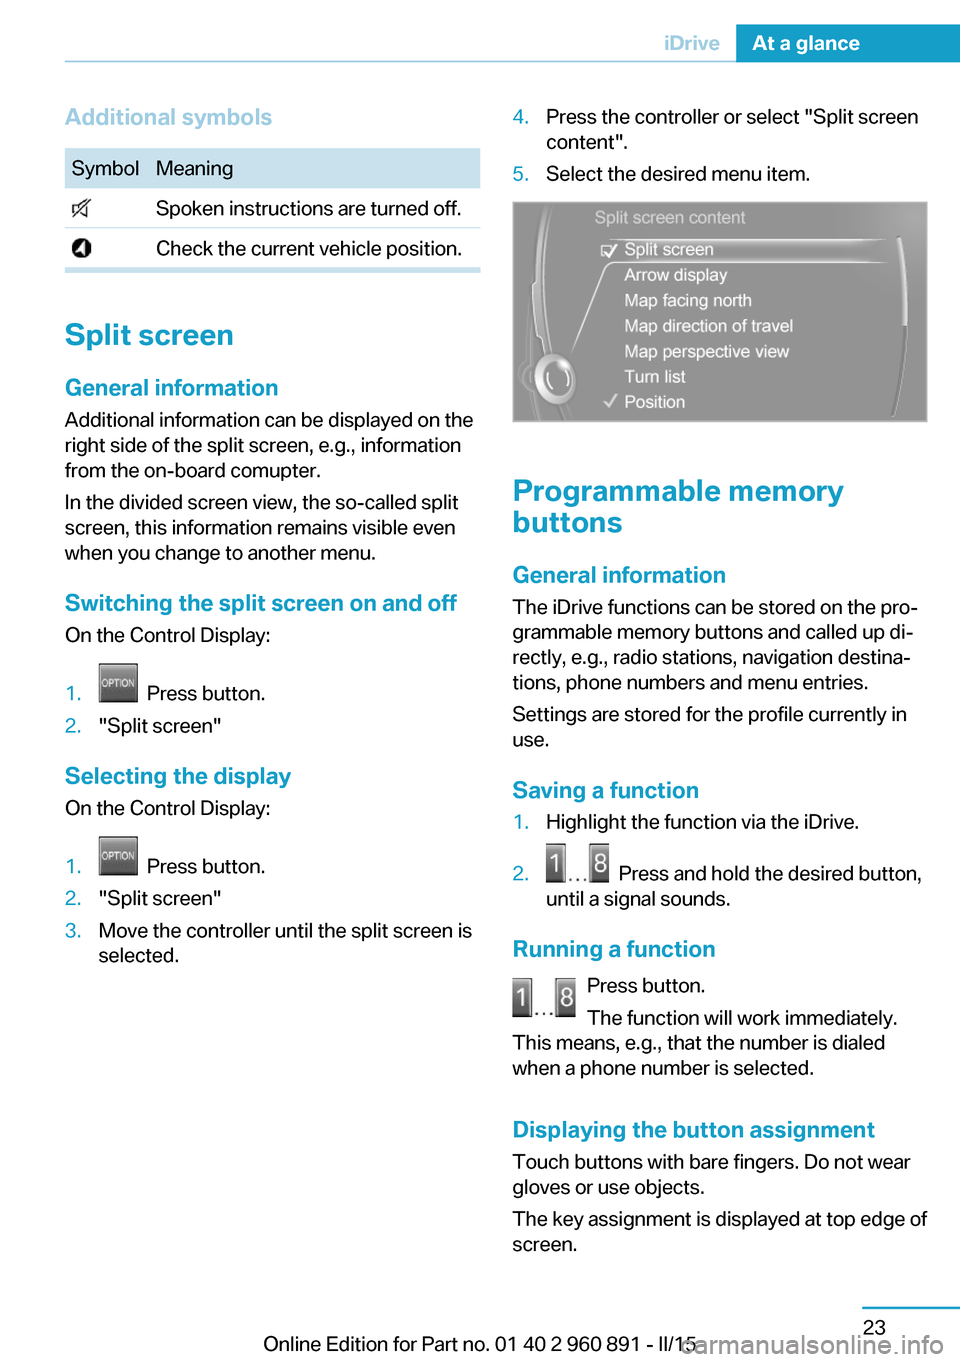
selected.4.Press the controller or select "Split screen
content".5.Select the desired menu item.
Programmable memory
buttons
General information
The iDrive functions can be stored on the pro‐
grammable memory buttons and called up di‐
rectly, e.g., radio stations, navigation destina‐
tions, phone numbers and menu entries.
Settings are stored for the profile currently in
use.
Saving a function
1.Highlight the function via the iDrive.2. Press and hold the desired button,
until a signal sounds.
Running a function
Press button.
The function will work immediately.
This means, e.g., that the number is dialed
when a phone number is selected.
Displaying the button assignment Touch buttons with bare fingers. Do not wear
gloves or use objects.
The key assignment is displayed at top edge of
screen.
Seite 23iDriveAt a glance23
Online Edition for Part no. 01 40 2 960 891 - II/15
Page 54 of 224
Opening and closingVehicle features and options
This chapter describes all standard, country-
specific and optional features offered with the
series. It also describes features that are not
necessarily available in your car, e. g., due to
the selected options or country versions. This
also applies to safety-related functions and
systems. The respectively applicable country
provisions must be observed when using the
respective features and systems.
Remote control/key General information
The vehicle is supplied with two remote con‐
trols with integrated key.
Every remote control holds a replaceable bat‐
tery.
You may set the key functions depending on
the optional features and country-specific ver‐
sion. For Settings, refer to page 46.
The vehicle stores personal settings for every
remote control. Personal Profile, refer to
page 39.
The remote controls hold information on re‐
quired maintenance. Service data in the re‐
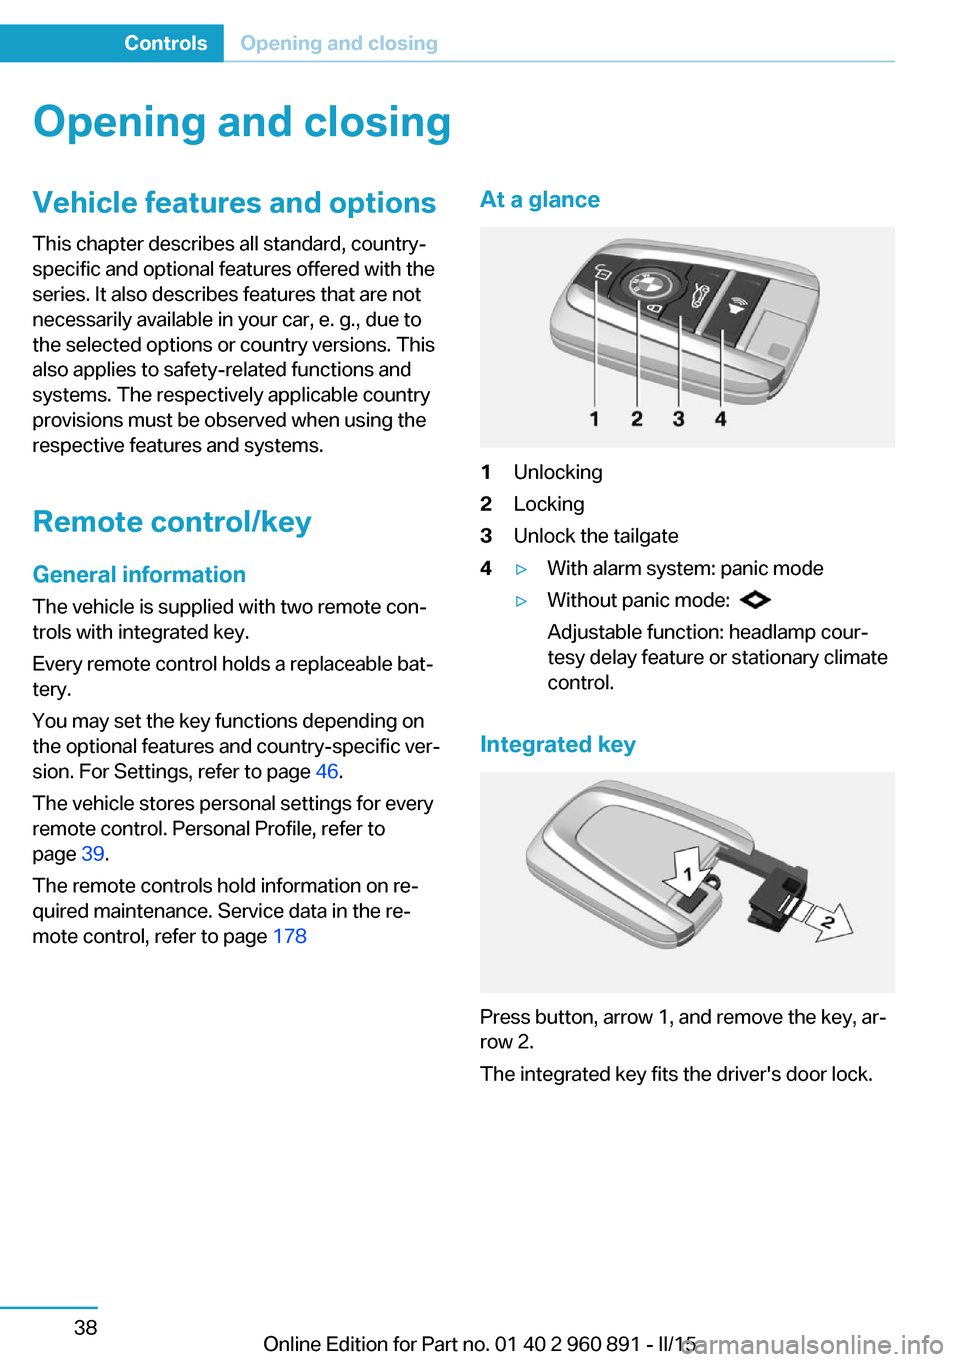
mote control, refer to page 178At a glance1Unlocking2Locking3Unlock the tailgate4▷With alarm system: panic mode▷Without panic mode:
Adjustable function: headlamp cour‐
tesy delay feature or stationary climate
control.
Integrated key
Press button, arrow 1, and remove the key, ar‐
row 2.
The integrated key fits the driver's door lock.
Seite 38ControlsOpening and closing38
Online Edition for Part no. 01 40 2 960 891 - II/15
Page 55 of 224

Replacing the battery1.Remove integrated key from remote con‐
trol.2.Raise the cover of the battery compart‐
ment, arrow 1.3.Remove the cover of the battery compart‐
ment, arrow 2.4.Insert a battery of the same type with the
positive side facing up.5.Press the cover closed.
Take the used battery to a recycling
center or to your service center.
New remote controls New remote controls are available from the
service center.
Loss of the remote controls Lost remote controls can be disabled by your
service center.
Emergency detection of remote
control
Also in the following situations, radio-ready
state and drive readiness can be established:
▷Interference of radio transmission to re‐
mote control by external sources e.g., by
radio masts.▷Empty battery in remote control.▷Interference from radio transmissions
through mobile devices in close proximity
to remote control.▷Interference of radio transmission by
charger while charging items such as mo‐
bile devices in the vehicle.
A Check Control message is displayed if one
attempts to turn on the radio-ready state or ac‐
tivate engine readiness.
Activation of drive readiness via
emergency detection of the remote
control
If a respective Check Control message ap‐
pears, hold the remote control with its back
against the marked area on the steering col‐
umn. The BMW logo on the remote control
should be at the same height as the marked
area. Press the Start/Stop button within
10 seconds while pressing the brake pedal.
If the remote control is not recognized: slightly
change the height position of the remote con‐
trol and repeat the procedure.
Personal Profile
The concept Personal Profile provides three profiles, using
which personal vehicle settings can be stored.
Every remote control has one of these profiles
assigned.
If the vehicle is unlocked using a remote con‐
trol, the assigned personal profile will be acti‐
vated. All settings stored in the profile are au‐
tomatically applied.
If several drivers use their own remote control,
the vehicle will adjust the personal settings
Seite 39Opening and closingControls39
Online Edition for Part no. 01 40 2 960 891 - II/15
Page 59 of 224
Malfunction
Remote control detection by the vehicle can
among others be malfunctioning under the fol‐
lowing circumstances:▷The battery of the remote control is dis‐
charged. Replace the battery, refer to
page 39.▷Interference of the radio connection from
transmission towers or other equipment
with high transmit power.▷Shielding of the remote control due to
metal objects.▷Interference of the radio connection from
mobile phones or other electronic devices
in direct proximity.
Do not transport the remote control together
with metal objects or electronic devices.
In the case of interference, the vehicle can also
be unlocked and locked from the outside with‐
out remote control, refer to page 43.
For US owners only
The transmitter and receiver units comply with
part 15 of the FCC/Federal Communication
Commission regulations. Operation is gov‐
erned by the following:
FCC ID:
▷LX8766S.▷LX8766E.▷LX8CAS.▷LX8CAS2.▷MYTCAS4.
Compliance statement:
This device complies with part 15 of the FCC
Rules. Operation is subject to the following
two conditions:
▷This device may not cause harmful inter‐
ference, and▷this device must accept any interference
received, including interference that may
cause undesired operation.Any unauthorized modifications or changes to
these devices could void the user's authority to
operate this equipment.
Without remote control
Locking from the outside1.Close the driver's door from the outside.2.Enter the vehicle via the front passenger
side and close front passenger door.3. Press button for central locking
system.
Vehicle is locked.4.Unlock the front passenger door via the
lever in the door frame, refer to page 44.5.Exit the vehicle on the front passenger
side:
Make sure that the remote control is not in
the vehicle.6.Close the front passenger door.
Unlocking from the outside
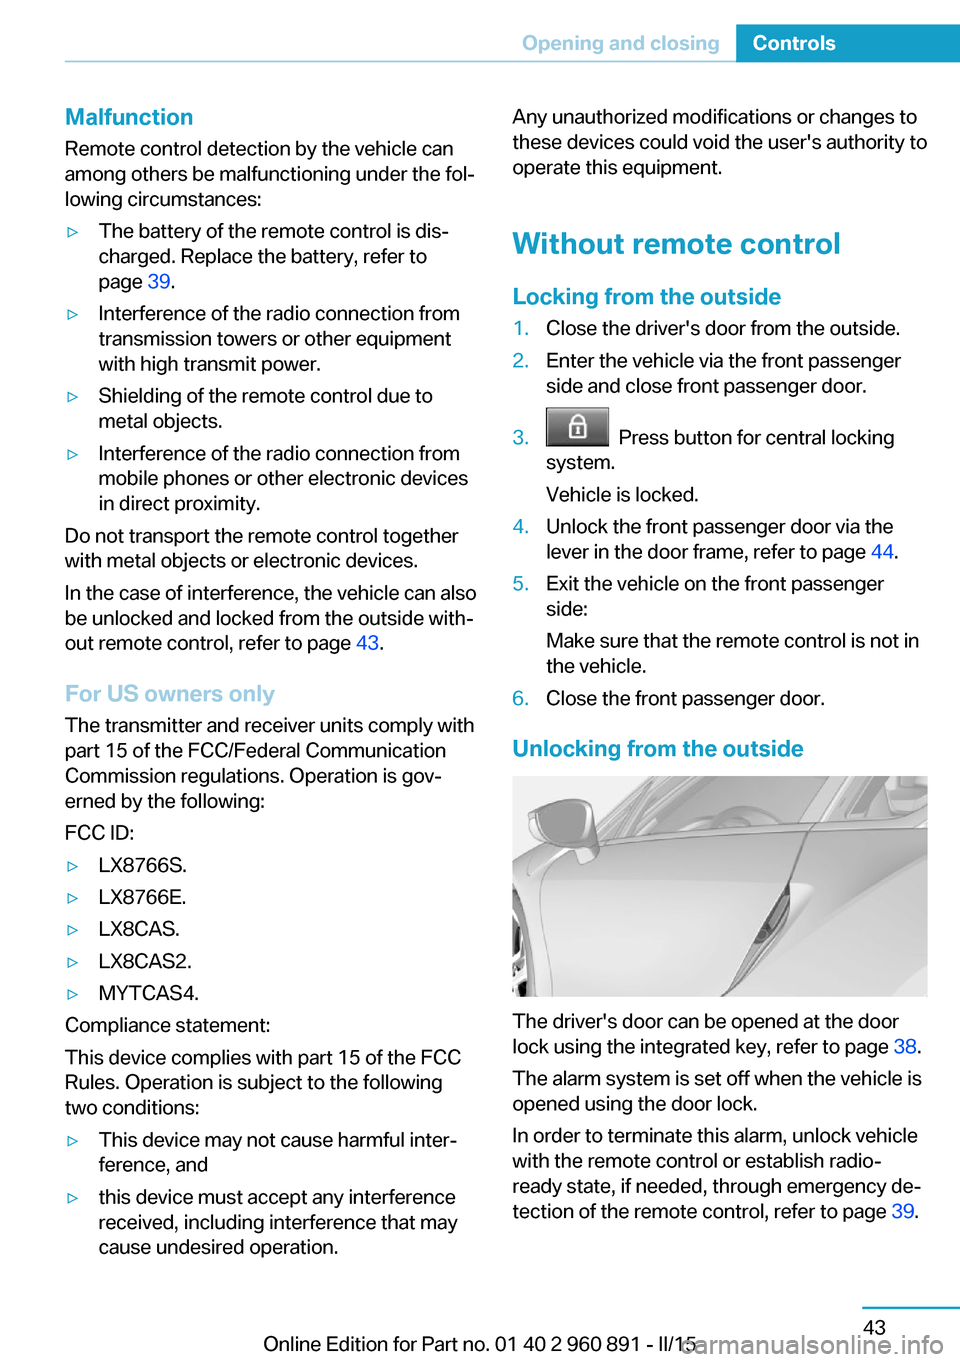
The driver's door can be opened at the door
lock using the integrated key, refer to page 38.
The alarm system is set off when the vehicle is
opened using the door lock.
In order to terminate this alarm, unlock vehicle
with the remote control or establish radio-
ready state, if needed, through emergency de‐
tection of the remote control, refer to page 39.
Seite 43Opening and closingControls43
Online Edition for Part no. 01 40 2 960 891 - II/15
Page 62 of 224
Locking
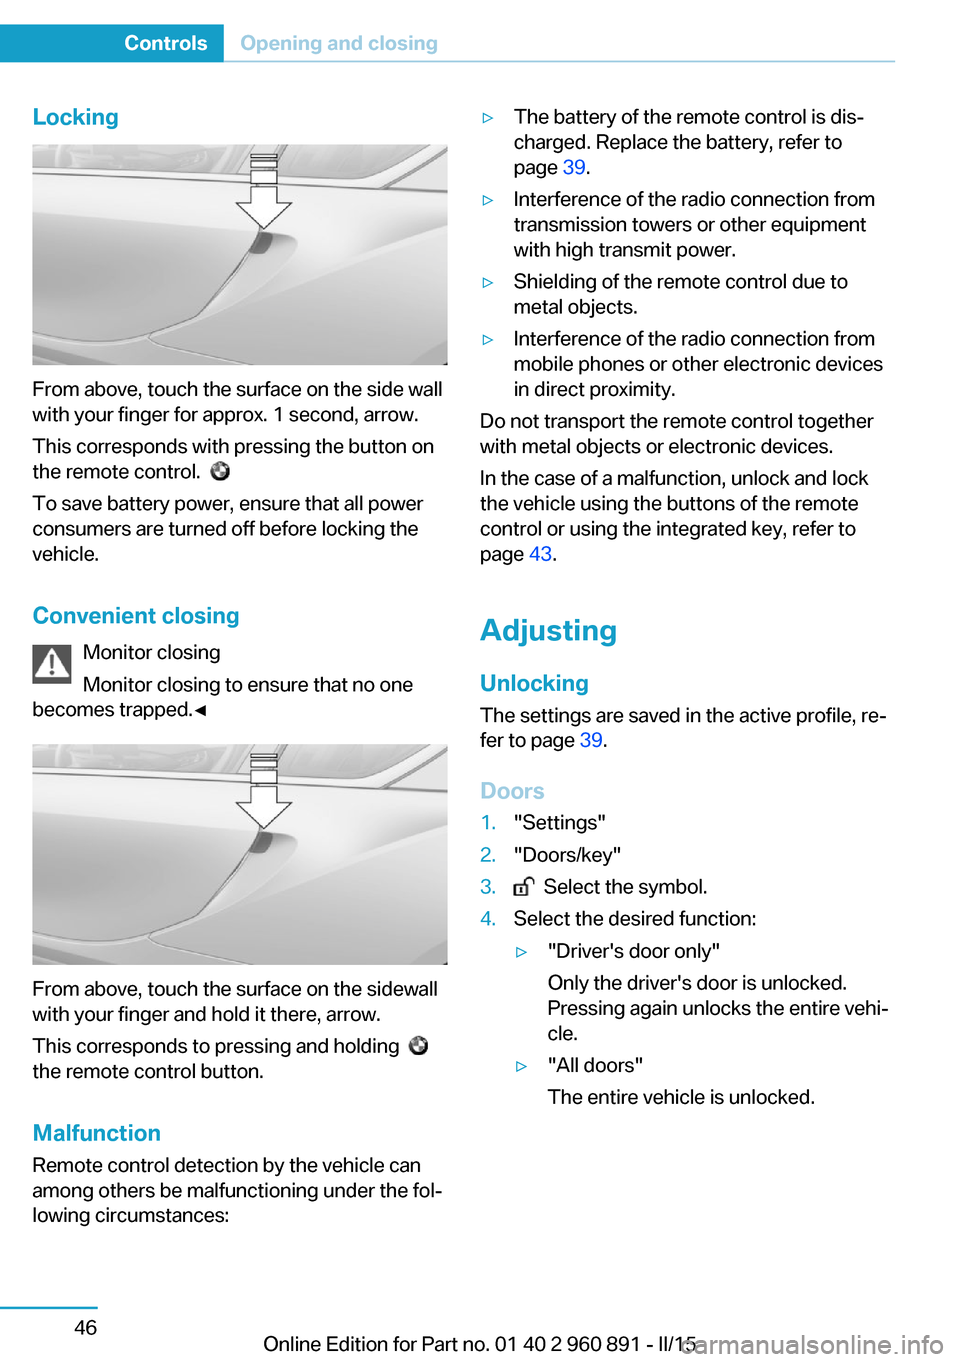
From above, touch the surface on the side wall
with your finger for approx. 1 second, arrow.
This corresponds with pressing the button on
the remote control.
To save battery power, ensure that all power
consumers are turned off before locking the
vehicle.
Convenient closing Monitor closing
Monitor closing to ensure that no one
becomes trapped.◀
From above, touch the surface on the sidewall
with your finger and hold it there, arrow.
This corresponds to pressing and holding
the remote control button.
Malfunction
Remote control detection by the vehicle can
among others be malfunctioning under the fol‐
lowing circumstances:
▷The battery of the remote control is dis‐
charged. Replace the battery, refer to
page 39.▷Interference of the radio connection from
transmission towers or other equipment
with high transmit power.▷Shielding of the remote control due to
metal objects.▷Interference of the radio connection from
mobile phones or other electronic devices
in direct proximity.
Do not transport the remote control together
with metal objects or electronic devices.
In the case of a malfunction, unlock and lock
the vehicle using the buttons of the remote
control or using the integrated key, refer to
page 43.
Adjusting
Unlocking The settings are saved in the active profile, re‐
fer to page 39.
Doors
1."Settings"2."Doors/key"3. Select the symbol.4.Select the desired function:▷"Driver's door only"
Only the driver's door is unlocked.
Pressing again unlocks the entire vehi‐
cle.▷"All doors"
The entire vehicle is unlocked.Seite 46ControlsOpening and closing46
Online Edition for Part no. 01 40 2 960 891 - II/15
Page 63 of 224
Tailgate
Depending on optional features and country
version, this setting is not offered in some
cases.1."Settings"2."Doors/key"3. Select the symbol.4.Select the desired function:▷"Tailgate"
The tailgate is unlocked.▷"Tailgate + door(s)"
The tailgate and the doors are un‐
locked.
Confirmation signals from the vehicle
The settings are saved in the active profile, re‐
fer to page 39.
1."Settings"2."Doors/key"3.Deactivate or activate the desired confir‐
mation signals.▷"Acoustic sig. lock/unlock"▷"Flash when lock/unlock"
Automatic locking
The settings are saved in the active profile, re‐fer to page 39.
1."Settings"2."Doors/key"3.Select the desired function:▷"Lock if no door is opened"
The vehicle locks automatically after a
short period of time if no door is
opened.▷"Lock after start driving"
The vehicle locks automatically after
you drive off.Without alarm system: headlamp
courtesy delay feature/standing
climate control
The settings are saved in the active profile, re‐
fer to page 39.1."Settings"2."Doors/key"3. Select the symbol.4.Select the desired function:▷"Pathway lighting"
Headlight courtesy delay feature▷"Comfort climate control"
Stationary climate control
Alarm system
The conceptWhen the vehicle is locked, the vehicle alarm
system responds to:
▷Opening a door, the hood or the tailgate.▷Movements in the interior.▷Changes in the vehicle tilt, e. g., during at‐
tempts at stealing a wheel.▷Disconnected battery voltage.
The alarm system briefly signals tampering:
▷By sounding an acoustic alarm.▷By switching on the hazard warning sys‐
tem.▷By flashing the high beams.
Arming and disarming the alarm
system
When you unlock or lock the vehicle, either
with the remote control or via the Comfort Ac‐
cess, the alarm system is disarmed or armed at
the same time.
Seite 47Opening and closingControls47
Online Edition for Part no. 01 40 2 960 891 - II/15
Page 170 of 224
4.Connect either a Level 1 or Level 2 charg‐
ing cable to the household socket or the
port on the charging station.5.Open charging port flap.6.Connect charging cable to the vehicle, re‐
fer to page 152.
At high temperatures, initially the high-voltage
battery is cooled. The charging process can be
started with a delay.
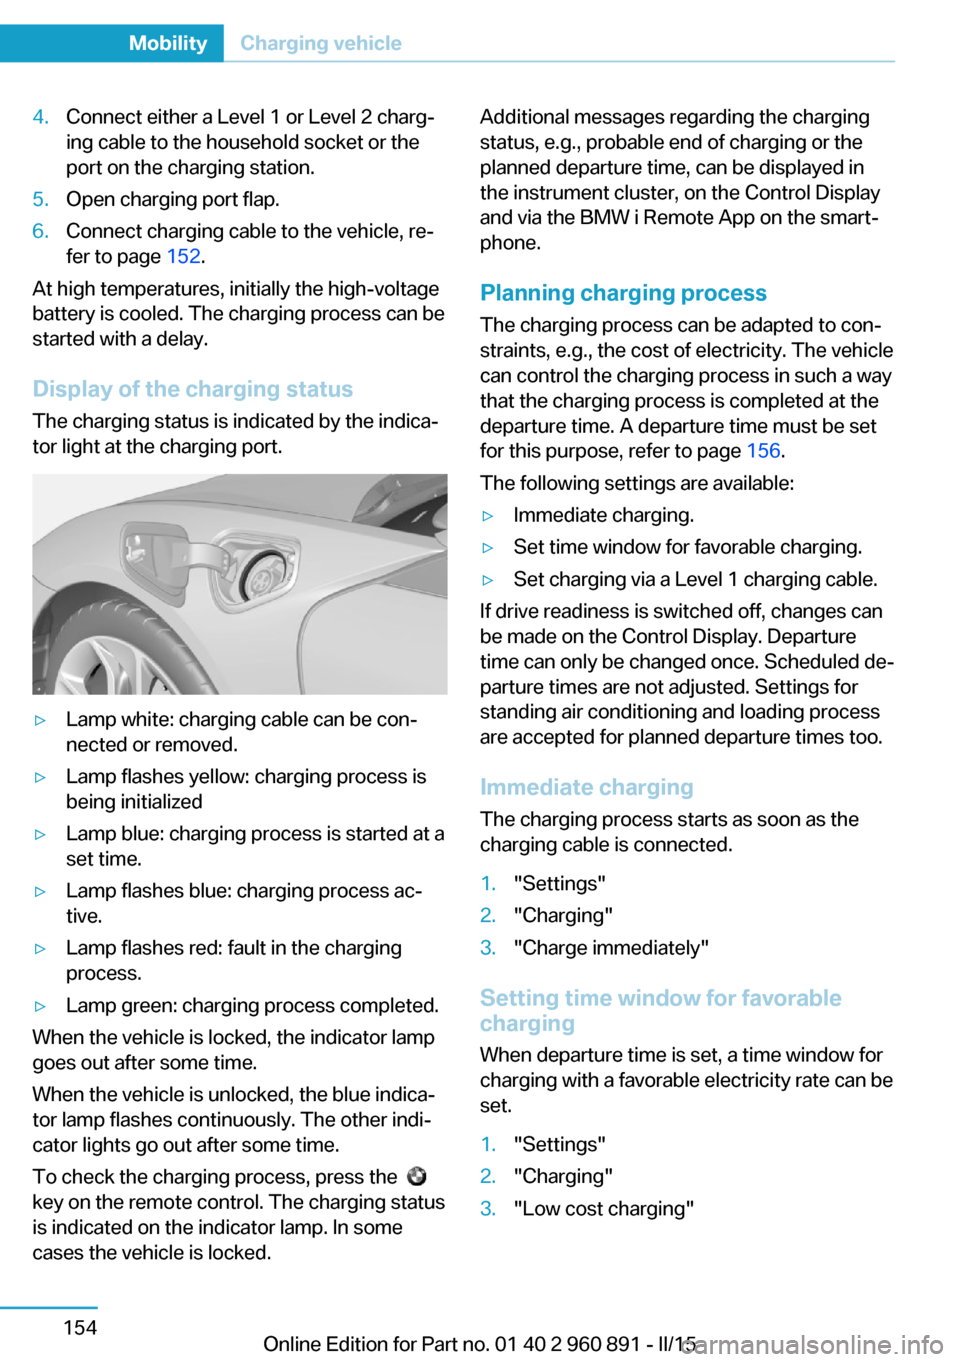
Display of the charging status
The charging status is indicated by the indica‐
tor light at the charging port.
▷Lamp white: charging cable can be con‐
nected or removed.▷Lamp flashes yellow: charging process is
being initialized▷Lamp blue: charging process is started at a
set time.▷Lamp flashes blue: charging process ac‐
tive.▷Lamp flashes red: fault in the charging
process.▷Lamp green: charging process completed.
When the vehicle is locked, the indicator lamp
goes out after some time.
When the vehicle is unlocked, the blue indica‐
tor lamp flashes continuously. The other indi‐
cator lights go out after some time.
To check the charging process, press the
key on the remote control. The charging status
is indicated on the indicator lamp. In some
cases the vehicle is locked.
Additional messages regarding the charging
status, e.g., probable end of charging or the
planned departure time, can be displayed in
the instrument cluster, on the Control Display
and via the BMW i Remote App on the smart‐
phone.
Planning charging process The charging process can be adapted to con‐
straints, e.g., the cost of electricity. The vehicle
can control the charging process in such a way
that the charging process is completed at the
departure time. A departure time must be set
for this purpose, refer to page 156.
The following settings are available:▷Immediate charging.▷Set time window for favorable charging.▷Set charging via a Level 1 charging cable.
If drive readiness is switched off, changes can
be made on the Control Display. Departure
time can only be changed once. Scheduled de‐
parture times are not adjusted. Settings for
standing air conditioning and loading process
are accepted for planned departure times too.
Immediate chargingThe charging process starts as soon as the
charging cable is connected.
1."Settings"2."Charging"3."Charge immediately"
Setting time window for favorable
charging
When departure time is set, a time window for
charging with a favorable electricity rate can be
set.
1."Settings"2."Charging"3."Low cost charging"Seite 154MobilityCharging vehicle154
Online Edition for Part no. 01 40 2 960 891 - II/15
Page 173 of 224
quired for operation of the onboard electron‐
ics.
With a discharged vehicle battery, no operation
of the vehicle is possible.
Place vehicle in service
To place the vehicle in service, charge as
usual.
If there is no possibility of charging on site,
contact the service center.
Charging vehicle with a discharged
vehicle battery1.Unlock the vehicle, if needed, using the
integrated key, refer to page 38.2.Secure the vehicle against rolling.3.Connect either a Level 1 or Level 2 charg‐
ing cable to the household socket or the
port on the charging station.4.Attach charging cable corresponding to
the charging socket connection.
Charging is started. The charging status is
not displayed. Do not open vehicle during
this time.
After several minutes, the vehicle is slightly
charged. The onboard electronics are ready
again. It is again possible to open the vehicle.
The charging status as well as the charging
state of the high-voltage battery can be dis‐
played again.
If the vehicle battery cannot be charged, con‐
tact the service center.
Seite 157Charging vehicleMobility157
Online Edition for Part no. 01 40 2 960 891 - II/15