2015 BMW 5 SERIES GRAN TURISMO Park release
[x] Cancel search: Park releasePage 5 of 263
Addendum
ADDENDUM TO OWNER'S MANUAL
We wanted to provide you with some updates
and clarifications with respect to the printed
BMW Owner's Manual. These updates and
clarifications will supersede the materials con-
tained in that document.
1. Where the terms “service center,” “the ser-
vice center,” “your service center,” “service
specialist,” or “service” are used in the
Owner's Manual, we wanted to clarify that
the terms refer to a BMW dealer's service
center or another service center or repair
shop that employs trained personnel that
can perform maintenance and repair work
on your vehicle in accordance with BMW
specifications.
2. Where the text of the Owner's Manual con-
tains an affirmative instruction to contact a
“service center” or “your service center,”
we wanted to clarify that BMW recom-
mends that, if you are faced with one of the
situations addressed by that text, you con-
tact or seek the assistance of a BMW
dealer's service center or another service
center or repair shop that employs trained
personnel that can perform maintenance
and repair work on your vehicle in accor-
dance with BMW specifications.
While BMW of North America LLC, at no
cost to you, will pay for repairs required by
the limited warranties provided with respect
to your vehicle and for maintenance under
the Maintenance Program during the appli-
cable warranty and maintenance coverage
periods, you are free to elect, both during
those periods and thereafter, to have main-
tenance and repair work provided by other
service centers or repair shops.
3. Where the Owner's Manual makes refer-
ence to parts and accessories having been
approved by BMW, those references are
intended to reflect that those parts and
accessories are recommended by BMW of
North America LLC. You may elect to use
other parts and accessories, but, if you do,
we recommend that you make sure that any
such parts and/or accessories are appropri-
ate for use on your vehicle.
4. At page 7, under the warranty section's dis-
cussion of homologation, where it states
that you “cannot lodge warranty claims for
your vehicle there,” the text should read
that you “may not be able to lodge warranty
claims for your vehicle there.”
5. At page 7, under the “Parts and Accesso-
ries” section, in the sixth sentence, the
word “cannot” should read “does not.”
6. At page 60, in the “Check and replace
safety belts” section, the text beginning,
“This should only be done by your service
center …” should be disregarded and the
following text should be read in lieu thereof:
“BMW recommends having this work per-
formed by a service center as it is important
that this safety feature functions properly.”
7. At page 60, under the heading: “Active
head restraint,” the paragraph beginning,
“Only attach accessories …” should be dis-
regarded and the following text should be
read in lieu thereof: “BMW recommends
that you attach accessories approved by
BMW to the seat or head restraint.”
8. At page 76, under the heading “Have the
malfunction corrected,” the text should be
disregarded and the following text should
be read in lieu thereof:
If the parking brake has been released man-
ually in response to a malfunction, it is
strongly recommended that a technician
return it to operation and that you have the
malfunction corrected at your BMW
dealer's service center or another service
center or repair shop that employs trained
personnel that can perform maintenance
and repair work on your vehicle in accor-
dance with BMW specifications.
9. At page 101, under the heading: “Special
windshield,” the paragraph beginning,
Online Edition for Part no. 01 40 2 954 285 - II/15
Page 78 of 263
At a glance
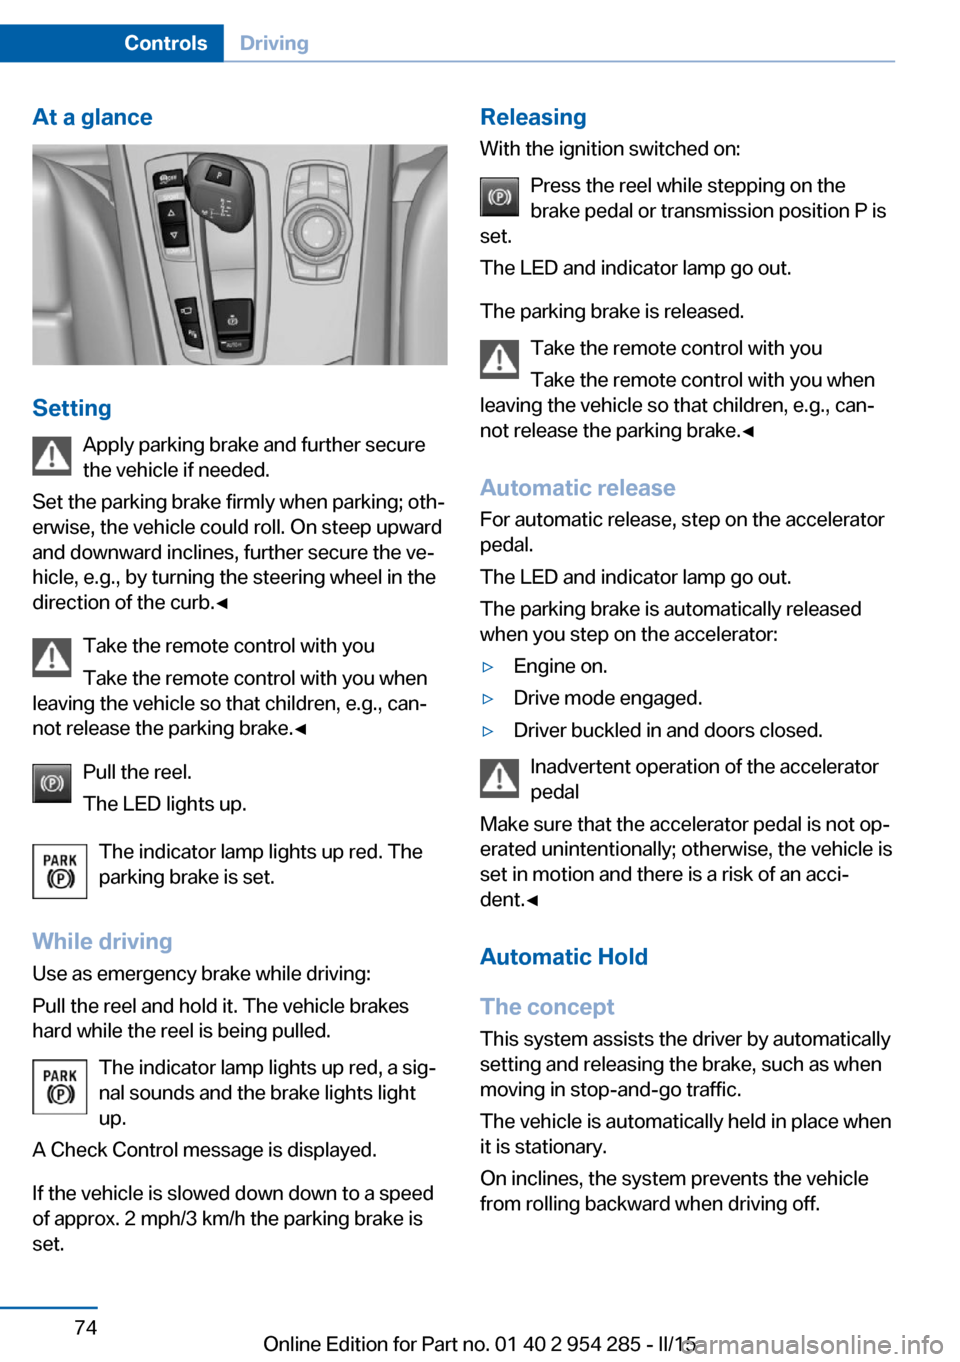
SettingApply parking brake and further secure
the vehicle if needed.
Set the parking brake firmly when parking; oth‐
erwise, the vehicle could roll. On steep upward
and downward inclines, further secure the ve‐
hicle, e.g., by turning the steering wheel in the
direction of the curb.◀
Take the remote control with you
Take the remote control with you when
leaving the vehicle so that children, e.g., can‐
not release the parking brake.◀
Pull the reel.
The LED lights up.
The indicator lamp lights up red. The
parking brake is set.
While driving
Use as emergency brake while driving:
Pull the reel and hold it. The vehicle brakes
hard while the reel is being pulled.
The indicator lamp lights up red, a sig‐
nal sounds and the brake lights light
up.
A Check Control message is displayed.
If the vehicle is slowed down down to a speed of approx. 2 mph/3 km/h the parking brake is
set.
Releasing
With the ignition switched on:
Press the reel while stepping on the
brake pedal or transmission position P is
set.
The LED and indicator lamp go out.
The parking brake is released. Take the remote control with you
Take the remote control with you when
leaving the vehicle so that children, e.g., can‐
not release the parking brake.◀
Automatic release For automatic release, step on the accelerator
pedal.
The LED and indicator lamp go out.
The parking brake is automatically released
when you step on the accelerator:▷Engine on.▷Drive mode engaged.▷Driver buckled in and doors closed.
Inadvertent operation of the accelerator
pedal
Make sure that the accelerator pedal is not op‐
erated unintentionally; otherwise, the vehicle is
set in motion and there is a risk of an acci‐
dent.◀
Automatic Hold
The concept This system assists the driver by automatically
setting and releasing the brake, such as when
moving in stop-and-go traffic.
The vehicle is automatically held in place when
it is stationary.
On inclines, the system prevents the vehicle
from rolling backward when driving off.
Seite 74ControlsDriving74
Online Edition for Part no. 01 40 2 954 285 - II/15
Page 79 of 263
Overview
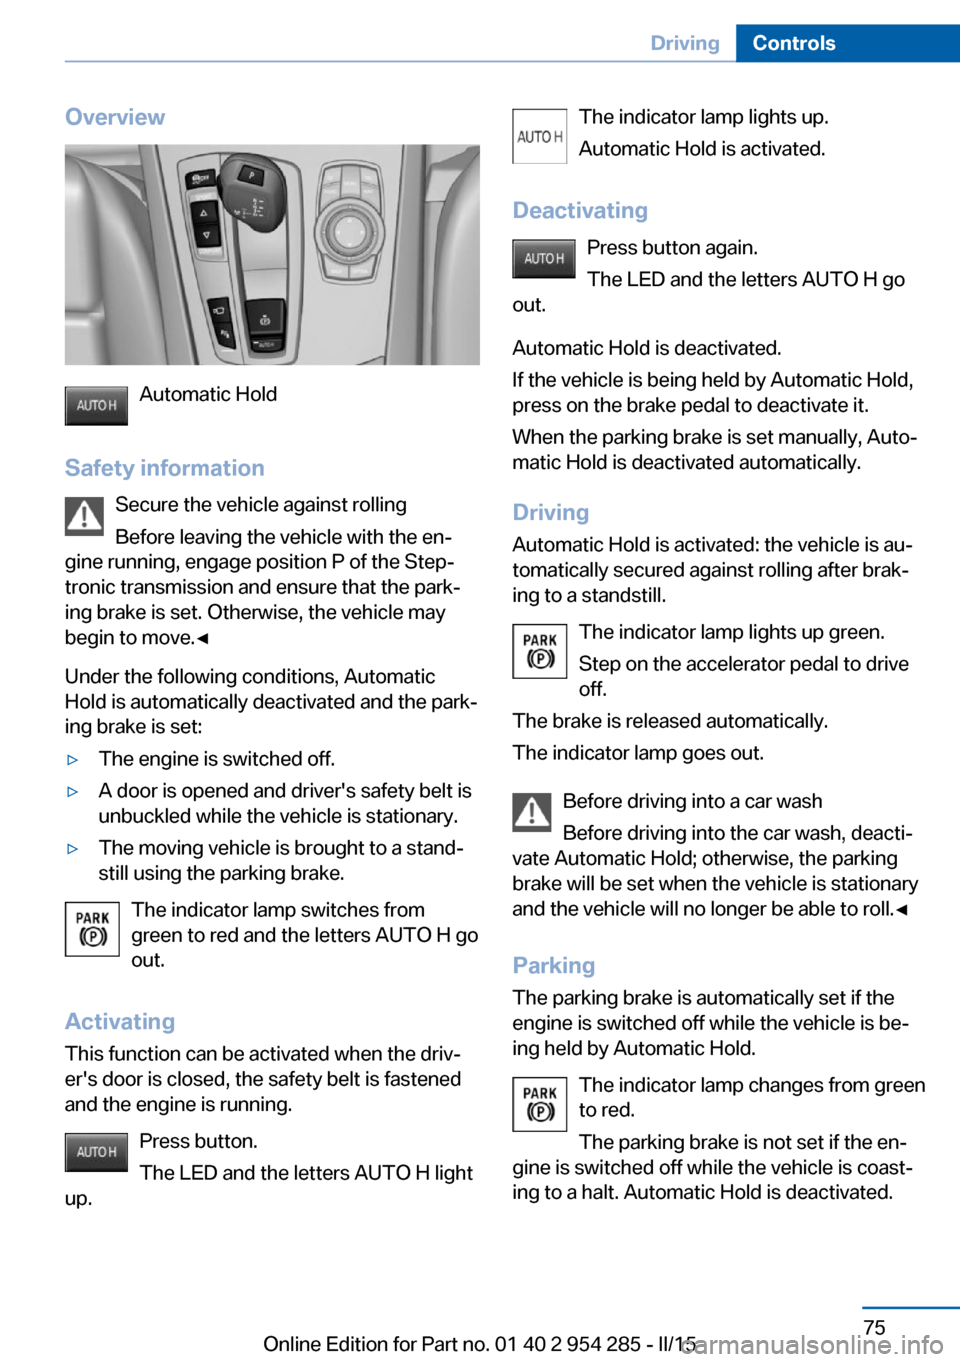
Automatic Hold
Safety information Secure the vehicle against rolling
Before leaving the vehicle with the en‐
gine running, engage position P of the Step‐
tronic transmission and ensure that the park‐
ing brake is set. Otherwise, the vehicle may
begin to move.◀
Under the following conditions, Automatic
Hold is automatically deactivated and the park‐
ing brake is set:
▷The engine is switched off.▷A door is opened and driver's safety belt is
unbuckled while the vehicle is stationary.▷The moving vehicle is brought to a stand‐
still using the parking brake.
The indicator lamp switches from
green to red and the letters AUTO H go out.
Activating
This function can be activated when the driv‐
er's door is closed, the safety belt is fastened
and the engine is running.
Press button.
The LED and the letters AUTO H light
up.
The indicator lamp lights up.
Automatic Hold is activated.
Deactivating Press button again.
The LED and the letters AUTO H go
out.
Automatic Hold is deactivated.
If the vehicle is being held by Automatic Hold,
press on the brake pedal to deactivate it.
When the parking brake is set manually, Auto‐
matic Hold is deactivated automatically.
Driving Automatic Hold is activated: the vehicle is au‐
tomatically secured against rolling after brak‐
ing to a standstill.
The indicator lamp lights up green.
Step on the accelerator pedal to drive
off.
The brake is released automatically. The indicator lamp goes out.
Before driving into a car wash
Before driving into the car wash, deacti‐
vate Automatic Hold; otherwise, the parking
brake will be set when the vehicle is stationary
and the vehicle will no longer be able to roll.◀
Parking
The parking brake is automatically set if the
engine is switched off while the vehicle is be‐
ing held by Automatic Hold.
The indicator lamp changes from green
to red.
The parking brake is not set if the en‐
gine is switched off while the vehicle is coast‐
ing to a halt. Automatic Hold is deactivated.Seite 75DrivingControls75
Online Edition for Part no. 01 40 2 954 285 - II/15
Page 80 of 263
Automatic Hold remains activated during the
engine stop brought about by the Auto Start/
Stop function.
Take the remote control with you
Take the remote control with you when
leaving the vehicle so that children, e.g., can‐
not release the parking brake.◀
Malfunction
In the event of a failure or malfunction of the
parking brake, secure the vehicle against roll‐
ing using a wheel chock, e.g., when leaving it.
Manual release Before releasing, secure the vehicle
against rolling
Before releasing the parking brake manually,
and whenever you park the vehicle with the
parking brake released, ensure that position P
of the Steptronic transmission is set.
Secure the vehicle in a manner appropriate to
the inclination of the road, e.g., with a wheel
chock; otherwise, there is a danger of an acci‐
dent and injuries if the vehicle rolls uninten‐
tionally.◀
The parking brake can be released manually in
the event of a power failure or electrical fault.
Unlocking Have the malfunction corrected
If the parking brake has been released
manually in response to a malfunction, only
technicians can return it to operation.
Have the malfunction corrected by your serv‐
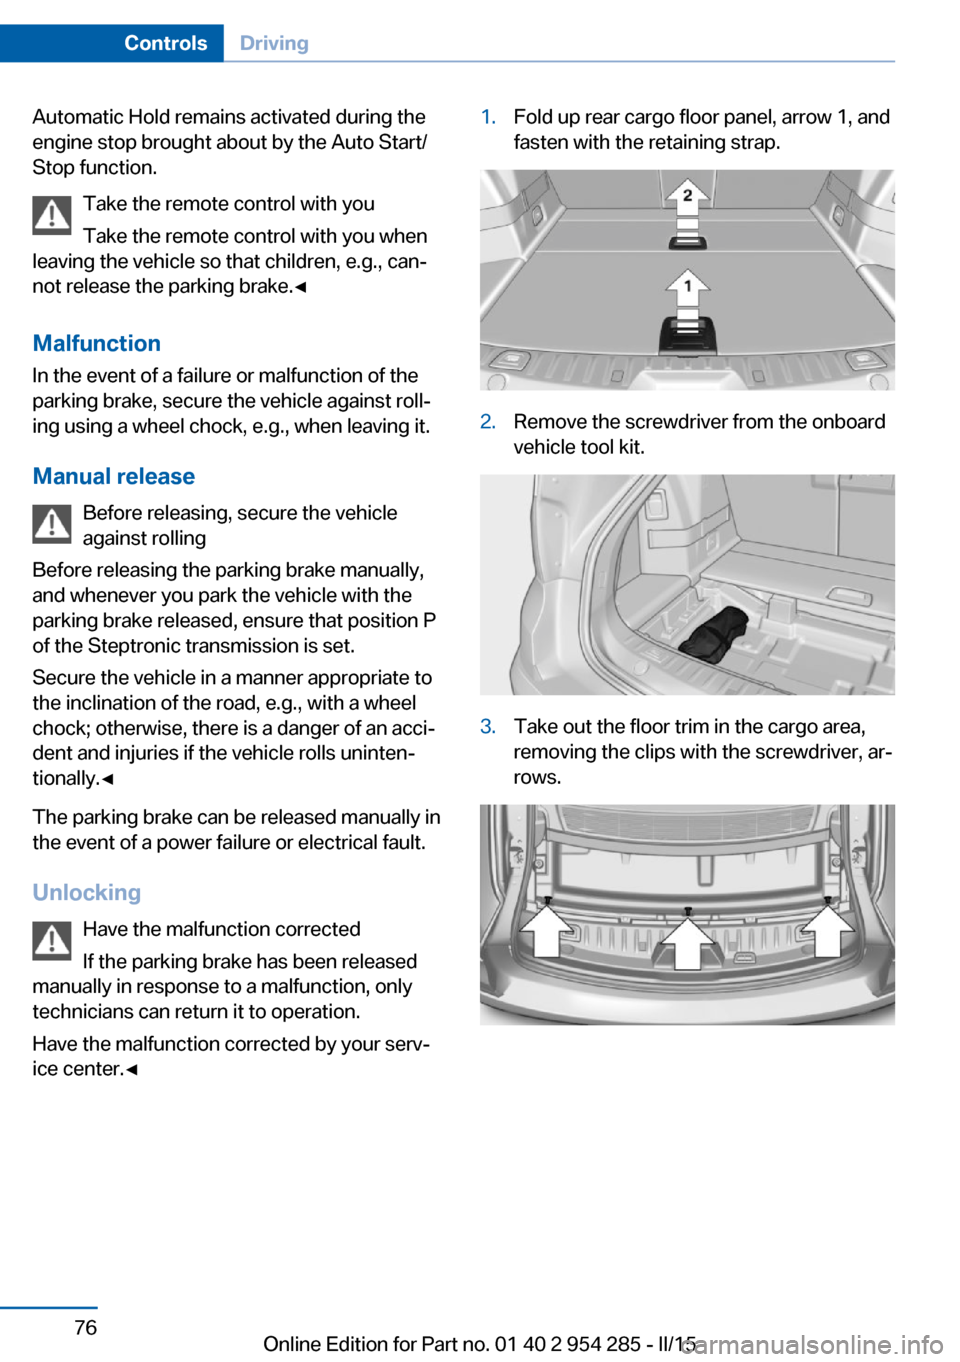
ice center.◀1.Fold up rear cargo floor panel, arrow 1, and
fasten with the retaining strap.2.Remove the screwdriver from the onboard
vehicle tool kit.3.Take out the floor trim in the cargo area,
removing the clips with the screwdriver, ar‐
rows.Seite 76ControlsDriving76
Online Edition for Part no. 01 40 2 954 285 - II/15
Page 81 of 263
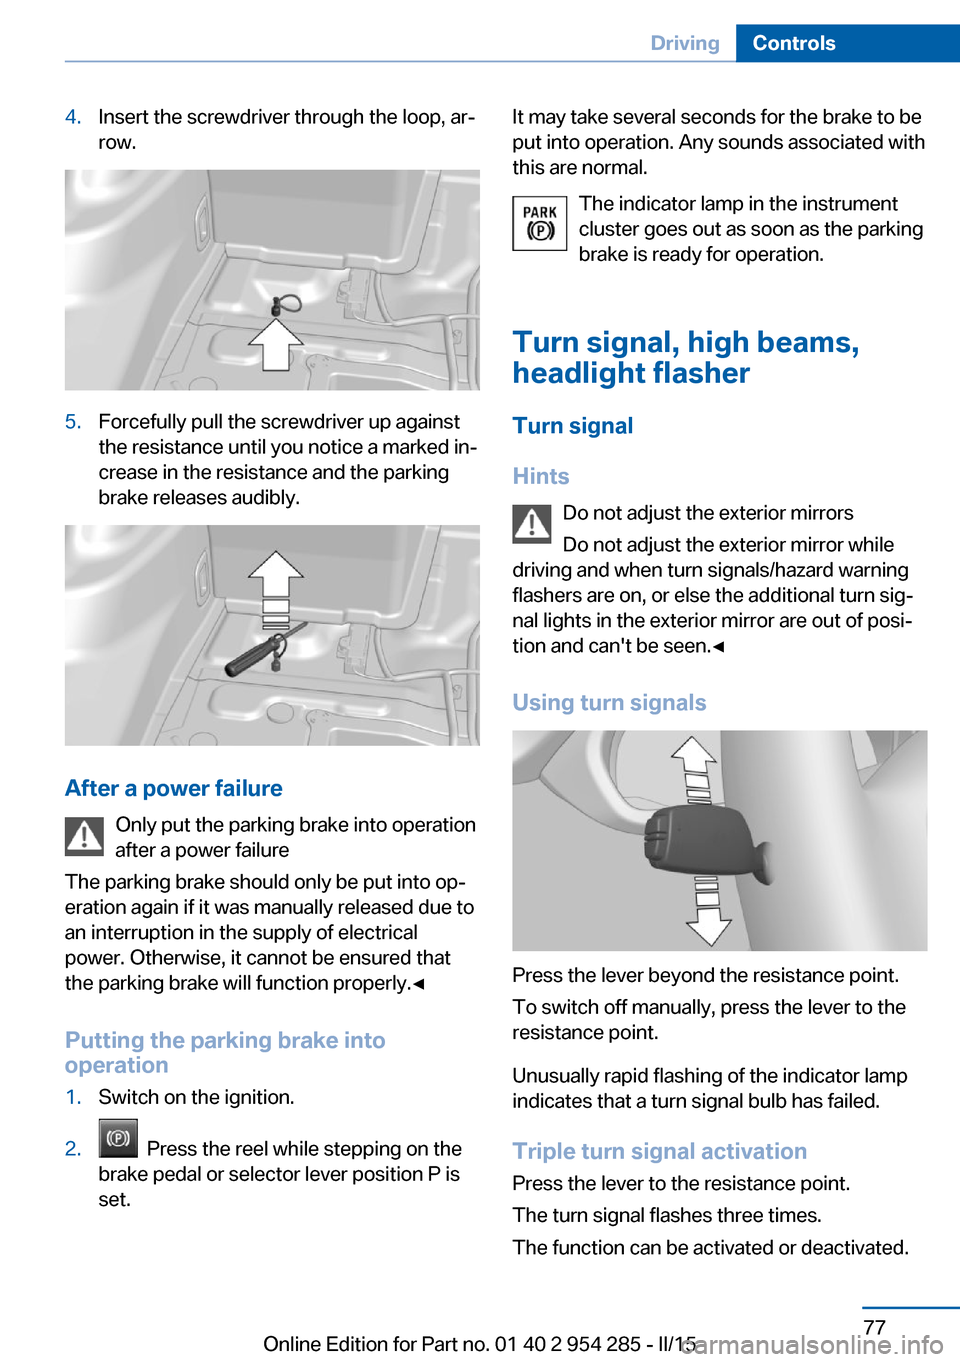
4.Insert the screwdriver through the loop, ar‐
row.5.Forcefully pull the screwdriver up against
the resistance until you notice a marked in‐
crease in the resistance and the parking
brake releases audibly.
After a power failure
Only put the parking brake into operation
after a power failure
The parking brake should only be put into op‐
eration again if it was manually released due to
an interruption in the supply of electrical
power. Otherwise, it cannot be ensured that
the parking brake will function properly.◀
Putting the parking brake into
operation
1.Switch on the ignition.2. Press the reel while stepping on the
brake pedal or selector lever position P is
set.It may take several seconds for the brake to be
put into operation. Any sounds associated with
this are normal.
The indicator lamp in the instrument
cluster goes out as soon as the parking
brake is ready for operation.
Turn signal, high beams,
headlight flasher
Turn signal
Hints Do not adjust the exterior mirrors
Do not adjust the exterior mirror while
driving and when turn signals/hazard warning
flashers are on, or else the additional turn sig‐
nal lights in the exterior mirror are out of posi‐
tion and can't be seen.◀
Using turn signals
Press the lever beyond the resistance point.
To switch off manually, press the lever to the
resistance point.
Unusually rapid flashing of the indicator lamp
indicates that a turn signal bulb has failed.
Triple turn signal activation Press the lever to the resistance point.
The turn signal flashes three times.
The function can be activated or deactivated.
Seite 77DrivingControls77
Online Edition for Part no. 01 40 2 954 285 - II/15
Page 85 of 263
Steptronic transmission
Selector lever positions
D Drive Selector lever position for normal vehicle oper‐
ation. All gears for forward travel are activated
automatically.
R is Reverse
Select only when the vehicle is stationary.
N Neutral: The vehicle may roll. Use in automatic car
washes, e.g.
When the ignition is switched off, refer to
page 70, selector lever position P is engaged
automatically.
P Park Select only when the vehicle is stationary. The
drive wheels are blocked.
P is engaged automatically:▷After the engine is switched off when the
vehicle is in radio-ready state, refer to
page 70, or when the ignition is switched
off, refer to page 70, and when selector
lever position R or D is set.▷With the ignition off, if selector lever posi‐
tion N is set.▷If the driver's safety belt is released, the
driver's door is opened, and the brake
pedal is not pressed while the vehicle is
stationary and selector lever position D or
R is set.
Before exiting the vehicle, make sure that se‐
lector lever position P is set. Otherwise, the ve‐
hicle may begin to move.
Kickdown Kickdown is used to achieve maximum driving
performance. Step on the accelerator pedal
beyond the resistance point at the full throttle
position.
Engaging selector lever positions Press on the brake pedal until you start
driving
To prevent the vehicle from creeping after you
select a gear, maintain pressure on the brake
pedal until you are ready to start.◀▷It is not possible to shift out of selector
lever position P until the engine is running
and the brake is applied.▷With the vehicle is stationary, press on the
brake pedal before shifting out of P or N;
otherwise, the shift command will not be
executed: shift lock.
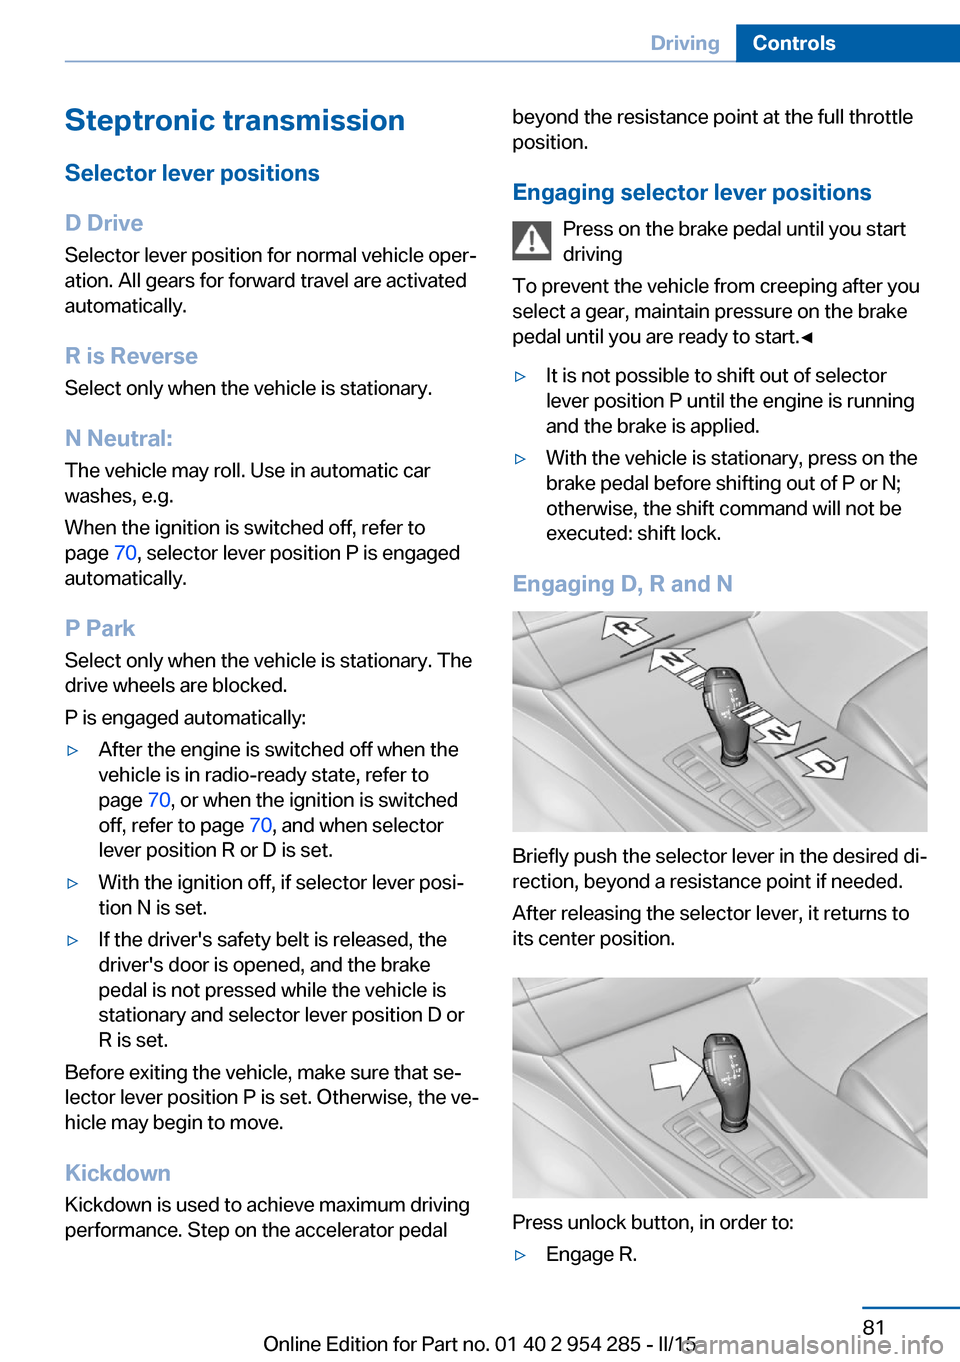
Engaging D, R and N
Briefly push the selector lever in the desired di‐
rection, beyond a resistance point if needed.
After releasing the selector lever, it returns to
its center position.
Press unlock button, in order to:
▷Engage R.Seite 81DrivingControls81
Online Edition for Part no. 01 40 2 954 285 - II/15
Page 92 of 263
In addition, an acoustic signal may sound and a
text message may appear on the Control Dis‐
play.
Indicator/warning lights
General information
The indicator and warning lights in the instru‐
ment cluster can light up in a variety of combi‐
nations and colors.
Several of the lights are checked for proper
functioning and light up temporarily when the
engine is started or the ignition is switched on.
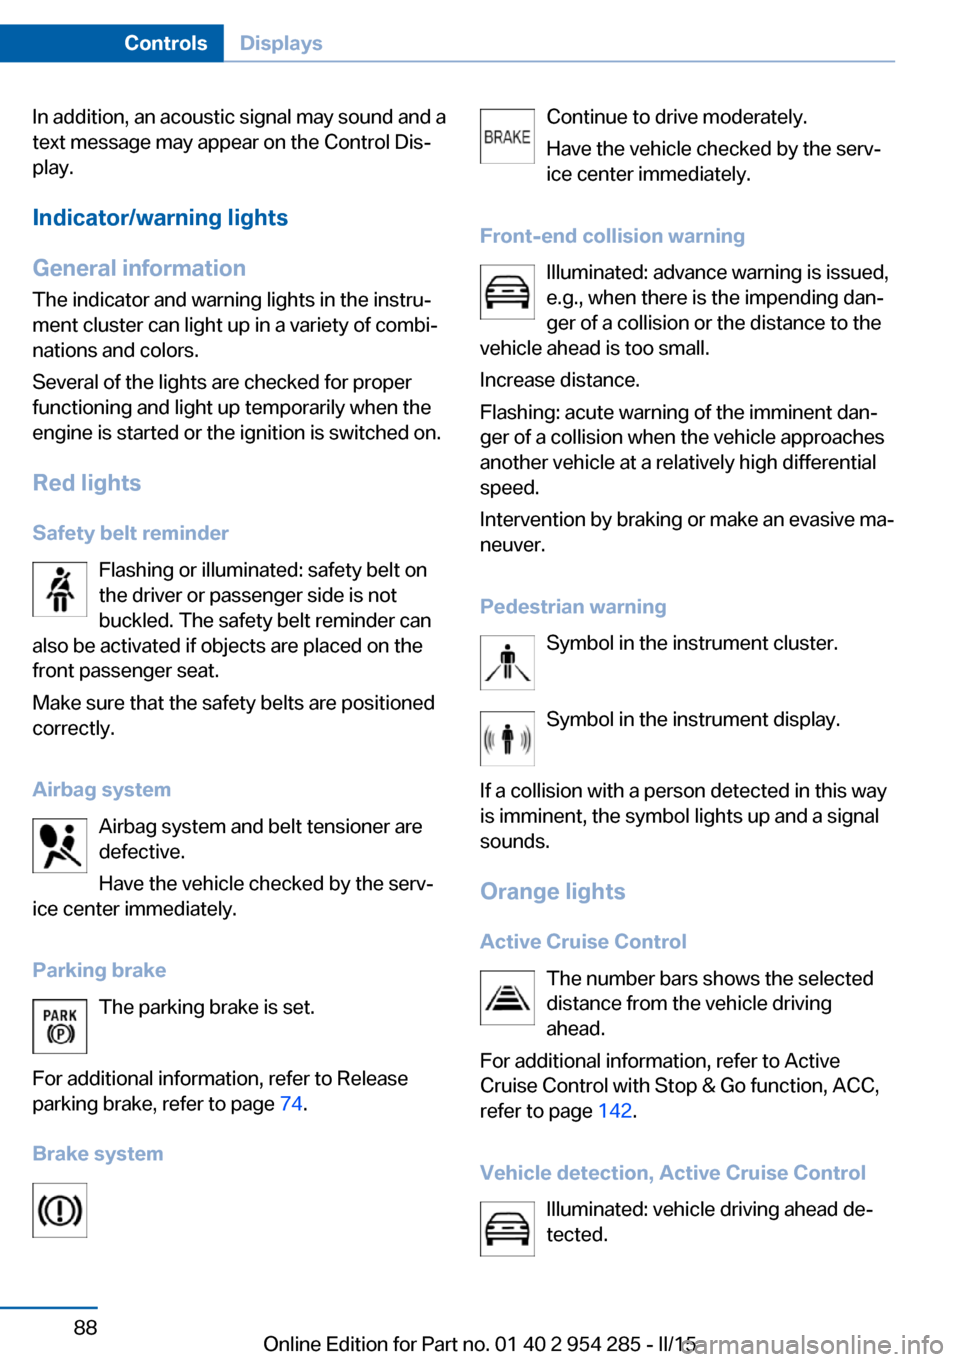
Red lights Safety belt reminder Flashing or illuminated: safety belt on
the driver or passenger side is not
buckled. The safety belt reminder can
also be activated if objects are placed on the
front passenger seat.
Make sure that the safety belts are positioned
correctly.
Airbag system Airbag system and belt tensioner are
defective.
Have the vehicle checked by the serv‐
ice center immediately.
Parking brake The parking brake is set.
For additional information, refer to Release
parking brake, refer to page 74.
Brake systemContinue to drive moderately.
Have the vehicle checked by the serv‐ ice center immediately.
Front-end collision warning Illuminated: advance warning is issued,
e.g., when there is the impending dan‐
ger of a collision or the distance to the
vehicle ahead is too small.
Increase distance.
Flashing: acute warning of the imminent dan‐
ger of a collision when the vehicle approaches
another vehicle at a relatively high differential
speed.
Intervention by braking or make an evasive ma‐
neuver.
Pedestrian warning Symbol in the instrument cluster.
Symbol in the instrument display.
If a collision with a person detected in this way
is imminent, the symbol lights up and a signal
sounds.
Orange lights Active Cruise Control The number bars shows the selected
distance from the vehicle driving
ahead.
For additional information, refer to Active
Cruise Control with Stop & Go function, ACC,
refer to page 142.
Vehicle detection, Active Cruise Control Illuminated: vehicle driving ahead de‐
tected.Seite 88ControlsDisplays88
Online Edition for Part no. 01 40 2 954 285 - II/15
Page 138 of 263
Driving stability control systemsVehicle features and optionsThis chapter describes all standard, country-
specific and optional features offered with the
series. It also describes features that are not
necessarily available in your car, e. g., due to
the selected options or country versions. This
also applies to safety-related functions and
systems. The respectively applicable country
provisions must be observed when using the
respective features and systems.
Antilock Brake System ABS ABS prevents locking of the wheels during
braking.
The vehicle contains its steering power even
during full brake applications, thus increasing
active safety.
ABS is operational every time you start the en‐
gine.
Brake assistant When you apply the brakes rapidly, this system
automatically produces the greatest possible
braking force boost. It reduces the braking dis‐
tance to a minimum during emergency stop.
This system utilizes all of the benefits provided
by ABS.
Do not reduce the pressure on the brake pedal
for the duration of the emergency stop.
Adaptive brake assistant In combination with the Active Cruise Control,
this system ensures that the brakes respond
even more rapidly when braking in critical sit‐
uations.Drive-off assistant
This system supports driving off on inclines.
The parking brake is not required.1.Hold the vehicle in place with the foot
brake.2.Release the foot brake and drive off with‐
out delay.
After the foot brake is released, the vehicle is
held in place for approx. 2 seconds.
Depending on the vehicle load or when a trailer
is used, the vehicle may roll back slightly.
Driving off without delay
After releasing the foot brake, start driv‐
ing without delay, since the drive-off assistant
will not hold the vehicle in place for more than
approx. 2 seconds and the vehicle will begin to
roll back.◀
DSC Dynamic Stability
Control
The concept DSC prevents traction loss in the power
wheels when driving off and accelerating.
DSC also recognizes unstable vehicle condi‐
tions such as fishtailing or nose-diving. Within
the physical limits DSC helps to keep the vehi‐
cle on a steady course by reducing engine
speed and by applying brakes to the individual
wheels.
Note Adjust your driving style to the situation
An appropriate driving style is always the
responsibility of the driver.
The laws of physics cannot be repealed, not
even with DSC.
Seite 134ControlsDriving stability control systems134
Online Edition for Part no. 01 40 2 954 285 - II/15