2015 BMW 5 SERIES GRAN TURISMO Park release
[x] Cancel search: Park releasePage 164 of 263

▷Maximum distance to row of parked vehi‐
cles: 5 ft/1.5 m.
Suitable parking space
▷Gap between two objects with a minimum
length of approx. 5 ft/1.5 m.▷Min. length of gap between two objects:
your vehicle's length plus approx.
4 ft/1.2 m.▷Minimum depth: approx. 5 ft/1.5 m.
Regarding the parking procedure
▷Doors and trunk lid closed.▷Parking brake released.▷When parking in parking spaces on the
driver's side, the corresponding turn signal
must be set where applicable.
Overview
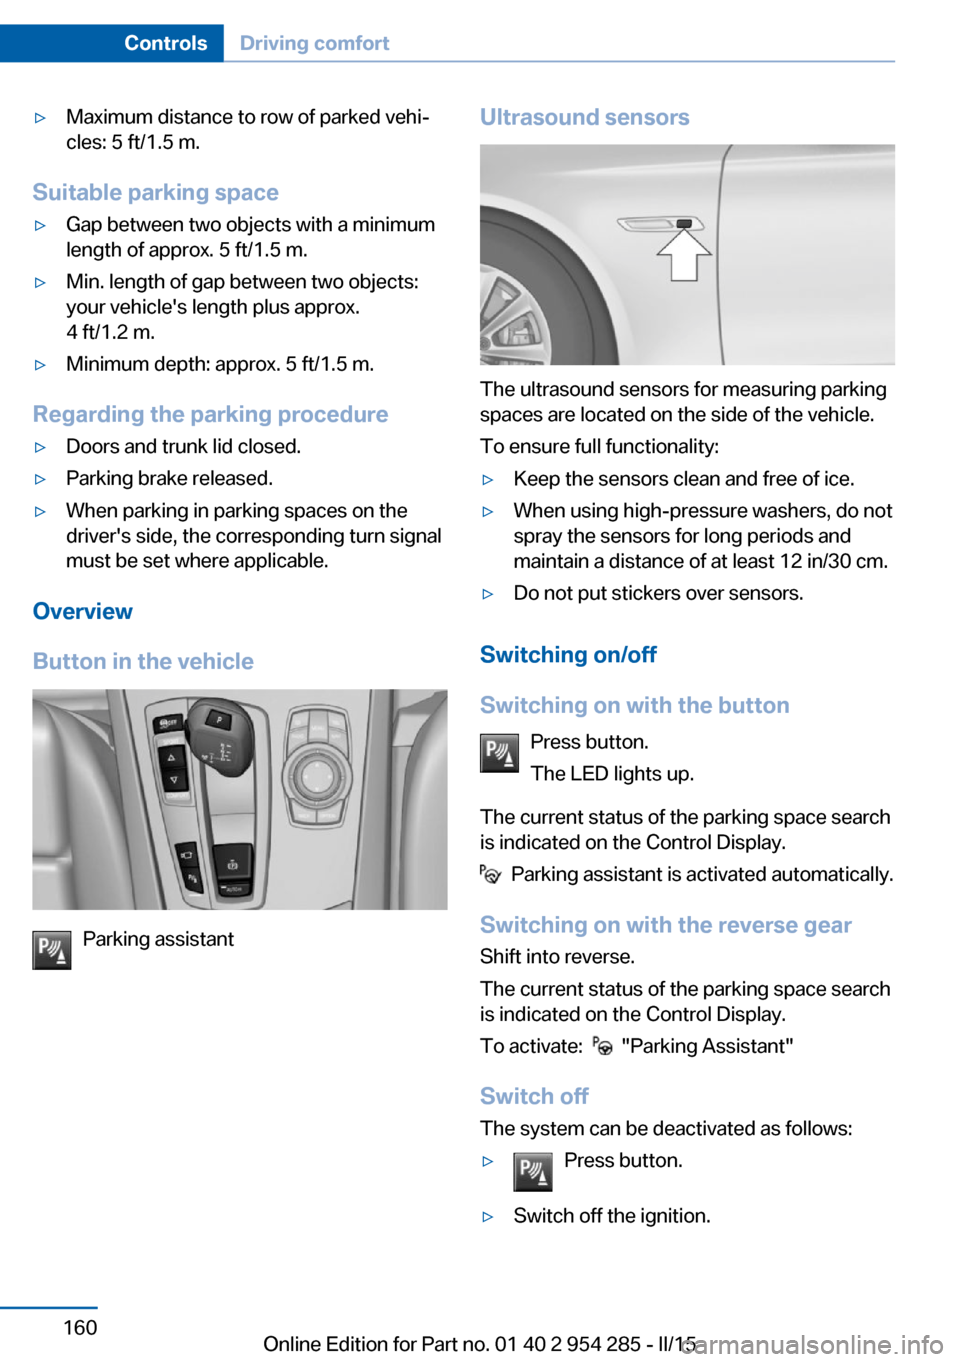
Button in the vehicle
Parking assistant
Ultrasound sensors
The ultrasound sensors for measuring parking
spaces are located on the side of the vehicle.
To ensure full functionality:
▷Keep the sensors clean and free of ice.▷When using high-pressure washers, do not
spray the sensors for long periods and
maintain a distance of at least 12 in/30 cm.▷Do not put stickers over sensors.
Switching on/off
Switching on with the button Press button.
The LED lights up.
The current status of the parking space search
is indicated on the Control Display.
Parking assistant is activated automatically.
Switching on with the reverse gear
Shift into reverse.
The current status of the parking space search
is indicated on the Control Display.
To activate:
"Parking Assistant"
Switch off
The system can be deactivated as follows:
▷Press button.▷Switch off the ignition.Seite 160ControlsDriving comfort160
Online Edition for Part no. 01 40 2 954 285 - II/15
Page 175 of 263

erases all programming of the buttons on
the interior rearview mirror.3.Hold the hand-held transmitter for the sys‐
tem to be controlled approx. 1 to 3 in/2.5 to
8 cm away from the buttons of the interior
rearview mirror. The required distance de‐
pends on the manual transmitter.4.Simultaneously press and hold the button
of the desired function on the hand-held
transmitter and the button to be program‐
med on the interior rearview mirror. The
LED on the interior rearview mirror will be‐
gin flashing slowly.5.Release both buttons as soon as the LED
flashes more rapidly. The LED flashing
faster indicates that the button on the inte‐
rior rearview mirror has been programmed.
If the LED does not flash faster after at
least 60 seconds, change the distance be‐
tween the interior rearview mirror and the
hand-held transmitter and repeat the step.
Several more attempts at different distan‐
ces may be necessary. Wait at least
15 seconds between attempts.
Canada: if programming with the hand-
held transmitter was interrupted, hold
down the interior rearview mirror button
and repeatedly press and release the
hand-held transmitter button for 2 sec‐
onds.6.To program other functions on other but‐
tons, repeat steps 3 to 5.
The systems can be controlled using the inte‐
rior rearview mirror buttons.
Special feature of the alternating-
code wireless system
If you are unable to operate the system after
repeated programming, please check if the
system to be controlled features an alternat‐
ing-code system.
Read the system's operating manual, or press
the programmed button on the interior rear‐
view mirror longer. If the LED on the interior
rearview mirror starts flashing rapidly and then
stays lit constantly for 2 seconds, the system
features an alternating-code system. Flashing
and continuous illumination of the LED will re‐
peat for approximately 20 seconds.
For systems with an alternating-code system,
the universal garage door opener and the sys‐
tem also have to be synchronized.
Please read the operating manual to find out how to synchronize the system.
Synchronizing is easier with the aid of a sec‐
ond person.
To synchronize:1.Park the vehicle within range of the re‐
mote-controlled system.2.Program the relevant button on the interior
rearview mirror as described.3.Locate and press the synchronizing button
on the system being programmed. You
have approx. 30 seconds for the next step.4.Hold down the programmed button on the
interior rearview mirror for approximately
3 seconds and then release it. If necessary,
repeat this step up to three times in order
to finish synchronization. Once synchroni‐
zation is complete, the programmed func‐
tion will be carried out.
Reprogramming individual buttons
1.Switch on the ignition.2.Press and hold the interior rearview mirror
button to be programmed.3.As soon as the interior rearview mirror LED
starts flashing slowly, hold the hand-held
transmitter for the system to be controlled
approx. 1 to 3 in/2.5 to 8 cm away from the
buttons of the interior rearview mirror. The
required distance depends on the manual
transmitter.Seite 171Interior equipmentControls171
Online Edition for Part no. 01 40 2 954 285 - II/15
Page 242 of 263

Before driving into a car wash
In order to ensure that the vehicle can roll in a
car wash, take the following steps:1.Drive into the car wash.2.Engage selector lever position N.3.Deactivating Automatic Hold, refer to
page 75.4.Release the parking brake.5.Switch the engine off.
In this way, the ignition remains switched
on, and a Check-Control message is dis‐
played.
Do not turn off the ignition in the car
wash
Do not turn off the ignition in the car wash;
otherwise, selector lever position P is en‐
gaged and damages can result.◀
The vehicle cannot be locked from the outside
when in selector lever position N. A signal
sounds when an attempt is made to lock the
vehicle.
To start the engine:
1.Depress the brake pedal.2.Press the Start/Stop button.
Pressing the Start/Stop button without step‐
ping on the brake turns the ignition off.
Selector lever positionSelector lever position P is engaged automati‐
cally:
▷When the ignition is switched off.▷After approx. 15 minutes.
Headlights
▷Do not rub dry and do not use abrasive or
acidic cleansers.▷Soak areas that have been dirtied e. g.,
from insects, with shampoo and wash off
with water.▷Thaw ice with de-icing spray; do not use an
ice scraper.
After washing the vehicle
After washing the vehicle, apply the brakes
briefly to dry them; otherwise, braking action
can be reduced and corrosion of the brake
discs can occur.
Completely remove all residues on the win‐
dows, to minimize loss of visibility due to
smearing and to reduce wiper noises and
wiper blade wear.
Vehicle care
Car care products BMW recommends using care and cleaning
products from BMW, since these have been
tested and approved.
Car care and cleaning products
Follow the instructions on the container.
When cleaning the interior, open the doors or
windows.
Only use products intended for cleaning vehi‐
cles.
Cleansers can contain substances that are
dangerous and harmful to your health.◀
Vehicle paint
Regular care contributes to driving safety and
value retention. Environmental influences in
areas with elevated air pollution or natural con‐
taminants, such as tree resin or pollen can af‐
fect the vehicle's paintwork. Tailor the fre‐
quency and extent of your car care to these
influences.
Aggressive substances such as spilled fuel, oil,
grease or bird droppings, must be removed im‐
mediately to prevent the finish from being al‐
tered or discolored.
Only use respectively approved cleaning and
care products for vehicles with matte finish.
Seite 238MobilityCare238
Online Edition for Part no. 01 40 2 954 285 - II/15
Page 254 of 263

Computer, refer to On-boardcomputer 96
Condensation on win‐ dows 164
Condensation under the vehi‐ cle 188
Condition Based Service CBS 223
Configure driving mode 141
Confirmation signal 47
ConnectedDrive, see user's manual for Navigation, En‐
tertainment and Communi‐
cation
ConnectedDrive Services
Continued driving with a flat tire 111 , 114
Control Display 18
Control Display, settings 98
Controller 18
Control systems, driving sta‐ bility 134
Convenient opening with the remote control 37
Coolant 221
Coolant level 221
Coolant temperature 92
Cooling function 165
Cooling, maximum 165
Cooling system 221
Cornering light 103
Corrosion on brake discs 188
Cosmetic mirror 172
Courtesy lamps during un‐ locking 37
Courtesy lamps with the vehi‐ cle locked 38
Cruise control 149
Cruise control, active with Stop & Go 142
Cruise Control, refer to Active Cruise Control 142
Cruising range 92
Cupholder 180
Curb weight 245
Current fuel consumption 93 D
Damage, tires 209
Damping control, dy‐ namic 137
Data, technical 244
Date 92
Daytime running lights 103
Defrosting, refer to Windows, defrosting 164
Dehumidifying, air 165
Deleting personal data 24
Deletion of personal data 24
Destination distance 97
Digital clock 92
Dimensions 244
Dimmable exterior mirrors 64
Dimmable interior rearview mirror 64
Direction indicator, refer to Turn signals 77
Display, electronic, instru‐ ment cluster 84
Display in windshield 100
Display lighting, refer to In‐ strument lighting 105
Displays 85
Displays, cleaning 240
Disposal, coolant 222
Disposal, vehicle battery 230
Distance control, refer to PDC 151
Distance to destination 97
Divided screen view, split screen 23
Door lock 39
Door lock, refer to Remote control 34
Doors, Automatic Soft Clos‐ ing 40
Downhill control 136
Drive-off assistant 134
Drive-off assistant, refer to DSC 134
Driver assistance, refer to In‐ telligent Safety 115 Driving Assistant, refer to In‐
telligent Safety 115
Driving Dynamics Con‐ trol 139
Driving instructions, break- in 186
Driving mode 139
Driving notes, general 186
Driving stability control sys‐ tems 134
Driving tips 186
DSC Dynamic Stability Con‐ trol 134
DTC Dynamic Traction Con‐ trol 135
Dynamic Damping Con‐ trol 137
Dynamic Drive 137
Dynamic Stability Control DSC 134
Dynamic Traction Control DTC 135
E
ECO PRO 193
ECO PRO, bonus range 194
ECO PRO display 193
ECO PRO displays 86
ECO PRO driving mode 193
ECO PRO mode 193
ECO PRO Tip - driving in‐ struction 195
EfficientDynamics 195
Electronic displays, instru‐ ment cluster 84
Electronic oil measure‐ ment 218
Electronic Stability Program ESP, refer to DSC 134
Emergency detection, remote control 35
Emergency release, fuel filler flap 200
Emergency release, parking brake 76 Seite 250ReferenceEverything from A to Z250
Online Edition for Part no. 01 40 2 954 285 - II/15