2015 AUDI TT ROADSTER instrument panel
[x] Cancel search: instrument panelPage 40 of 244
38 Opening and closing
well as the vehicle doors closed when not
in use.
@ Tips
- If the rear lid is ope n or not properly
locked when the ignition is turned on,
the door and rear lid warning appears in
the instrument cluster disp lay.
- If the rear lid on a locked vehicle is un
l ocked with the middle button
c;j on the
remote key, the rear lid is automatically
l ocked again immediately after clos ing.
This is indicated by the turn signals
blinking .
Rear Lid Emergency Release
If the rear lid cannot be opened , an emergen
cy release is provided .
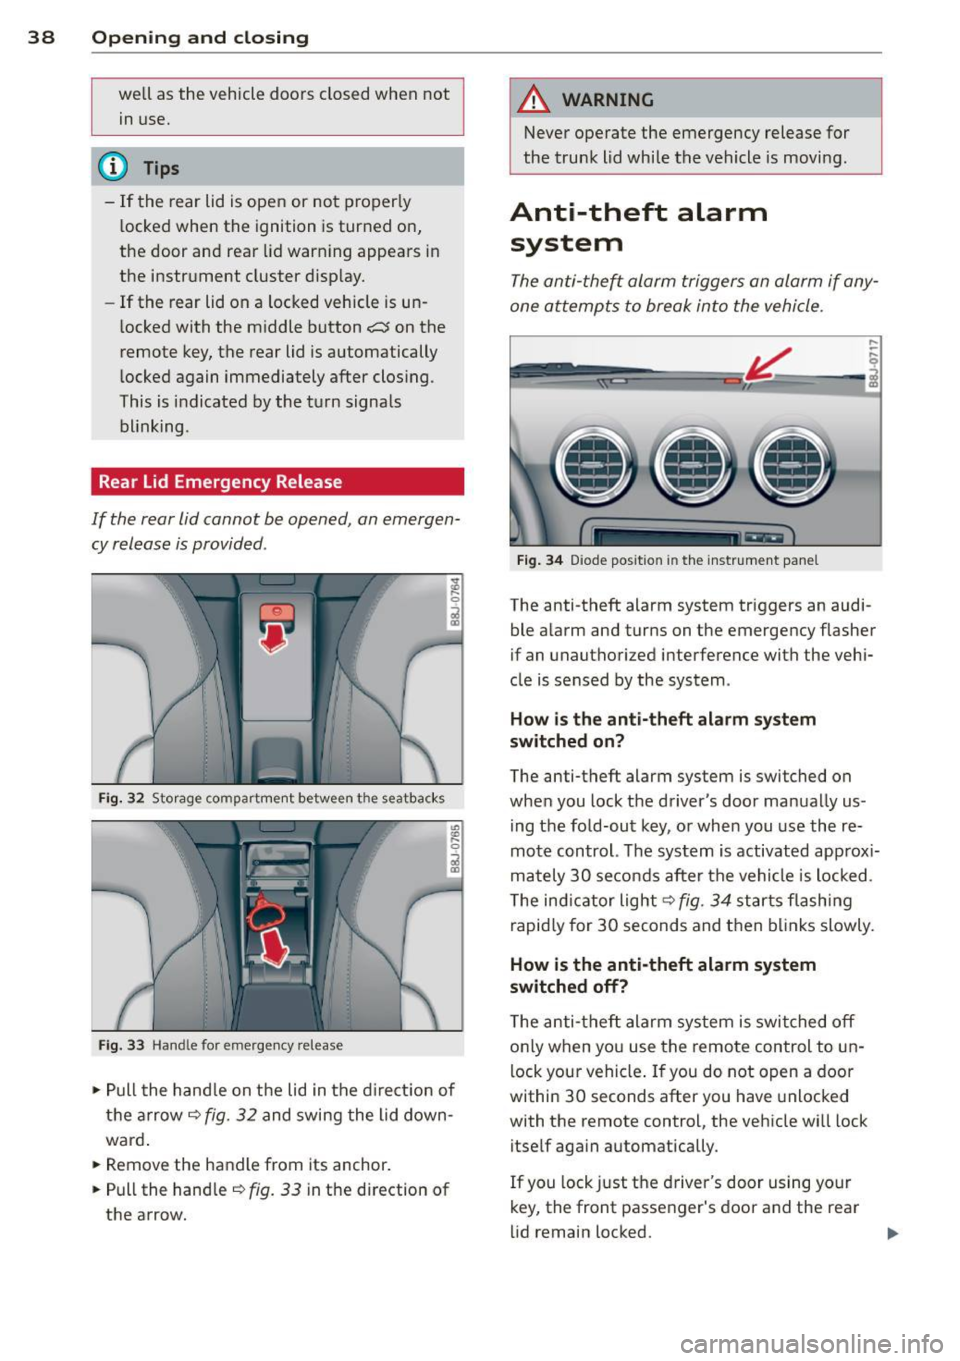
Fig. 32 Storage compartment between t he seatbacks
Fig. 33 Hand le for emergency re lease
., Pull the handle on the lid in the direction of
the arrow
i=;,fig. 32 and swing the lid down
ward .
.. Remove the handle from its anchor.
.. Pull the handle
r::;,fig. 33 in the direction of
the arrow.
A WARNING
-Never operate the emergency release for
the trunk lid while the vehicle is moving .
Anti-theft alarm
system
The anti-the~ alarm triggers an alarm if any
one attempts to break into the vehicle.
Fig. 34 Diode positio n in th e instrument panel
,..
-q
i
The anti-theft alarm system triggers an audi
ble a larm and turns on the emergency flasher
if an unauthorized interference with the vehi
cle is sensed by the system .
How is the anti-theft alarm system
switched on?
The anti-theft alarm system is switched on
when you lock the driver's door manually us
ing the fold-out key, or when you use the re
mote control. The system is activated approx i
mately 30 seconds after the vehicle is locked.
T he ind icator light
r::;, fig. 34 starts flashing
rapidly for 30 seconds and then blinks slowly.
How is the anti-theft alarm system
switched off?
The anti-theft alarm system is switched off
o nl y when you use the remote control to un
lock your vehicle . If you do not open a door
within 30 seconds after you have unlocked
with the remote control, the vehicle wi ll lock
itself aga in automatically .
If you lock just the driver's door using your
key, the front passenger's door and the rear
lid remain locked. ..,.
Page 50 of 244

48 Clear vision
Clear vision Lights
Switching the headlights on and off
Fig . 52 Instr ument pane l: lig ht sw itc h
Fig. 53 Instrum ent pane l: ligh t swi tch with daytime
runnin g lights (DRL)
The light switch must not be overturned past
the stops in
either direct ion.
Switching on automatic headlight
control*
.,. Turn the light switch to AUTO* ¢ fig. 52.
Switching on the side marker lights
... Turn the light switch to :;oo: .
Switching on the headlights and high
beam
... Turn the light switch to iD.
... Push the high beam lever forward towards
the instrument panel¢
page SO.
Switching off the lights
... Turn the light switch to 0.
The head lights only work when the ignition is
switched on. While start ing the engine or
when switching off the ignition, the head- lights
will go off and only the side ma rker
lights will be on.
Daytime running lights (DRL) (USA
models)
T he daytime running lights can be turned on
or off using this function. If the function is ac
tive, the daytime running lights are turned on
automatically when the ignit ion is switched
on.
The daytime running lights are activated
only
when the light switch is at the AUTO* or DRL *
position.
Daytime running lights (Canada models
only)
The daytime running lights are activated only
when the light switch ¢ fig. 52 is either at the
0 or the :;oo: position.
T he daytime r unning lights funct ion cannot be
turned off.
Automatic headlight control*
In the switch position AUTO the automatic
headlight control
is turned on. The low
beams are turned on automatically through a
light sensor as soon as ambient brightness
(e .g. when driving into a tunnel) falls below a
value preset at the factory. When ambient
brightness increases aga in, the low beams are
turned off again automatically ¢.&. .
In the
AUTO position the low beams are
switched off automatically when the ignition
is turned off .
Light Sensor Malfunction*
In the event of a light sensor malfunction, the
driver is notified in the instrument cluster dis
play:
tal Automatic headlights/automatic wipers
defective
For safety reasons the low beams are turned
on permanently with the switch in
AUTO* .
However, you can continue to turn the lights
on and off using the light switch . Have the
Ill>-
Page 54 of 244
52 Clear vis ion
Instrument panel illumination
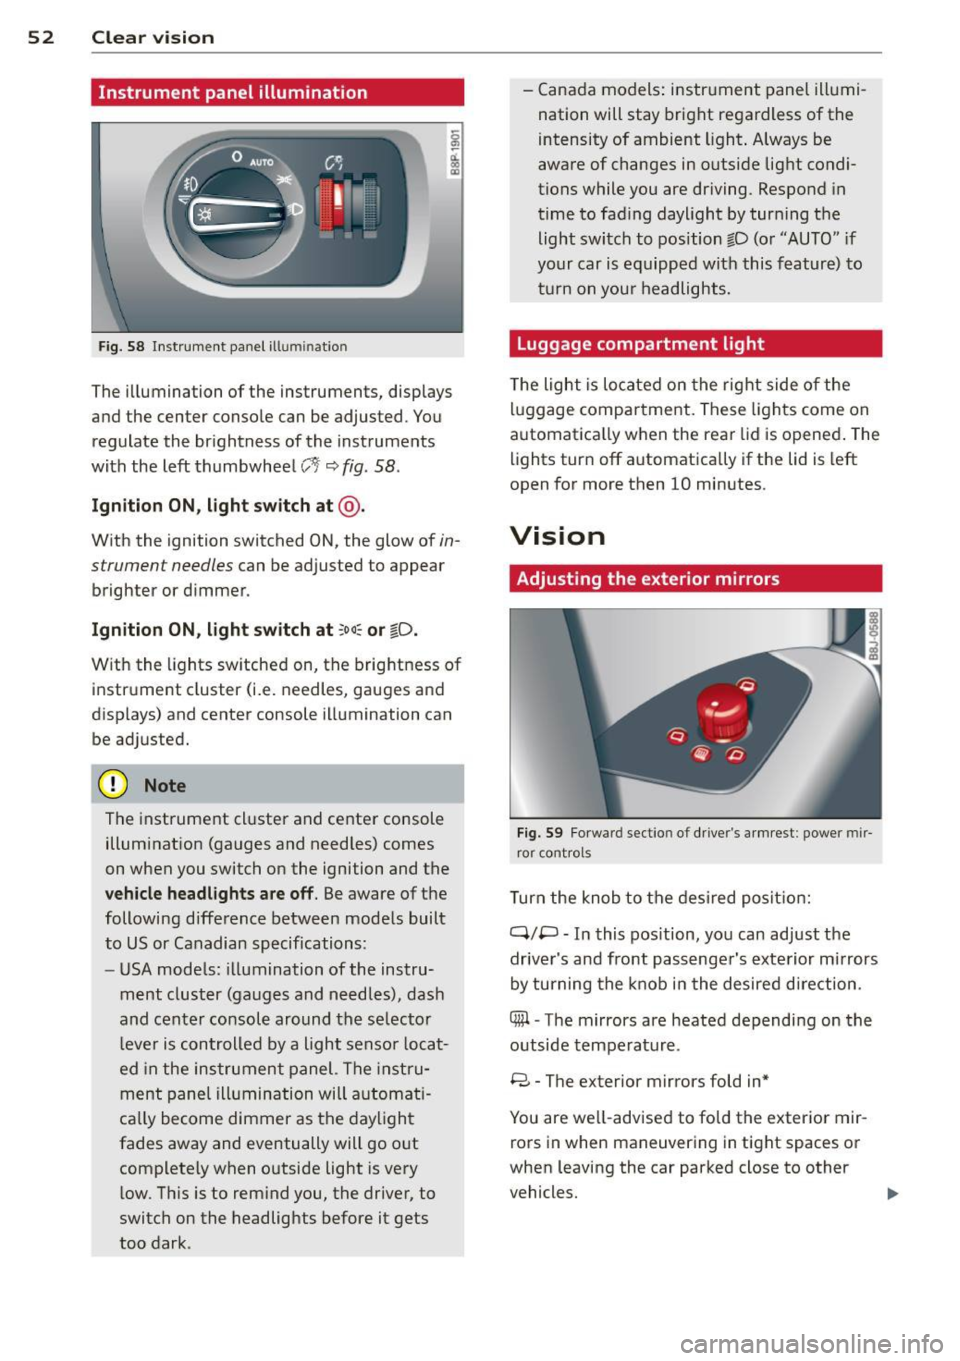
F ig. 58 Instrument panel ill umination
The illumination of the instruments, displays
and the center console can be adjusted. You
regulate the brightness of the instruments
with the left thumbwheel
CJ:J ~ fig. 58.
Ignition ON, light switch at @ .
With the ignition switched ON, the glow of in
strument needles can be adjusted to appear
brighter or dimmer.
Ignition ON , light switch at ;oo~ or io .
With the l ights sw itched on, the brightness of
instrument cluster (i.e. needles, gauges and
displays) and center console illumination can
be adjusted.
@ Note
The instrument cl uster and cente r console
illumination (gauges and needles) comes
on when you switch on the ignition and the
vehicle headligh ts ar e off . Be aware of the
following difference between mode ls built
to US or Canadian specifications:
- USA mode ls: illumination of the instru
ment cluster (gauges and needles), dash
and center consol e around the se lector
l ever is controlled by a light senso r locat
ed in the instrument panel. The instru
ment pane l illumination will a utomat i
cally become dimmer as the daylight
fades away and eventually will go out
complete ly when outside light is very
l ow . Th is is to rem ind you, the driver, to
switch on the headlights before it gets
too dark . -
Canada models: instrument panel illumi
nation will stay bright regardless of the
intensity of ambient light . Always be
aware of changes in outside light condi
tions while you are driving. Respond in
time to fading daylight by tur ning the
light switch to position fD (o r "AUTO" if
your car is equipped with this feature) to
t ur n on you r headlights.
Luggage compartment light
The light is located on the right side of the
lu ggage compartme nt. These lights come on
automat ica lly when the rear lid is opened . The
lights turn off automatica lly if the lid is left
open for more then 10 minutes.
Vision
Adjusting the exterior mirrors
Fig. 59 Fo rwa rd section of driver's a rmrest: power mir
ror controls
Turn the knob to the desired posit ion:
Q/ P -In this pos ition, you can adjust the
driver's and front passenger's exte rior m irrors
by turning the knob in the desired d irection.
4iil -The mirrors are heated depending on the
outside temperature .
8 -The exterior mirrors fold in*
You are we ll-advised to fold the exterior mir
rors in when maneuvering in tight spaces or
when leaving the car parked close to other
vehicles. ..,,.
Page 61 of 244
Seats and storage
General recommen
dations
Why is your seat adjustment so important?
The safety belts and the airbag system can
only provide maximum protection if the front
seats are correctly adjusted.
There are various ways of adjusting the front
seats to provide safe and comfortable support
for the driver and the front passenger. Adjust
your seat properly so that :
- you can easily and quick ly reach all the
switches and controls in the instrument
panel
- your body is properly supported thus reduc ing physical stress and fatigue
- the safety belts and airbag system can offe r
maximum protection
¢ page 108.
In the following sections, you will see exactly
how you can best adjust your seats .
There are special regulations and instructions
for installing a child safety seat on the front passenger's seat. Always heed the informa
tion regard ing child safety provided in
¢ page 129, Child Safety.
A WARNING
Incorrect seating position of the driver and
all other passengers can result in serious
personal injury.
- Always keep your feet on the f loor when
the vehicle is in motion -never p ut your
feet on top of the instrument panel, out
of the w indow or on top of the seat cush
ion! This applies espec ially to the passen
gers . If your seating position is incorrect
you increase the r isk of injury in the case
of sudden braking or an acc ident. If the
airbag inflates and the seating position
is incorrect this could result in personal
injury or even death.
- It is important for bo th the driver and
front passenger to keep a distance of a t
Seat s an d sto rage 59
least 10 inches (25 cm) between them
selves and the steering wheel and/or in
strument panel. If you're s itting any
closer than th is, the airbag system can
not protect you properly. In addition to
this, the front seats and head restra ints
must be adjusted to yo ur body height so
that they can give you max imum prote c
tion.
- Always try to keep as much distance as
possible be tween yourself and the s teer
ing wheel o r instrument pane l.
- Do not adjust the driver's or front pas
senger's seat whi le the vehicle is moving.
Your seat may move unexpected ly, caus
ing sudden loss of vehicle control and
personal injury . If you ad just yo ur seat
while the veh icle is moving, you are out
of posit ion.
Driver's seat
The correct seat position is important for safe
and relaxed driving.
We recommend that you adjust the driver's
seat in the fo llowing manner:
.,. Adj ust the seat in fore and aft direction so
t ha t you can easily push the peda ls to the
floor whi le keeping your knee sligh tly bent
c::> A in Why is your seat adjustment so im
portant? on page 59 .
.,. Adjust the seatback so that when you sit
w ith your back against the seatback, you can
still grasp the top of the steering wheel.
.,. Pos it ion the head restrai nt accord ing to the
occupant 's height
c::> page 62 . For maxi
mum protection, the top of the head re
straint shou ld be at least at eye level, pref
erably higher and idea lly level with the top
of the head
¢ page 94, fig. 100 .
A WARNING
Never place any objects in the dr iver's foot
well. An object could get into the pedal
area and interfere with pedal funct ion. In
case of sudden braking or an acc ident, you
would not be able to brake or accelerate!
Page 95 of 244
~ Always keep both feet in the footwell so
that you are in control of the vehicle at all
times.
For detailed information on how to adjust the
driver's seat, see
c:> page 60.
A WARNING
Drivers who are unbelted, out of position
or too close to the airbag can be seriously
injured by an airbag as it deploys. To help
reduce the risk of serious personal injury:
- Always adjust the driver's seat and the
steering wheel so that there are at least
10 inches (25 cm) between your breast
bone and the steering wheel.
- Always adjust the driver's seat and the
steering wheel so that there are at least
4 inches (10 cm) between the knees and
the lower part of the instrument panel.
- Always hold the steering wheel on the
outside of the steering wheel rim with
your hands at the 9 o'clock and 3 o'clock positions to help reduce the risk of per
sonal injury if the driver's airbag inflates.
- Never hold the steering wheel at the
12 o'clock position or with your hands at
other positions inside the steering wheel
rim or on the steering wheel hub. Hold
ing the steering wheel the wrong way
can cause serious injuries to the hands,
arms and head if the driver's airbag in
flates
- Pointing the steering wheel toward your
face decreases the ability of the supple
mental driver's airbag to protect you in a
collision .
- Always sit in an upright position and nev
er lean against or place any part of your
body too close to the area where the air
bags are located.
- Before driving, always adjust the front
seats and head restraints properly and make sure that all passengers are prop
erly restrained.
- Never adjust the seats while the vehicle
is moving. Your seat may move unexpect-
Driving Safely 93
ed ly and you could lose control of the ve
hicle .
- Never drive with the backrest reclined or
tilted far back! The farther the backrests
are tilted back, the greater the risk of in
jury due to incorrect positioning of the safety belt and improper seating posi
tion .
- Children must always ride in child seats
c:> page 129 . Special precautions apply
when installing a child seat on the front passenger seat
c:> page 108.
Proper seating position for the front
passenger
The proper front passenger seating position
is important for safe, relaxed driving .
For your own safety and to reduce the risk of
injury in the event of an accident, we recom
mend that you adjust the seat for the front
passenger to the following position :
~ Adjust the angle of the seatback so that it is
in an upright position and your back comes
in full contact with it whenever the vehicle is
moving.
~ Adjust the head restraint so that the upper
edge is as even w ith the top of your head as
possible but not lower than eye level and so
that it is as close to the back of your head as
possible
c:> page 94.
~ Keep both feet flat on the floor in front of
the front passenger seat .
~ Fasten and wear safety belts correctly
c:> page 103.
For detailed information on how to adjust the
front passenger's seat, see
c:> page 59 .
A WARNING
Front seat passengers who are unbelted,
out of position or too close to the airbag
can be seriously injured or killed by the air
bag as it unfolds. To help reduce the risk of
serious personal injury:
•
•
Page 96 of 244
94 Driving Safely
-Passengers must always sit in an upright
position and never lean against or place
any part of their body too close to the
area where the airbags are located.
- Passengers who are unbelted, out of po
sition or too close to the airbag can be
seriously injured by an airbag as it un
folds with great force in the blink of an
eye.
- Always make sure that there are at least
10 inches (25 cm) between the front
passenger's breastbone and the instru
ment panel.
-Always make sure that there are at least
4 inches (10 cm) between the front pas senger's knees and the lower part of the
instrument panel.
- Each passenger must always sit on a seat
of their own and properly fasten and
wear the safety belt belonging to that
seat.
- Before driving, always adjust the front
passenger seat and head restraint prop
erly.
- Always keep your feet on the floor in
front of the seat. Never rest them on the
seat, instrument panel, out of the win
dow, etc. The airbag system and safety
belt will not be able to protect you prop
erly and can even increase the risk of in
jury in a crash .
- Never drive with the backrest reclined or
tilted far back! The farther the backrests
are tilted back, the greater the risk of in
jury due to incorrect positioning of the
safety belt and improper seating posi
tion.
- Children must always ride in child seats
¢
page 129. Special precautions apply
when installing a child seat on the front
passenger seat ¢
page 108.
Proper adjustment of head restraints
Correctly adjusted head restraints are an im
portant port of your vehicle's occupant re straint system and can help to reduce the risk
of injuries in occident situations.
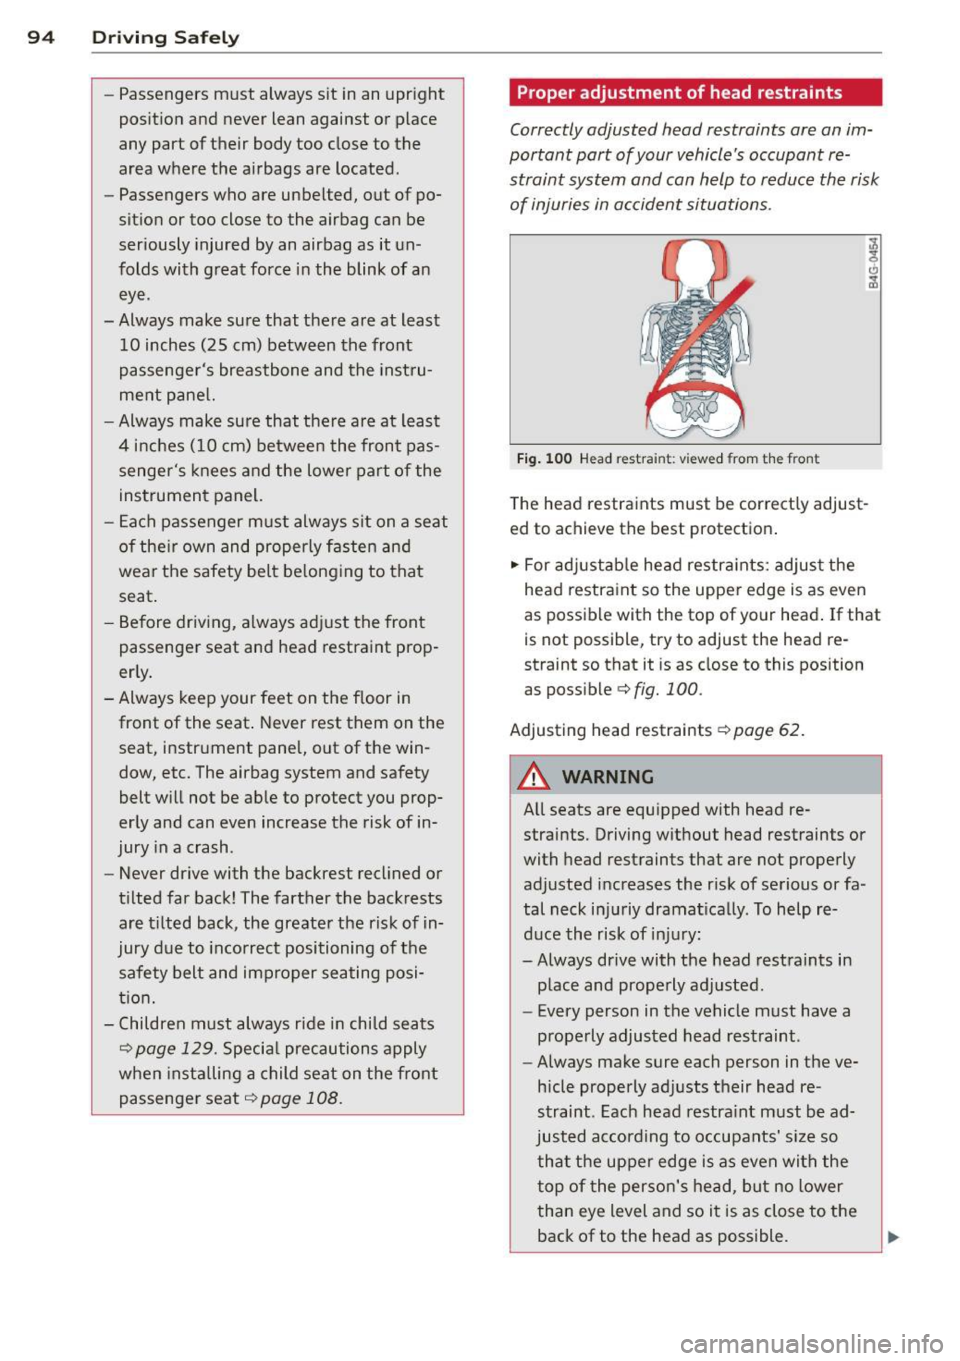
Fig. 100 Head restra int: v iewed from the front
The head restraints must be correctly adjust
ed to achieve the best protection.
" For adjustable head restraints: adjust the
head restraint so the upper edge is as even
as possible with the top of your head. If that
is not possible, try to adjust the head re
straint so that it is as close to this position
as possible¢
fig. 100.
Adjusting head restraints ¢ page 62.
A WARNING
-
All seats are equipped with head re-
straints. Driving without head restraints or
with head restraints that are not properly
adjusted increases the risk of serious or fa
tal neck injuriy dramatically . To help re
duce the risk of injury:
- Always drive with the head restraints in
place and properly adjusted.
- Every person in the vehicle must have a
properly adjusted head restraint.
- Always make sure each person in the ve
hicle properly adjusts their head re
straint . Each head restraint must be ad
justed according to occupants' size so
that the upper edge is as even with the
top of the person's head, but no lower
than eye level and so it is as close to the
back of to the head as possible.
Page 97 of 244
-Never attempt to adjust head restraint
while driving. If you have driven off and
must adjust the driver headrest for any
reason, first stop the vehicle safely be
fore attempting to adjust the head re
straint.
- Children must always be properly re
strained in a child restraint that is appro
priate for their age and size¢
page 129.
Examples of improper seating positions
The occupant restraint system can only re
duce the risk of injury if vehicle occupants are
properly seated.
Improper seating positions can cause serious
injury or death . Safety belts can only work
when they are properly positioned on the body. Improper seating positions reduce the
effectiveness of safety belts and will even in
crease the risk of injury and death by moving
the safety belt to critical areas of the body.
Improper seating positions also increase the
risk of serious injury and death when an air
bag deploys and strikes an occupant who is
not in the proper seating position. A driver is
responsible for the safety of all vehicle occu
pants and especially for children. Therefore:
.. Never allow anyone to assume an incorrect
seating position when the vehicle is being
used ¢,&. .
T he following bullets list only some sample
positions that will increase the risk of serious
injury and death. Our hope is that these exam
ples will make you more aware of seating po
sitions that are dangerous .
Therefore, whenever the vehicle is
moving :
-never stand up in the vehicle
- never stand on the seats
- never kneel on the seats
- never ride with the seatback reclined
- never lie down on the rear seat
- never lean up against the instrument panel
- never sit on the edge of the seat
- never sit sideways
Driving Safely 95
- never lean out the window
- never put your feet out the window
- never put your feet on the instrument panel
- never rest your feet on the seat cushion or
back of the seat
- never ride in the footwell
- never ride in the cargo area
A WARNING ,~
Improper seating positions increase the
risk of serious personal injury and death
whenever a vehicle is being used.
- Always make sure that all vehicle occu
pants stay in a proper seating position
and are properly restrained whenever the
vehicle is being used.
Driver and passenger
side footwell
Important safety instructions
A WARNING ~
Always make sure that the knee airbag can
inflate without interference. Objects be
tween yourself and the airbag can increase
the risk of injury in an accident by interfer
ing with the way the airbag deploys or by
being pushed into you as the airbag de
ploys.
- No persons (children) or animals should
ride in the footwell in front of the pas
senger seat. If the airbag deploys, this
can result in serious or fatal injuries.
- No objects of any kind should be carried
in the footwell area in front of the driv
er's or passenger's seat. Bulky objects
(shopping bags, for example) can ham
per or prevent proper deployment of the
airbag. Small objects can be thrown
through the vehicle if the airbag deploys
and injure you or your passengers.
-
•
•
Page 99 of 244
~ Distribute the load evenly in the luggage
compartment.
~ Always place and properly secure heavy items in the luggage compartment as far
forward as possible.
& WARNING
Improperly stored luggage or other items
can fly through the vehicle causing serious
personal injury in the event of hard brak
ing or an accident. To help reduce the risk
of serious personal injury :
- Always put objects, for example, luggage
or other heavy items in the luggage com
partment.
- Always secure objects in the luggage
compartment using the tie-down eyelets
and suitable straps.
& WARNING , ~
Heavy loads will influence the way your ve
hicle handles. To help reduce the risk of a
loss of control leading to serious personal
injury:
- Always keep in mind when transporting
heavy objects, that a change in the cen
ter of gravity can also cause changes in
vehicle handling:
- Always distribute the load as evenly as
possible.
- Place heavy objects as far forward in
the luggage compartment as possible.
- Never exceed the Gross Axle Weight Rat
ing or the Gross Vehicle Weight Rating
specified on the safety compliance stick
er on the left door jamb. Exceeding per
missible weight standards can cause the
vehicle to slide and handle differently.
- Please observe information on safe driv
ing
~ page 91.
& WARNING
To help prevent poisonous exhaust gas
from being drawn into the vehicle, always
keep the rear lid closed while driving.
- Never transport objects larger than
-
those fitting completely into the luggage
Driving Safely 97
area because the rear lid cannot be fully
closed.
- If you absolutely must drive with the rear
lid open, observe the following notes to
reduce the risk of poisoning:
- Close all windows,
- Close the convertible top,
- Open all air outlets in the instrument
panel,
- Switch off the air recirculation,
- Set the fresh air fan to the highest
speed.
& WARNING ~
Always make sure that the doors, all win-
dows, the convertible top and the rear lid
are securely closed and locked to reduce
the risk of injury when the vehicle is not
being used.
- After closing the rear lid, always make
sure that it is properly closed and locked .
- Never leave your vehicle unattended es
pecially with the rear lid left open . A
child could crawl into the vehicle through
the luggage compartment and close the
rear lid becoming trapped and unable to
get out. Being trapped in a vehicle can
lead to serious personal injury.
- Never let children play in or around the
vehicle.
- Never let passengers ride in the luggage
compartment. Vehicle occupants must
always be properly restrained in one of
the vehicle's seating positions.
(D Tips
- Air circulation helps to reduce window
fogging. Stale air escapes to the outside
through vents in the trim panel, on the
left side of the luggage compartment. Be sure to keep these slots free and
open.
- The tire pressure must correspond to the
load. The tire pressure is shown on the
tire pressure label. The tire pressure la
bel is located on the driver's side B-pillar .
The tire pressure label lists the ..,_ •
•