2015 AUDI S3 SEDAN lights
[x] Cancel search: lightsPage 132 of 282
Driving safety
Driving safety
Basics
Safe driving habits
Please remember -safe ty first!
This chapter contains important information,
tips, instructions and warnings that you need to
read and observe for your own safety, the safety
of your passengers and others. We have summar ized here what you need to know about safety
belts, airbags, child restraints as well as child
safety. Your safety is for us
priority number 1. Al
ways observe the information and warnings in
this section - for your own safety as well as that
of your passengers .
The information in this section applies to all
model versions of your vehicle . Some of the fea
tures described in this sections may be standard
equipment on some models, or may be optional
equipment on others. If you are not sure, ask
your authorized Audi dealer.
A WARNING
- Always make sure that you follow the in
structions and heed the WARNINGS in this
Manual.
It is in your interest and in the in
terest of your passengers.
- Always keep the complete Owner's Litera
ture in your Audi when you lend or sell your
vehicle so that this important information
will always be available to the driver and
passengers.
-
- Always keep the Owner's literature handy so
that you can find it easily if you have ques
tions .
- Always adjust your speed to the weather
traffic and conditions. Follow the speed lim
its .
- Always drive in such a way that you can stop
your vehicle safely.
- Always adjust your speed to the general
flow of traffic. Follow the speed limits.
130 ·
Safety equipment
The safety features are part of the occupant re
straint system and work together to help reduce the risk of injury in a wide variety of accident sit
uations.
Your safety and the safety of your passengers
should not be left to chance. Advances in tech
nology have made a variety of features available
to help reduce the risk of injury in an accident.
The following is a list of just a few of the safety
features in your Audi:
- sophisticated safety belts for driver and all pas-
senger seating positions,
- safety belt pretensioners,
- safety belt force limiters for the front seats,
- safety belt height adjustment systems for the
front seats,
- front airbags,
- knee airbags for the front seats*
- side airbags in the front seats and outer rear
seats*,
- side curtain airbags with ejection mitigation
features,
- special LATCH anchorages for child restraints,
- head restraints for each seating position,
- adjustable steering column .
- pre sense basic* (preventative passenger pro- tection)
These individual safety features, can work to gether as a system to help protect you and your
passengers in a wide range of accidents . These
features cannot work as a system if they are not
always correctly adjusted and correctly used .
Safety is everybody's responsibility!
Important things to do before driving
Safety is everybody's job! Vehicle and occupant
safety always depends on the informed and care
ful driver .
For your safety and the safety of your passen
gers,
before driving always:
.. Make sure that all lights and signals are operat
ing correctly .
.. Make sure that the tire pressure is correct. ..,.
Page 204 of 282

Checking and F ill in g
Using the proper engine o il is important for the
functionality and service life of the engine. Your
engine was factory-fi lled w ith a high-quality o il
which can usually be used throughout the ent ire
year.
@) Note
Your L imited New Vehicle Warranty does not
cover damage or malfunctions due to failure
to follow recommended ma intenance and use
requ irements as set forth in the Audi Ow ne r's
Manual and Wa rranty
& Ma intenance booklet .
- Use only a high quality eng ine oil t hat ex-
pressly comp lies w ith the Audi o il quality
standard specified for your vehicle's e ngine .
Using a ny other oil can cause se rious engine
damage.
- Do not mix any lubricants o r othe r addit ives
i nto the engine oil. Doing so can cause en
g ine damage.
(D Tips
If you need to add oil and there is none availa
ble that meets the Audi o il quality standard
y o ur eng ine requires, you m ay add a total of
no more than 0.5 quart/li ter o f a h igh-quali ty
"synthet ic"oil that meets the fo llowing speci
fications .
- V ehicles wi th gasoline engine: AC EA A3 o r
API SM with a viscosity grade of SAE 0W- 30,
SAE SW -30 or SAE SW-40 .
- Vehicles with d iesel engine: ACEA C3 o r
API CF with a viscosity g rade of SAE 0W-30
or SAE SW-30.
- Fo r more information abo ut engine oi l t h at
has been approved for your vehicle, please
contact either your a uthorized Audi dea ler
or Audi Customer Relations at
1 (800) 822-2834 or visit ou r web site at
www.aud iusa.com or www .aud icanada .ca.
Engine oil consumption
The engine in your vehicle depends on an ade
quate amount of oil to lubricate and cool all of
its moving parts .
In order to provide effective lubrication and cool ing of in ternal engine components, all internal
202
combust ion engines consume a certa in amoun t
of oil. Oil consumptio n varies from engine to en
gine and may change sign ificant ly over the li fe of
the engine . Typically, eng ines with a specif ied
break-in period (see
¢ page 70) consume more
o il dur ing the break-in per iod than they consume
after oil consumption has s tabilized .
Under normal cond itions, the rate of oil con
sump tion depends on the quality and viscos ity of
the oil, the RPM (revolutions per minute) at
wh ich the engine is operated, the ambie nt tem
perature and road cond it ions . Furthe r facto rs a re
t h e amo unt of o il di lution from water conde nsa
t ion or fue l residue and the ox idat ion leve l o f the
o il. As any engine is s ubject to wear as mileage
builds up, the oil consumption may increase ove r
time unt il rep lacement of wo rn components may
become necessary.
With a ll these va riab les coming into p lay, no
standard rate of oil consumption can be estab
li shed or spec ified. There is no alte rnative to reg
ul ar and frequent checking o f the oil leve l, see
Note .
If the yellow engine oi l level warning sym bo l Ill
in the instrument cluster lights up, yo u should
check the o il level as soon as possible
¢ page 203. Top off the oil at your earliest con
venience
¢ page 203.
A WARNING
Before you c heck anythi ng in the eng ine com
partment, always read and heed al l WAR N
IN GS ¢page 198.
(D Note
Driving w it h an insufficient o il level is likely to
cause severe damage to the engine.
(D Tips
- The oil pressure warning d isplay. is not
an indicator of the oil level. Do not rely on
it. Instead, check th e oil level in your en
gine at regular intervals, preferably each
time you refuel , and alway s before going
on a long trip.
Page 210 of 282
Checking and F ill in g
sure you are using the correct brake f luid .
The correct type of brake fluid is also indi
cated on the brake fluid reservoir .
- The brake fluid must be new. Heavy use of
the brakes can cause a vapor lock if the
brake fluid is left in the system too long.
This can ser iously affect the effic iency of
the brakes as well as your safety . This
could res ult in an accident.
(D Note
Brake flu id will damage the paint of your vehi
cle .
@ For the sake of the environment
Because of the problem of proper d isposa l of
brake fluid as well as the spec ia l tools re-
quired and the necessary expertise, we rec
ommend tha t you have the b rake fluid
changed by your author ized Audi dealer.
Battery
General information
The battery in yo ur Audi does not need any ma in
tenance under normal operating conditions. Aud i
recommends having the electro lyte level check by
an author ized Audi dealer or author ized Audi
Service Fac ility when the re a re
high outside tem
pe ratu res or when dr iv ing a ll day. The electroly te
leve l sho uld also be checked ea ch t ime the bat
t ery is charged
9 page 210 .
Have the battery checked when you br ing you r ve
hicle in fo r an inspec tio n. It is a good idea to re
p la ce the batte ry if i t is more than 5 ye ars old .
During certai n types of a irbag dep loyments, the
battery is disconnect ed from the vehicle electr i
cal system fo r safety reasons
9 .&. in Repair, care
and disposal of the airbags on page 163.
Disconnecting the battery terminals
Some veh icle functions (such as power windows)
are not ava ilable when the batte ry is disco nnect
ed. These functions must be programmed after
the ba ttery is reconnec ted. To avoid havi ng to do
t his , on ly disconnect the b attery from the veh icle
208
electrica l sys tem when that is necessa ry to pe r
form repairs.
To reprogram the func tion s, proceed as fo llows:
Function Reprogramming
P owe r window one-
9 page 41, Correcting
to uch up/down f unc-power window malfunc-
tion tions
Remote control key o r If the vehicle does not
Conve nience key reac t to the key , it must
be synchronized
9 page 35
Digita l clock 9 page 10
ESC indi cato r light The ind icator lig ht goes
o ut afte r driving a few
meters
Not running the vehicle for long periods of
time
If you do not d rive yo ur vehicle for several days or
weeks, e lectr ica l components are gradua lly re
duced or switched off. Th is red uces energy con
s u mption and maintains the vehicle's ability to
start over a long per iod of t ime ¢
page 128.
Some conven ience functions , such as inter ior
li ght ing or power seats* may not wo rk . These
convenienc e functions w ill be availabl e agai n
o nce you swi tch the ig nition on and sta rt the en
gine.
Winter operation Du ring the winter months , it is common for the
batte ry capaci ty to dec rease as the tempe rat ur es
become lower . This is because more powe r is
needed to start the vehicle and componen ts such
as the he ad lights and the rear window defogger
are used more frequent ly.
Avoid using powe r unnecessar ily, especially in
c ity dr iv ing o r o n short trips . H ave yo ur au thor
iz ed Audi de aler or author ized A udi Se rv ice Facili
ty check the ba ttery capacity before the start of
winter ¢
page 210. A well-charged battery will
not only reduce starting problems in co ld weath
er, but it will a lso last longer .
Page 212 of 282

Checking and Fill in g
negative cable on the battery must be dis·
connected. If you are just going to replace a
light bulb, then it is enough to switch off
the lights .
- Before disconnecting the battery, switch off
the anti-theft alarm system! Otherwise you
will set off the alarm .
- When disconnecting the battery, first dis
connect the negative cable and then the
posit ive cab le.
- Before reconnect ing the battery, make sure
all electrical consumers are switched off . Re
connect the pos itive cable first and then the
negative cable . Never intercha nge the ca
bles -th is could star t a fire!
- Never charge a froze n or a thawed-out bat
te ry.
It co uld explode! If a batte ry has fro
zen, then it m ust be repl aced. A d isc harged
b at tery can free ze over at 3 2 °F (0 °C).
- Make sure the vent hose is always attached
to the opening on the side of the battery .
- Never use batte ries which are damaged.
T he re is the danger of an explos ion! Always
replace a damaged battery.
_& WARNING
California P ropos ition 65 Warning:
- Battery posts , termina ls and re lated acces
sories contain lead and lead compounds ,
chemicals known to the Sta te of C alifornia
to cause ca nce r and reproductive problems.
Wash hands after hand ling.
(D Note
- Do not d isconnect t he ve hicle battery when
the ignition is o n or when the engine is run
ning, othe rwise , you w ill damage electronic
components in the electrical system .
- If your vehicle is going to stand for a long
period of time without be ing driven, p rotect
the battery from "freezing", otherwise it
will be damaged and will then have to be re
placed.
210
Battery charging
Starting the engine requires a well charged bat
tery .
Fig. 16 4 En g in e compa rtmen t: connecto rs fo r a c harg er
and jump start c ables
Always read and heed all WARNINGS below
c> .& and q .& in Working on the battery on
page 209 .
.,.. Switch off the ignition and all elec trical con
sumers.
.,.. Make s ure the area is we ll ventilated when you
charge the battery .
.,.. Open the eng ine hood
q page 199 .
.,.. Open the red cover on the positive pole
q fig. 164 .
.,.. Clamp the charge r te rm inal clamps as inst ruct
ed on the
battery terminal (+ ) and o nly on the
body ground point (· ).
.,.. On ly now plug the mains lead for the charging
equ ipmen t in to the wall outlet and turn it on
~ .& -
... Make sure the charging rate is not ov er
30 amps / 14 .8 Volt .
.,.. When the bat tery is fully cha rged : Tur n the
charg ing equipment off and remove the mains
lead from the wall outlet.
.,.. Now remove the clamps fo r the charging equip -
ment .
.,.. Close the red cover on the positive pole.
.,.. Close the hood
c> page 200.
A d ischarged battery can freeze at temperatures
of only 32 F
0 (0 °C) . Allow a frozen battery to
thaw complete ly before attempting to charge it
~ .&. . However, we recommend not using a
thawed battery aga in because the battery casing ..,_
Page 235 of 282
....,
N
0 > co
rl I.O
"'
"'
"'
rl
If the Tire Pressure Monitoring System
indicator appears
Applies to vehicles: with t ire p ressure monitoring syste m
The tire pressure indicator in the instrument
cluster informs you if the tire pressure is too low
or if there is a system malfunction.
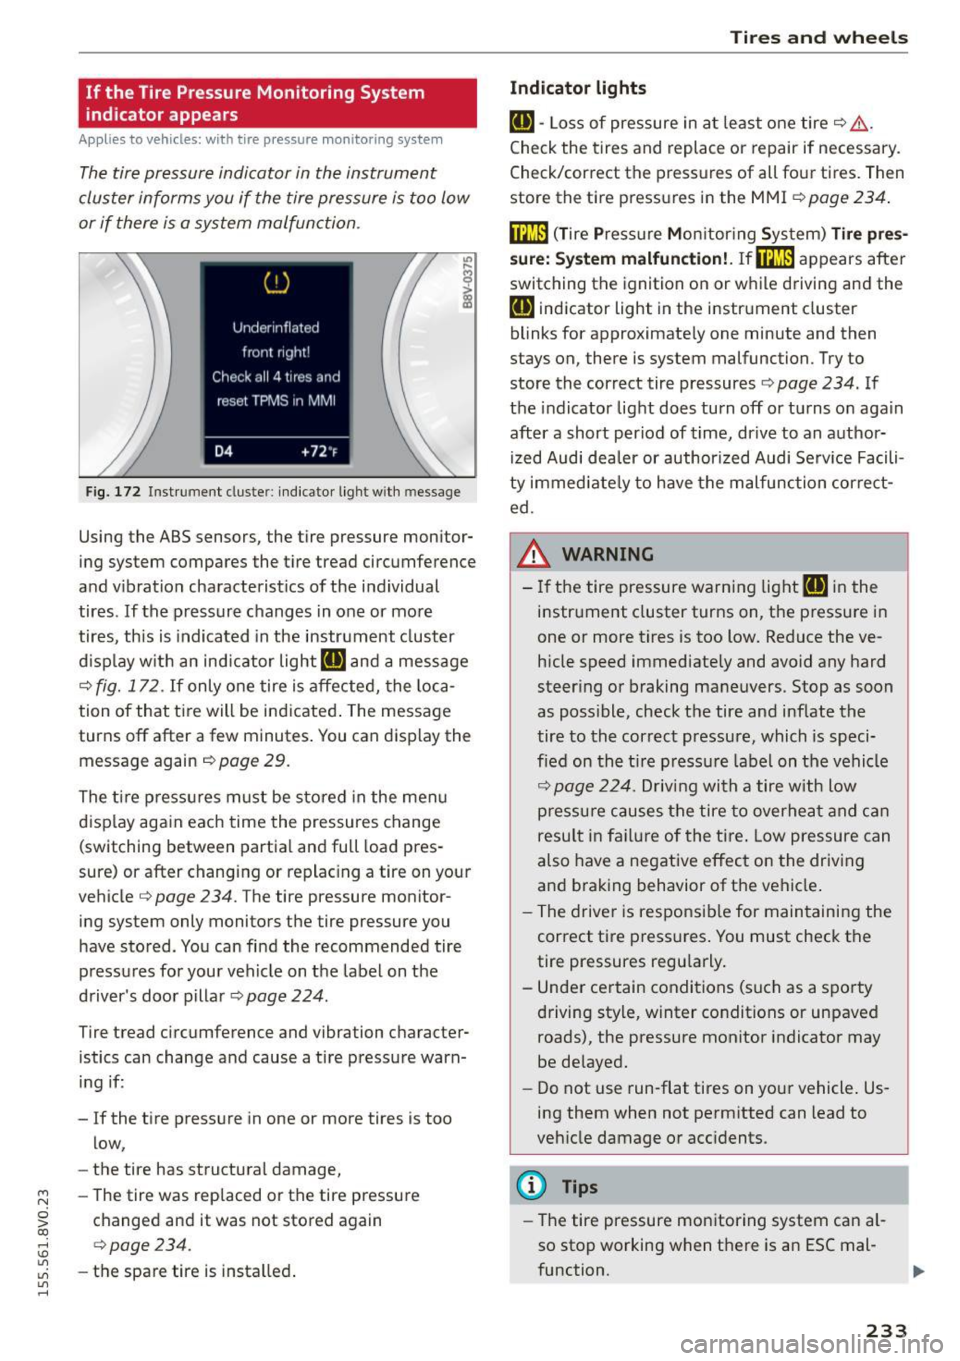
F ig. 172 Instrument cluster: in dicator light w ith message
Using the ABS sensors, the tire pressure monitor
ing system compares the tire tread circumference
and v ibration characterist ics of the ind ividual
tires.
If the pressure changes in one or mo re
tires, th is is indicated in the instrument cluster
d isp lay w ith an ind icator light
RE and a message
¢
fig. 172. If only o ne tire is affected, the loca
tion of that ti re will be indicated . The message
turns off after a few minutes . You can display the
message again
r::;,page 29.
The tire p ressu res m ust be stored in the menu
disp lay aga in each time the pressures change
(switching between partia l and full load pres
sure) or after changing or replac ing a tire on your
ve hicle¢
page 234. The tire pressure monitor
ing system only monitors the tire pressure you
have stored. You can find the recommended tire
pressures for your vehicle on the label on the
driver's door pillar¢
page 224.
Tire tread circumference and vibration character
istics can change and cause a tire pressure warn
in g if:
- If the tire pressure in one or more tires is too
low,
- the tire has structural damage,
- The tire was replaced or the tire pressure
changed and it was not stored again
¢ page 234.
-the spare tire is insta lled .
Tires and wheels
Indicator lights
RE -Loss of pressure in a t least one tire ¢ ,&.
Check the tires and replace or repair if necessary.
Check/correct the pressures of all four t ires. Then
store the tire p ressu res in the MMI ¢
page 234.
film (T ire Pressure Mon itor ing Sys tem) Tire pres
s ure: Sy stem malfunction!. If@m
appears after
switching the ignition on or while driving and the
RE ind icator light in the instr ument cluster
blinks for approximate ly one minute and then
stays on, there is system malfunction. Try to
store the correct tire pressures ¢
page 234. If
the indicator light does turn off or turns on aga in
after a short period of time, dr ive to an author
i zed Audi dea ler or author ized Audi Serv ice Facili
ty immed iate ly to have the malfunction corre ct
ed.
,&. WARNING
- If the tire pressure warning light RE in the
i n str ument cluster turns on, the pressure in
one or more tires is too low . Reduce the ve
h icle speed immediate ly and avoid any hard
steer ing or braking maneuvers. Stop as soon
as poss ible, check the tire and inf late the
tire to the correct pressure, which is speci
fied on the t ire p ress ure label on the vehicle
r::;, page 224. Driv ing with a tire with Low
p ressu re causes the tire to overhea t and c an
resul t in fa il ur e of the tire . Low pressure can
a lso have a negative effect on the driving
and b rak ing behavior of t he vehicle .
- T he drive r is respons ib le for main taining the
correct ti re press ures . You must check the
tire pressures regu larly .
- Under certain conditions (such as a sporty
driving style, winter conditions or unpaved
roads), the pressure monitor indicator may
be de layed.
- Do not use run-flat tires on yo ur vehicle . Us
ing them when not permitted can lead to
veh icle damage or acc idents.
(D Tips
- The tire pressure monitoring system can al
so stop working when t here is an ESC mal-
function. ..,.
233
Page 238 of 282
Care and cleaning
& WARNING
- Only wash the vehicle when the ignition is
off an d follow the i nstructions fr om the car
wash operator to r educe the r isk of acci
dents.
- To reduce the r isk of cuts, protect yourself
from sharp metal components when wash ing the underbody or the inside of the wheel
hous ings.
- After washing the vehicle, the braking effect
may be delayed due to moisture o n the
brake rotors or i ce in the winte r. T he bra kes
mus t be d ried first w ith a few caref ul bra ke
applications .
@ Note
-If you wash the ve hicle in an au tomatic car
wash, you m ust fold the e xterior m irrors in
to reduce the ris k of damage to the mirrors .
Power folding exterior mirrors* must only
be fo lded i n and out using the power folding
funct ion. -
To prevent paint damage, do not wash the
vehicle in direct sunlight.
- T o reduce the r is k of damage to the sur face,
do not use insect remov ing sponges, kitchen
sponges or similar items.
- Mat te finish painted vehicle components:
- To reduce the risk of damage to the sur-
face, do not use po lishi ng agents or hard
wax.
- Never use protective wax.
It can destroy
the matte finish effect.
- Do not place any stickers or magnet ic
signs on vehicle parts painted w ith matte
finish paint. The pa int co uld be damaged
when the sticke rs o r mag nets are re
moved.
@ For the sake of the environment
Only wash the ve hicle in facilities spec ially de
s igned fo r that purpose. This w ill reduce the
r isk of dir ty wa ter co ntaminated w ith oil from
entering the sewe r system.
Cleaning and care information
When cleaning and caring for individua l vehicle
components, refer to the following tables. The
information contained there is simply recommen
dations. For quest ions or for components that are not listed,
consult an authorized A udi dealer
or authorized Audi Service Facility . Also follow
the information found in
¢ _6.
Exterio r cleaning
Component Situation Solution
Windshield wiper
Deposits ¢ page 50, Cleaning windshield wiper blades
blades
Headlights /
Deposits Soft sponge with a mild soap
solutiona)
Tail lights
Sensors /
Deposits Sensors: soft cloth with solvent-free cleaning so lution
camera len se s Camera le ·nses : soft clot h w ith a lcohol-free clea ning so lu-
tion
Snow/ ice Hand brush/solvent-free de- icing spray
Wheel s Road sa lt Water
Brake dust Acid-free specia l cleaning solution
E xhau st tail pipe s Road salt Water, clean
ing solution su itab le for stain less stee l, if nee -
essary
D ecorative parts / Deposits Mild soap solution al, a clean ing solution suitable for stain-
trim l ess stee l, if necessary
236
Page 240 of 282
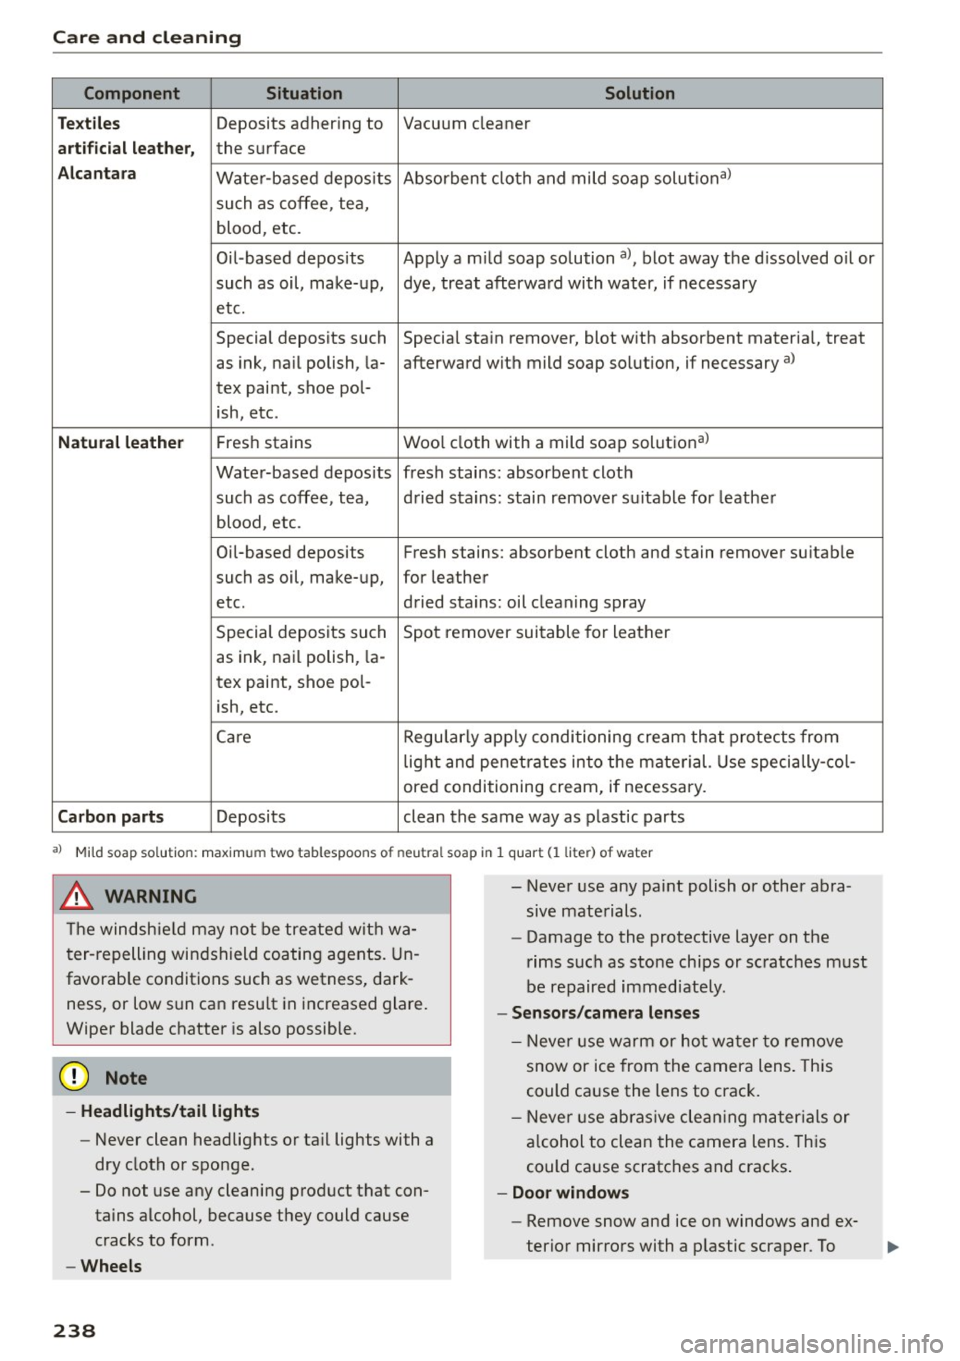
Care and cleaning
Component S ituation Solution
Te xtiles
Deposits adhering to Vacuum cleaner
arti ficial leath er, the surface
Alca ntara Wate r-based depos its Absorben
t cloth and mild soap solutional
such as coffee, tea,
blood, etc.
Oil-based deposits Apply a m ild soap solution al, blot away the d issolved oil or
such as oil, make-up, dye, treat afterwa rd with water, if necessary
etc.
Special deposits such Special stain remover, blot w ith absorbent materia l, treat
as ink, na il polish, la- afterward with mild soap so lution, if necessary a)
tex paint, shoe pol-
ish, etc.
Natural leather Fres h stains Wool cloth with a mild soap solutional
Wate r-based depos its fresh stains: absorbent clot h
such as coffee, tea, d ried stains: stain remover suitable for leathe r
blood, etc.
Oil-based deposits Fresh stains: absorbent cloth and stain remover suitab le
such as oil, make- up, for leather
etc. dried stains: oil cleaning spray
Special deposits such Spot remover sui table for leather
as ink, nai l polish, la -
tex paint, shoe pol-
ish, etc.
Care Regularly app ly condi tioning cream that protects from
lig ht and penet rates in to the mate rial. Use specially -col -
ored conditioning cream, if necessary.
Carbon part s Deposits clean the same way as plastic parts
al Mild soap sol ution: maxim um two tablespoons of neutral soap in 1 quar t (1 liter ) of water
_& WARNING
The windshie ld may not be tre ate d wit h wa
t er- repelling win dsh ield co ating agents. Un
favorab le conditions such as wetness, dark
ness, or low s un can resu lt in increased glare.
Wiper blade chatter is also possible.
(D Note
- Headlights/tail light s
-Never clean headlights or ta il lights with a
dry cloth or sponge.
- Do not use any cleaning prod uct that con
tains alcohol, because they could cause cracks to form.
- Wheels
238
-
- Never use any paint polish or other abra
sive mate rials.
- Damage to the protective layer on the
rims such as sto ne chips or sc ratches must
be repaired immediately.
- Sensors /camera lenses
- N eve r use warm or ho t w at er to remove
snow or ice from the camera lens . This
could ca use the lens to crack.
- N eve r use abras ive cle an ing m ateria ls or
a lcohol to clea n the camera lens. This
could ca use scratches and cracks .
-Doo r windows
- Remove snow and ice on windows and ex-
terio r mirro rs with a p lastic scraper. To
Page 251 of 282

....,
N
0 > co
rl I.O
"'
"'
"'
rl
-Some of the equipment listed in the follow
ing tables applies only to certain model
versions or certain opt ional equ ipment.
Interior fuse ass ignment
F ig. 186 Vehicle interior: fuse assignment
No. Equipment
Fl Engine components
F2 Seat
adjustment
F3 Hydraulic pump cover (Cabriolet)
F4 MM
controls, MMI-components
FS Gateway
F6 Anti-theft
alarm system
Climate/heati ng control, selector lever
F7 (automat ic transm ission), parking heater,
rear window heater relay coil
Diagnosis, electromechanical parking
F8 brake switch, light switch, rain/light sen-
sor, interior lighting
F9 Steering column switch module
FlO Display
.... ~ N
0
>
"' (0
Fll Reversible
driver's side safety belt tension-
ers
F12 MMI area
F13 Adapt ive dampers control module
No.
Fl4
FlS
Fl6
F 1 7
F18
F19
F20
F23
F 24
F 25
F 26
F27
F28
F29
F 31
F32
F 33
F34
F3S
F 36
F37
F 39
F 40
F 41
F42
F43
F 44
Fu ses a nd bulb s
Equipment
Climate control system blower
Electronic steering co lumn lock
MMI area
Instrument cluster
Rearview camera
Conv ince key system control mod ule, tank
system
Tank system
Exterior lighting, heated washer fluid noz-
zles
Panorama sunroof/ power top control
module, power top latch (Cabriolet)
Door/driver 's side doors (for example pow-
er windows)
Se at heating
Sound-amplifier
Power top control modu le, electronics
(Cab riolet)
Inter ior light ing
E xterior lighting
Driver assistance systems
Airbag
Button illumination, coils for upper cabin
heating relay (Cab riolet) and socket relay,
i nte rior sound, back- up light sw itch, tern-
perature sensor, oi l level sensor
Diagnosis, headlight range control system,
a ir quality sensor, automatic d imming
rearview m irror
Right cornering light/ right LED-headlight
Left cornering light/ left LED-headlight
Door/front passenger's side doors (for ex-
ample, power windows)
Sockets Reversible front passenger's side safety
belt tensioners
Central locking components, windshield
washer system
Head lights, l ight ing
a ll wheel drive
249