Page 73 of 314
 1.11 ,...., 1.11 ,....,
IAUTO I Switching automatic mode on
Automatic mode maintains a constant tem
perature inside the vehicl e. Air temperature,
airflow")
M N
0 <.J 'SI: ,...., \!) 1.1'1 ,...., 1.1'1 ,....,
IAUTO I Switching automatic mode on
Automatic mode maintains a constant tem
perature inside the vehicl e. Air temperature,
airflow and air distribution are controlled au
tomatically.
Adjusting the temperature
Temperatures between 60 °F (+16 °C) and
84 °F ( +28 °C) can be set. Outsid e of this
range,
lo or hi wi ll appear in the climate con
trol system disp lay. At both of these settings,
the climate control system runs continuously
at maximum cooling or heating power. There
is no temperature regu lation.
~ Adjusting the airflow
You can adjust the airf low manually to suit
your needs . To have the airf low regulated au
tomatically, press the
IAUTO j button.
li!J Adjusting the air distribution
You can manually select the vents where the
air will flow. To have the air distribution regu
lated automatically, press the
IAUTOI button .
~I~* Adjusting seat heating/
ventilation*
Pressing the button switches the seat heat
ing/ventilation on at the highest setting ( level
3). The LEDs indicate the heating/ventilation
level. To reduce the heating/venti lation, press
the button again. To switch the seat heating/
ventilation off, press the button repeatedly
until the LED turns off.
After 10 minutes, the seat heating automati
cally switches from level 3 to level 2.
l
The windshield and side windows are defrost
ed or cleared of condensation as quickly as
possible. The maximum amount of air flows
mainly from the vents below the windshield.
Recirculation mode switches off. The tempera
ture should be set to approximately 72 °F (22
°() .
The IAUTO I button switches the defroster off.
Warm and cold 71
liiii REAR! Switching rear window heater
on/off
The rear window heater only operates when
the engine is running. It switches off auto matically after 10 to 20 minutes, depending
o n th e outside temperature.
To prevent the rear window heater from
switching off automatically, press and ho ld
the
l liiil REARI button for more than 2 seconds.
This remains stored until the ign ition is
switched off .
I SYNC I Synchronization*
When synchronization is switched on, the
same settings are applied to both the driver
and front passenger, except for the seat heat
ing/ventilation*. The rear zone is also
synchronized. Synchronization switches off
when the settings for the front passenger s ide
or rear are adjusted.
You can also switch synchronization on by pressing and holding a dial. For example, if
you press and hold the dial on the front pas
senger side, the settings for that side are
transferred to the driver side. The same ap
plies to the rear.
Air vents
You can open or close the center and outer
vents in the cockpit and the vents in the rear
cente r console and door pillars using the
ridged thumbwheels. The levers adjust the di
rection of the airflow from the vents.
&_ WARNING
-=
-Do not use the recirc ulation for extended
periods of time . The windows could fog
up since no fresh air can enter the vehi
cle. If the windows fog up, press the air recirculation butto n aga in immediately
to switch off the air recirculation func
tion or se lect defrost.
- Individuals w ith reduced sensitivity to
pa in or temperature could deve lop burns
when using the seat heating function . To
red uce the risk of injur y, these individu-
als should not use seat heating. ..,.
Page 74 of 314

7 2 Warm and cold
(D Note
To avoid damage to the heating e lements
in the seats, do not kneel on the seats or
place heavy loads on a small area of the
seat .
Setup
Applies to vehicles: with four-zone a utomat ic clima te con·
tro l
The climate control system setup is accessed
through the MMI .
.,. Se lect : I CAR I func tion button> (Car )* sys·
terns con trol but ton > A /C.
Rear cabin settings*
When th is fu nction is selected, all sett ings for
the rear can be adjusted through the climate
control sys tem in the cockpit. The cl imate
con trol sy stem se ttings cannot be adjusted in
the rea r seat a t the same time. This func tion
switches o ff after a certain period of time or
when one of the dia ls in the cockp it is press
ed .
Auto recirculation*
The sensit ivity level of the au tomatic rec ircu
lation mode can be set at v ario us leve ls from
off to sensit ive. The recirculation mode is con
trolled a utomat ica lly. You must p ress the
I@ FRONT I button if fog forms on the win
dows.
Footwell temperature
You can ad just the footwe ll temperat ure so
that it is cooler or wa rmer.
Supplementary heater*
The supplementa ry heater warms the interio r
of vehicle s with diesel engines* mo re q uic k ly.
The su pplement ary he ate r is cont rolle d au to
mat ica lly in t he
Auto setting.
Steering wheel heating
App lies to vehicles: wi th hea ted s tee rin g wheel
The steering wheel rim can be heated .
Fig. 7 4 Stee ring co lu mn : steeri ng w hee l h ea tin g but ·
ton
.,. Press the~ button to swi tch steering whee l
heati ng on/off . The message
Steering wheel
heating on !/Steering wheel heating off !
appears in the instrument cluster d isplay.
T he temperat ure is maintained at a constant
level when steering wheel heating is switched
on.
T he steering whee l hea ting se tt ings are stor
ed automat ica lly and assigned to the remote
control key that is in use .
Page 75 of 314

M N
0 I.J "". rl I.O
"' rl
"' rl
On the road
Steering
Manually adjustable steering wheel
Applies to vehicles: with manu ally adjustable steering
w hee l
The height and reach of the steering wheel
can be adjusted .
Fig. 7 5 Lever on t he steering col umn
" Pull the lever¢ fig. 75 -arrow-¢ _&..
"Move the steer ing whee l to the desired posi
t ion.
" Push the lever aga inst the steeri ng column
u ntil it locks.
There must be at least 10 inc hes (25 cm) be
tween you r chest and the cente r of the steer
in g wheel.
If you cannot sit more than 10 in
ches (25 cm) from the s teer ing whee l, see if
adaptive eq uipment is available to help you
reach the peda ls and increase the distance
from the steer ing whee l.
F or deta iled informa tion on how to adjus t the
d river's seat, see
r::!.> page 53.
_& WARNING
Improper use of steering wheel adjust
ment and improper seating position can
cause se rious personal injury.
- Adjust the steer ing whee l co lumn on ly
when the veh icle is not moving to pre
vent loss of veh icle cont rol.
-
- Adjust the driver's seat or steering wheel
so that there is a min imum of 10 inches
(25 cm) between your chest and the
steering wheel¢
page 127, fig . 144. If
yo u cannot mai ntai n this min imum dis-
On the road 73
tance, the a irbag system cannot protect
you proper ly.
- If physical limitations prevent you from
sitting 10 inches (25 cm) or more from
the steering wheel, check with your au
thorized A udi dealer to see if adaptive
equ ipment is ava ilable.
- If the steer ing wheel is aligned with your
face , the suppleme nta l dr iver's a irbag
cannot provide as much protection in an
accident . Always make sure that the
steer ing whee l is a ligned with your
ches t.
- Always hold the ste ering whee l w ith your
hands at the 9 o'clock and 3 o'clock posi
tions to reduce the ris k of persona l injury
if the driver's airbag dep loys .
- N ever hold the stee ring wheel at the 12
o' clock posi tion or wi th your hands ins ide
the stee rin g wheel rim or on t he steering
wheel h ub. Holding the steering whee l
the wrong way can cause se rious injuries
to the hands, arms and head if the driv
er's airbag deploys.
Electrically adjustable steering wheel
App lies to vehicles: wi th electrica lly ad justable stee ring
w heel
The steering wheel position can be electrically
adjusted for height and reach.
F ig . 76 Switc h fo r steeri ng w hee l ad justment
" To adjust the height, press the switch up/
down. The steer ing column w ill cont inue
moving as long as you are pressing the
switch .
" To move t he steering wheel forwa rd or back,
press the switch forward/back. The steering
I),-
Page 76 of 314
 be
tween you r chest and the center of the stee")
7 4 On the road
column will continue moving as long as you
are pressing the switch.
There must be at least 10 inc hes (25 cm) be
tween you r chest and the center of the steer
ing whee l.
If you cannot sit more than 10 in
ches (25 cm) from the steering whee l, see if
adaptive equipment is available to help you reach the pedals and increase the distance
from the steer ing wheel.
F or detai led information on how to adjust the
driver's seat, see
<::> page 53 .
In vehicles with the memory f unction* , the
steering column settings are stored together
with the seat position.
A WARNING
Improper use of steering wheel adjust
ment and improper seating position can
cause se rious personal injury.
- Adjust the steer ing whee l column on ly
when the vehicle is not moving to pre
vent loss of veh icle control.
-
- Adjust the driver's seat or steering wheel
so that the re is a min imum of 10 inches
(25 cm) between your chest and the
steering wheel ¢
page 12 7, fig. 144. If
you can not maintain this min imum dis
tan ce, the airbag system cannot protect
yo u properly.
- If phys ica l limi tations prevent you from
sitting 10 in ches (25 cm) o r more from
the steering wheel, check with yo ur au
tho rized Aud i dealer to see if adaptive
equipment is availab le .
- If the steering wheel is aligned with you r
face, the supp lemental drive r's airbag
cannot provide as much protect ion in an
acc ident. A lways make sure that the
steering wheel is aligned with your
chest.
- Always hold the steering wheel with your
hands at the 9 o'clock and 3 o'clock posi
t ions to reduce the risk of pe rsonal injury
if the d river 's airbag deploys.
- Never hold the steering whee l at the 12
o'clock posit ion or w ith your hands i nside the steering wheel rim or on the steering
wheel hub. Hold
ing the steer ing wheel
the wrong way can cause serious injuries
to the hands, arms and head if the driv
er 's airbag deploys.
Easy entry feature
Applies to vehicles: with electrically adjustable steering
wheel
The easy entry feature makes it easier to en
ter and exit the vehicle by automatically ad
justing the steering wheel.
.. Select in the MM I: ICARI function button>
(Car )* sys tem s control b utton > V ehicle set
ting s
> Seats > D rive r's seat > Easy entry >
On .
When the easy ent ry feature is turned on, the
steering wheel moves up to the park position
when you switch
off the ignition. After you en
ter the veh icle, the steering wheel moves to
the stored position as soon as you sw itch on
the ignit ion.
Starting and stopping
the engine
Starting the engine
This button switches on the ignition and
starts the engine.
Fig . 77 Center console: S TART ENGINE S TOP butto n
Switching the ign ition on /off
.. To switch the ign ition on/off, press the
I STAR T ENGINE ST OPI button . Do not press
the brake pedal while doing this . Diesel
veh icles are preheated while the ignit ion is
sw itched on .
lilJ,
Page 77 of 314
 ..,.,
,...., ..,., ,....,
Starting the engine
\"Press the brake pedal c::> _&..
\"Pr ess the !START ENGINE STOPI button
c::> fig. 77. The engi ne will start.
\"")
M N
0 <.J 'SI: ,...., \!) ..,.,
,...., ..,., ,....,
Starting the engine
"'Press the brake pedal c::> _&..
"'Pr ess the !START ENGINE STOPI button
c::> fig. 77. The engi ne will start.
"' It is possible that there will be a slight delay
when starting the engine for diesel vehicles
in colder temperatures. Therefore, you must
hold the brake pedal down until the engine
starts. The indicator lamp
Ii illuminates
when the engine is preheated.
If the engine should not start immedi ately,
the starting process is automatically stopped
after a short time . Repeat starting procedure.
Start-Stop-System*:
Note the information on c::> page 79, Start
Stop-System.
A WARNING
- Never allow the engine to run in confined
spaces -danger of asphyxiation .
- Never turn off the engine until the vehi
cle has come to a complete stop.
- The brake booster and power steering
only work when the engine is running.
If
the engine is off, you have to use more
force when steering or braking. Because
you cannot steer and brake as you usual
ly would, this could lead to crashes and
serious injuries.
-Avoid high engine rpm, full throttle and
heavy engine loads until the engine has
reached operating temperature - other
wise you risk engine damage.
- The engine cannot be started by pushing
or towing the vehicle.
(D Tips
-After a cold engine is started, there may
be a brief period of increased noise be
cause oil pressure must first build up in
the hydraulic valve adjusters. This is nor mal and not a cause for concern.
- If you leave the vehicle with the ignition
switched on, the ignition will switch off
On the road 75
after a certain period of time. Please
note that electrical equipment such as
exterior lights will switch off as well
when that happens.
Stopping the engine
"'Bring your vehicle to a complete stop.
"' Move the selector lever to the P or N posi
tion .
"'Press the
I STAR T ENGINE ST OP I button
c::> page 7 4, fig. 77.
Steering lock
The steer ing locks when you turn the engine
off using the
I STAR T ENGINE STOP I button
and open the driver's door. The locked steer ing helps prevent vehicle theft.
Emergency off
If necessary, the engine can be switched off
with the selector lever in the R or D/S posi
tion. The engine stops if you press the
I START ENGINE STOPI button at speeds below
6 mph (10 km/h).
A WARNING
-Never turn off the engine until the vehi
cle has come to a complete stop.
- The brake booster and power steering
only work when the engine is running. If
the engine is off, you have to use more
force when steering or braking. Because
you cannot steer and brake as you usual
ly would, this could lead to crashes and
serious injuries.
- For safety reasons, you should always
park your vehicle with the selector lever
in P. Otherwise, the vehicle could inad
vertently roll away.
- After the engine has been switched off,
the radiator fan can continue to run for
up to 10 minutes -even with the ignition
switched off.
It can also switch on again
after some time if the coolant tempera
ture rises as the result of a heat buildup
.
or if the engine is hot and the engine .,..
Page 78 of 314

76 On the road
compartment is additionally heated by
the sun's rays.
(D Note
Do not stop the engine immediate ly after
hard or extended driving. Keep the engine r un ning for approximately two minutes to
prevent excessive heat build -up.
Driver message in the instrument
cluster display
Turn off ignition before leaving car
This message appears and a warning tone
sounds if you open the dr iver 's door when the
i gnit ion is switched on .
Press brake pedal to start engine
This message appears if you press the
I START ENGINE STOP! button to start the en
gine and do not depress the brake peda l. The
engine can on ly be started if the brake pedal
is depressed.
Ill Is key in the vehicle?
If the indicator light turns on and the mes
sage appears, the remote control key was re
moved from the vehicle while the engine was
running . If the ignition key is not in the vehi
cle you will not be ab le to switch on the igni
tion or restart the engine after it has been
switched off. You w ill also not be able to lock
the vehicle from the outside .
Shift to P, otherwise vehicle can roll away.
Doors do not lock if lever is not in P.
This message appears for sa fe ty reasons
a long with an audib le warning tone if the P
selector lever position is not engaged when
stopping the engine with the
I STAR T ENGIN E ST OP ! button . Select the P se
lector lever position . Otherwise the vehicle
could roll and it can not be locked .
II Key is not recognized. Hold back of key
against marked area . See owner's manual.
If the indicator light turns on and this mes
sage appears, there is a malfunction
¢ page 76.
Turn off ignition before leaving car. Battery
is discharging
T h is message appears if the driver's door is
opened while the ignition is switched on. Al
ways switch off the ignit ion if you are leav ing
the vehicle . See also ¢
page 80.
Shift to P and turn off ignition before leav
ing car, otherwise vehicle can roll away
This message appears if the driver's door is
opened wh ile the ignition is switched on and
the selec tor lever is not in the P position. Shift
the selec tor lever into the P position and
swi tch off the ignition when you exit the vehi
cle. Otherwise the vehicle could roll . See also
¢ page 80.
Starting the engine if there is a
malfunction
It may not be possible to start the engine un
der cer tain circums tances, for example if the
ba ttery in the vehicle key is drained, if in ter
ference hos affected the key or if there is a
system malfunction .
Fig. 78 Center co nsol e/master key: star ting the eng ine
i f the re is a mal funct ion
Requirement: The message Key not recog
nized. Hold back of key against marked area.
See owner's manual.
must appear and the in
dicator light
II must sw itch on .
.,. Hold the master key vertically in the loca
tion indicated
f >l) ¢ fig . 78 .
.,. Press the brake pedal ¢ A in Starting the
engine on page
75 .
Page 79 of 314

M N
0 I.J "". rl I.O
"' rl
"' rl
.. Press the !S TAR T ENGINE STOP I button. The
engine will start.
.. Drive to your author ized Audi dealer imme
diately to have the malfunction corrected .
@ Tips
You can view the message again by press ing the
! START ENGINE STOPI button.
Electromechanical
parking brake
Operation
The electromechanical parking brake replaces
the hand brake.
Fig. 79 Center console: Park ing brake
.. Pull on the switch<®> c:;, fig . 79 to apply the
parking brake. The indicator lights in the
switch and. (USA models)/ . (Cana -
da models) in the instrument cluster illumi
nate .
.. With the ignit ion sw itched on, step on the
brake pedal or the accelerator pedal and
press the sw itch<®> at the same time to re
lease the parking brake. The indicator lights
in the switch and. (USA models) . (Can
ada models) in the instrument cluster go
out .
Your vehicle is equipped with an electrome
chanica l parking brake. The parking brake is
designed to prevent the vehicle from rolling unintentionally and replaces the hand brake .
In addition to the norma l functions of a tradi
tional hand brake, the electromechanical parking brake provides various convenience
and safety functions.
On the road 77
When starting from rest
- The integral start ing assist helps you when
driving by automatically re leasing the park
ing brake c>
page 78, Starting from rest.
-When start ing on inclines, the starting as
sist p revents the vehicle from unintentiona l
ly rolling back. The braking force of the
parking brake is not re leased until sufficient
driving force has been built up at the
wheels.
Emergency brake function
An emergency brake ensures that the vehicle
can be slowed down even if the
normal brakes
fail
c:;, page 78, Emergency braking.
A WARNING
Do not press the accelerator pedal inadver
tently if the veh icle is stationary but the
engine is running and a gear is selected .
Otherwise th e vehicle w ill start to move
immediately and could result in a crash.
@ Tips
- If the parking brake is applied with the
ignition switched
off, the indicator lights
in the switch and. (USA models)/ •
(Canada models) in the instrument clus
t er w ill go out after a certain period of
time.
- Occasional noises when the parking
brake is applied and released are normal
and are not a cause fo r concern.
- When the vehicle is pa rked, the parking
brake goes through a self-test cycle at
regu lar intervals. Any associated noises
are normal.
Parking
.. Press the brake pedal to stop the vehicle.
.. Pull the switch(®) to set the parking brake.
.. Move the selector lever to P .
.. Tu rn the engine offc>
.&.
.,. When on inclines or decl ines, turn the steer
ing wheel so that your veh icle wi ll roll into
the curb if it begins to move. ""
Page 80 of 314

78 On the road
& WARNING
-When you leave your vehi cle -even if on
ly brief ly -always take the ignition key
with yo u. This applies par ticu larly when
children remain in the veh icle. Otherw ise
the ch ildren could start the engine, re
lease the parking brake or operate elec
trical equipment (e.g. power windows) .
There is the risk of an accident.
- When the vehicle is locked, no one -par
t icularly not children should remain in
the vehicle. Loc ked doors make it more
difficult for emergency wor kers to get in
to the vehicle - putt ing lives at risk.
Starting from rest
The starting assist function ensures that the
parking brake is released automatically upon starting.
Stopping and applying parking brake
" Pull the switch ID to apply the park ing
brake.
St arting and automa tically relea sing the
parking brake
.. When you start to drive as usua l, the park
ing brake is automatically released and you r
vehicle begins to move.
When stopp ing at a traff ic signa l or stopp ing
in city traffic, the parking brake can be ap
plied . The veh icle does not have to be held
with the footbrake. The par king brake elimi
nates the tendency to c reep with a drive range
engaged. As soon as you dr ive
off as usua l,
the park ing brake is released automatically
and the vehicle starts to move.
Starting on slopes
When sta rt ing on in cl ines, the starting ass ist
p revents the veh icle from uninten tionally ro ll
ing bac k. The braking force o f the parking
brake is not released un til sufficient dr iving
force has been b uilt up at the whee ls.
(D Tips
For safety reasons, the parking bra ke is re
l eased automatically only when the driv
er's safety belt is engaged in the buckle.
Starting off with a trailer
To prevent rolling back unintentionally on an
incline, do the following:
.. Keep the sw itch(®) pulled and depress the
accelerator. The pa rking bra ke stays applied
and prevents the vehicle from roll ing back
ward.
" You can release the switch© once you are
sure that you are developing enough for
wa rd momentum at the wheels as you de
press the acce lerator.
Depend ing on the we ight of the rig (vehicle
and trailer) and the severity of the incline, you
may roll backwards as you start. You can p re
vent rolling backwa rds by holdi ng the par king
brake switch (®) pulled o ut and ac celera ting -
j u st as you wou ld w hen s tarti ng on a hill wi th
a conventiona l hand brake.
Emergency braking
In the event that the conven tional brake sys
tem fails or locks.
"I n an emergency, pull the switch(®) and
cont inue to pull it to slow your ve hicl e down
w ith the par king b rake.
" As soon as you re lease the swi tch (®) or ac -
celerate, the braking process stops.
If you p ull the swi tc h (®) a nd hold it above a
speed of about 5 mph (8 km/h), the emergen
cy braking f unction is initiated. The ve hicle is
braked at all four whee ls by activating the hy
draulic brake system. The brake performance
is similar to making an emergency stop¢&..
In order not to activate the emergency brak-
ing by mistake, an audib le warning tone (buz
zer) sounds when the switch(®) is pulled. As ..,.
 1
1 2
2 3
3 4
4 5
5 6
6 7
7 8
8 9
9 10
10 11
11 12
12 13
13 14
14 15
15 16
16 17
17 18
18 19
19 20
20 21
21 22
22 23
23 24
24 25
25 26
26 27
27 28
28 29
29 30
30 31
31 32
32 33
33 34
34 35
35 36
36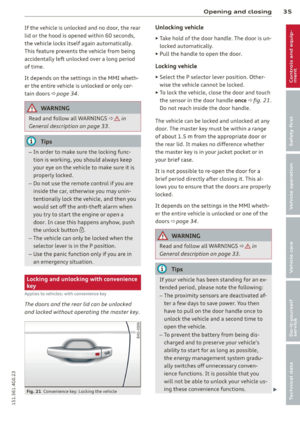 37
37 38
38 39
39 40
40 41
41 42
42 43
43 44
44 45
45 46
46 47
47 48
48 49
49 50
50 51
51 52
52 53
53 54
54 55
55 56
56 57
57 58
58 59
59 60
60 61
61 62
62 63
63 64
64 65
65 66
66 67
67 68
68 69
69 70
70 71
71 72
72 73
73 74
74 75
75 76
76 77
77 78
78 79
79 80
80 81
81 82
82 83
83 84
84 85
85 86
86 87
87 88
88 89
89 90
90 91
91 92
92 93
93 94
94 95
95 96
96 97
97 98
98 99
99 100
100 101
101 102
102 103
103 104
104 105
105 106
106 107
107 108
108 109
109 110
110 111
111 112
112 113
113 114
114 115
115 116
116 117
117 118
118 119
119 120
120 121
121 122
122 123
123 124
124 125
125 126
126 127
127 128
128 129
129 130
130 131
131 132
132 133
133 134
134 135
135 136
136 137
137 138
138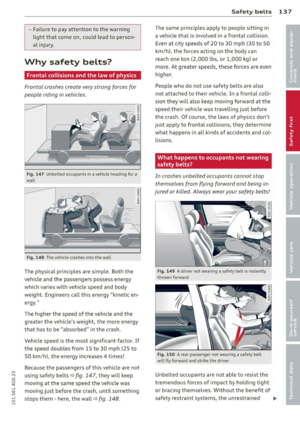 139
139 140
140 141
141 142
142 143
143 144
144 145
145 146
146 147
147 148
148 149
149 150
150 151
151 152
152 153
153 154
154 155
155 156
156 157
157 158
158 159
159 160
160 161
161 162
162 163
163 164
164 165
165 166
166 167
167 168
168 169
169 170
170 171
171 172
172 173
173 174
174 175
175 176
176 177
177 178
178 179
179 180
180 181
181 182
182 183
183 184
184 185
185 186
186 187
187 188
188 189
189 190
190 191
191 192
192 193
193 194
194 195
195 196
196 197
197 198
198 199
199 200
200 201
201 202
202 203
203 204
204 205
205 206
206 207
207 208
208 209
209 210
210 211
211 212
212 213
213 214
214 215
215 216
216 217
217 218
218 219
219 220
220 221
221 222
222 223
223 224
224 225
225 226
226 227
227 228
228 229
229 230
230 231
231 232
232 233
233 234
234 235
235 236
236 237
237 238
238 239
239 240
240 241
241 242
242 243
243 244
244 245
245 246
246 247
247 248
248 249
249 250
250 251
251 252
252 253
253 254
254 255
255 256
256 257
257 258
258 259
259 260
260 261
261 262
262 263
263 264
264 265
265 266
266 267
267 268
268 269
269 270
270 271
271 272
272 273
273 274
274 275
275 276
276 277
277 278
278 279
279 280
280 281
281 282
282 283
283 284
284 285
285 286
286 287
287 288
288 289
289 290
290 291
291 292
292 293
293 294
294 295
295 296
296 297
297 298
298 299
299 300
300 301
301 302
302 303
303 304
304 305
305 306
306 307
307 308
308 309
309 310
310 311
311 312
312 313
313