2015 Alfa Romeo Giulietta change wheel
[x] Cancel search: change wheelPage 2 of 288

We really know your car because we invented, designed and built it: we re\
ally know every single detail. At Alfa Romeo Service authorised workshops you can find technicians directly trained by us,
offering quality and professionalism for all service operations.
Alfa Romeo workshops are always close to you for the regular servicing operations, season checks and practical recommendations by our experts.
With Alfa Romeo Genuine Parts you keep the reliability, comfort and performance features of your new car unchanged in time: that's why you bought it for.
Always ask for Genuine Parts for the components used on our cars; we rec\
ommend them because
they come from our steady commitment in research and development of high\
ly innovative technologies. For all these reasons: rely on Genuine Parts, because they are the only ones designed by Alfa Romeo for your car.
SAFETY:
BRAKING SYSTEMENVIRONMENT: PARTICULATE FILTERS, CLIMATE CONTROL MAINTENANCECOMFORT: SUSPENSION
AND WINDSCREEN WIPERS PERFORMANCE: SPARK PLUGS, INJECTORS AND BATTERIESLINEACCESSORI
ROOF RACK BARS, WHEEL RIMS
WHY CHOOSING GENUINE PARTS
Cop Alfa Giulietta EN QUAD 12/03/14 08.33 Pagina 2
Page 41 of 288

MAIN BEAM HEADLIGHTS
To activate the main beam headlights,
with ring nut A fig. 31 at
, pull the
stalk towards the steering wheel
beyond the end of travel position. The
warning light switches on in the
instrument panel.
When the stalk is pulled towards the
steering wheel again, beyond the end
of travel position, the main beam
headlights deactivate, the dipped beam
headlights reactivate and the
warning light switches off.
It is not possible to switch on the main
beam headlights constantly if automatic
light control is active.
FLASHING
To do this, pull the stalk towards the
steering wheel (unstable position)
regardless of the position of ring nut A
fig. 31. The
warning light switches
on in the instrument panel.
REAR FOG LIGHTS
For the activation and deactivation of
the rear fog lights, refer to the
"Controls" section.DIRECTION INDICATORS
Bring the stalk to the (stable) position:
❒upwards: activates right direction
indicator;
❒downwards: activates left direction
indicator.
Warning light
orwill blink on the
instrument panel.
The direction indicators are switched off
automatically when the steering wheel
is straightened.
"Lane change" function
If you wish to signal a lane change,
place the left stalk in the unstable
position for less than half a second. The
direction indicator on the side selected
will flash five times and then switch
off automatically.
“FOLLOW ME HOME”
DEVICE
This device allows you to illuminate the
area in front of the car for a certain
amount of time.Activation
With the key turned to STOP or
removed, pull stalk A towards the
steering wheel within 2 minutes from
when the engine is turned off.
Each time the stalk is moved, the lights
stay on for an extra 30 seconds up to
a maximum of 210 seconds; then
the lights are switched off automatically.
Also, each time the stalk is operated,
the
warning light on the
instrument panel switches on. The
display shows the time set for the
function and the corresponding
graphics.
The warning light comes on when the
lever is operated and stays on until
the function is automatically
deactivated. Each movement of the
stalk only increases the amount of time
the lights stay on.
Deactivation
Keep the stalk pulled towards the
steering wheel for more than 2
seconds.
37
Page 43 of 288

AUTOrain sensor activation (for
versions/markets, where
provided) (the windscreen wipers
adapt the operating speed
automatically to suit the intensity
of the rain)
intermittent operation;
continuous slow operation;
continuous fast operation.
Move the stalk upwards (unstable
position) to limit operation to the time
for which the stalk is held in this
position. When released, the stalk will
return to its default position and the
wiper will be automatically stopped.
"Smart washing"
function
Pull the lever towards the steering
wheel (unstable position) to operate the
windscreen washer. Keep the stalk
pulled for more than half a second to
operate the windscreen washer jet and
wiper automatically with a single
movement.
The wiper stops working three strokes
after the stalk is released. A further
stroke after approximately 6 seconds
completes the cycle.RAIN SENSOR
(for versions/markets, where provided)
This is an infrared LED sensor fitted
on the car windscreen fig. 33.
It is able to detect the presence of rain
and consequently manage windscreen
wiping in accordance with the amount
of water on the windscreen.
Activation
The sensor is activated when ring nut A
fig. 32 is turned to “automatic” position
(“AUTO” control): the windscreen wiper
stroke frequency is thus adjusted in
accordance with the amount of water
on the windscreen.
This frequency can vary from no stroke
(no rain - windscreen dry) up to the
2
ndconstant speed operation (heavy
rain - windscreen wet).The sensitivity of the rain sensor can be
adjusted through the Setup menu
(see paragraph “Menu Items” in the
“Knowing the instrument panel”
section).
If the engine is stopped with the lever in
“automatic” position, when it is next
started no wiping cycle will take place
even if it is raining. This prevents
accidental activation of the rain sensor
when the engine is started (e.g. when
the windscreen is being washed by
hand or the wipers are stuck to the
windscreen when there is ice).
To restore automatic operation of the
rain sensor, turn the ring nut on the
right stalk A fig. 32 from automatic
position (AUTO) toOposition and then
turn A ring nut back to the AUTO
position.
When the rain sensor is reactivated
using any of the manoeuvres described
above, reactivation is indicated by a
single stroke of the windscreen wipers,
regardless of the condition of the
windscreen.
If the sensitivity is changed whilst the
rain sensor is operating, a windscreen
wiper stroke is carried out to confirm
the change.
33A0K0558
39
Page 72 of 288

The activation of the Dynamic mode is
also shown by the change in the
instrument panel lighting that, after
decreasing, reaches the highest
luminosity and then returns to the
previously set values.
Disengagement
To deactivate “Dynamic” mode and
return to “Natural”, repeat the same
movement of the lever within the same
times. In this case, the LED
corresponding to “Natural” mode will
light up and the words “Natural on” will
appear on the display (see fig. 79).ENGAGEMENT/
DISENGAGEMENT OF “All
Weather” MODE
Engagement
Move lever A fig. 75 downwards (to the
letter “a”) and hold in this position for
0.5 seconds until the corresponding
LED lights up or the word “All Weather”
appears on the display (see fig. 80).
ESC and ASR systems:intervention
thresholds aimed at guaranteeing
the maximum safety in low grip driving
conditions. It is recommended to
activate the "All Weather" mode when
fitting snow chains.
"ELECTRONIC Q2" system:the
system is deactivated.
Steering wheel tuning:maximum
comfort.DST:higher braking control
coordinated with ABS/ESC. Standard
control over lateral acceleration.
Oversteering compensation depending
on the ESC/ASR intervention
thresholds: a slight movement on the
steering wheel encourages the driver to
carry out the most appropriate
manoeuvre.
Engine:standard response.
Disengagement
To deactivate “All Weather” mode and
return to “Natural”, carry out the same
procedure described for “Dynamic”
mode, but move lever A fig. 75 to “a”.
IMPORTANT
❒It is not possible to switch directly
from “Dynamic” mode to “All
Weather” mode and vice versa. You
must always first go back to “Natural”
mode and then select the other
mode.
❒The driving mode engaged before the
engine stops is maintained when it is
next started.
❒In the event of system failure or a
fault with lever A, no driving modes
can be selected. The display will
show a warning message.
79A0K1059
80A0K1511
68
GETTING TO KNOW YOUR CAR
Page 76 of 288

WARNING
48) When replacing the battery,
always contact an Alfa Romeo
Dealership. The replacement
battery should be of the same
type (HEAVY DUTY) and should
have the same characteristics.
49) Before opening the bonnet,
make sure that the engine is off
and that the ignition key is in
the STOP position. Follow the
instructions on the dedicated
label on the front crossmember
(fig. 85). We recommend that you
remove the key from the ignition if
other people remain in the car.
The car should always be left after
the key has been removed or
turned to the STOP position.
During refuelling, make sure that
the engine is off (and that the
ignition key is in the STOP
position).
iTPMS (indirect Tyre
Pressure
Monitoring System)
(for versions/markets, where provided)
DESCRIPTION
The car can be equipped with the
iTPMS (indirect Tyre Pressure
Monitoring System) which monitors the
tyre inflation status thanks to wheel
speed sensors.
The system warns the driver if one or
more tyres are flat by the dedicated
warning light
continuously on and a
warning message on the display.
If one tyre only is flat, the system can
indicate its position: it is anyway
recommended to check the pressure
on all four tyres.
This indication is displayed also when
turning the engine off and on again until
the RESET procedure is carried out.
RESET PROCEDURE
The iTPMS system needs an initial
"self-learning" phase (with length
depending on the driving style and road
conditions: optimal conditions being
RESET procedure is carried out.❒whenever the tyre pressure is
modified;
❒when even only one tyre is changed;
❒when tyres are rotated/inverted;
❒when the space-saver wheel is fitted.
Before carrying out the RESET, inflate
the tyres to the rated pressure values
specified in the inflation pressure table
(see "Wheels" paragraph in the
"Technical specifications" section).
If the RESET is not carried out, in all
above cases, the warning lightmay
give false indications on one or more
tyres.
To carry out the RESET, with the car
stopped and the ignition key at
MAR-ON, press the button
fig. 86 on
the dashboard for 2 seconds; after
the RESET, the display shows a
dedicated message, indicating that the
"self-learning" has started.
86A0K060872
GETTING TO KNOW YOUR CAR
The Reset procedure must be carried
out:
which starts when driving
on
a
straight
road
at
80
km/h
for
at least 20 minutes)
the
Page 80 of 288

ACCESSORIES
PURCHASED BY THE
OWNER
If after purchasing the car, you decide
to install electrical accessories that
require a permanent electric supply
(radio, satellite anti-theft system, etc.) or
accessories that in any case burden
the electric supply, contact an Alfa
Romeo Dealership, whose qualified
personnel, besides suggesting the
most suitable devices from
Lineaccessori Alfa Romeo, will also
check whether the car's electrical
system is able to withstand the load
required, or whether it needs to be
integrated with a more powerful battery.
58)
INSTALLING ELECTRICAL
ELECTRONIC DEVICES
Electrical and electronic devices
installed after buying the car in the
context of after-sales service must carry
the following label:fig. 88Fiat Group Automobiles S.p.A.
authorises the installation of transceiver
devices on condition that such
installations are carried out in
a workmanlike fashion, following the
manufacturer’s instructions, at a
specialised centre.
IMPORTANT Traffic police may not
allow the car on the road if devices
have been installed which modify the
features of the car. This may also cause
invalidation of warranty in relation to
faults caused by the change either
directly or indirectly related to it.
Fiat Group Automobiles S.p.A. shall not
be liable for damage caused by the
installation of accessories either not
supplied or recommended by Fiat
Group Automobiles S.p.A. and/or not
installed in compliance with the
provided instructions.
RADIO TRANSMITTERS
AND MOBILE PHONES
Radio transmitter equipment (vehicle
mobile phones, CB radios, amateur
radio etc.) cannot be used inside the
car unless a separate aerial is mounted
on the roof.IMPORTANT The use of these devices
inside the passenger compartment
(without a separate aerial) may cause
the vehicle’s electronic systems to
malfunction. This could compromise
safety in addition to constituting a
potential hazard for passengers' health.
As far as the use of EC-approved
mobile phones is concerned (GSM,
GPRS, UMTS), follow the usage
instructions provided by the mobile
phone manufacturer.
WARNING
58) Take care when fitting additional
spoilers or non-standard alloy
wheels: they could reduce the
ventilation of the brakes and
affect efficiency in sharp,
repeated braking or on long
descents. Make sure that nothing
obstructs the pedal stroke (mats,
etc.).
88DISPOSITIVI-ELETTRONICI
76
GETTING TO KNOW YOUR CAR
/
Page 156 of 288

POSITIONS OF THE
LEVER
Park (P)
Position P corresponds to the neutral
position of the transmission and locks
drive wheels mechanically.
It should only be engaged with the car
stationary and the handbrake should be
applied, if necessary.
With the ignition key at MAR-ON or with
engine running, or when the engine
switches off, if the gear lever is not
correctly positioned in P, letter P starts
flashing on the gear lever trim.
In this case, move the lever correctly to
position P.
21)
The ignition key can be removed only
when the lever is in position P. Moving
the lever from P to D must be
performed only when the car is
stationary and the engine at idling
speed.
Shifting from P to any other position of
the selector lever, with ignition key in
MAR-ON position, must be made
pressing the brake pedal and using the
button on the gear lever (see paragraph
"Selector lever").
If the battery is flat, to release the lever
you need to remove the gaiter and
operate the lever A fig. 132.IMPORTANT NEVER leave the car
before having positioned the selector
lever in P.
Reverse (R)
The engine cannot be started with the
lever in position R.
Shifting from R to N or D is free, while
shifting from R to P can be made by the
button on the gear lever, with engine
at idling speed.
22)
Neutral (N)
It corresponds to neutral for a standard
manual gearbox. The engine can be
started with the lever in position N.
Engage N in case of prolonged stops.
To move the lever from position N,
release the accelerator and make sure
the engine is stable at idling speed.Shifting from N to D is free, while
shifting from N to R or P can only be
made by the button on the gear lever.
Drive (D) - Automatic
forward gear
It is the lever position in standard
running conditions.
Shifting from D to N is free, while
shifting from D to R or P can only be
made by the button on the gear lever.
Sequential mode (+ / –)
Shifting the lever from position D on
side in stable position, the transmission
is used in sequential mode.
Shifting the lever in unstable position (+
or −) gears are changed.
Important information
IMPORTANT All movements of the gear
lever must be performed with car
stationary and engine idling only.
The drive wheels are mechanically
locked in position P.
Shifting from P to R is possible with
brake pedal pressed and button on
gear lever pressed.
Shifting from R to N and from N to D is
free.
132A0K0619
152
STARTING AND DRIVING
Page 159 of 288

“Kick-Down” function
To resume speed quickly, when the
accelerator pedal is pressed fully, the
transmission control system downshifts
("Kick-down" function).
IMPORTANT When driving on roads
with poor grip conditions (snow, ice,
etc.) avoid activating the kick-down
function.
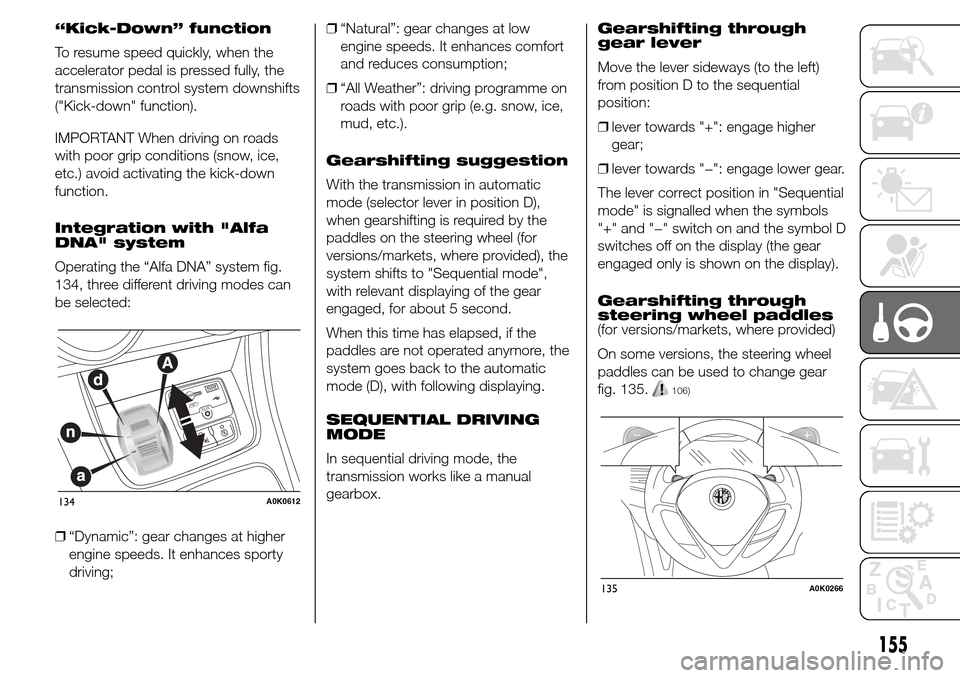
Integration with "Alfa
DNA" system
Operating the “Alfa DNA” system fig.
134, three different driving modes can
be selected:
❒“Dynamic”: gear changes at higher
engine speeds. It enhances sporty
driving;❒“Natural”: gear changes at low
engine speeds. It enhances comfort
and reduces consumption;
❒“All Weather”: driving programme on
roads with poor grip (e.g. snow, ice,
mud, etc.).
Gearshifting suggestion
With the transmission in automatic
mode (selector lever in position D),
when gearshifting is required by the
paddles on the steering wheel (for
versions/markets, where provided), the
system shifts to "Sequential mode",
with relevant displaying of the gear
engaged, for about 5 second.
When this time has elapsed, if the
paddles are not operated anymore, the
system goes back to the automatic
mode (D), with following displaying.
SEQUENTIAL DRIVING
MODE
In sequential driving mode, the
transmission works like a manual
gearbox.Gearshifting through
gear lever
Move the lever sideways (to the left)
from position D to the sequential
position:
❒lever towards "+": engage higher
gear;
❒lever towards "−": engage lower gear.
The lever correct position in "Sequential
mode" is signalled when the symbols
"+" and "−" switch on and the symbol D
switches off on the display (the gear
engaged only is shown on the display).
Gearshifting through
steering wheel paddles
(for versions/markets, where provided)
On some versions, the steering wheel
paddles can be used to change gear
fig. 135.
106)
134A0K0612
135A0K0266
155