2015 Alfa Romeo Giulietta warning
[x] Cancel search: warningPage 48 of 288

CONTROLS
HAZARD WARNING
LIGHTS
Operation
Press switch A fig. 40 to switch the
lights on/off.
Warning lights
andon the
instrument panel switch on and switch
A flashes when the lights are on.
Emergency braking
In the event of emergency braking the
hazard warning lights are lit up
automatically as well as the
and
warning lights in the panel.
The lights switch off automatically when
emergency braking ceases.
17)
FOG LIGHTS
(for versions/markets, where provided)
Operation
Press button
fig. 41 to switch the
lights on/off.
With the lights on, warning light
in
the instrument panel switches on.
REAR FOG LIGHTS
Operation
Press button
fig. 41 to switch the
lights on/off.
The rear fog lights are only switched on
with the dipped headlights or front
fog lights on.
Press the button again to switch the
lights off, or switch off the dipped
headlights or the front fog lights (for
versions/markets, where provided).
39A0K056440A0K0622
41A0K0609
44
GETTING TO KNOW YOUR CAR
GLOVE COMPARTMENT
LIGHT
This light comes on automatically when
the glove compartment is opened
and switches off when it is closed.
The light switches on/off regardless of
the ignition key position.
With the lights on, warning light
in
the instrument panel switches on.
Page 49 of 288

CENTRAL LOCKING
Operation
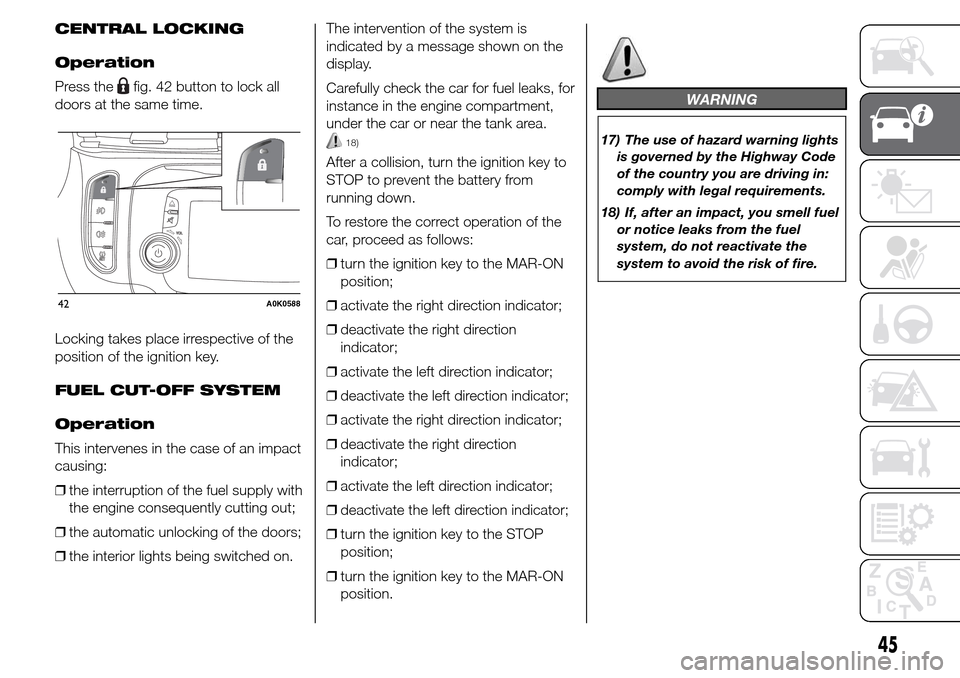
Press the
fig. 42 button to lock all
doors at the same time.
Locking takes place irrespective of the
position of the ignition key.
FUEL CUT-OFF SYSTEM
Operation
This intervenes in the case of an impact
causing:
❒the interruption of the fuel supply with
the engine consequently cutting out;
❒the automatic unlocking of the doors;
❒the interior lights being switched on.The intervention of the system is
indicated by a message shown on the
display.
Carefully check the car for fuel leaks, for
instance in the engine compartment,
under the car or near the tank area.
18)
After a collision, turn the ignition key to
STOP to prevent the battery from
running down.
To restore the correct operation of the
car, proceed as follows:
❒turn the ignition key to the MAR-ON
position;
❒activate the right direction indicator;
❒deactivate the right direction
indicator;
❒activate the left direction indicator;
❒deactivate the left direction indicator;
❒activate the right direction indicator;
❒deactivate the right direction
indicator;
❒activate the left direction indicator;
❒deactivate the left direction indicator;
❒turn the ignition key to the STOP
position;
❒turn the ignition key to the MAR-ON
position.
WARNING
17) The use of hazard warning lights
is governed by the Highway Code
of the country you are driving in:
comply with legal requirements.
18) If, after an impact, you smell fuel
or notice leaks from the fuel
system, do not reactivate the
system to avoid the risk of fire.
42A0K0588
45
Page 53 of 288

EXTINGUISHER
(for versions/markets, where provided)
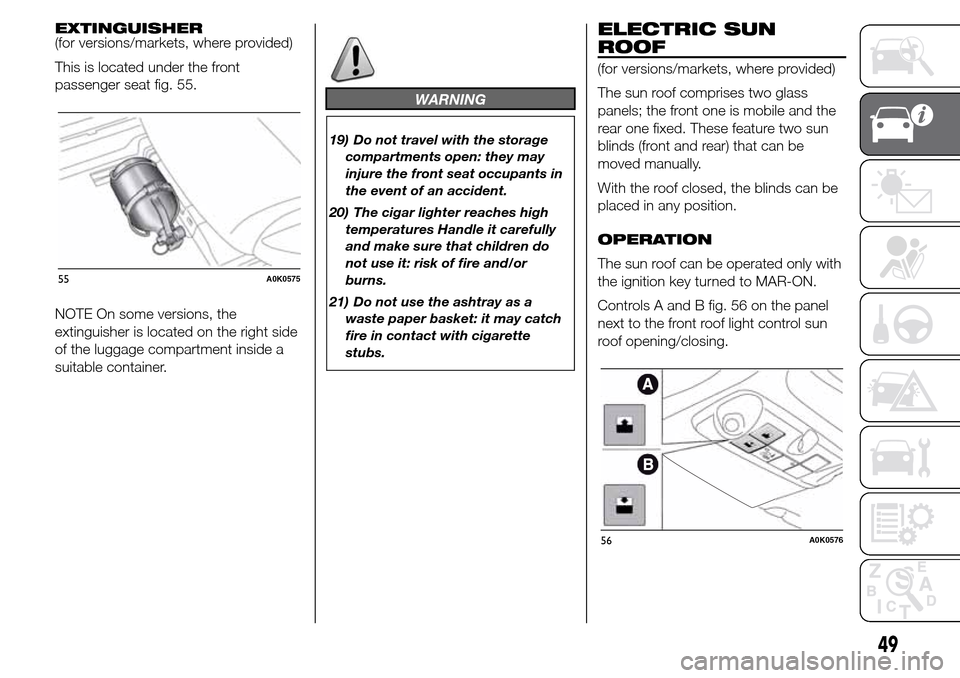
This is located under the front
passenger seat fig. 55.
NOTE On some versions, the
extinguisher is located on the right side
of the luggage compartment inside a
suitable container.
WARNING
19) Do not travel with the storage
compartments open: they may
injure the front seat occupants in
the event of an accident.
20) The cigar lighter reaches high
temperatures Handle it carefully
and make sure that children do
not use it: risk of fire and/or
burns.
21) Do not use the ashtray as a
waste paper basket: it may catch
fire in contact with cigarette
stubs.
ELECTRIC SUN
ROOF
(for versions/markets, where provided)
The sun roof comprises two glass
panels; the front one is mobile and the
rear one fixed. These feature two sun
blinds (front and rear) that can be
moved manually.
With the roof closed, the blinds can be
placed in any position.
OPERATION
The sun roof can be operated only with
the ignition key turned to MAR-ON.
Controls A and B fig. 56 on the panel
next to the front roof light control sun
roof opening/closing.
55A0K0575
56A0K0576
49
Page 55 of 288

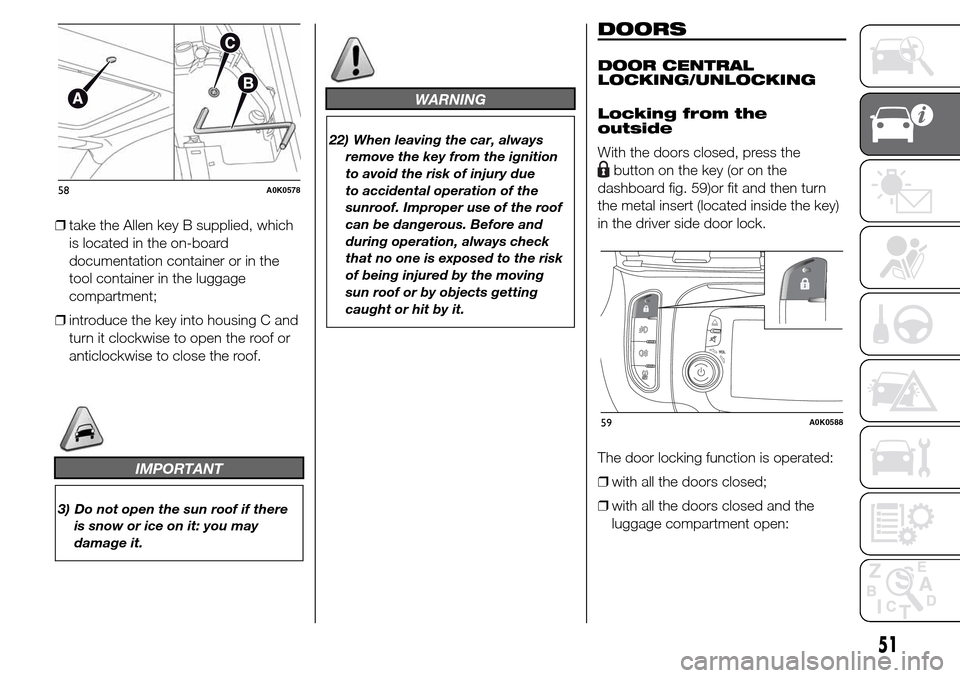
❒take the Allen key B supplied, which
is located in the on-board
documentation container or in the
tool container in the luggage
compartment;
❒introduce the key into housing C and
turn it clockwise to open the roof or
anticlockwise to close the roof.
IMPORTANT
3) Do not open the sun roof if there
is snow or ice on it: you may
damage it.
WARNING
22) When leaving the car, always
remove the key from the ignition
to avoid the risk of injury due
to accidental operation of the
sunroof. Improper use of the roof
can be dangerous. Before and
during operation, always check
that no one is exposed to the risk
of being injured by the moving
sun roof or by objects getting
caught or hit by it.
DOORS
DOOR CENTRAL
LOCKING/UNLOCKING
Locking from the
outside
With the doors closed, press the
button on the key (or on the
dashboard fig. 59)or fit and then turn
the metal insert (located inside the key)
in the driver side door lock.
The door locking function is operated:
❒with all the doors closed;
❒with all the doors closed and the
luggage compartment open:
58A0K0578
59A0K0588
51
Page 59 of 288

IMPORTANT With ignition key at STOP
or removed, the electric windows
remain active for about 3 minutes and
are deactivated when a door is opened.
IMPORTANT With the anti-crush
system, when the
button on the
remote control is pressed for longer
than 2 seconds the windows will open,
whilst if the
button is pressed for
longer than 2 seconds the windows will
close.
IMPORTANT
7) The system conforms to the
2000/4/EC standard concerning
the safety of passengers leaning
out of the passenger
compartment.
WARNING
23) Incorrect use of the electric
windows may be dangerous.
Before and during their operation,
ensure that any passengers are
not at risk from the moving glass
either by personal objects getting
caught in the mechanism or by
being hit by it directly. When
leaving the car, always remove
the key from the ignition to
prevent accidental operation of
the electric windows from being a
hazard for those still on board.
Electric window system
initialisation
The system must be re-initialised after
disconnecting the battery or if the
relevant protection fuse is blown.
Initialisation procedure:
❒fully close the window to initialise
manually;
❒after the window has reached the
upper end of travel, hold the up
button pressed for at least one
second.For versions/markets where provided,
after there has been no power supply
for the control units (battery replaced or
disconnected or protection fuses for
the electric window control units
replaced), the automatic operation of
the windows must be restored.
The restoration procedure must be
performed as described below with the
doors closed:
❒completely open the driver's door
window keeping the operating button
pressed for at least three seconds
after the (lower) end of travel position
is reached;
❒completely raise the driver side
window and hold the button down for
at least 3 seconds once the (upper)
end of travel position has been
reached;
❒proceed in the same way as
described in points 1 and 2 for the
passenger side door;
❒make sure that the initialisation is
correct by checking that the windows
work automatically.
55
Page 63 of 288

WARNING
24) A heavy load that has not been
secured may cause serious
injuries to passengers in the event
of an accident.
25) If you are travelling in an area
with limited opportunities for
refuelling and you wish to bring
petrol with you in a petrol can, you
must do so in compliance with
current regulations and using an
approved can, appropriately
secured to the load securing
attachments. However, the risks
of fire in case of collision increase
anyway.
BONNET
OPENING
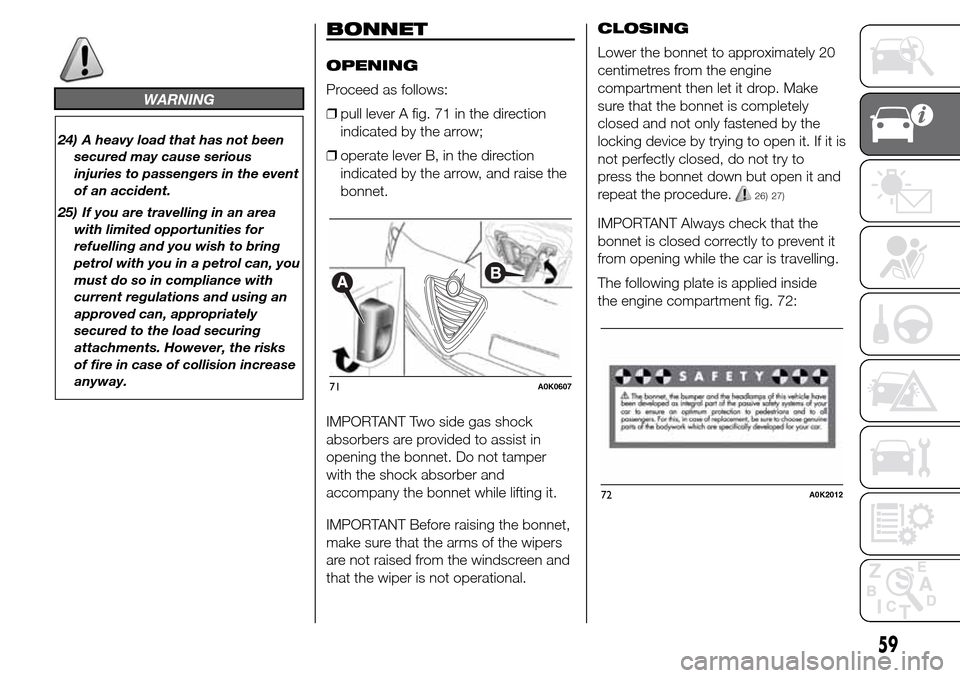
Proceed as follows:
❒pull lever A fig. 71 in the direction
indicated by the arrow;
❒operate lever B, in the direction
indicated by the arrow, and raise the
bonnet.
IMPORTANT Two side gas shock
absorbers are provided to assist in
opening the bonnet. Do not tamper
with the shock absorber and
accompany the bonnet while lifting it.
IMPORTANT Before raising the bonnet,
make sure that the arms of the wipers
are not raised from the windscreen and
that the wiper is not operational.CLOSING
Lower the bonnet to approximately 20
centimetres from the engine
compartment then let it drop. Make
sure that the bonnet is completely
closed and not only fastened by the
locking device by trying to open it. If it is
not perfectly closed, do not try to
press the bonnet down but open it and
repeat the procedure.
26) 27)
IMPORTANT Always check that the
bonnet is closed correctly to prevent it
from opening while the car is travelling.
The following plate is applied inside
the engine compartment fig. 72:
71A0K0607
72A0K2012
59
Page 64 of 288

WARNING
26) For safety reasons, the bonnet
must always be properly closed
while driving. Therefore, make
sure that the bonnet is properly
closed and that the lock is
engaged. If you discover that the
bonnet is not perfectly closed
during travel, stop immediately
and close the bonnet in the
correct manner.
27) Perform these operations only
when the car is stationary.
ROOF RACK/SKI
RACK
The attachments A are located in the
areas illustrated in the figure and can
only be accessed with the doors open.
28) 29)
8) 9)
Lineaccessori Alfa Romeo includes a
dedicated roof rack/ski rack for this car.
WARNING
28) After travelling for a few
kilometres, check to ensure that
the fixing screws for the
attachments are well tightened.
29) Evenly distribute the load and
take into account, when driving,
the increased responsiveness
of the car to side wind.
IMPORTANT
8) Never exceed the maximum
permitted loads (see “Technical
specifications” section).
9) The size of the loads you
transport must strictly comply
with currently applicable
regulations.
73A0K0590
60
GETTING TO KNOW YOUR CAR
Page 66 of 288

ESC SYSTEM
IN BRIEF
The ESC system improves the
directional control and stability of the
car in various driving conditions.
The ESC system corrects the car’s
understeer and oversteer, distributing
the brake force on the appropriate
wheels. The torque supplied by
the engine can also be reduced in
order to maintain control of the car.
30) 31) 32) 33) 34)
The ESC system uses sensors installed
on the car to determine the trajectory
that the driver intends to follow and
compares it with the car’s effective
trajectory. When the real trajectory
deviates from the desired trajectory, the
ESC system intervenes to counter the
car’s understeer or oversteer.
❒Oversteer: occurs when the car is
turning more than it should according
to the angle of the steering wheel.
❒Understeer: occurs when the car is
turning less than it should according
to the angle of the steering wheel.The ESC system also includes the
following systems:
❒EBD
❒ABS
❒CBC
❒ASR
❒HILL HOLDER
❒HBA
❒MSR
❒DST
❒“ELECTRONIC Q2” (“E-Q2”)
❒"PRE-FILL" (RAB - Ready Alert
Brake)
SYSTEM ACTIVATION
The ESC system switches on
automatically when the engine is
started and cannot be switched off.
SYSTEM INTERVENTION
This is indicated by the flashing of the
warning light on the instrument
panel, to inform the driver that the car is
in critical stability and grip conditions.EBD SYSTEM
The EBD system is an integral part of
the ESC system and intervenes during
braking, distributing the brake force
optimally between front and rear
wheels.
This guarantees greater braking stability
for the car, preventing sudden locking
of the rear wheels and the consequent
instability of the car.
ABS
This system, which is an integral part of
the braking system, prevents one or
more wheels from locking and slipping
in all road surface conditions,
irrespective of the intensity of the
braking action, ensuring that the car
can be controlled even during
emergency braking and optimising
stopping distances.
The system intervenes when braking
and the wheels are about to lock,
typically in emergency braking or
low-grip conditions, when locking may
be more frequent.
The system also improves control and
stability of the car when braking on a
surface where the grip of the left and
right wheels varies, or on corners.
62
GETTING TO KNOW YOUR CAR