Page 158 of 288

In both cases, if the described
conditions and times are not respected,
the ignition key will be automatically
locked.
To remove the key, turn it to MAR-ON
and then to STOP.
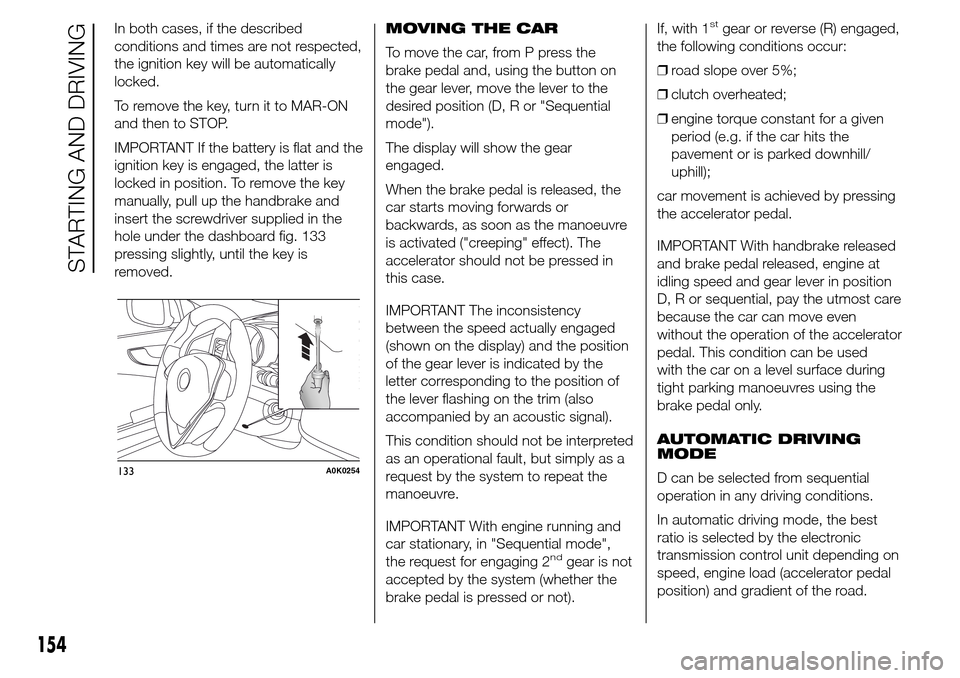
IMPORTANT If the battery is flat and the
ignition key is engaged, the latter is
locked in position. To remove the key
manually, pull up the handbrake and
insert the screwdriver supplied in the
hole under the dashboard fig. 133
pressing slightly, until the key is
removed.MOVING THE CAR
To move the car, from P press the
brake pedal and, using the button on
the gear lever, move the lever to the
desired position (D, R or "Sequential
mode").
The display will show the gear
engaged.
When the brake pedal is released, the
car starts moving forwards or
backwards, as soon as the manoeuvre
is activated ("creeping" effect). The
accelerator should not be pressed in
this case.
IMPORTANT The inconsistency
between the speed actually engaged
(shown on the display) and the position
of the gear lever is indicated by the
letter corresponding to the position of
the lever flashing on the trim (also
accompanied by an acoustic signal).
This condition should not be interpreted
as an operational fault, but simply as a
request by the system to repeat the
manoeuvre.
IMPORTANT With engine running and
car stationary, in "Sequential mode",
the request for engaging 2
ndgear is not
accepted by the system (whether the
brake pedal is pressed or not).If, with 1
stgear or reverse (R) engaged,
the following conditions occur:
❒road slope over 5%;
❒clutch overheated;
❒engine torque constant for a given
period (e.g. if the car hits the
pavement or is parked downhill/
uphill);
car movement is achieved by pressing
the accelerator pedal.
IMPORTANT With handbrake released
and brake pedal released, engine at
idling speed and gear lever in position
D, R or sequential, pay the utmost care
because the car can move even
without the operation of the accelerator
pedal. This condition can be used
with the car on a level surface during
tight parking manoeuvres using the
brake pedal only.
AUTOMATIC DRIVING
MODE
D can be selected from sequential
operation in any driving conditions.
In automatic driving mode, the best
ratio is selected by the electronic
transmission control unit depending on
speed, engine load (accelerator pedal
position) and gradient of the road.
133A0K0254
154
STARTING AND DRIVING
Page 166 of 288

STORING THE CAR
If the car is to be left inactive for longer
than a month, the following precautions
should be noted:
❒park the car in covered, dry and if
possible well-ventilated premises and
slightly open the windows;
❒check that the handbrake is not
engaged;
❒disconnect the negative battery
terminal and check the battery
charge. Repeat this check once
every three months during storage;
❒if the battery is not disconnected
from the electrical system, checks its
state of charge every thirty days;
❒clean and protect the painted parts
using protective wax;
❒clean and protect the shiny metal
parts using special compounds
available commercially;
❒sprinkle talcum powder on the
windscreen and rear window wiper
rubber blades and lift them off the
glasses;
❒slightly open the windows;❒cover the car with a cloth or
perforated plastic sheet. Do not use
compact plastic sheets which do
not allow humidity to evaporate from
the surface of the car.
❒inflate tyres to +0.5 bar above the
standard prescribed pressure and
check it periodically;
❒do not drain the engine cooling
system;
❒Any time the car is left inactive for
two weeks or more, operate the
air conditioning system with engine
idling for at least 5 minutes, setting
external air and with fan at maximum
speed. This operation will ensure a
suitable lubrication to minimise
possibility of damage to the
compressor when the system is
operated again.
IMPORTANT After turning the ignition
key to STOP, wait at least 1 minute
before disconnecting the electrical
supply to the battery.
162
STARTING AND DRIVING
Page 180 of 288
Bulbs Type Power Re. Figure
Front side lights/Daytime running lights (DRL) LED – –
Rear side lights LED – –
Dipped headlights H7 55W D
Main beam headlamps H1 55W E
Main/Dipped beams (versions with Bi-Xenon
headlights) (for versions/markets, where provided)F D1S -
Front direction indicators PY24W 24W B
Rear direction indicators R10W 10W B
Side direction indicators LED – –
Brake light LED – –
3rd brake light LED – –
Number plate light W5W 5W A
Fog lights H3 55W E
Rear fog lights H21W 21W B
Reversing lights P21W 21W B
Front roof light C10W 10W C
Luggage compartment roof light W5W 5W A
Glove compartment light C5W 5W C
176
IN AN EMERGENCY
Page 182 of 288

DIRECTION INDICATORS
Front
To change the bulb, proceed as follows:
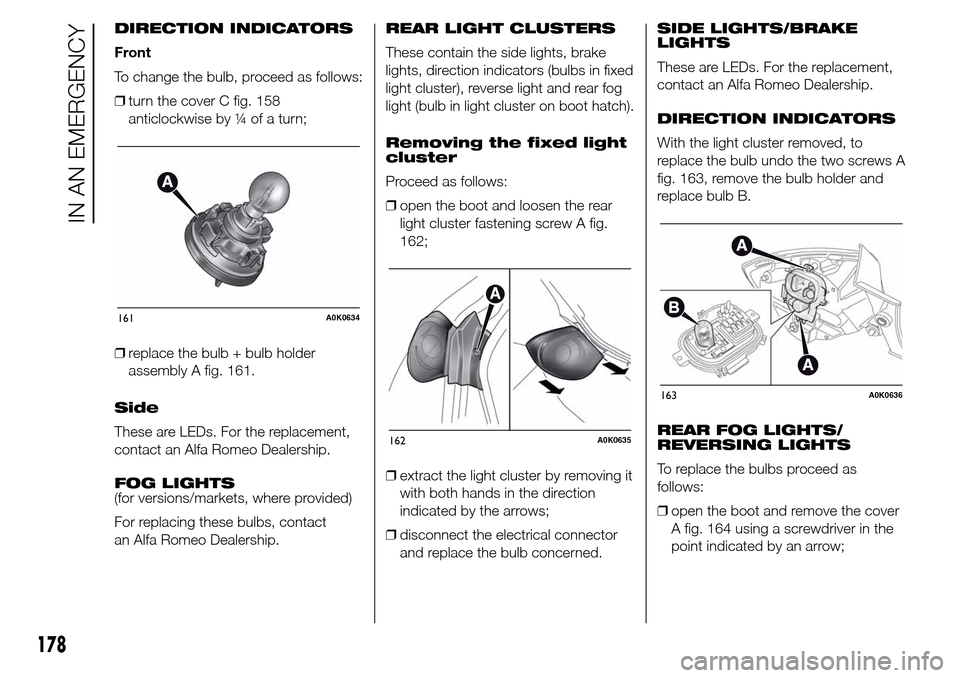
❒turn the cover C fig. 158
anticlockwise by ¼ of a turn;
❒replace the bulb + bulb holder
assembly A fig. 161.
Side
These are LEDs. For the replacement,
contact an Alfa Romeo Dealership.
FOG LIGHTS
(for versions/markets, where provided)
For replacing these bulbs, contact
an Alfa Romeo Dealership.REAR LIGHT CLUSTERS
These contain the side lights, brake
lights, direction indicators (bulbs in fixed
light cluster), reverse light and rear fog
light (bulb in light cluster on boot hatch).
Removing the fixed light
cluster
Proceed as follows:
❒open the boot and loosen the rear
light cluster fastening screw A fig.
162;
❒extract the light cluster by removing it
with both hands in the direction
indicated by the arrows;
❒disconnect the electrical connector
and replace the bulb concerned.SIDE LIGHTS/BRAKE
LIGHTS
These are LEDs. For the replacement,
contact an Alfa Romeo Dealership.
DIRECTION INDICATORS
With the light cluster removed, to
replace the bulb undo the two screws A
fig. 163, remove the bulb holder and
replace bulb B.
REAR FOG LIGHTS/
REVERSING LIGHTS
To replace the bulbs proceed as
follows:
❒open the boot and remove the cover
A fig. 164 using a screwdriver in the
point indicated by an arrow;
161A0K0634
162A0K0635
163A0K0636
178
IN AN EMERGENCY
Page 183 of 288
❒remove the connector A fig. 165 and
extract the bulb holder assembly by
operating on the retaining tab B
and then by loosening the screw C;
❒remove the bulb by pushing it slightly
and turning it anticlockwise (D =
reverse light bulb;E=rearfoglight
bulb);
❒refit the bulb holder assembly
positioning it correctly, fasten screw
C and then fix it by means of the
retaining tab B. Reconnect connector
A then refit cover A fig. 164.
IMPORTANT Protect the tip of the
screwdriver with a cloth to prevent
scratching when removing the cover A.3
rdBRAKE LIGHTS
These are LED lights and are located
on the spoiler integrated with the
tailgate. For the replacement, contact
an Alfa Romeo Dealership.NUMBER PLATE LIGHTS
To replace the bulbs proceed as
follows:
❒remove the number plate light units A
fig. 166;
❒turn the bulb holder B fig. 167
anticlockwise, extract the bulb C and
replace it.
164A0K0637
165A0K0638
166A0K0639
167A0K0640
179
Page 201 of 288

SCHEDULED SERVICING PLAN
PETROL VERSIONS
Thousands of miles 9 18 27 36 45 54 63 72 81 90
Thousands of kilometres 15 30 45 60 75 90 105 120 135 150
Years12345678910
Check tyre condition/wear and adjust pressure, if
necessary; check “Fix&Go Automatic” kit recharge expiry
date (for versions/markets, where provided)●●●●●●●●●●
Check operation of lighting system (headlights, direction
indicators, hazard warning lights, luggage compartment,
passenger compartment, glove compartment, instrument
panel warning lights, etc.)●●●●●●●●●●
Check and, if necessary, top up fluid levels (engine
coolant, hydraulic clutch/brakes, windscreen washer,
battery, etc.)●●●●●●●●●●
Check exhaust emissions/smokiness●●●●●●●●●●
Use the diagnosis socket to check supply/engine
management system operation, emissions and, for
versions/markets, where provided, engine oil degradation●●●●●●●●●●
Visually inspect condition of: exterior bodywork,
underbody protection, pipes and hoses (exhaust, fuel
system, brakes), rubber elements (boots, sleeves, bushes,
etc.)●●●●●
Check windscreen/rear window wiper blade position/wear●●●●●
197
The checks listed in the Scheduled Servicing Plan, after reaching 120,000 km/8 years, must be cyclically repeated starting from
the first interval, thus following the same intervals as before.
Page 205 of 288

DIESEL VERSIONS
Thousands of miles 12 24 36 48 60 72 84 96 108 120
Thousands of kilometres 20 40 60 80 100 120 140 160 180 200
Years12345678910
Check tyre condition/wear and adjust pressure, if
necessary; check “Fix&Go Automatic” kit recharge expiry
date (for versions/markets, where provided)●●●●●●●●●●
Check operation of lighting system (headlights, direction
indicators, hazard warning lights, luggage compartment,
passenger compartment, glove compartment, instrument
panel warning lights, etc.)●●●●●●●●●●
Check and, if necessary, top up fluid levels (engine
coolant, hydraulic clutch/brakes, windscreen washer,
battery, etc.)●●●●●●●●●●
Check exhaust emissions/smokiness●●●●●●●●●●
Use the diagnosis socket to check supply/engine
management system operation, emissions and, for
versions/markets, where provided, engine oil degradation●●●●●●●●●●
Visually inspect condition of: exterior bodywork,
underbody protection, pipes and hoses (exhaust, fuel
system, brakes), rubber elements (boots, sleeves, bushes,
etc.)●●●●●
Check windscreen/rear window wiper blade position/wear●●●●●
Check operation of windscreen wiper/washer system and
adjust jets, if necessary●●●●●
201
The checks listed in the Scheduled Servicing Plan, after reaching 120,000 km/6 years, must be cyclically repeated starting from
the first interval, thus following the same intervals as before.
Page 206 of 288

Thousands of miles 12 24 36 48 60 72 84 96 108 120
Thousands of kilometres 20 40 60 80 100 120 140 160 180 200
Years12345678910
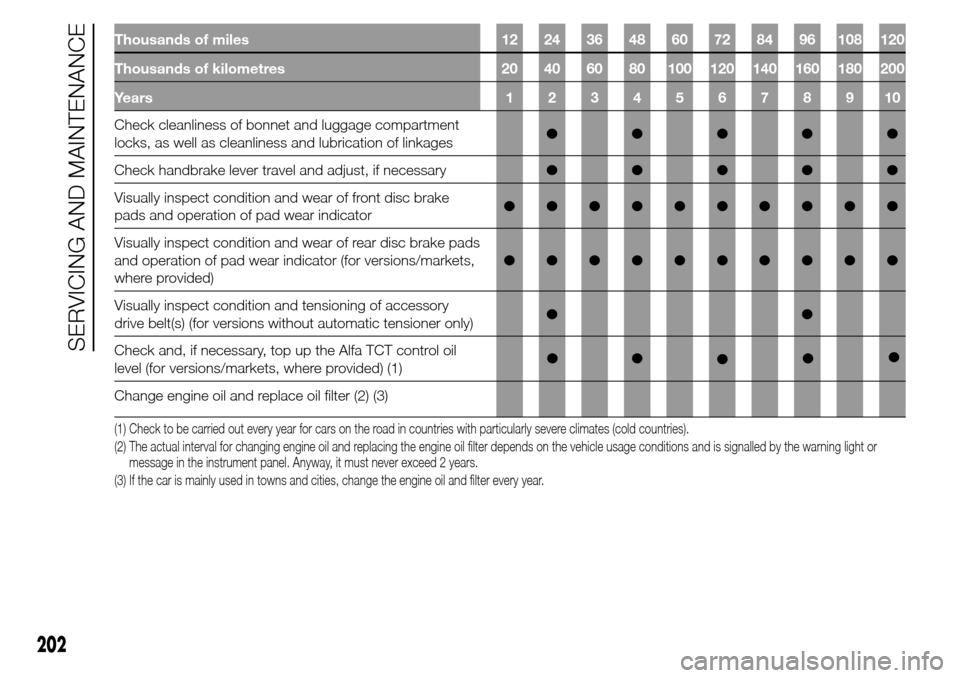
Check cleanliness of bonnet and luggage compartment
locks, as well as cleanliness and lubrication of linkages●●●●●
Check handbrake lever travel and adjust, if necessary●●●●●
Visually inspect condition and wear of front disc brake
pads and operation of pad wear indicator●●●●●●●●●●
Visually inspect condition and wear of rear disc brake pads
and operation of pad wear indicator (for versions/markets,
where provided)●●●●●●●●●●
Visually inspect condition and tensioning of accessory
drive belt(s) (for versions without automatic tensioner only)●●
Check and, if necessary, top up the Alfa TCT control oil
level (for versions/markets, where provided) (1)●
Change engine oil and replace oil filter (2) (3)
(1) Check to be carried out every year for cars on the road in countries with particularly severe climates (cold countries).
(2) The actual interval for changing engine oil and replacing the engine oil filter depends on the vehicle usage conditions and is signalled by the warning light or
message in the instrument panel. Anyway, it must never exceed 2 years.
(3) If the car is mainly used in towns and cities, change the engine oil and filter every year.
202
SERVICING AND MAINTENANCE●●●●