2015 Alfa Romeo Giulietta handbrake
[x] Cancel search: handbrakePage 156 of 288

POSITIONS OF THE
LEVER
Park (P)
Position P corresponds to the neutral
position of the transmission and locks
drive wheels mechanically.
It should only be engaged with the car
stationary and the handbrake should be
applied, if necessary.
With the ignition key at MAR-ON or with
engine running, or when the engine
switches off, if the gear lever is not
correctly positioned in P, letter P starts
flashing on the gear lever trim.
In this case, move the lever correctly to
position P.
21)
The ignition key can be removed only
when the lever is in position P. Moving
the lever from P to D must be
performed only when the car is
stationary and the engine at idling
speed.
Shifting from P to any other position of
the selector lever, with ignition key in
MAR-ON position, must be made
pressing the brake pedal and using the
button on the gear lever (see paragraph
"Selector lever").
If the battery is flat, to release the lever
you need to remove the gaiter and
operate the lever A fig. 132.IMPORTANT NEVER leave the car
before having positioned the selector
lever in P.
Reverse (R)
The engine cannot be started with the
lever in position R.
Shifting from R to N or D is free, while
shifting from R to P can be made by the
button on the gear lever, with engine
at idling speed.
22)
Neutral (N)
It corresponds to neutral for a standard
manual gearbox. The engine can be
started with the lever in position N.
Engage N in case of prolonged stops.
To move the lever from position N,
release the accelerator and make sure
the engine is stable at idling speed.Shifting from N to D is free, while
shifting from N to R or P can only be
made by the button on the gear lever.
Drive (D) - Automatic
forward gear
It is the lever position in standard
running conditions.
Shifting from D to N is free, while
shifting from D to R or P can only be
made by the button on the gear lever.
Sequential mode (+ / –)
Shifting the lever from position D on
side in stable position, the transmission
is used in sequential mode.
Shifting the lever in unstable position (+
or −) gears are changed.
Important information
IMPORTANT All movements of the gear
lever must be performed with car
stationary and engine idling only.
The drive wheels are mechanically
locked in position P.
Shifting from P to R is possible with
brake pedal pressed and button on
gear lever pressed.
Shifting from R to N and from N to D is
free.
132A0K0619
152
STARTING AND DRIVING
Page 158 of 288

In both cases, if the described
conditions and times are not respected,
the ignition key will be automatically
locked.
To remove the key, turn it to MAR-ON
and then to STOP.
IMPORTANT If the battery is flat and the
ignition key is engaged, the latter is
locked in position. To remove the key
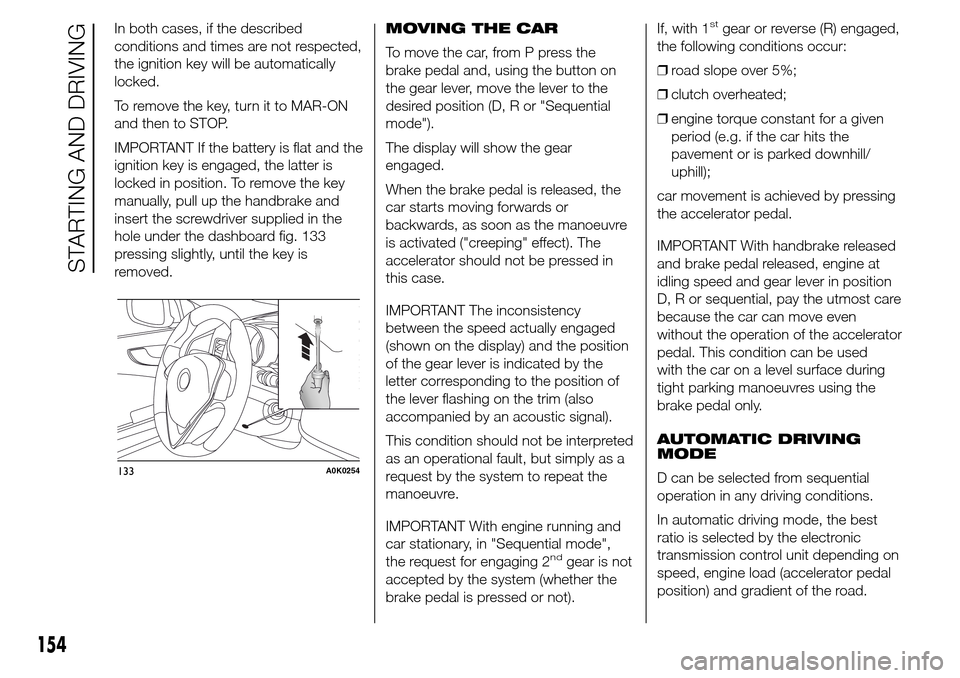
manually, pull up the handbrake and
insert the screwdriver supplied in the
hole under the dashboard fig. 133
pressing slightly, until the key is
removed.MOVING THE CAR
To move the car, from P press the
brake pedal and, using the button on
the gear lever, move the lever to the
desired position (D, R or "Sequential
mode").
The display will show the gear
engaged.
When the brake pedal is released, the
car starts moving forwards or
backwards, as soon as the manoeuvre
is activated ("creeping" effect). The
accelerator should not be pressed in
this case.
IMPORTANT The inconsistency
between the speed actually engaged
(shown on the display) and the position
of the gear lever is indicated by the
letter corresponding to the position of
the lever flashing on the trim (also
accompanied by an acoustic signal).
This condition should not be interpreted
as an operational fault, but simply as a
request by the system to repeat the
manoeuvre.
IMPORTANT With engine running and
car stationary, in "Sequential mode",
the request for engaging 2
ndgear is not
accepted by the system (whether the
brake pedal is pressed or not).If, with 1
stgear or reverse (R) engaged,
the following conditions occur:
❒road slope over 5%;
❒clutch overheated;
❒engine torque constant for a given
period (e.g. if the car hits the
pavement or is parked downhill/
uphill);
car movement is achieved by pressing
the accelerator pedal.
IMPORTANT With handbrake released
and brake pedal released, engine at
idling speed and gear lever in position
D, R or sequential, pay the utmost care
because the car can move even
without the operation of the accelerator
pedal. This condition can be used
with the car on a level surface during
tight parking manoeuvres using the
brake pedal only.
AUTOMATIC DRIVING
MODE
D can be selected from sequential
operation in any driving conditions.
In automatic driving mode, the best
ratio is selected by the electronic
transmission control unit depending on
speed, engine load (accelerator pedal
position) and gradient of the road.
133A0K0254
154
STARTING AND DRIVING
Page 160 of 288

To use the paddles on the steering
wheel, the gear lever must be in
"Sequential mode" or in D:
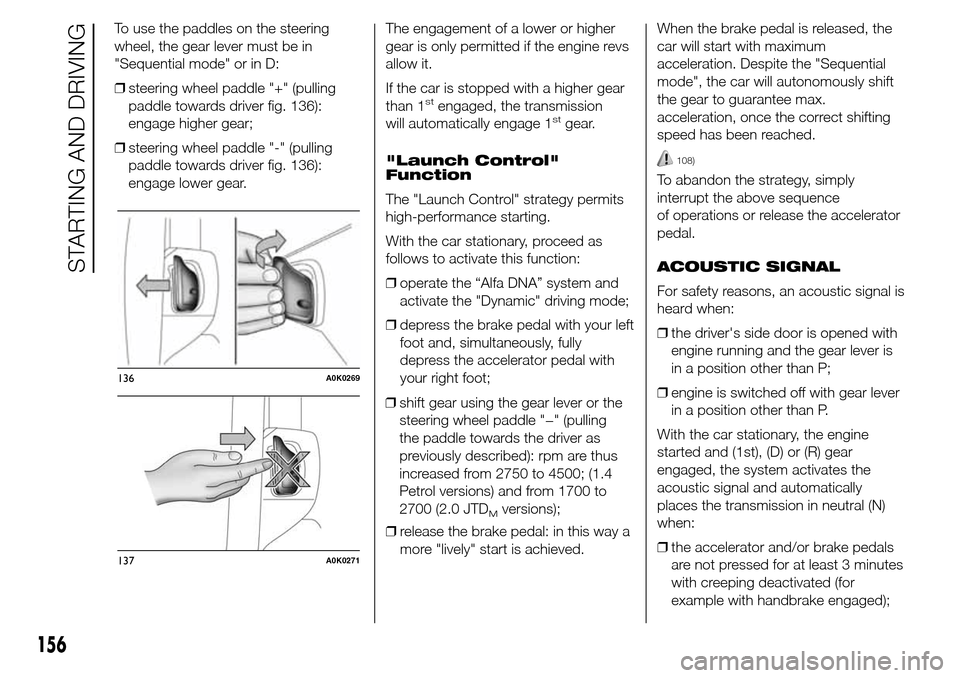
❒steering wheel paddle "+" (pulling
paddle towards driver fig. 136):
engage higher gear;
❒steering wheel paddle "-" (pulling
paddle towards driver fig. 136):
engage lower gear.The engagement of a lower or higher
gear is only permitted if the engine revs
allow it.
If the car is stopped with a higher gear
than 1
stengaged, the transmission
will automatically engage 1stgear.
"Launch Control"
Function
The "Launch Control" strategy permits
high-performance starting.
With the car stationary, proceed as
follows to activate this function:
❒operate the “Alfa DNA” system and
activate the "Dynamic" driving mode;
❒depress the brake pedal with your left
foot and, simultaneously, fully
depress the accelerator pedal with
your right foot;
❒release the brake pedal: in this way a
more "lively" start is achieved.When the brake pedal is released, the
car will start with maximum
acceleration. Despite the "Sequential
mode", the car will autonomously shift
the gear to guarantee max.
acceleration, once the correct shifting
speed has been reached.
108)
To abandon the strategy, simply
interrupt the above sequence
of operations or release the accelerator
pedal.
ACOUSTIC SIGNAL
For safety reasons, an acoustic signal is
heard when:
❒the driver's side door is opened with
engine running and the gear lever is
in a position other than P;
❒engine is switched off with gear lever
in a position other than P.
With the car stationary, the engine
started and (1st), (D) or (R) gear
engaged, the system activates the
acoustic signal and automatically
places the transmission in neutral (N)
when:
❒the accelerator and/or brake pedals
are not pressed for at least 3 minutes
with creeping deactivated (for
example with handbrake engaged);
136A0K0269
137A0K0271
156
STARTING AND DRIVING
❒shift gear using the gear lever or the
steering wheel paddle "−" (pulling
the paddle towards the driver as
previously described): rpm are thus
increased from 2750 to 4500; (1.4
Petrol versions) and from 1700 to
2700 (2.0 JTD
Mversions);
Page 161 of 288

❒the brake pedal is pressed for longer
than 10 minutes;
❒the driver's door is opened with
creeping deactivated (for example
with handbrake engaged) without
pressing brake and/or accelerator
pedals;
❒a fault has been detected in the
transmission.
IMPORTANT Shifting to neutral (N) -
operated by the system - involves
a situation of inconsistency between
gear lever position and gear engaged.
The manoeuvre is accompanied by
an acoustic inconsistency signal. This
acoustic signal continues until the gear
lever is placed in P or N, to restore
the correct transmission operation
conditions.
PARKING THE CAR
To park safely, with the brake pedal
pressed, P must be engaged and, in
case of parking uphills/downhills, the
handbrake must be engaged.
Before releasing the brake pedal, wait
until P appears on the display.
IMPORTANT NEVER leave the car
before having positioned the lever in P.TOWING THE CAR
Make sure that the transmission is in
neutral (N), checking that the car moves
when pushed, and proceed in the
same way as for towing a normal car
with a manual gearbox.
IMPORTANT If the transmission cannot
be put in neutral (N), do not tow the
car and contact an Alfa Romeo
Dealership. Should the lever be in P,
release it before towing (see paragraph
"Positions of the lever").
IMPORTANT
INFORMATION
With car stationary and gear engaged,
always keep the brake pedal pressed
until you decide to set off, then release
the brake and accelerate gradually.
During prolonged stops with the engine
running, it is advisable to keep the
transmission in neutral (N).
To protect the clutch, never use the
accelerator to keep the car stationary
(for example when stopped uphills/
downhills): clutch overheating could
damage it. Use the brake pedal instead
or the handbrake and only press the
accelerator pedal when you wish to set
off.If reverse (R) is engaged, only engage
the 1stgear (or vice versa) when the car
is completely stopped.
Although it is highly inadvisable, if you
are driving downhill and, for unexpected
reasons, you let the car move forward
with the transmission in neutral (N),
when there is a request to engage
a gear, depending on the speed of the
car, the system will automatically
engage the best gear for the correct
transmission of drive torque to the
wheels.
107)
IMPORTANT
21) If the car is on a gradient, always
pull the handbrake BEFORE
placing the gear lever in P.
22) Engage reverse only with the car
stationary, engine at idling speed
and accelerator fully released.
157
Page 166 of 288

STORING THE CAR
If the car is to be left inactive for longer
than a month, the following precautions
should be noted:
❒park the car in covered, dry and if
possible well-ventilated premises and
slightly open the windows;
❒check that the handbrake is not
engaged;
❒disconnect the negative battery
terminal and check the battery
charge. Repeat this check once
every three months during storage;
❒if the battery is not disconnected
from the electrical system, checks its
state of charge every thirty days;
❒clean and protect the painted parts
using protective wax;
❒clean and protect the shiny metal
parts using special compounds
available commercially;
❒sprinkle talcum powder on the
windscreen and rear window wiper
rubber blades and lift them off the
glasses;
❒slightly open the windows;❒cover the car with a cloth or
perforated plastic sheet. Do not use
compact plastic sheets which do
not allow humidity to evaporate from
the surface of the car.
❒inflate tyres to +0.5 bar above the
standard prescribed pressure and
check it periodically;
❒do not drain the engine cooling
system;
❒Any time the car is left inactive for
two weeks or more, operate the
air conditioning system with engine
idling for at least 5 minutes, setting
external air and with fan at maximum
speed. This operation will ensure a
suitable lubrication to minimise
possibility of damage to the
compressor when the system is
operated again.
IMPORTANT After turning the ignition
key to STOP, wait at least 1 minute
before disconnecting the electrical
supply to the battery.
162
STARTING AND DRIVING
Page 169 of 288

REPLACING A
WHEEL
GENERAL
INSTRUCTIONS
The car is equipped with the “Fix&Go
Automatic Kit”: see the paragraph
“Fix&Go Automatic Kit” for how to use
this device.
As an alternative to the “Fix&Go
Automatic Kit” the car may be
requested with a space-saver wheel:
see the instructions on the following
pages for changing the wheel.
113) 114) 115) 116) 117)
JACK
Please note that:
❒the jack weight is 1.76 kg;
❒the jack requires no adjustment;
❒the jack cannot be repaired and in
the event of a fault it must be
replaced by another original one;
❒no tool other than its cranking device
may be fitted on the jack.
To change a wheel, proceed as follows:❒stop the car in a position that is not
dangerous for oncoming traffic
where you can change the wheel
safely. The ground should be flat
if possible, and sufficiently firm;
❒switch off the engine, pull up the
handbrake and engage the 1
stgear
or reverse. Wear the reflective safety
jacket (compulsory by law) before
getting out of the car;
❒open the luggage compartment, pull
tab A fig. 139 and lift up the mat;
❒using wrench A fig. 140 positioned in
the tool box, loosen the locking
device, take the tool box B and place
it close to the wheel to be replaced,
then take the space-saver wheel C;❒take the wrench A fig. 141 and
loosen the fixing bolts by about one
turn. For versions with alloy rims,
shake the car to facilitate detachment
of the rim from the wheel hub.
❒position the jack under the car, near
the wheel to be changed. On
versions where this is fitted, be
careful not to damage the plastic
aerodynamic guard;
139A0K0648
140A0K0649
141A0K0650
165
Page 174 of 288

"Fix&Go Automatic"
kit
This is located in the luggage
compartment (the kit container may
vary according to version - see fig.
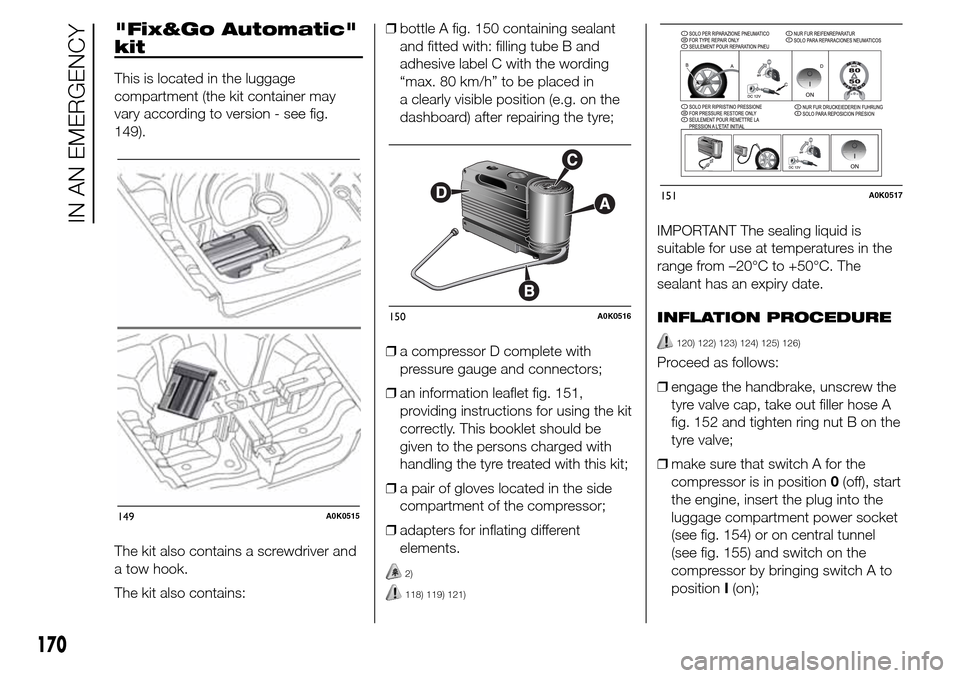
149).
The kit also contains a screwdriver and
a tow hook.
The kit also contains:❒bottle A fig. 150 containing sealant
and fitted with: filling tube B and
adhesive label C with the wording
“max. 80 km/h” to be placed in
a clearly visible position (e.g. on the
dashboard) after repairing the tyre;
❒a compressor D complete with
pressure gauge and connectors;
❒an information leaflet fig. 151,
providing instructions for using the kit
correctly. This booklet should be
given to the persons charged with
handling the tyre treated with this kit;
❒a pair of gloves located in the side
compartment of the compressor;
❒adapters for inflating different
elements.
2)
118) 119) 121)
IMPORTANT The sealing liquid is
suitable for use at temperatures in the
range from –20°C to +50°C. The
sealant has an expiry date.
INFLATION PROCEDURE
120) 122) 123) 124) 125) 126)
Proceed as follows:
❒engage the handbrake, unscrew the
tyre valve cap, take out filler hose A
fig. 152 and tighten ring nut B on the
tyre valve;
❒make sure that switch A for the
compressor is in position0(off), start
the engine, insert the plug into the
luggage compartment power socket
(see fig. 154) or on central tunnel
(see fig. 155) and switch on the
compressor by bringing switch A to
positionI(on);
149A0K0515
150A0K0516
151A0K0517
170
IN AN EMERGENCY
Page 175 of 288

❒inflate the tyre to the pressure
indicated in the “Wheels” paragraph
in the “Technical data” chapter. In
order to obtain a more precise
reading, check the pressure value on
pressure gauge B fig. 153 with the
compressor off;
❒if after five minutes it is still impossible
to reach at least 1.8 bar, disengage
the compressor from the valve and
power socket, then move the car
forwards by approx. ten metres
in order to distribute the sealing fluid
inside the tyre evenly, then repeat
the inflation operation;
❒if you still cannot obtain a pressure of
at least 1.8 bar within 5 minutes from
the compressor switching on, do
not drive off and contact an Alfa
Romeo Dealership;❒after having driven for about 10
minutes, stop and recheck the tyre
pressure; remember to engage
the handbrake;
❒if a pressure value of at least 1.8 bar
is detected, restore the correct
pressure (with the engine running and
the handbrake engaged), resume
driving and drive with great care to an
Alfa Romeo Dealership.
CHECKING AND
RESTORING TYRE
PRESSURE
The compressor can also be used to
check and, if necessary, adjust the tyre
pressure.
Release quick coupling A fig. 157 and
connect it directly to the valve of the
tyre to be inflated.
152A0K0518
153A0K0519
154A0K0520
155A0K0128
156A0K0521
171