2015 Alfa Romeo Giulietta height
[x] Cancel search: heightPage 21 of 288

Height adjustment
(for versions/markets, where provided)
Move lever B fig. 12 up or down until
the required height is reached.
IMPORTANT Carry out the adjustment
whilst seated in the driver's seat.
Backrest angle
adjustment
Turn knob C fig. 12 until the required
position is reached.
8)
Electric seat heating
(for versions/markets, where provided)
With the key turned to MAR-ON, press
button A fig. 13 to switch the function
on/off.
When the function is enabled, the LED
on the button switches on.Electric lumbar
adjustment
(for versions/markets, where provided)
With the key turned to MAR-ON, press
button B fig. 13 to switch the function
on/off.
When the function is enabled, the LED
on the button switches on.
FRONT SEATS WITH
ELECTRIC ADJUSTMENT
(for versions/markets, where provided)
The controls for seat adjustment are fig.
14:
Multifunction control A:
❒seat height adjustment (vertical seat
movement);
❒lengthwise seat movement;
B: Backrest angle and lumbar
adjustment;C: Driver's side seat position memory
buttons.
IMPORTANT Electric adjustment is only
possible with the ignition key turned
to MAR-ON and for approximately
1 minute after turning it to STOP. The
seat can be moved after opening the
door for about 3 minutes, or until the
door is closed.
Memorising driver’s
seat positions
Buttons C allow three different driver’s
seat positions to be memorised and
recalled.
Memorisation and recall are possible
with the ignition key in MAR-ON
position and for 3 minutes after opening
the driver's side door or until the door
is closed, even when the ignition key
is to the STOP position.
The performed position memorisation is
confirmed by a beep.
To memorise a seat position, adjust it
with the various controls, then press the
button where you want to memorise
the position for several seconds.
When a new seat position is
memorised, the previously memorised
position on the same button is
automatically overwritten.
13A0K0213
14A0K0214
17
Page 22 of 288

Recalling a memorised position is also
possible for about 3 minutes after
the doors are opened and about 1
minute after the ignition key is turned to
the STOP position.
To recall a memorised position, press
the relevant button briefly.
SEAT HEATING
(for versions/markets, where provided)
With the ignition key at MAR-ON,
turn ring nut A fig. 15 to switch the
function on/off.
Heating can be set to 3 different levels
(0 = seat heating off).
WARNING
6) All adjustments must be made
solely with the car stationary.
7) After releasing the adjustment
lever, always check that the seat
is locked on the guides by trying
to move it back and forth. Failure
to lock the seat in place could
result in its unexpected
movement and the driver losing
control of the car.
8) For maximum protection keep the
backrest upright, lean back into it
and make sure that the seat belt
fits closely across the chest and
pelvis.
HEAD RESTRAINTS
FRONT
These are height-adjustable and lock
into the desired position automatically.
For the height adjustments proceed
as follows:
9)
❒upwards adjustment: raise the head
restraint until it clicks into place;
❒downwards adjustment: press button
A fig. 16 and lower the head restraint.
Proceed as follows to remove the head
restraints:
❒raise the head restraints to their
maximum height;
❒press buttons A and B fig. 16, then
remove the head restraints by pulling
them upwards.
15A0K0215
16A0K0624
18
GETTING TO KNOW YOUR CAR
Page 23 of 288

“Anti-Whiplash” device
The head restraints are equipped with
an “Anti-Whiplash” device, which
reduces the distance between head
and head restraint in the event of a rear
impact, thus mitigating the “whiplash”
effect.
The head restraint may move when the
backrest is pressed by the occupant's
torso or hand: this behaviour is caused
by the system and should not be
considered a malfunction.
REAR
Two height-adjustable head restraints
are provided for the back seats (for the
adjustment see the previous
paragraph).
On some versions a head restraint is
also provided for the central seat.
Proceed as follows to remove the head
restraints:
❒raise the head restraints to their
maximum height;
❒press buttons A and B fig. 17, then
remove the head restraints by pulling
them upwards.
WARNING
9) The head restraints must be
adjusted so that the head, rather
than the neck, rests on them. Only
in this case they can protect your
head correctly.
STEERING WHEEL
It can be adjusted axially and vertically.
To adjust, release the lever by pushing it
forwards (position 1 fig. 18) and adjust
the steering wheel. Having made the
adjustment, lock lever A by pulling
it towards the steering wheel (position
2).
10) 11)
NOTE The "Quadrifoglio Verde"
versions are equipped with sports
configuration steering wheel.17A0K0625
18A0K0700
19
Page 61 of 288

See the descriptions in “Removing the
parcel shelf” and “Folding back the
seats” paragraphs for how to expand
the luggage compartment.Removing the parcel
shelf
Proceed as follows:
❒free the ends of the two parcel shelf
B mounting links A fig. 66 by
removing the eyelets C from the
mounting pins;
❒free the pins A fig. 67 outside the
shelf then remove the parcel shelf
B sliding it outwards.❒after removal, the parcel shelf can be
loaded sideways into the luggage
compartment or placed between the
front seat backrests and the
folded-back rear seat cushions (with
the luggage compartment completely
expanded).
Folding the seats
Proceed as follows:
❒raise the headrests to the maximum
height, press both buttons A and B
fig. 68 to the side of the two
supports, then remove the head
restraints by sliding them upwards;
❒move the seat belts to the side,
making sure that they are correctly
extended and not twisted;
66A0K0586
67A0K0585
57
EXTENDING THE
LUGGAGE
COMPARTMENT
The luggage compartment can be
partially (1/3 or 2/3) or totally extended
by splitting the rear seat.
Page 137 of 288

76) If the belt has been subjected to
heavy strain, for example after an
accident, it must changed
completely together with the
anchors, anchor fastening screws
and the pretensioner. Even if the
belt has no visible defects, it could
have lost its resilience.
IMPORTANT
15) Operations which lead to
impacts, vibrations or localised
heating (over 100°C for a
maximum of six hours) in the area
around the pretensioner may
damage or deploy it. Contact an
Alfa Romeo Dealership should
intervention be necessary on
these components.
CARRYING
CHILDREN SAFELY
For optimal protection in the event of an
impact, all occupants must be seated
and wearing adequate restraint
systems, including newborn and other
children!
This prescription is compulsory in all EC
countries according to EC Directive
2003/20/EC.
Compared with an adult, a child's head
is larger and heavier in proportion to
his/her body and the child's muscular
and bone structures are not fully
developed. Therefore, correct restraint
systems other than adult seat belts
are necessary to reduce as much as
possible the risk of injuries in case
of accident, braking or sudden
manoeuvre.
Children must be seated safely and
comfortably. As far as the
characteristics of the child restraint
systems used allow, you are advised to
keep children in rear facing restraint
systems for as long as possible (at least
until 3–4 years old), since this is the
most protected position in the event of
an impact.
77) 78)
The choice of the most suitable child
restraint device depends on the weight
of the child; there are various types of
child restraint systems and you are
advised always to choose the one that
is most suitable for the child.
When over 1.50 m in height, from the
point of view of restraint systems,
children are considered as adults and
wear seat belts normally.
In Europe the characteristics of children
restraint systems are ruled by the
regulation ECE-R44, dividing them into
five weight groups:
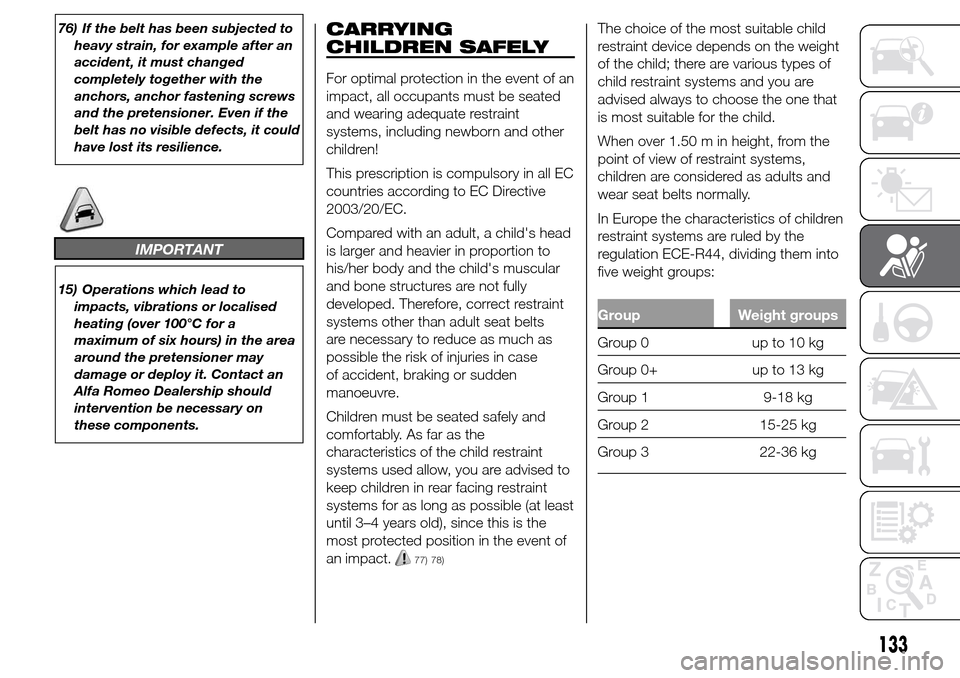
Group Weight groups
Group0 upto10kg
Group 0+ up to 13 kg
Group 1 9-18 kg
Group 2 15-25 kg
Group 3 22-36 kg
133
Page 139 of 288

GROUP 1
79) 80)
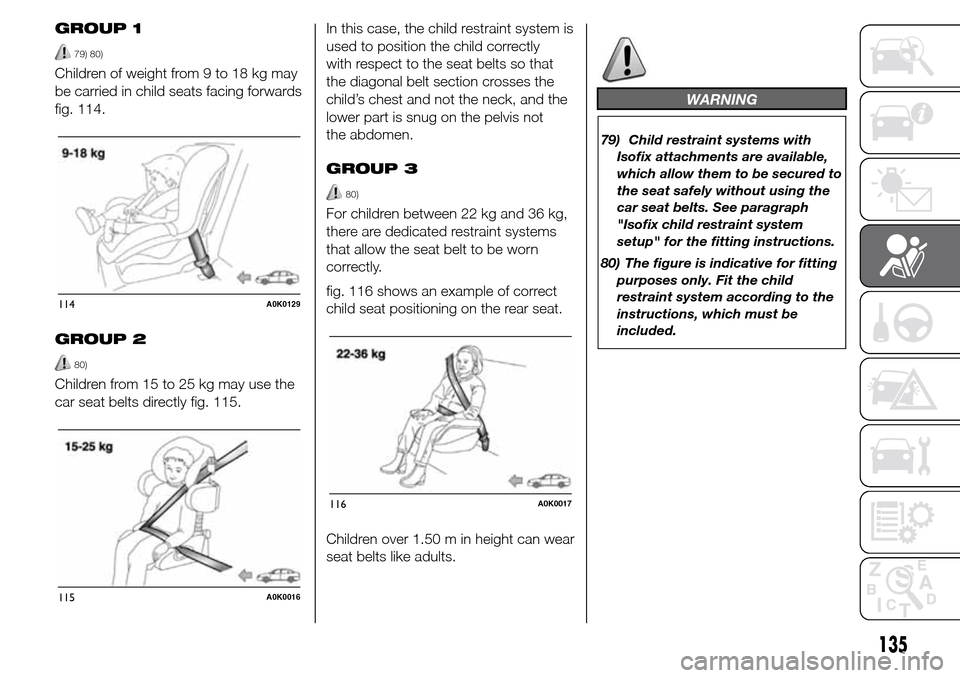
Children of weight from 9 to 18 kg may
be carried in child seats facing forwards
fig. 114.
GROUP 2
80)
Children from 15 to 25 kg may use the
car seat belts directly fig. 115.In this case, the child restraint system is
used to position the child correctly
with respect to the seat belts so that
the diagonal belt section crosses the
child’s chest and not the neck, and the
lower part is snug on the pelvis not
the abdomen.
GROUP 3
80)
For children between 22 kg and 36 kg,
there are dedicated restraint systems
that allow the seat belt to be worn
correctly.
fig. 116 shows an example of correct
child seat positioning on the rear seat.
Children over 1.50 m in height can wear
seat belts like adults.
WARNING
79) Child restraint systems with
Isofix attachments are available,
which allow them to be secured to
the seat safely without using the
car seat belts. See paragraph
"Isofix child restraint system
setup" for the fitting instructions.
80) The figure is indicative for fitting
purposes only. Fit the child
restraint system according to the
instructions, which must be
included.
114A0K0129
115A0K0016
116A0K0017
135
Page 140 of 288

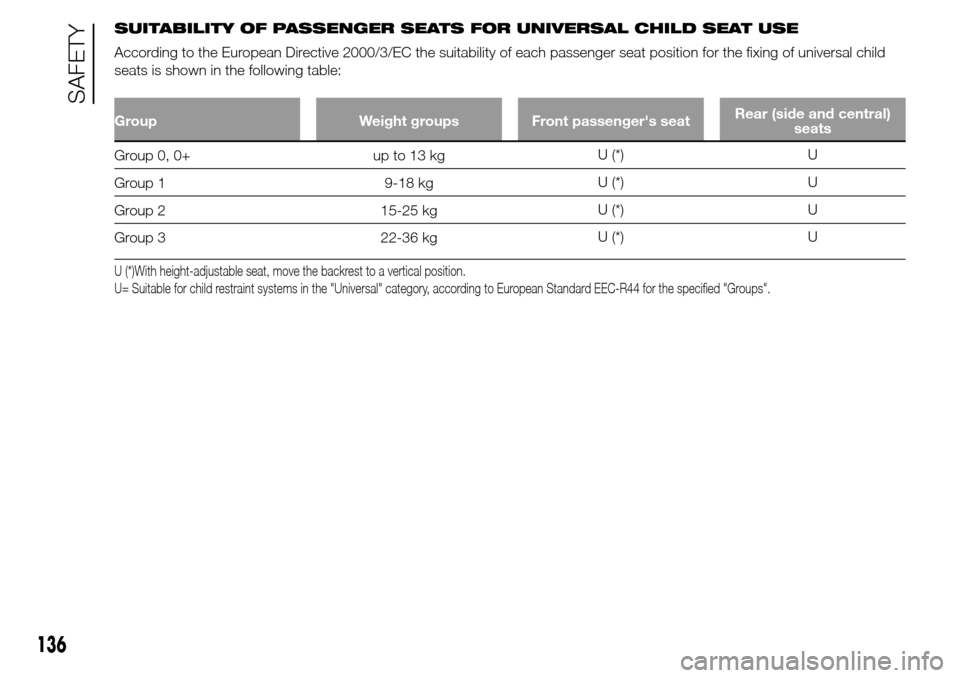
SUITABILITY OF PASSENGER SEATS FOR UNIVERSAL CHILD SEAT USE
According to the European Directive 2000/3/EC the suitability of each passenger seat position for the fixing of universal child
seats is shown in the following table:
Group Weight groups Front passenger's seatRear (side and central)
seats
Group 0, 0+ up to 13 kgU (*) U
Group 1 9-18 kgU (*) U
Group 2 15-25 kgU (*) U
Group 3 22-36 kgU (*) U
U (*)With height-adjustable seat, move the backrest to a vertical position.
U= Suitable for child restraint systems in the "Universal" category, according to European Standard EEC-R44 for the specified "Groups".
136
SAFETY
Page 240 of 288

WHEELS
RIMS AND TYRES
Pressed steel or alloy rims. Tubeless
radial carcass tyres. All approved tyres
are listed in the registration document.
IMPORTANT If there are any
discrepancies between the Owner
Handbook and the registration
document, take the information from
the latter. For safe driving, the car must
be fitted with tyres of the same make
and type on all wheels.
IMPORTANT Do not use tubes with
tubeless tires.
SPACE-SAVER WHEEL
Pressed steel rim. Tubeless tyre.
CORRECT TYRE READING
Example fig. 199:
205/55 R 16 91V
205Rated width (S, distance in mm
between sidewalls)
55Height/width ratio (H/S) as a
percentage
RRadial tyre
16Rim diameter in inches (Ø)
91Load rating (capacity)
VMaximum speed indexMaximum speed index
Qup to 160 km/h
Rup to 170 km/h
Sup to 180 km/h
Tup to 190 km/h
Uup to 200 km/h
Hup to 210 km/h
Vup to 240 km/h
Wup to 270 km/h
Yup to 300 km/h
Maximum speed index
for snow tyres
QM+Sup to 160 km/h
TM+Sup to 190 km/h
HM+Sup to 210 km/h
Load rating (capacity)
60= 250 kg76= 400 kg
61= 257 kg77= 412 kg
62= 265 kg78= 425 kg
63= 272 kg79= 437 kg
64= 280 kg80= 450 kg
65= 290 kg81= 462 kg
66= 300 kg82= 475 kg
67= 307 kg83= 487 kg
68= 315 kg84= 500 kg
69= 325 kg85= 515 kg
70= 335 kg86= 530 kg
71= 345 kg87= 545 kg
72= 355 kg88= 560 kg
73= 365 kg89= 580 kg
74= 375 kg90= 600 kg
75= 387 kg91= 615 kg
199A0K0043
236
TECHNICAL SPECIFICATIONS