2015 Acura TLX steering wheel adjustment
[x] Cancel search: steering wheel adjustmentPage 21 of 75

34 || 35
VEHICLE CONTROLS
VEHICLE CONTROLS
TABLE OF
CONTENTS
INDEX
VISUAL INDEX
VOICE COMMAND INDEX
SAFETY
INFORMATION
CLIENT
INFORMATION
INSTRUMENT PANEL
SPECIFICATIONS
VEHICLE
CONTROLS
MAINTENANCE
AUDIO AND
CONNECTIVITY
HANDLING THE UNEXPECTED
BLUETOOTH®
HANDSFREELINK®
DRIVING
ACURALINK®
NAVIGATION
Do not use the wipers when the windshield is dry. The windshield will get
scratched, or the rubber blades will get damaged.
In cold weather, the blades may freeze to the windshield, becoming stuck.
Operating the wipers in this condition may damage the wipers. Use the defroster
to warm the windshield, or manually clear the windshield of ice and snow before
turning on the wipers.
NOTICE
Headlight Washers*
Canadian models
Heated Windshield Button*
Canadian models
Turn the headlights on. Press the
headlight washer button to operate the
washers.
The headlight washers also operate
when you first turn on the windshield
wipers.
Turn the vehicle on. Press the heated
windshield button to de-ice the
windshield.
The heated windshield may
automatically activate when the
outside temperature is below 4°C,
and deactivate when the temperature
reaches 6°C.
*if equipped
Adjusting the Seats
Make seat adjustments before driving to ensure the best comfort and safety.
Adjusting the Front Seats
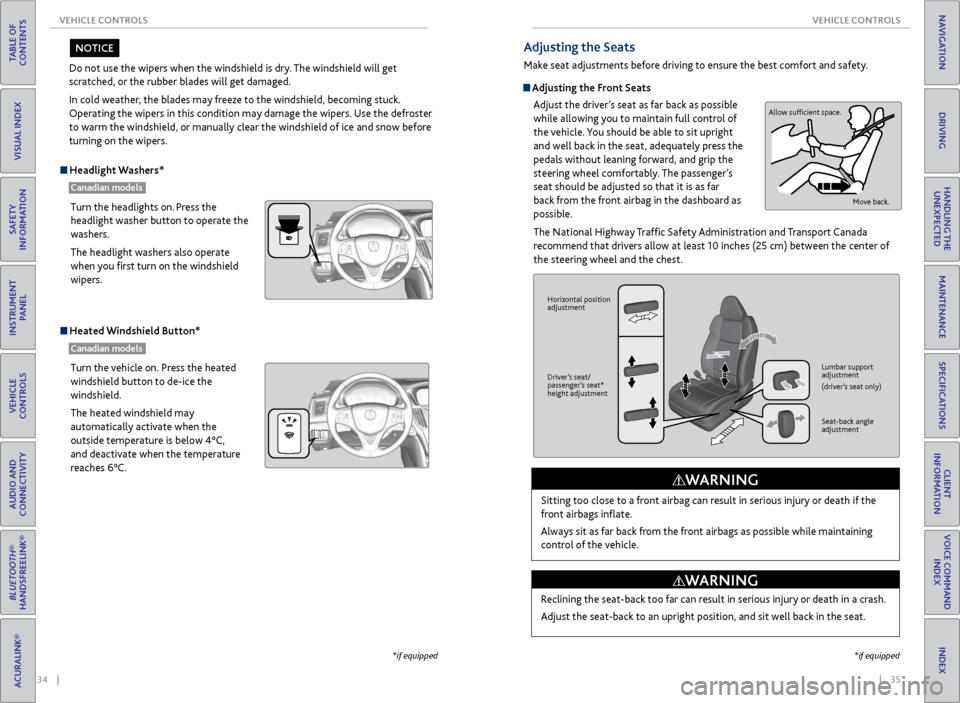
Adjust the driver’s seat as far back as possible
while allowing you to maintain full control of
the vehicle. You should be able to sit upright
and well back in the seat, adequately press the
pedals without leaning forward, and grip the
steering wheel comfortably. The passenger’s
seat should be adjusted so that it is as far
back from the front airbag in the dashboard as
possible.
The National Highway Traffic Safety Administration and Transport Canada
recommend that drivers allow at least 10 inches (25 cm) between the center of
the steering wheel and the chest.
Sitting too close to a front airbag can result in serious injury or death if the
front airbags inflate.
Always sit as far back from the front airbags as possible while maintaining
control of the vehicle.
WARNING
Allow sufficient space. Move back.
Horizontal position
adjustment
Driver’s seat/
passenger’s seat*
height adjustment Lumbar support
adjustment
(driver’s seat only)
Seat-back angle
adjustment
Reclining the seat-back too far can result in serious injury or death in a crash.
Adjust the seat-back to an upright position, and sit well back in the seat.
WARNING
*if equipped
Page 23 of 75

38 || 39
VEHICLE CONTROLS
VEHICLE CONTROLS
TABLE OF
CONTENTS
INDEX
VISUAL INDEX
VOICE COMMAND INDEX
SAFETY
INFORMATION
CLIENT
INFORMATION
INSTRUMENT PANEL
SPECIFICATIONS
VEHICLE
CONTROLS
MAINTENANCE
AUDIO AND
CONNECTIVITY
HANDLING THE UNEXPECTED
BLUETOOTH®
HANDSFREELINK®
DRIVING
ACURALINK®
NAVIGATION
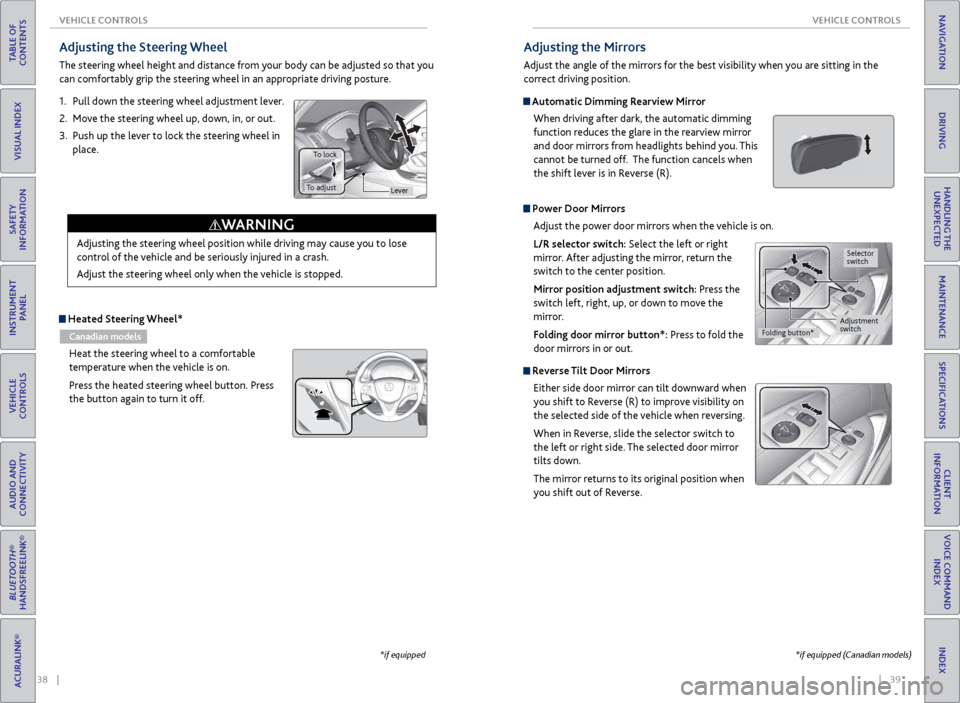
Adjusting the Steering Wheel
The steering wheel height and distance from your body can be adjusted so that you
can comfortably grip the steering wheel in an appropriate driving posture.
1. Pull down the steering wheel adjustment lever.
2. Move the steering wheel up, down, in, or out.
3. Push up the lever to lock the steering wheel in
place.
Heated Steering Wheel*
Canadian models
Heat the steering wheel to a comfortable
temperature when the vehicle is on.
Press the heated steering wheel button. Press
the button again to turn it off.
Adjusting the steering wheel position while driving may cause you to lose
control of the vehicle and be seriously injured in a crash.
Adjust the steering wheel only when the vehicle is stopped.
WARNING
Lever
To lock
To adjust
*if equipped *if equipped (Canadian models)
Adjusting the Mirrors
Adjust the angle of the mirrors for the best visibility when you are sitting in the
correct driving position.
Automatic Dimming Rearview Mirror
When driving after dark, the automatic dimming
function reduces the glare in the rearview mirror
and door mirrors from headlights behind you. This
cannot be turned off. The function cancels when
the shift lever is in Reverse (R).
Power Door Mirrors Adjust the power door mirrors when the vehicle is on.
L/R selector switch: Select the left or right
mirror. After adjusting the mirror, return the
switch to the center position.
Mirror position adjustment switch: Press the
switch left, right, up, or down to move the
mirror.
Folding door mirror button*: Press to fold the
door mirrors in or out.
Reverse Tilt Door Mirrors
Either side door mirror can tilt downward when
you shift to Reverse (R) to improve visibility on
the selected side of the vehicle when reversing.
When in Reverse, slide the selector switch to
the left or right side. The selected door mirror
tilts down.
The mirror returns to its original position when
you shift out of Reverse.
Adjustment
switch Selector
switch
Folding button*
Page 26 of 75

44 || 45
AUDIO AND CONNECTIVITY
AUDIO AND CONNECTIVITY
TABLE OF
CONTENTS
INDEX
VISUAL INDEX
VOICE COMMAND INDEX
SAFETY
INFORMATION
CLIENT
INFORMATION
INSTRUMENT PANEL
SPECIFICATIONS
VEHICLE
CONTROLS
MAINTENANCE
AUDIO AND
CONNECTIVITY
HANDLING THE UNEXPECTED
BLUETOOTH®
HANDSFREELINK®
DRIVING
ACURALINK®
NAVIGATION
1. Press SETTINGS.
2. Select Audio Settings.
3. Select Sound.
4. Select the setting to adjust.
Steering Wheel Controls
Operate certain functions of the audio system using the steering wheel controls.
SOURCE button: Cycle through available audio
modes.
Left selector wheel: Roll up or down to adjust
volume. Press to mute. Move (or hold) left or
right to change stations or tracks.
FM/AM/XM® Radio
Move right or left for the next or previous station.
Move and hold right or left for the next or
previous strong station.
CD/HDD*/iPod*/USB/Bluetooth® Audio
Move right or left for the next or previous track. Move and hold right or left for
the next or previous folder (CD/USB).
Pandora®
Move right for the next song. Move and hold right or left for the next or previous
station.
Adjusting the Sound
Adjust various sound settings using these two methods.
Left selector wheel
SOURCE button
*if equipped
ODMD screen
NAVAUDI OAUDIONAV
SETTINGS
button
BACK
button Interface
dial
Select More, then Sound
Settings. Select + or - to
make adjustments.
5.
Adjust the setting to the desired
level. Press the interface dial.
6. Press BACK to exit the menu.
State or local laws may prohibit the operation of handheld electronic devices while operating a
vehicle.
AUDIO AND CONNECTIVITY
Learn how to operate the vehicle’s audio system.
Basic Audio Operation
Connect audio devices and operate buttons and displays for the audio system.
USB Adapter Cable
Connect a USB flash drive or other audio device, such as an iPod® or iPhone®.
1. Slide the front pocket lid forward.
2. Install the flash drive or cable connector to
the USB connector.
Auxiliary Input Jack
Connect standard audio devices with a 1/8-inch (3.5 mm) stereo miniplug.
1. Open the center console. Open the AUX
cover.
2. Connect the device to the input jack. Use the
device to control the audio.
iPod and iPhone are trademarks of Apple, Inc.