Page 112 of 521
111
uuGauges and Multi-Information Display uMulti-Information Display
Instrument Panel
4. Roll the right selector wheel until “Trip A”
Reset Timing appears on the display, then
push the right selector wheel.
u The display switches to the
customization setup screen, where you
can select When Refueled , IGN Off ,
Manually Reset , or Exit .
5. Roll the right selector wheel and select
When Refueled , then push the right
selector wheel.
u The When Refueled Setup screen
appears, then the display returns to the
customization menu screen.
6. Roll the right selector wheel until Exit
appears on the display, then push the right
selector wheel.
7. Repeat Step 6 until you return to the
normal screen.
Models with
navigation
system
Models without
navigation
system
Models with
navigation
system
Models without
navigation
system
Models with
navigation
system
Models without
navigation
system
Page 147 of 521

146
uuOperating the Switches Around the Steering Wheel uDriving Position Memory System
Controls
Driving Position Memory SystemYou can store two driver’s seat (except for power lumbar), steering wheel and door
mirror positions with the driving position memory system.
When you unlock and open the driver’s door with a remote transmitter, or keyless
access system, the seat and door mirrors adjust automatically to one of the two
preset positions.
The steering wheel will move to the stored position when you set the power mode
to ACCESSORY.
The multi-information display shows you which remote transmitter you used to
unlock the vehicle when you enter.
• DRIVER 1 transmitter is linked to memory button 1.
• DRIVER 2 transmitter is linked to memory button 2.
1Driving Position Memory System
Using the audio/information screen or multi-
information display, you can disable the automatic
seat, steering wheel and door mirrors adjustment
function.
2 Customized Features P. 102, 263
DRIVER 1 DRIVER 2
Page 164 of 521

Continued
163
uuInterior Lights/Interior Convenience Items uInterior Convenience Items
Controls
4. The previous code is displayed. Select OK.
u You will receive a confirmation message
on the display. Select OK.
When you enter the PIN code for the first time
or if you want to change the code:
1. Select Shortcuts .
2. Select Valet.
3. Select the item you want to be PIN-
protected from the locked area, then select
OK .
4. Enter your selected four-digit PIN code,
then select OK.
5. You will be asked to enter the same four-
digit PIN code again. Enter, then select OK.
u You will receive a confirmation message
on the display. Select OK.
To unlock:
1. Select Valet.
2. Select Unlock .
3. Enter the four-digit PIN code you have
previously selected, then select OK.
1Valet Mode
The PIN code entering screen also appears when you
press:•The glove box open button•The trunk release button on the driver's door, on
the trunk, or on the remote
While the glove box or the trunk is PIN-protected.
If you have locked all the items of the locked area, the
PIN code entering screen appears with the power
mode in ACCESSORY.
You can cancel the valet mode when you manually
open the trunk. 2 When You Cannot Open the Trunk P. 494
If you have only set Navi, Phone, Audio PIN-
protected but forgot your four-digit PIN code, you
need to go to a dealer to have the set valet mode
reset.
Page 184 of 521
Continued
183
uuClimate Control System uUsing Automatic Climate Control
Controls
■Shortcuts
You can store two sets of your preferred temperature, fan speed, and vent mode
settings to the climate control system. To store a set of the climate control settings:
1.Select Shortcuts .
2. Adjust the climate control system to your
preference.
2 Climate Control System P. 177
3.Select Climate .
4. Select Edit.
5. Select Add.
6. Select Preset 1 or Preset 2 you want to
store your settings to.
To recall one of the settings:
1. Select Shortcuts .
2. Select Climate .
3. Select Preset 1 or Preset 2 .
To delete a preset:
1. Select Shortcuts .
2. Select Climate .
3. Select Edit.
4. Select Delete .
5. Select Preset 1 or Preset 2 you want to
delete.
1 Shortcuts
You can also store a set by pressing and holding the
preset number you want to store that setting after
step 3.
Page 193 of 521

192
uuAudio System uAudio Remote Controls
Features
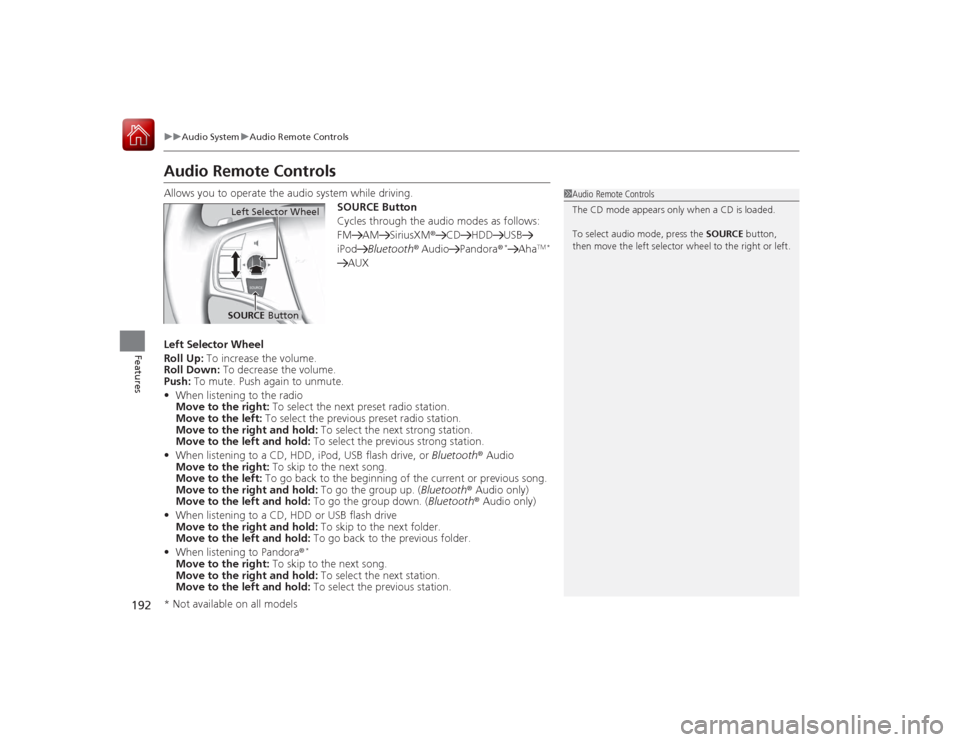
Audio Remote ControlsAllows you to operate the audio system while driving.
SOURCE Button
Cycles through the audio modes as follows:
FM AM SiriusXM®CD HDD USB
iPod Bluetooth ® Audio Pandora®
*
Aha
TM *
AUX
Left Selector Wheel
Roll Up: To increase the volume.
Roll Down: To decrease the volume.
Push: To mute. Push again to unmute.
• When listening to the radio
Move to the right: To select the next preset radio station.
Move to the left: To select the previous preset radio station.
Move to the right and hold: To select the next strong station.
Move to the left and hold: To select the previous strong station.
• When listening to a CD, HDD, iPod, USB flash drive, or Bluetooth® Audio
Move to the right: To skip to the next song.
Move to the left: To go back to the beginning of the current or previous song.
Move to the right and hold: To go the group up. (Bluetooth ® Audio only)
Move to the left and hold: To go the group down. (Bluetooth® Audio only)
• When listening to a CD, HDD or USB flash drive
Move to the right and hold: To skip to the next folder.
Move to the left and hold: To go back to the previous folder.
• When listening to Pandora ®
*
Move to the right: To skip to the next song.
Move to the right and hold: To select the next station.
Move to the left and hold: To select the previous station.
1Audio Remote Controls
The CD mode appears only when a CD is loaded.
To select audio mode, press the SOURCE button,
then move the left selector wheel to the right or left.
Left Selector WheelSOURCE Button
* Not available on all models
Page 194 of 521

193Features
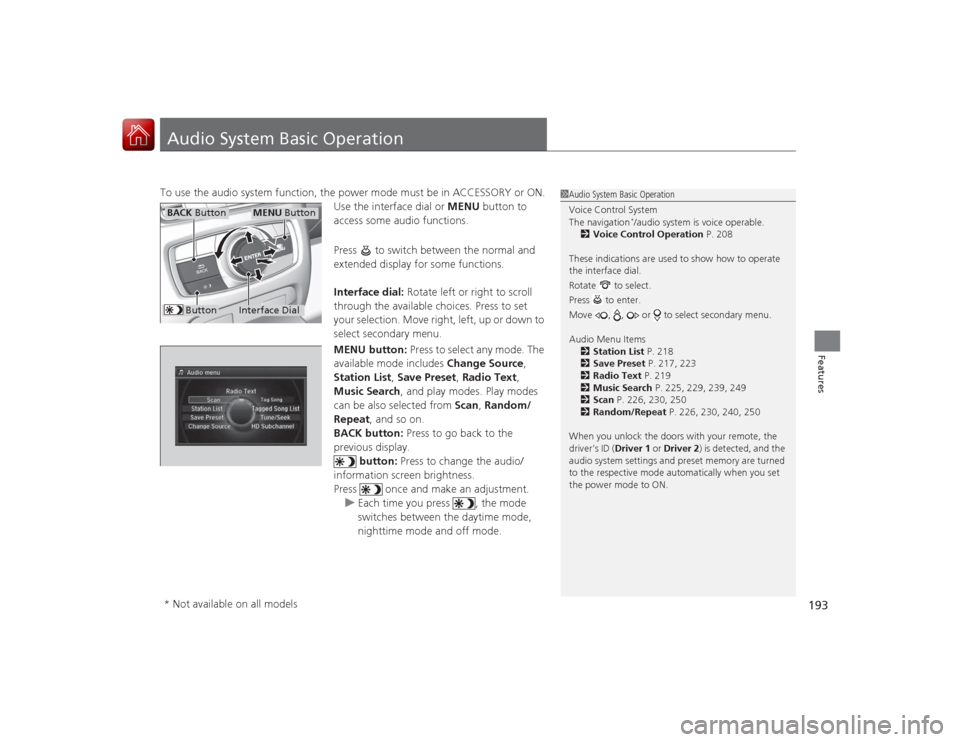
Audio System Basic OperationTo use the audio system function, the power mode must be in ACCESSORY or ON.Use the interface dial or MENU button to
access some audio functions.
Press to switch between the normal and
extended display for some functions.
Interface dial: Rotate left or right to scroll
through the available choices. Press to set
your selection. Move right, left, up or down to
select secondary menu.
MENU button: Press to select any mode. The
available mode includes Change Source,
Station List , Save Preset, Radio Text ,
Music Search , and play modes. Play modes
can be also selected from Scan, Random/
Repeat , and so on.
BACK button: Press to go back to the
previous display.
button: Press to change the audio/
information screen brightness.
Press once and make an adjustment. u Each time you press , the mode
switches between the daytime mode,
nighttime mode and off mode.
1Audio System Basic Operation
Voice Control System
The navigation
*/audio system is voice operable.
2 Voice Control Operation P. 208
These indications are used to show how to operate
the interface dial.
Rotate to select.
Press to enter.
Move , , or to select secondary menu.
Audio Menu Items 2 Station List P. 218
2 Save Preset P. 217, 223
2 Radio Text P. 219
2 Music Search P. 225, 229, 239, 249
2 Scan P. 226, 230, 250
2 Random/Repeat P. 226, 230, 240, 250
When you unlock the doors with your remote, the
driver’s ID (Driver 1 or Driver 2) is detected, and the
audio system settings and preset memory are turned
to the respective mode au tomatically when you set
the power mode to ON.
Interface Dial
MENU Button
BACK Button
Button
* Not available on all models
Page 196 of 521
Continued
195
uuAudio System Basic Operation uOn Demand Multi-Use Display
TM
Features
You can preset the settings of four or three
categories ( Places
*, Phone , Climate , Audio )
from Shortcuts .
■
Shortcuts
1Shortcuts
The preset memory is cleared when it is disconnected
from the power source, such as when the battery is
disconnected or goes dead.
Shortcuts Icon* Not available on all models
Page 197 of 521
uuAudio System Basic Operation uOn Demand Multi-Use Display
TM
196Features
■Places
*
You can store up to six addresses, and the home address for your preset
destinations.
To store an address on the selected preset
number:
1.Select Shortcuts .
2. Select Places .
3. Select Edit or No Entry .
u If you select No Entry, go to step 6.
4. Select Add.
u All the six preset icons appear.
5. Select the preset number to which you
want to store an address.
6. The screen changes to a list of addresses
stored in your address book.
7. Select an address you want to store as a
preset.
To enter one of the preset addresses, or
Home as your destination:
1. Select Shortcuts .
2. Select Places .
3. Select a preset number or Home.
u The system starts to calculate the route
to your selected destination.
1Places
*
See the Navigation System Manual for how to store
address book entries, and enter your home address.
* Not available on all models