2015 Acura RDX ECO mode
[x] Cancel search: ECO modePage 8 of 258

7
Quick Reference GuideAudio Control Display
Press the AUDIO button to display the audio system on the navigation screen.
FM/AM Radio (P136), SiriusXM® Radio (P140)
Hard Disk Drive (HDD) (P149), iPod®
(P159), Pandora® (P164), USB Flash Drive
(P168)
Band
Stereo indicatorPresets
Tune, scan, and
other functions
iPod® mode
(HDD mode, USB
mode, Pandora®
mode)
Search menu
Track list Repeat, shuffle, and other functions
Compact Disc (P145)
Bluetooth
® Audio (P172)
Disc mode
Play mode
Recorded
icon
Recording icon
Recording
ready icon
Repeat, random, scan, and
other functions
Track list
Bluetooth®
Audio mode
Stop/Start
control
Sound preferences
Page 21 of 258
20
System Setup
Start-up
The navigation system starts automatically when you set the power mode to
ACCESSORY or ON. At start-up, the follow ing Confirmation screen is displayed.
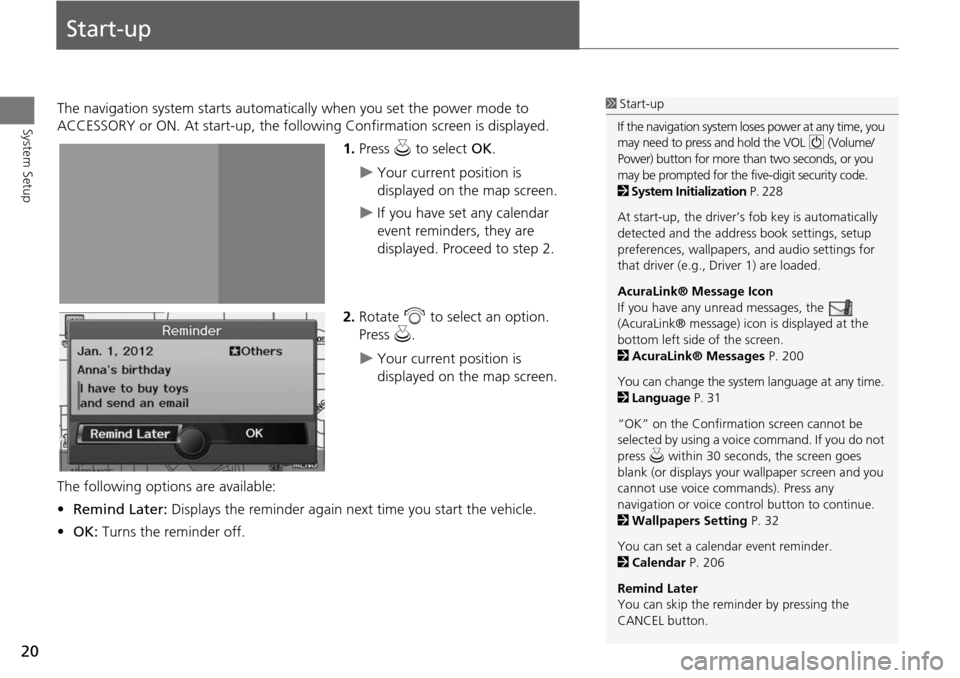
1.Press u to select OK.
Your current position is
displayed on the map screen.
If you have set any calendar
event reminders, they are
displayed. Proceed to step 2.
2. Rotate i to select an option.
Press u.
Your current position is
displayed on the map screen.
The following options are available:
• Remind Later: Displays the reminder again next time you start the vehicle.
• OK: Turns the reminder off.
1Start-up
If the navigation system lo ses power at any time, you
may need to press and hold the VOL 9 (Volume/
Power) button for more than two seconds, or you
may be prompted for the five-digit security code.
2 System Initialization P. 228
At start-up, the driver’s fob key is automatically
detected and the addres s book settings, setup
preferences, wallpapers, and audio settings for
that driver (e.g., Driver 1) are loaded.
AcuraLink® Message Icon
If you have any unread messages, the
(AcuraLink® message) icon is displayed at the
bottom left side of the screen.
2 AcuraLink® Messages P. 200
You can change the system language at any time.
2 Language P. 31
“OK” on the Confirmati on screen cannot be
selected by using a voice command. If you do not
press u within 30 seconds, the screen goes
blank (or displays your wallpaper screen and you
cannot use voice commands). Press any
navigation or voice cont rol button to continue.
2 Wallpapers Setting P. 32
You can set a calendar event reminder.
2 Calendar P. 206
Remind Later
You can skip the reminder by pressing the
CANCEL button.
Page 30 of 258
29
Interface SettingsColor
System Setup
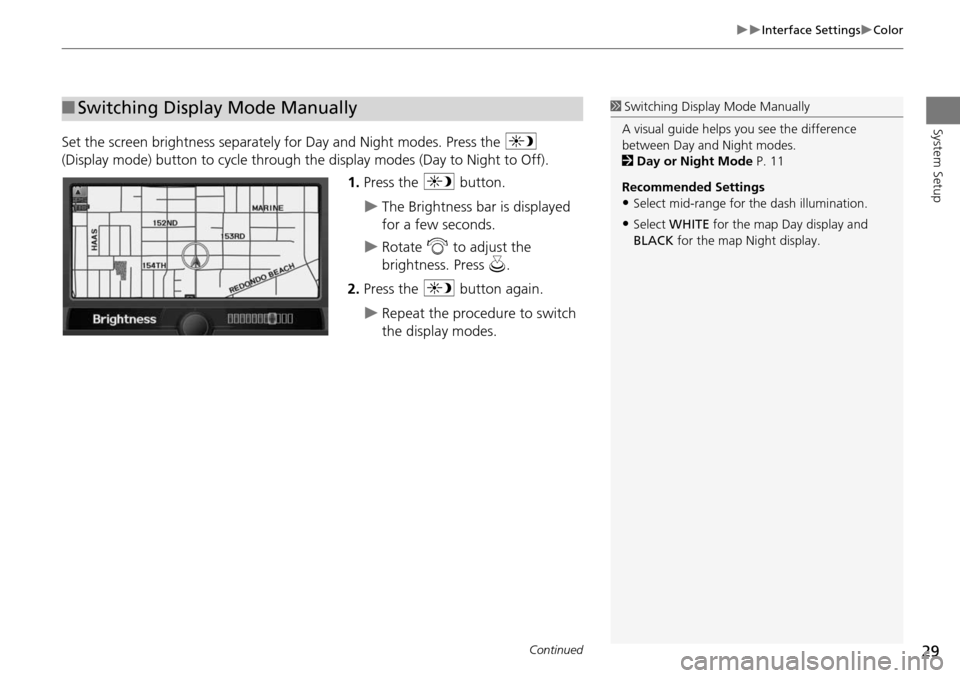
Set the screen brightness separately for Day and Night modes. Press the a
(Display mode) button to cycle through the display modes (Day to Night to Off).
1. Press the a button.
The Brightness bar is displayed
for a few seconds.
Rotate i to adjust the
brightness. Press u.
2. Press the a button again.
Repeat the procedure to switch
the display modes.
■Switching Display Mode Manually1 Switching Display Mode Manually
A visual guide helps y ou see the difference
between Day an d Night modes.
2 Day or Night Mode P. 11
Recommended Settings
•Select mid-range for the dash illumination.
•Select WHITE for the map Day display and
BLACK for the map Night display.
Continued
Page 45 of 258

44
System Setup
Music Search Setup
HAUDIO button (in iPod® mode) AUDIO MENU Music Search Setup
Use this feature to set up the music search abilities when using Song By Voice™
(SBV) commands.
Rotate i to select an item. Press u .
The following item s are available:
• Song By Voice : Turns the feature on or off.
2Song By Voice™ (SBV) P. 45
• Phonetic Modification : Changes the phonetic (song name, artist name, etc.) so
that they are more easily reco gnized through voice commands.
2Phonetic Modification P. 46
1Music Search Setup
You can also display the Music Search Setup
items in the DISC (music CD) or HDD mode.
Select HDD Setup in AUDIO MENU .
This feature is only available when the system
language is set to English.
Page 47 of 258
46
Music Search SetupPhonetic Modification
System Setup
Phonetic Modification
HAUDIO button (in iPod® mode) AUDIO MENU Music Search Setup
Phonetic Modification
Add phonetic modifications of difficult or foreign words so that it is easier for SBV to
recognize artists, songs, albums, and composers in voice commands when searching
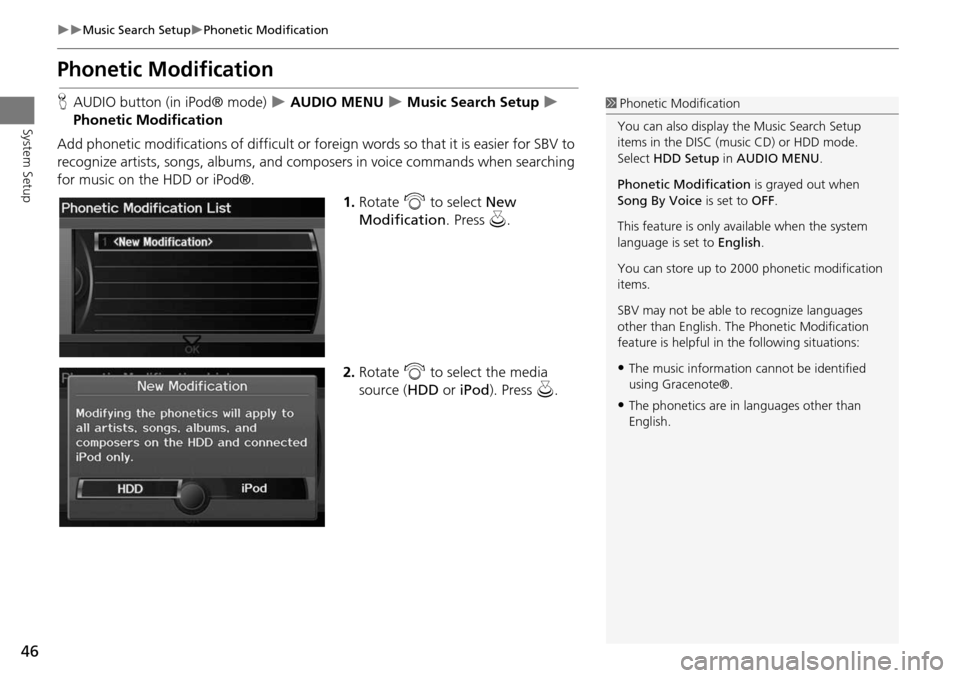
for music on the HDD or iPod®. 1.Rotate i to select New
Modification . Press u.
2. Rotate i to select the media
source ( HDD or iPod). Press u.1Phonetic Modification
You can also display the Music Search Setup
items in the DISC (music CD) or HDD mode.
Select HDD Setup in AUDIO MENU .
Phonetic Modification is grayed out when
Song By Voice is set to OFF.
This feature is only available when the system
language is set to English.
You can store up to 2000 phonetic modification
items.
SBV may not be able to recognize languages
other than English. The Phonetic Modification
feature is helpful in the following situations:
•The music information cannot be identified
using Gracenote®.
•The phonetics are in languages other than
English.
Page 65 of 258

64
System Setup
Data Reset
Reset Factory Default Settings
HINFO button Set up Other Reset Factory Default
Reset all the settings on the Setup screens and multi-view rear camera brightness
settings to their factory default.
Rotate i to select Yes. Press u to
reset the settings.1 Reset Factory Default Settings
When you transfer the vehicle to a third party,
reset all settings to default and delete all
personal data.
The following settings are reset:
•Brightness, Contrast, Black Level, Volume,
Interface Dial Feedback, Brightness (multi-view
rear camera)
•Basic Settings: Units, Voice Recognition Tutor,
Display Voice Command Tips, Verbal Reminder
•Routing & Guidance: Rer outing, Unverified
Area Routing, Traf fic Rerouting, Edit Waypoint
Search Area, Guidance Mode, Street Name
Guidance
•Clock Adjustment: Auto Daylight, Auto Time
Zone, Time
•Vehicle: Off-road Tracking
•Color: Map Color, Menu Color
•Route Preference
AcuraLink/Messages settings are not reset to
their factory default settings.
2 AcuraLink® Messages P. 200
Page 134 of 258
133
Audio
This section describes how to operate the audio system. You can play
music from a wide array of media s ources, and control the audio system
using the audio buttons, the Interface Dial, or voice control.
Audio System .................................................. 134
About Your Audio System .............................. 134
Auxiliary Input Jack ......... .......................... ..... 134
System Theft Protection ................................. 135
Playing FM/AM Radio ..................................... 136
Selecting FM/AM Mode.................................. 136
Audio Screen Control ..................................... 136
Audio Menu .................................................. 137
Radio Data System (RDS) ................................ 138
Playing SiriusXM® Radio ................................ 140
Selecting SiriusXM® Mode............................. 140
Audio Screen Control ..................................... 140
Audio Menu .................................................. 141
Note Function ................................................ 142
SiriusXM® Radio Service ................................ 144
Playing a Disc ................................................... 145
Selecting Disc Mode ....................................... 145
Audio Screen Control ..................................... 145
Audio Menu .................................................. 146 Playing MP3/WMA/AAC Discs ........................ 147
Recommended Discs ...................................... 148
Playing Hard Disc Drive (HDD) Audio ............ 149
Selecting HDD Mode ...................................... 149
Audio Screen Control ..................................... 150
Audio Menu ................................................... 150
Recording a Music CD to HDD........................ 152
Searching for Music........................................ 154
Editing a Playlist or Album .............................. 155
Editing Track Information ............................... 156
Displaying Music Information ......................... 157
Updating Gracenote® Album Info .................. 158
Playing an iPod® ............................................. 159
Selecting iPod® Mode .................................... 160
Audio Screen Control ..................................... 160
Audio Menu ................................................... 161
Searching for Music........................................ 162
Searching for Music Using Song By Voice™ (SBV) ............................................................... 163 Playing Pandora®
........................................... 164
Selecting Pandora® Mode ............................. 164
Audio Screen Control..................................... 165
Audio Menu .................................................. 166
QuickMix ....................................................... 167
Playing a USB Flash Drive ............................... 168
Selecting USB Mode....................................... 169
Audio Screen Control..................................... 169
Audio Menu .................................................. 170
Playing Tracks in Folders................................. 171
Playing Bluetooth ® Audio............................. 172
Selecting Bluetooth ® Audio Mode ................ 172
Switching to HFL Mode .................................. 173
Audio Screen Control..................................... 173
Adjusting the Sound ....................................... 174
Audio Remote Controls .................................. 175
Steering Wheel Controls ................................ 175
Page 136 of 258
135
Audio SystemSystem Theft Protection
Audio
System Theft Protection
The system is disabled when it is disconnected from the power source, such as when
the battery is disconnected or goes dead.
■ Reactivating the System
1. Set the power mode to ON, and turn on the system.
If you set the power mode to ACCESSORY, you will be requested to enter the
security code. See step 3.
2. Press and hold the VOL 9 (Volume/Power) button again for more than two
seconds.
The system is reactivated when the syst em’s control unit recognizes that the
system is in your vehicle.
If the control unit fails to recognize, “ENTER CODE” appears on the navigation
screen.
3. Enter the security code.
If you do not enter the code correctly after 10 tries, leave the system for one
hour before trying again, or visit a dealer to have the system reset.
1Audio System Theft Protection
Find the audio system’s se curity code and serial
number label in your Owner’s Manual kit.
Do not store the label in y our vehicle. If you lose
the label, you must first retrieve the serial
number, and then obtain the code from a dealer.
U.S. Only
You can register the security code at Acura
Owners (owners.acura.com.), and find
information on how to retr ieve the serial number
and obtain the code at radio-
navicode.acura.com .
2 Entering the Security Code P. 228