Page 35 of 215

Keys, doors and windows33Windows
Windscreen
Windscreen stickers Do not attach stickers, e.g. toll road
stickers or similar, on the windscreen
in the area of the interior mirror.
Otherwise the detection zone of the
sensor in the mirror housing could be
restricted.
Manual windows The door windows can be opened or
closed with the window cranks.
Power windows9 Warning
Take care when operating the
power windows. Risk of injury,
particularly to children.
Keep a close watch on the
windows when closing them.
Ensure that nothing becomes
trapped in them as they move.
Switch on ignition to operate power
windows.
Operate the switch for the respective
window by pushing to open or pulling to close.
For vehicles with automatic opening
feature for the driver's door window;
when opening, operate the switch
again to stop window movement.
In the event of closing difficulties due
to frost or the like, operate the switch
several times to close the window in
stages.
Overload
If the windows are repeatedly
operated within short intervals, the window operation is disabled for
some time.
Rear windows Sliding side windows
Page 37 of 215
Keys, doors and windows35
Heating works with the engine
running and is switched off
automatically after a short time.
Climate control system 3 96.
Electronic climate control system 3 98.
Sun visors The sun visors can be folded down orswivelled to the side to prevent
dazzling.
If the sun visors have integral mirrors, the mirror covers should be closed
when driving.
Sun visors also feature a holder for
parking tickets etc.
Wide view mirror 3 32.Roof
Glass panel Emergency exit
In an emergency, the glass can be
broken. Use the hammer to break the
glass panel 3 33.
Page 100 of 215

98Climate control
Demisting and defrosting the
windows ■ Switch cooling AC on.
■ Set temperature control to warmest
level.
■ Set fan speed to highest level.
■ Set air distribution control to V.
■ Switch on heated rear window Ü.
■ Open side air vents as required and
direct them towards door windows.
■ For simultaneous warming of the foot well, set air distribution control
to J.
Notice
If the V button is pressed while the
engine is running, an Autostop will
be inhibited until the V button is
pressed again.
If the V button is pressed while the
engine is in an Autostop, the engine will restart automatically.Electronic climate control
system
Controls for: ■ Temperature
■ Air distribution ( s or K) and menu
selection
■ Fan speed x
AUTO=Automatic modeu=air recirculationV=demisting and defrostingÜ=heated rear window,
heated exterior mirrorsAC OFF=switch off air conditioningHeated rear window, heated exterior
mirrors Ü 3 34 , 3 31 , Heated seats ß
3 41.
The preselected temperature is
automatically regulated. In automatic
mode, the fan speed and air
distribution automatically regulate the
air flow.
The system can be manually adapted by use of air distribution and air flow
controls.
The electronic climate control system
is only fully operational when the
engine is running.
For correct operation do not cover the
sensor on the instrument panel.
Automatic mode Basic setting for maximum comfort:
■ Press AUTO button ("AUTO"
appears in the display).
■ Set desired temperature (the temperature appears in the
display).
■ Open all air vents.
Page 134 of 215

132Driving and operating
The camera is typically installed
under the number plate moulding with a display monitor fitted to the driver's
sun visor.
Functionality
The rear view camera system
enables the driver to view the rear of
the vehicle in the display monitor
whilst reversing.
The system can be activated or
deactivated by selecting the
Start/Stop button located on the right-
hand side of the display monitor.
The remaining buttons on the monitor enable the user to select source
AV1 or AV2 and adjust the brightness
and contrast of the display monitor.
To achieve the optimum visibility, the
rear view camera must not be
obscured by dirt, snow or ice.9 Warning
The system is intended as a
reversing aid and does not replace driver vision.
Do not let this feature tempt you
into take risks when reversing.
Failure to use proper care when
reversing may result in damage to
the vehicle, injury, or death.
Always check the outside,
rearview mirrors and glance over
your shoulder before reversing.
The driver assistance systems do not relieve the driver from full
responsibility for vehicle
operation.Fuel
Fuel for diesel enginesOnly use diesel fuel that complies
with EN 590. The fuel must have low
sulphur content (max. 10 ppm).
Equivalent standardised fuels with a
biodiesel (= FAME according to
EN14214) content of max. 7% by
volume (like DIN 51628 or equivalent
standards) may be used.
In countries outside the European
Union use Euro-Diesel fuel with a
sulphur concentration below 50 ppm.Caution
Use of fuel that does not comply to EN 590 or similar can lead to
engine powerloss, increased wear
or engine damage and may affect
your warranty.
Do not use marine diesel oils, heating
oils or entirely plant-based diesel
fuels, such as rape seed oil or bio
Page 154 of 215
152Vehicle care
7. Push bulb into socket slightly,rotate anti-clockwise, remove andrenew bulb.
Turn signal light ( 1)
Tail and brake light ( 2)
Reverse light ( 3)
Rear fog light, may be on one side
only ( 4)
8. Replace bulb holder in lamp assembly.
9. Replace the three screws on the rear of the lamp assembly.
10. Reattach wiring connector to lamp
assembly.
11. Replace lamp assembly from the outer side into original position,
ensuring that it is seated correctly.
12. Replace the two nuts onto the locating pins on the rear of the
lamp assembly.
13. Install the upper and lower trim panels to the rear pillar.Side turn signal lights
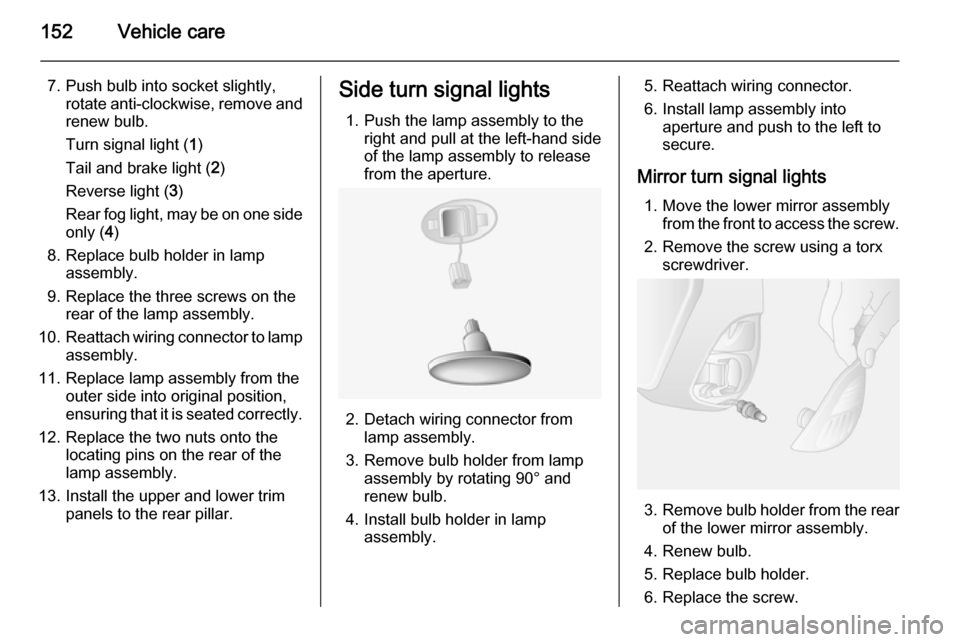
1. Push the lamp assembly to the right and pull at the left-hand sideof the lamp assembly to release
from the aperture.
2. Detach wiring connector from lamp assembly.
3. Remove bulb holder from lamp assembly by rotating 90° and
renew bulb.
4. Install bulb holder in lamp assembly.
5. Reattach wiring connector.
6. Install lamp assembly into aperture and push to the left to
secure.
Mirror turn signal lights 1. Move the lower mirror assembly from the front to access the screw.
2. Remove the screw using a torx screwdriver.
3. Remove bulb holder from the rear
of the lower mirror assembly.
4. Renew bulb.
5. Replace bulb holder.
6. Replace the screw.
Page 178 of 215

176Vehicle care
Do not clean the engine compartmentwith a steam-jet or high-pressure jet
cleaner.
Thoroughly rinse and leather-off the
vehicle. Rinse leather frequently. Use
separate leathers for painted and
glass surfaces: remnants of wax on
the windows will impair vision.
Exterior lights Headlight and other light covers aremade of plastic. Do not use any
abrasive or caustic agents, do not use
an ice scraper, and do not clean them dry.
Polishing and waxing
Wax the vehicle regularly (at the
latest when water no longer beads).
Otherwise, the paintwork will dry out.
Polishing is necessary only if the paint
has become dull or if solid deposits
have become attached to it.
Paintwork polish with silicone forms a protective film, making waxing
unnecessary.Unpainted plastic body parts must not
be treated with wax or polishing
agents.
Matt filmed body parts or decor tapes must not be polished, to avoid
gleaming. Do not use hot wax
programmes in automatic car washes if the vehicle is equipped with theseparts.
Matt painted decor parts, e.g. mirror housing cover, must not be polished.
Otherwise these parts would become
agleam or the colour would be
dissolved.
Windows and windscreen wiper blades Use a soft lint-free cloth or chamoisleather together with window cleaner
and insect remover.
When cleaning the rear window from
inside, always wipe in parallel to the
heating element to prevent damage.
For mechanical removal of ice, use a
sharp-edged ice scraper. Press the
scraper firmly against the glass so
that no dirt can get under it and
scratch the glass.Clean smearing wiper blades with a
soft cloth and window cleaner.
Wheels and tyres Do not use high-pressure jet
cleaners.
Clean rims with a pH-neutral wheel
cleaner.
Rims are painted and can be treated
with the same agents as the body.
Paintwork damage
Rectify minor paintwork damage with
a touch-up pen before rust forms.
Have more extensive damage or rust areas repaired by a workshop.
Underbody Some areas of the vehicle underbody
have a PVC undercoating while other critical areas have a durable
protective wax coating.
After the underbody is washed, check
the underbody and have it waxed if
necessary.
Page 194 of 215
192Technical dataVehicle dimensionsVan, DoublecabFront-wheel drive
Gross vehicle weight
2800,
3300,
3500
3300,
3500
3500
SizeL1L2L3Length [mm]504855486198Width without mirrors [mm]207020702070Width with mirrors [mm]247024702470Height - unladen (without antenna) [mm]
H12303--H22496/2500 8)2496/2499 8)2488H3-2745/27498)2744Wheelbase [mm]318236824332Track width [mm]
Front175017501750Rear1730173017308) 3500 GVW.
Page 195 of 215
Technical data193
Van, DoublecabRear-wheel drive
Gross vehicle weight
3500,
45003500,
4500SizeL3L4Length [mm]61986848Width without mirrors [mm]20702070Width with mirrors [mm]24702470Height - unladen (without antenna) [mm]
H22527 9)
/2549 10)-9)11)
/2557 10)H327869)
/2815 10)-9)11)
/2808 10)Wheelbase [mm]36824332Track width [mm]
Front17501750Rear1730 9)
/1612 10)16129)
With Single rear wheels.
10) With Twin rear wheels.
11) Figure not available at time of printing.


